Plant, Garlic, Now, for — Setting Up Your Winter Garden for Spring Success
Plant, Garlic, Now, for blends practical, low-cost techniques with real environmental impact. Use these eco-first methods to reduce waste, save water, build living soil, and support pollinators—all while keeping your garden beautiful and productive through the cold season.
[lwptoc]
Why Plant, Garlic, Now, for Matters This Season
Winter prep is when smart gardeners get ahead: leaves become mulch, rain becomes irrigation, and “waste” becomes soil food. With Plant, Garlic, Now, for, you set resilient foundations now—so spring growth is faster, healthier, and cheaper. This isn’t just about weathering the colder months; it’s about actively leveraging nature’s dormancy to build a stronger, more vibrant garden ecosystem for the year ahead. Every action taken now amplifies its positive effect when the days lengthen and temperatures rise. Think of it as an investment in future abundance, where every fallen leaf and drop of captured rain is a deposit into your garden’s biological bank account.
The beauty of the “Plant, Garlic, Now, for” approach lies in its simplicity and accessibility. You don’t need specialized equipment or a massive budget. Many of the most impactful tools are already on hand: fallen leaves from your yard or a neighbor’s, discarded cardboard boxes, even kitchen vegetable scraps. These seemingly humble items become powerful catalysts for transforming your garden into a self-sustaining powerhouse. By understanding and working with natural cycles, rather than against them, you can significantly reduce your reliance on external inputs, whether that’s store-bought fertilizers, endless bags of mulch, or costly irrigation. This empowers you to create a garden that is not only productive but also deeply connected to its environment, fostering local biodiversity and contributing to a healthier planet. And, of course, planting garlic now sets you up for a delicious, homegrown harvest next summer, a tangible reward for your proactive efforts.
Core Materials & Tools for Practical Gardening
Embarking on the Plant, Garlic, Now, for journey requires a thoughtful selection of tools and materials, emphasizing natural, reusable, and locally sourced options. These core items form the backbone of a resilient and low-impact garden.
- Dry leaves, shredded cardboard, twig cuttings: These are your foundational layers for mulching and sheet-mulching. Dry leaves are nature’s free fertilizer and an unparalleled source of organic matter. Shredded cardboard acts as a weed barrier and slowly breaks down, adding carbon to the soil. Twig cuttings, when chopped finely, improve soil structure and provide habitat. Collect them from your own yard or ask neighbors; often, people are happy to share their “waste.”
- Compost setup: This is a non-negotiable for feeding your soil. Whether it’s a simple open bin for large quantities, a Bokashi system for processing kitchen scraps indoors with fermentation, or a worm tower for containers and small spaces, a composting method diverts organic waste from landfills and creates nutrient-rich soil amendment. Each system has its merits depending on space and volume of waste.
- Rain barrel with downspout diverter; watering can or soaker hose: Water conservation is paramount. A rain barrel captures precious rainwater, reducing your reliance on treated tap water, which can be expensive and chlorinated. A simple downspout diverter makes installation easy. For distribution, a classic watering can is perfect for targeted application and small areas, while a soaker hose delivers water directly to plant roots with minimal evaporation for larger beds.
- Reusable pots (terracotta/metal/wood) and sturdy seed trays: Invest in durable pots made from natural materials that will last for years. Terracotta allows roots to breathe, metal offers a modern look, and wood can be rustic and insulating. Avoid single-use plastics. Sturdy seed trays, ideally those made from recycled content or ones you can reuse season after season, prevent unnecessary waste and perform better than flimsy alternatives.
- Hand tools (stainless trowel, pruners, rake) and a simple sieve: Quality over quantity. A stainless steel trowel will resist rust and last a lifetime. Sharp bypass pruners are essential for clean cuts that promote plant health. A sturdy rake is invaluable for collecting leaves and leveling beds. A simple garden sieve, easily made from scrap wood and wire mesh, is perfect for refining compost or creating a fine seed-starting mix from leaf mold.
Step-by-Step Method for Winter Garden Preparation
Step 1 — Build a No-Dig Base with Leaves
The foundation of a thriving, low-maintenance garden begins with the no-dig method, particularly effective when implementing Plant, Garlic, Now, for principles. This approach keeps soil structure intact, fosters a healthy microbial ecosystem, and dramatically reduces weeding efforts.
Start by clearing the chosen bed or new garden area of any significant weeds, though a light layer of green growth isn’t a problem. Lay down a generous layer of flattened cardboard directly over the existing soil or lawn. Ensure the cardboard pieces overlap by 10–15 cm (4–6 inches) to prevent weeds from finding gaps. This layer acts as a powerful weed suppressor, gradually breaking down to enrich the soil.
Once the cardboard is in place, wet it lightly. This helps it settle, begins the decomposition process, and ensures it stays put, especially in windy conditions. Next, add a thick layer, 5–10 cm (2–4 inches), of shredded leaves. Shredding the leaves (you can run over them with a lawnmower or use a leaf shredder) helps them decompose faster and creates a more uniform mulch. This leaf layer is vital; it provides a slow-release source of nutrients, retains moisture, regulates soil temperature, and, crucially, kickstarts a robust fungal network beneath. Fungi are essential for breaking down organic matter and making nutrients available to plants.
Finally, top this off with a thin layer of finished compost—about 2–3 cm (1 inch) is sufficient. This compost layer introduces beneficial microorganisms and provides immediate nutrients for any new plantings, such as your garlic cloves. The combination of cardboard, leaves, and compost creates a lasagna-like bed that significantly improves soil health over the winter, providing an ideal environment for your spring plantings, and is perfectly aligned with the “Plant, Garlic, Now, for” philosophy.
Step 2 — Capture Rain & Water Smarter
Water is a precious resource, and integrating smart water management is crucial for the success of your Plant, Garlic, Now, for garden. Reducing reliance on municipal water saves money and decreases your environmental footprint.
The first and most impactful step is to install a rain barrel. Position it under a downspout from your roof. A simple diverter kit makes installation straightforward, channeling water into the barrel when it rains and automatically diverting excess once the barrel is full. Ensure your rain barrel is positioned on a stable, level surface, perhaps on concrete blocks, to support its weight when full. Captured rainwater is free, unchlorinated, and often preferred by plants. Use a watering can attached to the spigot at the bottom of the barrel for easy access.
Beyond capture, focus on smarter application. Water early in the morning, before the sun gets high. This allows water to soak into the soil before evaporating, reaching root zones where it’s most needed. Group your potted plants by their water needs: place drought-tolerant plants together and water-lovers together. This prevents overwatering some and underwatering others. Mulching containers with a 2-3 cm (1 inch) layer of leaves, wood chips, or even gravel significantly reduces evaporation from the soil surface, keeping moisture locked in. For potted plants, placing saucers underneath with a layer of gravel can help; the gravel lifts the pot slightly, preventing root rot, while any overflow water collected in the saucer can slowly re-evaporate, creating a mini-humid environment around the plant or getting reabsorbed.
Step 3 — Feed Soil Life Naturally
The heart of the “Plant, Garlic, Now, for” approach lies in nurturing the soil’s intricate ecosystem. Healthy soil equals healthy plants, and doing this naturally, without synthetic inputs, builds long-term resilience.
Begin a cold compost system. A cold compost is simply a pile or bin where organic materials, primarily fallen leaves, are allowed to break down slowly over time. Layer leaves with nitrogen-rich “greens” like coffee grounds, kitchen scraps, or fresh grass clippings (if available) to balance the carbon. Turn the pile occasionally to aerate it and speed decomposition, but even an unturned pile will eventually break down. This slow process creates a rich, dark humus perfect for amending garden beds. Alternatively, for smaller spaces or indoor use, consider a Bokashi system. Bokashi uses anaerobic fermentation to break down food scraps, including meat and dairy (which are unsuitable for traditional compost). Once fermented, the “pre-compost” can be trenched directly into resting garden beds, where soil microbes finish the job.
Another excellent way to feed your soil and prepare for spring is by refining last year’s leaf mould. Leaf mould is essentially decomposed leaves, broken down primarily by fungi, creating a lovely, crumbly, nutrient-rich soil conditioner. Sieve this finished leaf mould through a simple screen (like hardware cloth stapled to a wooden frame) to remove any large pieces. The resulting silky, fine material is invaluable. It can be used to craft an exceptional seed-starting mix, offering excellent drainage and moisture retention, perfect for early sowings. It also makes a fantastic top-dressing for established plants, slowly releasing nutrients and improving soil structure. By focusing on these natural methods, you feed the beneficial bacteria, fungi, and worms that perform the essential work of nutrient cycling in your garden, a cornerstone of “Plant, Garlic, Now, for” principles.
Step 4 — Balance Pests with Habitat
Rather than outright eradication, the “Plant, Garlic, Now, for” method promotes ecological balance in the garden, turning potential pest problems into opportunities for beneficial wildlife. Creating habitat for predators and pollinators helps manage pests naturally and makes your garden a more vibrant place.
One simple act with a huge impact is to keep select seed heads on herbaceous plants throughout winter. While some gardeners prefer a tidy look, leaving these provides crucial food for winter birds. Finches, sparrows, and other species relish the seeds, and in turn, these birds contribute to natural pest control throughout the year by feeding on insects. Consider designating a “habitat corner” in your garden. Here, bundle together hollow plant stems (like those from sunflowers, coneflowers, or bamboo), dead twigs, and fallen leaves. This creates essential shelter and nesting sites for beneficial insects like solitary bees, lacewings, and ladybugs. These insects are essential allies, preying on aphids and other common garden pests.
When pest problems do arise, always default to the least invasive solutions. Mild soap sprays can deter soft-bodied insects. Neem oil, derived from the neem tree, can disrupt insect feeding and reproduction, but use it sparingly and target specific pests to avoid harming beneficials. Garlic sprays, homemade from crushed garlic steeped in water, can also act as an insect repellent due to their strong odor. The key is judicious use: identify the pest, start with the mildest treatment, and apply only when necessary. Furthermore, embrace companion planting. Planting garlic (as per “Plant, Garlic, Now, for”) among other vegetables can deter pests with its strong scent. Marigolds deter nematodes, and nasturtiums can act as a trap crop for aphids. By fostering natural predator-prey relationships and creating inviting habitats, you build a resilient garden ecosystem that largely manages its own pest control.
Environmental & Cost Impact of Practical Gardening
Implementing the principles of Plant, Garlic, Now, for delivers profound environmental benefits and significant cost savings, transforming your garden into a model of resource efficiency and ecological health.
Environmentally, the impact is multifaceted. Diverting organic waste is a major win. By actively collecting and transforming fallen leaves, kitchen scraps, and garden prunings into rich compost or leaf mould, you prevent countless bags of material from ending up in landfills. Decomposing organic matter in landfills produces methane, a potent greenhouse gas. Composting, on the other hand, sequesters carbon and enriches soil, directly combating climate change. This practice also drastically reduces your need for synthetic fertilizers and pesticides, which often have detrimental effects on soil health, water quality (through runoff), and non-target organisms, including beneficial insects and pollinators.
Water conservation is another cornerstone. Through strategic mulching, particularly with leaves, and the installation of rain barrels, you can cut irrigation needs by a substantial margin. Mulch acts as a blanket, reducing evaporation from the soil surface, keeping it cooler in summer and warmer in winter, thus moderating soil moisture levels. Rain barrels allow you to capture and store precipitation, reducing reliance on municipal water supplies, which often undergo energy-intensive treatment and transportation processes. This directly reduces your household’s water bill and lessens the strain on local water resources.
Perhaps most importantly, this approach fundamentally increases garden biodiversity. By leaving seed heads, creating brush piles, and planting thoughtfully, you provide essential food, shelter, and breeding sites for a wide array of wildlife, from birds and beneficial insects to vital soil microorganisms. This rich biodiversity creates a more stable and resilient ecosystem, better equipped to handle environmental stresses and naturally manage pests and diseases. By fostering habitat, your garden becomes a vibrant hub of life, contributing to local ecological health rather than detracting from it.
From a cost perspective, the benefits are equally compelling. Free “waste” materials like leaves, cardboard, and kitchen scraps replace expensive store-bought mulches, compost, and soil amendments. Capturing rainwater eliminates or significantly reduces your dependence on treated city water, leading to lower utility bills. Reducing or eliminating the need for synthetic fertilizers, pesticides, and herbicides means less money spent on garden chemicals. Furthermore, a healthier, more resilient garden needs fewer interventions, translating to less time and money spent on problem-solving. Over time, these small savings accumulate significantly, making the “Plant, Garlic, Now, for” method not just better for the planet, but also for your wallet, providing a truly sustainable and economically viable way to garden.
Advanced Techniques for the Dedicated Gardener
For those looking to deepen their commitment to the Plant, Garlic, Now, for philosophy and push the boundaries of their garden’s self-sufficiency, these advanced eco-hacks offer greater efficiency and impact.
- Charge homemade biochar in compost tea before mixing into beds: Biochar, produced from the pyrolysis of biomass, is a stable form of carbon that can dramatically improve soil structure, water retention, and nutrient availability. Its porous nature makes it an excellent habitat for beneficial microbes. However, raw biochar can initially absorb nutrients from the soil. The advanced step is to “charge” it by soaking it in nutrient-rich compost tea for several days or weeks. This allows the biochar’s pores to become colonized with microbes and saturated with nutrients, making it an immediate asset when incorporated into your garden beds. It’s like creating a slow-release biological and nutrient sponge for your soil.
- Swap plastic seed trays for soil blocks: While reusable plastic seed trays are better than single-use, soil blocks take sustainability a step further. Soil blocks are self-contained cubes of compressed seed-starting mix. They eliminate the need for any plastic trays or pots, reducing plastic waste entirely. Seedlings grown in soil blocks experience better air circulation around their roots, which leads to stronger, healthier root systems and reduces transplant shock. Specialized soil blockers are available in various sizes, making it easy to create these little biodegradable pots for your seedlings.
- Try milk-jug winter sowing for hardy perennials and salad greens: This ingenious method allows you to start seeds outdoors during winter, mimicking nature’s own cycles. Collect translucent plastic milk jugs or similar containers. Cut them almost in half horizontally, leaving a small hinge. Fill the bottom with 10-15 cm (4-6 inches) of potting mix, sow your hardy perennial or cold-tolerant salad green seeds, water, and then tape the jug back together. Poke some drainage holes in the bottom and ventilation holes in the top. Place these “mini-greenhouses” outdoors in a sunny spot. The jug creates a protected microclimate, and the seeds experience natural chilling and fluctuating temperatures, leading to robust germination when spring arrives. This saves indoor space and electricity for grow lights.
- Insulate patio pots with cardboard jackets and leaf fill to protect roots: For container gardeners, winter can be harsh on plant roots, especially for tender perennials or less cold-hardy specimens. Protect them from extreme temperature fluctuations by creating an insulating jacket. Wrap the outside of your pots with several layers of cardboard. Secure with twine or duct tape. Then, fill the space between the cardboard jacket and the pot with dry leaves, straw, or even scrunched-up newspaper. This creates a thick thermal barrier, preventing the soil from freezing solid or fluctuating wildly in temperature, which can stress and kill roots. For extra protection, elevate pots off cold concrete.
Design & Aesthetics (Keep It Beautiful)
The “Plant, Garlic, Now, for” approach proves that gardening for environmental benefit doesn’t mean sacrificing beauty. In fact, many sustainable practices enhance the garden’s visual appeal, cultivating a rich, naturalistic style.
Embrace natural materials in your hardscaping and container choices. Instead of plastic, opt for recycled-wood edges for raised beds or pathways. The warm tones and texture of wood complement foliage and flowers, and as it weathers, it develops a charming, aged patina. Incorporate stone elements – stepping stones, small retaining walls, or decorative rocks – which add permanence and natural beauty, and can be sourced locally or from reclaimed materials.
For container plantings, seek out characterful, naturally aged objects. Mossy terracotta planters, antique metal tubs (ensure proper drainage), or rustic wooden barrels add a touch of timeless elegance. These materials integrate seamlessly with a natural setting and offer superior longevity compared to plastic alternatives. Consider creating vignettes with these containers, grouping them at varying heights to add visual interest.
Lighting can transform your garden in the darker months and extends its usability into the evenings. Choose warm solar path lighting or low-voltage LED fixtures. These are energy-efficient, often rechargeable, and cast a soft, inviting glow that highlights pathways and features without creating light pollution. The warm light creates a cozy, Nordic feel, especially against the cool tones of winter foliage or snow.
To ensure cohesion and a sense of calm, adopt a restrained palette. This doesn’t mean a monochrome garden, but rather selecting a core group of colors for your hardscaping, key plants, and decorative elements. For instance, rely on the greens of evergreens, the rich browns of leaf mulch, the silver-greys of weathered wood, and pops of seasonal color. Repeat textures throughout the garden – the finely shredded leaves on a bed, the rough bark of a tree, the smooth surface of a stone. This repetition creates a harmonious flow and visual unity, making the garden feel deliberate and cared for, even during its quieter, colder phase. Remember, a thriving ecosystem, as championed by “Plant, Garlic, Now, for”, is inherently beautiful, reflecting health and vitality.
Common Mistakes to Avoid in Your Winter Garden
Even with the best intentions, certain practices can hinder your sustainable gardening efforts. Being aware of these common mistakes, especially when operating under the “Plant, Garlic, Now, for” principles, can save you time, effort, and resources.
- Using peat moss: This is a key environmental mistake. Peat bogs are vital carbon sinks and unique ecosystems, and harvesting peat contributes significantly to greenhouse gas emissions and habitat destruction. Avoid peat-based potting mixes and amendments. Instead, choose leaf mould, coir (a renewable coconut fiber by-product), or compost as superior and environmentally responsible alternatives. Leaf mould, in particular, enhances soil structure, moisture retention, and provides a fungal-dominant environment that many plants, including garlic, thrive in.
- Over-tidying: While a certain level of tidiness is appealing, an overly manicured garden can be an ecological desert. Resist the urge to cut back all perennials in fall and rake up every last leaf. “Over-tidying” removes crucial winter habitat and food sources for beneficial insects, birds, and small mammals. Instead, remove outright hazards (diseased plants, unstable branches) but leave standing dead stalks, spent seed heads, and a generous layer of leaves in designated habitat zones. These areas provide shelter for overwintering beneficial insects, whose presence will help manage pests naturally come spring, aligning perfectly with the pest-balancing aspect of “Plant, Garlic, Now, for.”
- Watering at midday: This is inefficient and wasteful. When you water in the middle of the day, particularly on sunny or windy days, a significant portion of the water evaporates before it can reach the plant roots. This not only wastes water but can also leave your plants dehydrated. Instead, water deeply and thoroughly in the early morning or late evening. Early morning watering allows the water to soak in before evaporation rates peak and gives foliage time to dry, reducing fungal disease potential. Late evening watering also minimizes evaporation, but ensure leaves don’t stay wet overnight if disease is a concern.
- Heavy fertilizing in cold soils: Plants’ metabolic rates slow considerably in cold temperatures, and the activity of soil microorganismsresponsible for nutrient cycling diminishes. Applying heavy doses of synthetic fertilizers to cold, dormant soil is largely ineffective and can even be detrimental. Much of the fertilizer won’t be utilized by plants and can leach into groundwater or runoff, polluting waterways. Focus instead on feeding the soil microbes through organic matter. Top-dress beds with compost or leaf mould. These materials break down slowly over winter, feeding the microbial life, which in turn makes nutrients available to plants when they resume active growth in spring. This gradual, biological approach is far more effective and aligns with the natural feeding cycles encouraged by “Plant, Garlic, Now, for.”
Storage & Winter Care for a Thriving Start
Proactive storage and care over the winter months are pivotal for the long-term health of your garden and tools, ensuring you’re ready for a vibrant spring with minimal fuss, a key aspect of “Plant, Garlic, Now, for”.
First, protect your valuable rainwater cache. If your rain barrel is exposed to freezing temperatures, it’s essential to prevent water from freezing and potentially cracking the barrel. Either drain it completely and disconnect the downspout diverter, or, if you wish to keep some water, ensure it has physical space for ice expansion (e.g., a plastic bottle filled with sand floating inside to absorb ice pressure). Make sure the spigot is open to drain any remaining water, particularly from the tap, to prevent damage.
Your compost setup benefits from winter attention. If you have an active hot compost pile, keep aerating it periodically, even in cold weather, to maintain decomposition. For cold compost piles or bins that slow down significantly in winter, ensure they are well-covered to prevent excessive rainwater from leaching nutrients and making the pile too soggy. A layer of dry leaves or a tarp can suffice. This helps maintain an optimal moisture balance, crucial for microbial activity.
Leaf mould is a gardener’s gold, and proper storage ensures its quality. If you have dedicated leaf mould pens or wire cages, label them with the date each batch was started. This helps you track their progress; leaf mould typically takes 1-2 years to fully decompose into a rich, crumbly texture. Ensure your leaf mould is kept moist but not waterlogged. A simple cover or placing it in a shaded area can help maintain suitable conditions for fungal breakdown.
Finally, tool care extends their lifespan and keeps them performing at their best. Before storing any metal tools (trowels, hoes, shovels, pruners), clean off all soil and rust. Dry them thoroughly. Then, apply a light coat of oil (linseed oil, mineral oil, or even used cooking oil) to all metal parts. This prevents rust over the damp winter months. For bypass pruners, sharpen the blades and apply a drop of camellia oil or similar to the pivot point for smooth operation. Store hand tools neatly in a dry shed or garage. Regarding cardboard, flat storage is ideal. Keep any spare cardboard boxes or flattened sheets dry and stacked. They’ll be ready for quick sheet-mulch builds or weed suppression come spring, or whenever a new garden bed or planting area becomes free. This organized approach to winter storage means less work in spring and a more efficient gardening year overall, perfectly reflecting the thoughtful preparation embedded in “Plant, Garlic, Now, for.”
Seasonal Checklist: What to Do When
Mastering the “Plant, Garlic, Now, for” approach means working with, not against, the seasons. Here’s a pragmatic checklist to guide your winter, spring, summer, and fall activities for year-round garden health and productivity.
Fall (Now – When the first hard frost hits)
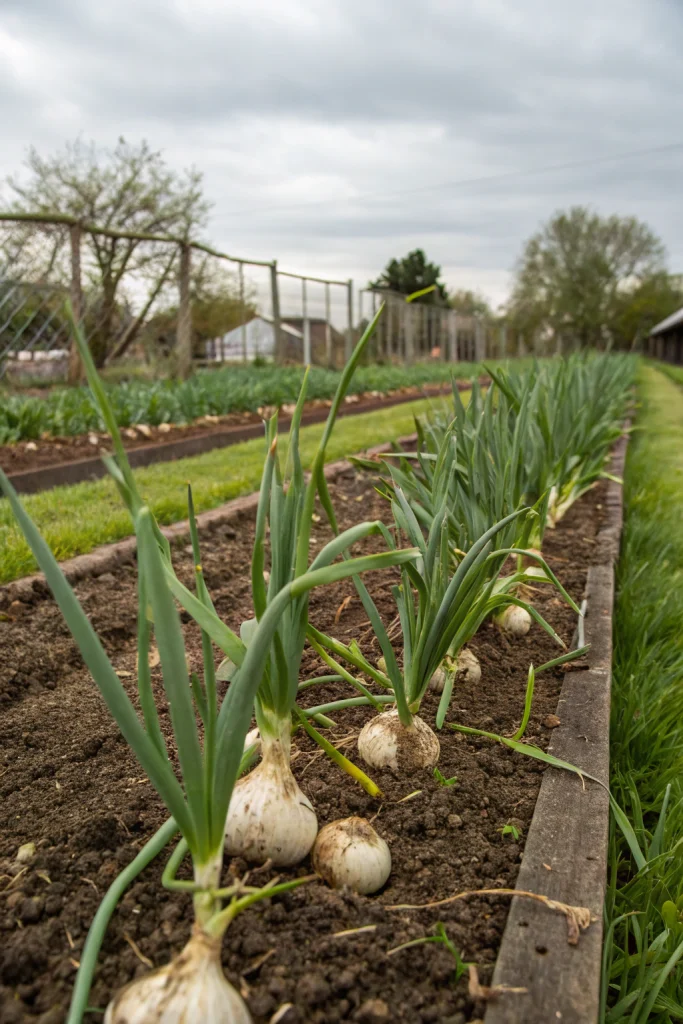
- Plant Garlic: This is paramount for “Plant, Garlic, Now, for”. Plant individual cloves, pointed end up, 10-15 cm (4-6 inches) deep and apart, in prepared no-dig beds.
- Leaf Collection & Mulching: Actively collect all fallen leaves. Shred them with a mower and apply a thick, 10-15 cm (4-6 inch) layer as mulch on empty beds, around dormant perennials, and in containers.
- Start Leaf Mould: Dedicate a corner or simple cage for leaf mould creation. Keep leaves moist.
- Build No-Dig Beds: Lay cardboard, wet it, then layer with shredded leaves and compost where new beds are desired.
- Rain Barrel Installation/Maintenance: Install new barrels or clean existing ones. Ensure downspout diverters are working.
- Compost System Setup: Begin a cold compost pile or load up a Bokashi bin with kitchen scraps.
- Tool Cleaning & Oiling: Essential for winterizing. Clean, sharpen, and oil all metal tools before storage.
- Habitat Creation: Leave some seed heads standing. Create brush piles or bundle hollow stems in a designated habitat corner.
Winter (Dormancy period)
- Monitor Mulch: Check mulch layers; top up with more leaves if they’ve compressed significantly, especially on garlic beds.
- Compost Turning: Turn cold compost piles periodically if temperatures allow, to encourage decomposition. Keep Bokashi active indoors.
- Winter Sowing: Prepare milk jug mini-greenhouses and sow hardy perennial or cold-tolerant annual seeds.
- Insulate Containers: Wrap and insulate patio pots with cardboard and leaves to protect roots.
- Prepare Seed Starting Mix: Sieve finished leaf mould to create a fine, nutrient-rich mix for early spring sowings.
- Plan for Spring: Review seed catalogs, plan crop rotations, and map out new garden areas.
- Rain Barrel Protection: Drain or protect rain barrels from freezing if severe cold is expected.
Spring (Thawing & New Growth)
- Check Garlic: Observe emerging garlic shoots. Ensure they have adequate moisture.
- Top-Dress Beds: Lightly top-dress existing beds with a new layer of compost or well-rotted leaf mould.
- Spring Planting: Continue planting early spring vegetables and flowers.
- Seed Starting: Start seeds indoors or directly sow cold-tolerant varieties outdoors as soil warms.
- Mulch Pushed Away: As soil warms, gently push back heavy winter mulch from around emerging tender plants to allow soil to heat up.
- Weed Control: Hand-pull small weeds as they appear, reinforcing the no-dig weed suppression.
- Compost Tea: Begin brewing compost tea for liquid feeding as plants become active.
Summer (Peak Growth & Harvest)
- Harvest Garlic: Typically late spring or early summer, when lower leaves begin to yellow.
- Water Management: Continue using collected rainwater. Water deeply and in the early morning.
- Mulch Replenishment: As the season progresses, ensure mulch layers are maintained to conserve moisture and suppress weeds.
- Compost Maintenance: Keep feeding your compost system with garden and kitchen waste.
- Pest Management: Observe for pests; use habitat, companion planting, and mild organic sprays only if necessary.
- Succession Planting: Plan and sow successive crops to maintain continuous harvests.
Troubleshooting Common Winter Garden Issues
While the “Plant, Garlic, Now, for” approach builds resilience, winter presents its unique challenges. Knowing how to troubleshoot common issues ensures your garden remains on track for spring success.
- Mulch blowing away: If your shredded leaf mulch is frequently being lifted by winter winds, it means it’s too light or not sufficiently consolidated.
- Solution: Lightly water the mulch after application; this helps it settle and knit together. For very windy areas, you can strategically place branches or small rocks on top of the mulch to anchor it down. Consider using slightly coarser materials in the mix, like twig cuttings, which are heavier.
- Waterlogging in No-Dig beds: While no-dig improves drainage over time, a new bed, especially over compacted soil, can sometimes become waterlogged with heavy winter rains. This can kill roots, including your newly planted garlic.
- Solution: Ensure your cardboard layer at the base has ample points for water to eventually permeate (though it will break down). If the issue is severe, consider gently aerating the underlying compacted soil with a broadfork before laying down your no-dig layers. For existing beds, avoid walking on them when wet, as this compacts the soil further. Improved organic matter will naturally enhance drainage over time.
- Pests overwintering in habitat piles: While helpful, sometimes unwanted guests (like slugs or specific pests) can take refuge in beneficial insect habitats.
- Solution: Differentiate between beneficial and problematic inhabitants. Most pests are less active in deep winter. If you notice a specific problem, gently disturb the habitat pile in late winter before spring emergence to encourage movement. For slugs, create specific “slug traps” (like buried containers of beer) away from your main habitat areas. Avoid destroying all habitats, as the benefits still outweigh the risks.
- Rain barrel freezing and damage: As addressed in Storage & Winter Care, frozen water can expand and crack barrels.
- Solution: Always drain your rain barrel completely before sustained hard freezes. Disconnect the downspout diverter so water flows freely. If you must keep some water, use the “plastic bottle with sand” trick. Consider insulating the barrel itself if you live in an extremely cold climate and still wish to collect during brief thaws.
- Seedlings in winter sow jugs not germinating: If your milk jug seedlings aren’t sprouting in spring, it could be due to seed viability, incorrect timing, or insufficient light/temperature fluctuations.
- Solution: Ensure you’re using fresh seeds suitable for winter sowing (i.e., those that require stratification or are very cold hardy). Place jugs in a bright spot outdoors where they experience natural light and temperature swings—this is critical. Don’t open them too early. Patience is key; germination happens on nature’s schedule.
- Garlic “heaving” out of the soil: Extremely cold temperatures combined with thawing and freezing cycles can cause surface soil to expand and contract, pushing garlic cloves out of the ground.
- Solution: A good, thick layer of mulch (10-15 cm / 4-6 inches) is your best defense against heaving. It insulates the soil and maintains a more stable temperature. If you see cloves partially exposed, gently push them back down and add more mulch around them. Ensure they were planted at the correct depth initially.
Conclusion
The journey with Plant, Garlic, Now, for is more than just a set of techniques—it’s a transformative philosophy for gardening that reconnects us with nature’s rhythms, conserves precious resources, and cultivates a deeper appreciation for the living world beneath our feet. By embracing the simple, yet profound, acts of utilizing autumn’s bounty, harvesting rainwater, nurturing soil life, and fostering biodiversity, you are not merely preparing a garden; you are forging a resilient, self-sustaining ecosystem right in your backyard.
From the moment you gather those first fallen leaves to create your no-dig beds, you embark on a path that diverts waste from landfills, reducing your carbon footprint. Each drop of captured rainwater is a conscious choice to lessen the strain on municipal systems and reduce energy consumption. By cultivating a vibrant soil microbiology through composting and leaf mould, you replace the need for synthetic fertilizers, fostering a healthier foundation for all your plants. And by creating simple habitat zones, you invite beneficial insects and birds, turning your garden into a dynamic sanctuary that manages its own pest issues naturally.
The beauty of this approach lies in its accessibility and the tangible rewards it offers. You don’t need a large plot or expensive tools; the core principles can be applied to balconies, small urban gardens, or sprawling rural landscapes. The initial investments are minimal, primarily time and observation, while the returns are immense: a healthier environment, significant cost savings, and a garden that thrives with fewer inputs and less intervention. Imagine the satisfaction of harvesting your own garlic next summer, grown in soil enriched by your winter efforts, or the joy of watching pollinators interact with plants that found refuge in your winter habitat areas.
As you move forward with these practices, remember that every small action contributes to a larger ecological impact. The “Plant, Garlic, Now, for” guide isn’t about perfection, but about progress. It’s about making conscious, environmentally sound choices that yield not only a beautiful and productive garden, but also contribute to a healthier planet. Your spring garden will indeed repay you with vigor and fewer inputs, making gardening a truly reciprocal and rewarding endeavor. Embrace these methods, and watch your garden, and your connection to it, flourish.
FAQ
- Can I start now? Yes—the peak time to begin many of these practices, especially planting garlic and collecting leaves for no-dig beds and leaf mold, is in the fall. Focus on leaves, rain capture, no-dig prep, tool care, and habitat creation to set a strong foundation for spring.
- Only a balcony? Absolutely! Balconies are perfect for adopting “Plant, Garlic, Now, for” principles. Use worm towers or Bokashi systems in planters for composting. Insulate pots with cardboard and leaves. Consider vertical gardening to maximize space. Small rain chains can direct water into containers.
- Special tools required? No—one of the core tenets is to use what’s available. A rake for leaves, pruners for cutting back, and a basic compost bin (or even just dedicated bags for leaf mold) are sufficient. You can even make a simple sieve from scrap materials.
- My yard doesn’t produce many leaves. Where can I get them? Many neighbors or even local municipal parks are happy for you to take their surplus leaves, which are often considered yard waste. Always ask permission first!
- How often should I turn my compost pile in winter? For a cold compost pile, turning is less frequent. Aim for once every few weeks if temperatures are above freezing. If it’s consistently below freezing, microbial activity will slow significantly, and turning becomes less critical. Ensure it’s covered to protect from excessive moisture.
- What if I don’t have enough cardboard for new beds? Beyond flattened shipping boxes, sources include appliance stores (for larger sheets), or sometimes local recycling centers. If you can’t get enough, you can reduce the area of your new bed or use thicker layers of leaves as a primary weed suppressor, though cardboard offers superior blockage.
- Science behind this? Yes, the methods are rooted in ecological science. Mulching reduces water loss (evaporation) and moderates soil temperature. No-dig preserves soil structure and fungal networks, vital for nutrient exchange. Composting recycles nutrients and builds soil organic matter, improving fertility and water retention. Habitat creation supports biodiversity crucial for natural pest control and pollination. For more in-depth scientific resources, consult university extension services or respected permaculture texts.
- Healthline — Growing food in limited space
- Harvard T.H. Chan — Plate & Planet (sustainability)
- Medical News Today — Health benefits of gardening


