Layered, No-Dig, Garden, Beds — Build Living Soil and Abundant Harvests Sustainably
Layered, No-Dig, Garden, Beds blends practical, low-cost techniques with real environmental impact. Use these eco-first methods to reduce waste, save water, build living soil, and support pollinators—all while keeping your garden beautiful and productive through the cold season.
[lwptoc]
Why Layered, No-Dig, Garden, Beds Matters This Season
Winter prep is when smart gardeners get ahead: leaves become mulch, rain becomes irrigation, and “waste” becomes soil food. With Layered, No-Dig, Garden, Beds, you set resilient foundations now—so spring growth is faster, healthier, and cheaper. This proactive approach fundamentally shifts your gardening paradigm from reactive problem-solving to proactive ecosystem building. By understanding and implementing the principles of no-dig gardening now, you are not just preparing for the next growing season, but cultivating a long-term, sustainable relationship with your land. The benefits extend beyond your immediate garden space, contributing to local biodiversity, reducing your carbon footprint, and fostering a healthier planet.
The colder months, often seen as a period of dormancy, are actually prime time for establishing the underlying structure of a truly regenerative garden. While above-ground growth slows, the subterranean world of fungi, bacteria, and invertebrates is ready to process organic matter, turning it into nutrient-rich humus. By feeding this unseen workforce now, you ensure a vibrant, biologically active soil ready to support vigorous plant growth come spring. This pre-season effort drastically cuts down on common spring tasks like weeding and soil amending, freeing up your time when planting demands are highest. Furthermore, conserving resources like water and reducing the need for external inputs means your garden becomes a self-sustaining system, less reliant on fossil fuels and chemical interventions.
Core Materials & Tools for Your Sustainable No-Dig Garden
Embarking on the journey of Layered, No-Dig, Garden, Beds doesn’t require a hefty investment in specialized equipment. In fact, many of the most crucial “materials” are likely already available in your backyard or can be sourced freely. The emphasis here is on recycling, upcycling, and leveraging natural processes. By starting with what you have, you immediately reduce your environmental impact and minimize costs, setting a truly sustainable precedent for your gardening endeavors.
- Dry leaves, shredded cardboard, twig cuttings (mulch & sheet-mulch layers): These are the bedrock of no-dig gardening. Fallen leaves provide carbon-rich material, which slowly breaks down into nutrient-rich leaf mould, a superior soil amendment. Shredded cardboard acts as an excellent weed barrier, smothering existing vegetation and providing a slow-release carbon source for soil microbes. Twig cuttings, when chopped into smaller pieces, add structural integrity to your layers and improve drainage while slowly decaying.
- Compost setup (bin, bokashi, or worm tower for containers): A dedicated system for composting is essential for closing the loop on kitchen and garden waste. A traditional compost bin is perfect for larger volumes of leaves, grass clippings, and garden trimmings. Bokashi is an anaerobic fermentation process that rapidly breaks down all food scraps, including meat and dairy, into a pre-compost material that can then be buried directly into beds. For smaller spaces or container gardens, a worm tower allows red wigglers to efficiently process food waste into rich vermicompost and nutrient-dense “worm tea.”
- Rain barrel with downspout diverter; watering can or soaker hose: Water is a precious resource, and capturing rainwater is a cornerstone of eco-friendly gardening. A rain barrel hooked up to a downspout diverter provides a free, chlorine-free water source for your plants. For application, a simple watering can is effective for small areas, while a soaker hose ensures efficient, deep watering at the root zone, minimizing evaporation compared to overhead sprinklers.
- Reusable pots (terracotta/metal/wood) and sturdy seed trays: Opt for durable, eco-friendly alternatives to single-use plastic. Terracotta, while heavier, offers natural insulation and breathability. Metal containers can be stylish and long-lasting, while treated wood provides a rustic aesthetic. Sturdy, reusable seed trays made from recycled plastics or biodegradable materials will serve you season after season, reducing waste from flimsy, throwaway options.
- Hand tools (stainless trowel, pruners, rake) and a simple sieve: Investing in high-quality, durable tools will save you money and frustration in the long run. Stainless steel trowels are rust-resistant and strong. Sharp bypass pruners are indispensable for maintaining plants and gathering materials. A sturdy rake helps spread layers evenly. A simple garden sieve, perhaps made from a salvaged screen or hardware cloth, is invaluable for refining compost or leaf mould into a fine, crumbly texture perfect for seed starting.
Understanding these eco-swaps is fundamental to maximizing the positive impact of your Layered, No-Dig, Garden, Beds. Peat moss, while commonly used, is harvested from ancient peat bogs, a non-renewable resource that plays a critical role in carbon sequestration and biodiversity. Leaf mould, on the other hand, is a free, homemade alternative that improves soil structure, water retention, and microbial activity far better than peat. Synthetic fertilizers, often derived from fossil fuels and associated with environmental runoff, can be replaced by the gentle, nutrient-rich boost of homemade compost tea, which feeds the soil food web. Choosing solar or LED lighting reduces energy consumption, and perhaps most importantly, selecting native plants provides crucial habitat and food sources for local pollinators and wildlife, ensuring your garden thrives as part of a larger ecosystem.
Step-by-Step Method for Establishing Resilient No-Dig Garden Beds
Step 1 — Build a No-Dig Base with Leaves and Cardboard
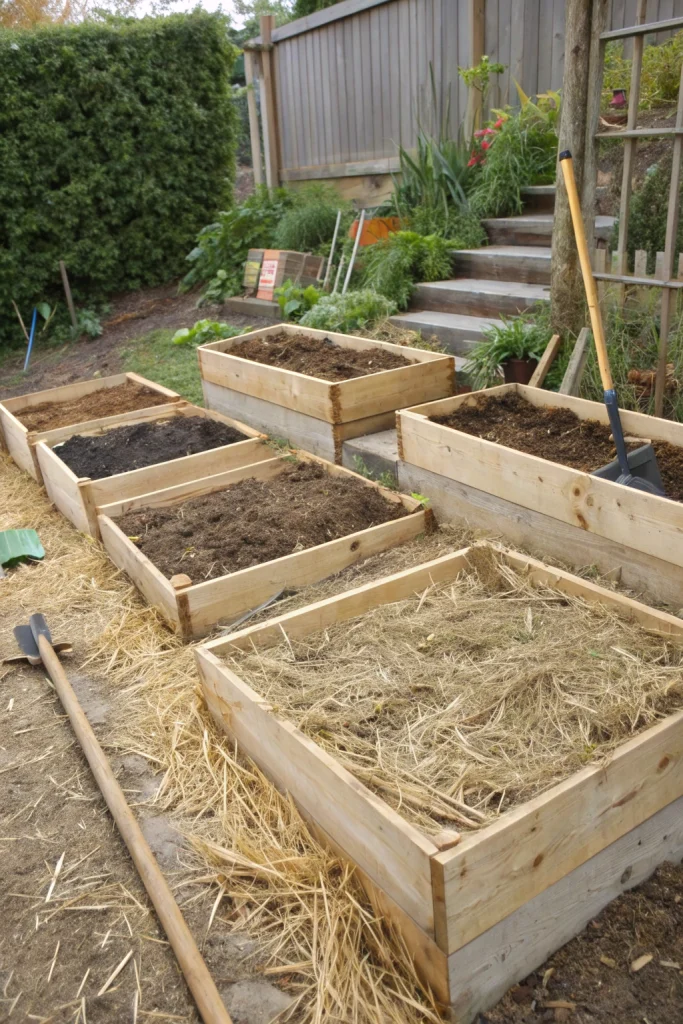
The foundation of any successful Layered, No-Dig, Garden, Beds lies in its initial construction, specifically the strategic layering of organic materials. This technique is designed to mimic natural forest floor processes, where leaves and other detritus accumulate and slowly decompose, building rich, living soil without disruptive tilling. Start by selecting your garden bed location. Once chosen, lay down a thick layer of flattened cardboard directly onto the bare soil or existing grass. Ensure that each piece of cardboard overlaps the next by at least 10–15 cm (4–6 inches). This overlapping is crucial to prevent weeds from finding gaps to poke through. Before adding subsequent layers, thoroughly wet the cardboard. This helps it to break down faster, creates a moist environment for soil microbes, and secures it against wind. The cardboard acts as an initial weed barrier, effectively smothering existing turf and weed seeds by blocking light and airflow. It also provides a valuable carbon source for the soil food web as it decomposes.
Once your cardboard foundation is in place and adequately moistened, the next layer is typically a substantial amount of shredded leaves. Aim for a depth of 5–10 cm (2–4 inches). Dry leaves are abundant in autumn and can be collected from your own yard or even neighbors’. Shredding them, either with a leaf blower/vac or a lawnmower, helps them decompose faster and compacts them more efficiently. This layer of leaves serves multiple functions: it acts as an excellent mulch, conserving soil moisture; it slowly breaks down into nutrient-rich leaf mould, a highly desirable soil amendment; and it provides a significant carbon source that fuels the microbial activity beneath. Following the leaves, add a thin layer of finished compost—about 1-2 cm (0.5-1 inch)—if you have it. This introduces a diverse community of beneficial microbes and fungi directly into your new bed, jumpstarting the decomposition process and immediately enriching the nascent soil environment. This initial layering is what suppresses existing weeds, buffers soil moisture, and most importantly, begins to build a vibrant, living soil structure, creating an ideal home for beneficial fungi networks that will thrive in undisturbed soil, establishing a resilient foundation for spring planting.
Step 2 — Capture Rain & Water Smarter for Efficiency
Efficient water management is a cornerstone of sustainable gardening, particularly in a system of Layered, No-Dig, Garden, Beds where soil health directly influences water retention. The first crucial step is to install a rain barrel with a downspout diverter. This simple setup allows you to collect precious rainwater from your roof, diverting it from storm drains where it often contributes to runoff and pollution. Rainwater is superior to municipal tap water for plants as it is free of chlorine, fluoride, and other chemicals that can be detrimental to beneficial soil microbes. Start watering with collected rainwater as early in the season as possible, and continue to rely on it as your primary garden water source. This not only reduces your water bill but also lessens the strain on local water resources, contributing to long-term environmental sustainability. Position your rain barrel strategically near your garden beds for easy access, or integrate multiple barrels if your space and rainfall allow.
Beyond collection, smart water application is vital. For container gardens and potted plants, grouping pots by their specific water needs is an effective strategy. Place those requiring more moisture together, and those tolerant of drier conditions in a separate cluster. This approach prevents overwatering some plants while underwatering others. Crucially, mulch containers with a layer of leaves—similar to how you would mulch your main garden beds. This leaf mulch significantly reduces evaporation from the soil surface, keeping the potting mix moist for longer periods and reducing the frequency of watering. Furthermore, adding saucers with a layer of gravel underneath pots achieves two benefits: the gravel elevates the pot slightly, preventing it from sitting in standing water and reducing the risk of root rot, while the water collected in the saucer creates a localized humidity zone around the plant, further lowering evaporation rates from the pot itself. This comprehensive approach to water capture and intelligent application ensures your plants receive the moisture they need with minimal waste, maximizing the benefits of your no-dig system’s water-retaining capabilities.
Step 3 — Feed Soil Life Naturally with Organic Matter
The health of a Layered, No-Dig, Garden, Beds system is intrinsically linked to the vitality of its soil food web. Feeding the soil life naturally is paramount to building fertility and resilience. One of the most effective ways to do this through the colder months is to start a cold compost pile. Unlike hot composting, which requires precise carbon-to-nitrogen ratios and frequent turning, cold composting is a slower, more passive process perfect for accumulating garden debris and kitchen scraps over winter. A simple cold compost mixture can consist primarily of fallen leaves (“browns”) mixed with coffee grounds (“greens”). The leaves provide essential carbon, while coffee grounds add nitrogen and trace minerals. This gentle decomposition process creates a habitat for a diverse range of microorganisms, fungi, and invertebrates, all working to break down organic matter into stable humus. The resulting compost, though slower to form, is extremely rich and biologically active.
Alternatively, or in conjunction, consider using bokashi indoors. Bokashi is a fermentation process that quickly breaks down all manner of food waste, including meat, dairy, and cooked foods that are typically excluded from traditional compost. This anaerobic system uses beneficial microorganisms to “pickle” the food scraps. Once fermented, the bokashi pre-compost is then trenched directly into resting garden beds. Burying it allows beneficial fungi and microbes in the soil to rapidly break down the fermented material into nutrient-rich humus without attracting pests. This method is incredibly efficient for composting kitchen waste year-round, injecting a concentrated dose of active biology and nutrients directly into your beds. Furthermore, you can proactively prepare for spring by sieving last year’s leaf mould. Leaf mould is pure decomposed leaves, a phenomenal soil conditioner that improves soil structure, water retention, and acts as a slow-release nutrient source. Sieving it creates a fine, crumbly material that is perfect for crafting a silky seed-starting mix, giving your early sowings a gentle, nutrient-rich start in a medium that mimics natural forest soil. By consistently feeding the soil food web through these methods, you cultivate a microbiome that naturally suppresses diseases, cycles nutrients, and produces healthier, more resilient plants, reinforcing the self-sufficiency of your Layered, No-Dig, Garden, Beds.
Step 4 — Balance Pests with Habitat and Natural Defenses
In a thriving Layered, No-Dig, Garden, Beds ecosystem, the goal is not to eliminate all “pests” but rather to create a balanced environment where natural predators and beneficial insects can keep potential problems in check. Winter offers numerous opportunities to prepare for this ecological balance. Instead of tidying every last plant stem, selectively keep certain seed heads on your plants. These provide vital food sources for winter birds, who, in turn, will become your allies against garden pests during the growing season. Goldfinches love thistle seeds, while sparrows and juncos will feast on a variety of dried seed heads. This simple act turns your garden into a winter bird feeder, encouraging these beneficial visitors to linger. Additionally, create a dedicated habitat corner within your garden, or even a small, inconspicuous area. Bundle hollow stems (from plants like elderberry, sunflower, or bamboo) and sticks, along with a pile of fallen leaves and a few decaying logs. This creates shelter and nesting sites for overwintering beneficial insects such as solitary bees, lacewings, and ladybugs. These insects are invaluable natural pest controls, ready to emerge in spring and patrol your garden for aphids and other unwelcome guests.
When pest problems inevitably arise, practice the principle of least harm. Only resort to intervention when absolutely necessary, and always start with the gentlest methods. Mild soap solutions can be effective against soft-bodied insects like aphids, disrupting their exoskeletons. Neem oil, derived from the neem tree, is a natural insecticide that acts as an antifeedant and growth disruptor, but should be used sparingly as it can affect beneficials too. Garlic sprays are also a mild deterrent. The key is judicious application: target only the affected plants and test a small area first. Heavy use of broad-spectrum pesticides, even organic ones, can decimate beneficial insect populations and disrupt the delicate ecological balance you’ve worked to build in your Layered, No-Dig, Garden, Beds. A more proactive and sustainable approach is companion planting, which leverages plant relationships to deter pests. For example, planting marigolds near vegetables can repel nematodes and other insect pests, while nasturtiums can act as a trap crop, luring aphids away from more desirable plants. Integrating these practices into your gardening routine fosters a dynamic, self-regulating ecosystem where nature handles pest control, minimizing your intervention and maximizing your organic harvest.
Environmental & Cost Impact of Layered, No-Dig, Garden, Beds
Adopting the principles of Layered, No-Dig, Garden, Beds yields a profound ripple effect across both environmental sustainability and personal economics. The benefits are not just theoretical; they are tangible and measurable, transforming your garden into a more resilient, productive, and cost-effective space. One of the most significant environmental impacts is waste diversion. With this method, you can proactively intercept and utilize countless bags of fallen leaves, grass clippings, and other yard waste that would otherwise end up in landfills. This organic material, instead of becoming a methane-producing problem, is transformed into a valuable resource, forming the building blocks of healthy soil in your beds. This reduction in landfill waste directly translates to a lower carbon footprint for your household and community.
Beyond waste, the environmental savings extend significantly to water conservation. The generous layers of mulch—primarily leaves and cardboard—act as a natural blanket over the soil. This drastically reduces evaporation, meaning your soil stays moist for longer periods, even during dry spells. Coupled with strategic rain capture via rain barrels, your irrigation needs will plummet. Imagine the cumulative effect of hundreds of gardeners across a region reducing their water usage by 30-50% or more. This lessens the strain on municipal water supplies, particularly crucial in areas prone to drought. From a financial perspective, this translates directly into lower water bills, year after year. The reliance on free, abundant organic materials also means a dramatic reduction in the need to purchase external inputs like synthetic fertilizers, peat moss, or even expensive bagged compost. You are literally growing your own soil, turning what was once considered “waste” into your garden’s most valuable asset.
Furthermore, Layered, No-Dig, Garden, Beds inherently fosters increased garden biodiversity. By feeding the soil food web with varied organic matter and leaving soil undisturbed, you create an optimal habitat for a vast array of microorganisms, fungi, and beneficial invertebrates. These form the invisible workforce that drives nutrient cycling, improves soil structure, and suppresses disease. Above ground, incorporating habitat zones, leaving seed heads, and practicing companion planting attracts pollinators, predatory insects, and birds, all of which contribute to a healthier, more balanced ecosystem. This biodiversity acts as a natural pest control, reducing the need for costly and environmentally damaging pesticides. In essence, you cultivate a garden that works with nature, not against it, becoming a vibrant, self-regulating ecosystem that delivers abundant, healthy produce while minimizing cost and environmental impact.
Advanced Eco Hacks for Peak Garden Performance
Once you’ve mastered the basics of Layered, No-Dig, Garden, Beds, you can elevate your sustainable gardening practices with these advanced eco-hacks that further enhance soil health, resource efficiency, and plant vitality:
- Charge homemade biochar in compost tea before mixing into beds: Biochar is a highly porous form of charcoal produced by pyrolysis (heating biomass in the absence of oxygen). When added to soil, it improves water retention, nutrient availability, and provides a long-term habitat for beneficial microbes. However, raw biochar can initially “tie up” nutrients. The trick is to “charge” it by soaking it in nutrient-rich compost tea for several days or weeks. This allows the biochar’s microscopic pores to become saturated with microbial life and available nutrients, turning it into a powerful soil amendment that acts like a slow-release sponge, delivering fertility directly to plant roots.
- Swap plastic seed trays for soil blocks: Plastic seed trays, even reusable ones, eventually degrade and contribute to plastic waste. Soil blocks offer an elegant and sustainable alternative. These are self-contained blocks of compressed soil mix (often made from leaf mould, compost, and coarse sand) that hold their shape. Seeds are sown directly into the top of each block. This eliminates the need for plastic trays, reduces transplant shock (as roots are air-pruned at the edges of the block), and encourages stronger, healthier starts. Specialized soil block makers are available, or you can craft simpler versions.
- Try milk-jug winter sowing for hardy perennials and salad greens: Winter sowing is a remarkably effective, low-fuss method for germinating hardy seeds outdoors during the cold season. You repurpose translucent plastic milk jugs into mini-greenhouses. Cut the jug almost in half horizontally, leaving a hinge. Poke drainage holes in the bottom. Fill the bottom half with several inches of potting mix (ideally leaf mould-based), sow your seeds, wet thoroughly, then tape the jug shut. Remove the cap for ventilation and place outdoors. The jugs protect seeds from harsh weather fluctuations, provide naturally stratified conditions, and allow seeds to germinate when conditions are ideal in spring, resulting in robust seedlings ready to plant. This works wonderfully for many native perennials, cold-hardy annuals, and early salad greens.
- Insulate patio pots with cardboard jackets and leaf fill to protect roots: For container gardeners, winter can be harsh on plant roots, especially for perennials or small shrubs in pots. Unlike in-ground plants, which benefit from the insulating mass of surrounding soil, container roots are exposed to freezing air temperatures on all sides. To prevent ‘root heave’ and temperature stress, create insulating jackets for your patio pots. Wrap the outside of the pot with several layers of cardboard, securing it with twine or tape. Then, fill any gaps between the pot and the cardboard jacket with dry leaves. This acts as a thick, natural thermal barrier, significantly protecting roots from extreme cold and minimizing the risk of winter damage.
Design & Aesthetics for Your Eco-Friendly No-Dig Garden
Implementing Layered, No-Dig, Garden, Beds doesn’t mean sacrificing beauty for sustainability. In fact, these methods often lend themselves to a garden aesthetic that is deeply connected to nature, rustic charm, and a sense of enduring tranquility. The key is to blend sustainability with thoughtful design, creating a space that is both productive and visually appealing. Embrace the natural materials inherent in eco-gardening: recycled-wood edges for your beds, for example, provide a warm, organic boundary compared to stark plastic or concrete. Reclaimed timber or even thick branches can delineate pathways and beds, integrating seamlessly into the natural environment.
Mossy planters, perhaps old terracotta pots that have developed a beautiful patina over time, or salvaged stone trough planters, add an immediate sense of age and established beauty. Encourage moss and lichen growth in shady, moist areas for an enchanting, ancient garden feel. Instead of bright, artificial lights, opt for warm solar path lighting. These soft, ambient lights create a cozy, inviting atmosphere in the evenings, highlighting key features without consuming electricity. Think of a “Nordic feel”—minimalist, yet deeply connected to natural elements, emphasizing texture, natural colors, and subtle illumination.
To achieve cohesion in your design, choose a restrained palette for your hardscaping elements and plant choices. Earth tones, greens, and whites provide a calm backdrop, allowing the natural vibrancy of your plants to shine. Repetition of textures, such as the rough bark of a wooden bench, the smooth surface of a stone paver, and the intricate patterns of a fern, creates visual harmony and depth. Consider planting a variety of native species that offer diverse foliage, flower forms, and seed heads throughout the seasons. This not only supports local wildlife but also ensures continuous visual interest. By integrating these design principles, your Layered, No-Dig, Garden, Beds will not only be a powerhouse of sustainable production but also a serene and aesthetically pleasing sanctuary, proving that eco-friendly can indeed be exquisitely beautiful.
Common Mistakes to Avoid in Your Sustainable Garden
While Layered, No-Dig, Garden, Beds is a forgiving and rewarding practice, being aware of common pitfalls can save you time, effort, and occasional frustration. Avoiding these mistakes ensures your garden builds resilience efficiently.
- Using peat moss (unsustainable—choose leaf mould instead): This is perhaps one of the most critical eco-mistakes. Peat moss is harvested from ancient peat bogs, which are unique ecosystems and vital carbon sinks. Their extraction is highly destructive and releases stored carbon into the atmosphere, contributing to climate change. Despite its common use, peat moss offers limited nutritional value and can be overly acidic. Instead, wholeheartedly embrace leaf mould. It’s free, environmentally sound, vastly superior in improving soil structure, enhancing water retention, and supporting microbial life. A well-rotted leaf mould provides a crumbly, rich texture that peat cannot match, making it an ideal soil amendment for your no-dig beds and an excellent component for seed-starting mixes.
- Over-tidying (remove hazards, keep habitat zones for allies): The urge to create a perfectly pristine garden can be detrimental to a sustainable ecosystem. While removing truly diseased material or sharp hazards is essential, excessive tidying robs beneficial insects and wildlife of crucial overwintering sites, food sources, and shelter. Leaving fallen leaves in certain areas, allowing some spent perennial stems to stand, and creating small brush piles provides vital habitat. These “messy” zones attract predatory insects (like ladybugs and lacewings), solitary bees, and birds, all of which become invaluable allies in pest control. Embrace a slightly wilder, more natural aesthetic that acknowledges the interconnectedness of your garden ecosystem.
- Watering at midday (evaporation losses; water early/late): Watering when the sun is high in the sky is inefficient and wasteful. A significant portion of the water evaporates before it has a chance to penetrate the soil and reach plant roots. This is particularly true for overhead watering. The best times to water your Layered, No-Dig, Garden, Beds are early in the morning or late in the evening. Morning watering allows the plants to absorb moisture before the day heats up and gives foliage time to dry, reducing the risk of fungal diseases. Evening watering works well too, as cooler temperatures minimize evaporation, giving the water more time to soak in. Always prioritize deep, infrequent watering over shallow, frequent sprinkles, encouraging roots to grow deeper and making plants more drought-tolerant.
- Heavy fertilizing in cold soils (feed microbes, not just plants): In conventional gardening, there’s often a push to “feed the plants” with synthetic fertilizers, particularly in spring. However, in a no-dig system, the focus shifts to “feeding the soil microbes.” Cold soils mean microbial activity is significantly slowed. Applying heavy doses of chemical fertilizers at this time is largely ineffective, as nutrients aren’t readily processed and can leach away, polluting waterways. More importantly, synthetic fertilizers can harm the delicate soil food web you’re trying to cultivate. Instead, during colder periods, focus on adding organic matter like well-rotted compost, leaf mould, or bokashi pre-compost. These materials provide a slow, steady release of nutrients as the soil warms up and microbial life becomes active. You are nurturing the ecosystem that will naturally supply your plants with all they need, creating a healthier, more self-sufficient garden.
Storage & Winter Care for Your No-Dig Garden Tools and Materials
Proper winterization and storage are key to the longevity of your gardening tools and the efficiency of your Layered, No-Dig, Garden, Beds system. A little effort now will ensure everything is ready and in prime condition for the bustling spring season.
- Cover rain barrels: If you live in an area prone to freezing temperatures, it’s crucial to cover your rain barrels or, ideally, drain them completely if they are not specifically designed to withstand freezing. Accumulated water can freeze, expand, and crack plastic or even metal barrels. Disconnect downspout diverters and ensure barrels are empty to prevent damage. A simple tarp secured over the top can offer some protection if complete draining isn’t possible or desired, but always prioritize emptying if significant freezes are expected.
- Aerate compost: Even cold compost piles benefit from occasional aeration, especially before winter sets in. Use a compost aerator tool or a pitchfork to turn and mix the pile. This introduces oxygen, which is vital for aerobic decomposition, and helps prevent anaerobic conditions that can lead to unpleasant odors. Aerating also helps to distribute moisture and microbes throughout the pile, ensuring a more consistent breakdown of organic material over the colder months.
- Label leaf-mould pens by date: If you’re serious about making leaf mould (and you should be!), setting up dedicated “pens” or cages (simple wire mesh cylinders work well) for leaves is highly efficient. Label each pen with the year the leaves were collected. Leaf mould typically takes 1-2 years to fully decompose into a rich, crumbly soil conditioner. By dating your pens, you know which batch is ready to harvest each season, ensuring a continuous supply of this invaluable material for your Layered, No-Dig, Garden, Beds.
- Oil cleaned tools: Before storing your hand tools (trowels, pruners, spades), thoroughly clean off any soil, rust, or sap. A wire brush can help with stubborn grime. Once clean and dry, apply a light coat of linseed oil or another suitable tool oil to all metal parts. This protects them from rust during damp winter storage and ensures they glide smoothly when reintroduced to service in spring. For pruners, a drop of oil on the pivot point also helps maintain smooth operation. Store tools in a dry, protected area.
- Store dry cardboard flat for quick sheet-mulch builds when beds become free: Cardboard is a fundamental component of no-dig bed construction. Collect and store large, dry, flattened pieces of cardboard from appliance boxes or other sources throughout the year. Keeping them stored flat prevents warping and makes them easy to deploy. Having a ready supply of cardboard on hand means you can quickly create new Layered, No-Dig, Garden, Beds or extend existing ones whenever a patch of ground becomes available, such as after harvesting an annual crop. This proactive storage saves time and effort, maintaining the continuous improvement of your garden’s soil.
Conclusion
Layered, No-Dig, Garden, Beds proves greener gardening is easier, cheaper, and more resilient. Start with leaves, water capture, soil life, and habitat—your spring garden will repay you with vigor and fewer inputs.
FAQ
- Can I start now? Yes—focus on leaves, rain capture, no-dig prep, and tool care. The winter months are an ideal time to lay the foundational layers of cardboard and leaves, allowing them to begin decomposing and smothering weeds well before spring planting season. This head start will significantly reduce your workload in spring.
- Only a balcony? Use worm towers/bokashi in planters and insulate pots with cardboard + leaves. Even without a traditional garden plot, you can implement no-dig principles. A worm tower or bokashi system is perfect for composting kitchen scraps directly into your containers. Insulating pots with layers of cardboard and dry leaves provides critical root protection over winter, extending the life of your container plants.
- Special tools required? No—rake, pruners, and a basic bin (or bags) are enough. The beauty of no-dig gardening is its simplicity and reliance on readily available materials. You don’t need expensive machinery. Your hands, a sturdy rake for spreading layers, good pruners for cutting materials, and a basic bin (or even heavy-duty bags) for collecting leaves are sufficient to get started.
- Science behind this? See resources below. The principles of Layered, No-Dig, Garden, Beds are deeply rooted in ecological science, mimicking how nature builds soil. Resources below provide further insights into soil food web dynamics, organic matter decomposition, water conservation, and biodiversity that underpin these highly effective methods.
- Healthline — Growing food in limited space
- Harvard T.H. Chan — Plate & Planet (sustainability)
- Medical News Today — Health benefits of gardening


