The Ultimate 7-Step Guide to DIY Drip Irrigation for Raised Beds
Welcome, fellow garden enthusiasts! Are you tired of spending countless hours standing with a hose, meticulously watering each plant in your raised beds? Do you dream of a garden that practically waters itself, saving you time, effort, and precious water? If so, you’ve come to the right place! Transforming your raised beds with a custom-built DIY drip irrigation system is not only achievable but also incredibly rewarding. This comprehensive guide will walk you through everything you need to know, from understanding the benefits to a step-by-step installation process, allowing you to build an automated watering system using basic hardware store parts.
Building your own drip irrigation system for raised beds is a game-changer for any home gardener. It offers precision watering directly to the root zone, significantly reduces water waste, and fosters healthier plant growth. Imagine waking up to perfectly hydrated plants without lifting a finger – that’s the power of DIY drip irrigation. Let’s dive in and elevate your gardening experience!
[lwptoc]
Why This Matters for Your Garden
The benefits of implementing a DIY drip irrigation system in your raised beds are manifold, touching on efficiency, plant health, and environmental responsibility. Traditional watering methods, such as overhead sprinklers or hand-watering, often lead to significant water loss due to evaporation, runoff, and inefficient distribution. Drip irrigation, by contrast, delivers water slowly and directly to the soil where plant roots can readily absorb it.
One of the primary advantages is water conservation. Studies show that drip irrigation can reduce water usage by 30-50% compared to conventional methods. This is not only good for your water bill but also for the planet, especially in regions prone to drought or water restrictions. By minimizing surface wetness, drip systems also help prevent weed growth, as weed seeds often require surface moisture to germinate. This means less weeding for you, freeing up time for other enjoyable gardening tasks.
Furthermore, consistent and targeted watering promotes healthier plants. Fluctuations in soil moisture, from bone dry to waterlogged, can stress plants and hinder their growth. Drip irrigation maintains a steady level of moisture around the root zone, encouraging deeper root development and stronger, more resilient plants. This consistent hydration can also lead to increased yields and more vibrant produce. It reduces the risk of fungal diseases, like powdery mildew and blight, which thrive in damp foliage, by keeping the leaves dry.
For those with busy schedules, an automated drip system provides unparalleled convenience. Once installed and programmed with a timer, your garden will be watered exactly when and how much it needs, even when you’re away on vacation. This peace of mind allows you to enjoy your garden more and worry about its basic needs less. It truly transforms gardening from a chore into a seamless, enjoyable hobby, allowing you to focus on the creative aspects of growing.
What You Need: Tools, Materials, and Considerations
Embarking on your DIY drip irrigation journey requires a careful selection of tools and materials. Most of these items are readily available at your local hardware store or online gardening suppliers. Planning ahead will ensure a smooth installation process and a highly effective system. Start by assessing the layout and size of your raised beds to determine the exact quantities of tubing and emitters required.
Essential Tools:
- Utility Knife or Tubing Cutter: For clean cuts on drip tubing.
- Hole Punch Tool: Specifically designed for pushing emitters into drip tubing.
- Measuring Tape: To accurately measure tubing lengths and emitter placement.
- Marker: For marking cut points and emitter locations.
- Gloves: To protect your hands during installation.
- Zip Ties or Landscaping Staples: For securing tubing.
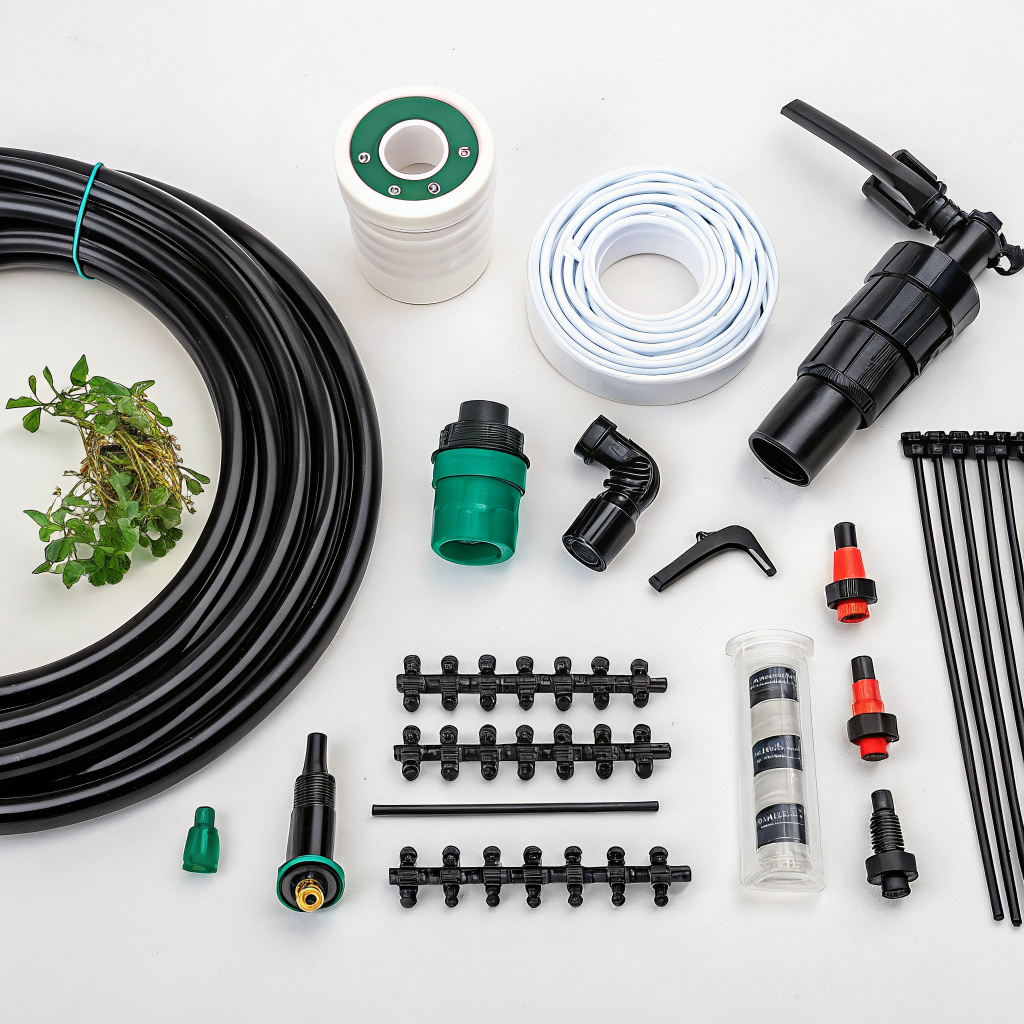
Required Materials:
- Pressure Regulator: This is crucial as most residential water pressure is too high for drip systems. A 25 PSI (pounds per square inch) regulator is commonly recommended. It protects the system from bursting.
- Filter: To prevent sediment and debris from clogging emitters, which can render your system ineffective.
- Hose Splitter (Optional): If you want to use the same spigot for your drip system and other watering needs.
- Timer (Mechanical or Digital): An essential component for automating your system. Digital timers offer more flexibility for programming.
- Main Drip Tubing (1/2″ or 3/4″): This is the backbone of your system, carrying water from the spigot to your raised beds.
- Micro Tubing (1/4″): Used to branch off from the main line to individual plants or rows.
- Drip Emitters: These come in various flow rates (e.g., 0.5 GPH, 1 GPH) and types (button emitters, adjustable drippers, micro-sprayers). Choose based on your plants’ water needs. For example, thirsty plants like tomatoes might benefit from higher flow rates or multiple emitters.
- Goof Plugs: For sealing accidental holes in the tubing or closing off emitters you no longer need.
- Fittings:
- T-Connectors: For splitting the main line.
- Elbow Connectors: For changing the direction of the main line.
- End Caps or End Plugs: To seal off the end of your main tubing runs.
- Barbed Connectors: For connecting different sections of tubing and micro-tubing.
- Threaded Connectors: To connect your system to the spigot and other components.
- Stakes or Staples: To secure the tubing to the ground in the raised beds, preventing it from shifting.
Step-by-Step Guide: Building Your DIY Drip System
Now that you have all your materials, let’s get down to the exciting part: assembling your DIY drip irrigation system for your raised beds. Follow these steps carefully for a leak-free and efficient setup. Remember, patience and proper planning are key to a successful irrigation project.
Step 1: Plan Your Layout
Before cutting any tubing, draw a detailed map of your raised beds. Mark the location of your water source (spigot), the path of your main drip tubing, and the precise spot where each plant will receive water. Consider the type of plants and their spacing. For closely spaced plants or rows, drip line (tubing with built-in emitters) might be more efficient than individual emitters. This planning phase is crucial for minimizing material waste and ensuring comprehensive coverage. Think about how many lines you need per bed and where branch lines will connect.
Step 2: Connect to the Water Source
Begin by connecting your system to the outdoor spigot. First, attach the hose splitter (if using). Then, connect the timer to the splitter or directly to the spigot. Following the timer, screw on the backflow preventer (often integrated into pressure regulators or timers), then the pressure regulator, and finally the filter. This order is important to protect your system and ensure only filtered, low-pressure water enters your drip lines. Secure all connections tightly to prevent leaks. You might also want to wrap connections with water-resistant tape for extra security.
Step 3: Lay the Main Drip Tubing
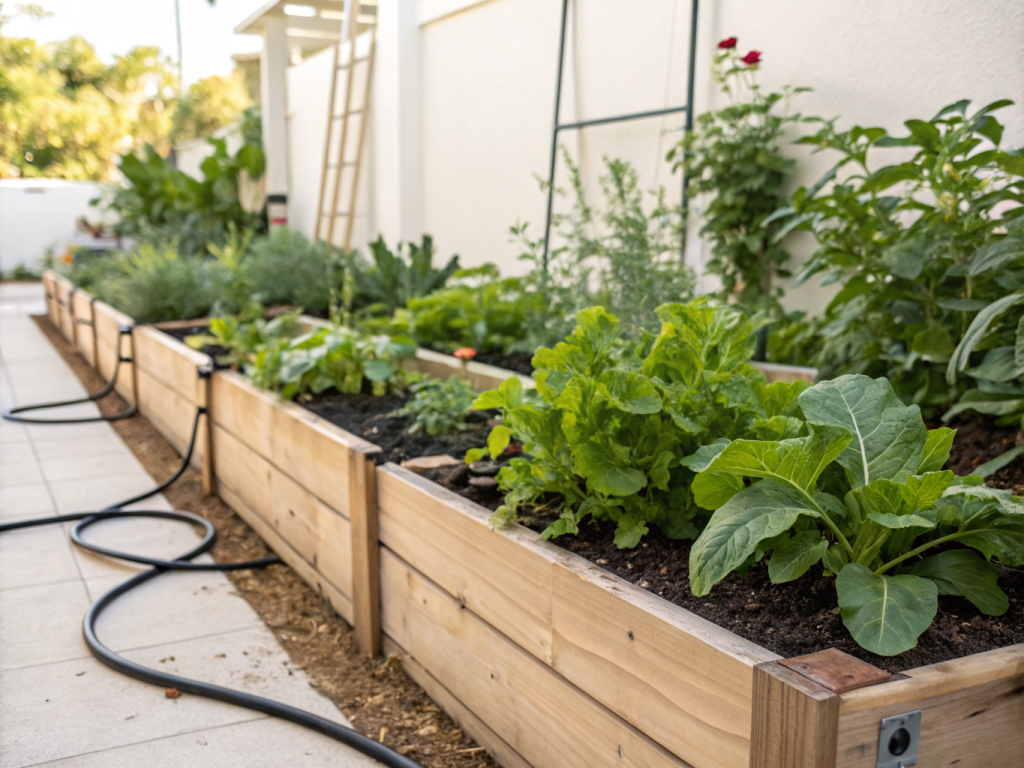
Roll out your main drip tubing (1/2″ or 3/4″) and lay it along the perimeter or down the center of your raised beds, according to your plan. Gently unroll it in the sun for an hour or so, as warm tubing is more flexible and easier to work with. Use elbow fittings for corners and T-fittings to branch off to multiple beds or sections. Cut the tubing with your utility knife or tubing cutter, ensuring clean, straight cuts. You can secure the main line with landscaping staples or zip ties to prevent it from moving, particularly in windy conditions or during gardening activities. Ensure the main line is easily accessible for future maintenance.
Step 4: Install Micro Tubing and Emitters
Once your main line is in place, it’s time to add the micro tubing and emitters. Use the hole punch tool to create small, clean holes in the main drip tubing where you want to branch off. Insert a barbed connector into each hole, then attach a length of 1/4″ micro tubing. Run the micro tubing to individual plants. At the end of each micro tubing run, insert your chosen drip emitter. For plants with higher water needs, you can use multiple emitters or higher GPH emitters. Position emitters directly at the base of each plant for optimal water delivery to the root zone. You can also use stakes to hold the micro tubing and emitters in place near the plant.
Step 5: Flush and Test the System
Before capping off your main lines, it’s crucial to flush your entire system. Turn on the water slowly and let it run for a few minutes. This will clear out any debris, such as plastic shavings, that might have entered the tubing during installation and could clog your emitters. After flushing, turn off the water and install end caps or flush valves at the end of each main tubing run. Now, turn the water back on and carefully inspect all connections and emitters for leaks. Watch to ensure all emitters are dripping evenly. Adjust emitters as needed and tighten any loose connections. This step helps identify and fix issues before they become larger problems, potentially damaging your plants or wasting water. Take note of any areas that might need more or less water as you observe the system running.
By following these detailed steps, you’ll have a functional and efficient DIY drip irrigation system for your raised beds, ready to deliver consistent moisture to your plants with minimal effort from you. This precise watering approach ensures every drop counts, promoting robust growth and beautiful harvests.
Pro Tips and Common Mistakes to Avoid
Mastering DIY drip irrigation involves more than just following instructions; it also means learning from experienced gardeners and avoiding common pitfalls. These pro tips will help you optimize your system, extend its lifespan, and ensure your plants thrive. Understanding what can go wrong helps in preventing issues before they arise.
Pro Tips for Success:
- Soak Tubing in the Sun: Before installation, lay your drip tubing in the sun for 30-60 minutes. Warm tubing is much more pliable and easier to unroll, cut, and connect, significantly reducing frustration during assembly.
- Use a Timer: An automated timer is arguably the most valuable component. It ensures consistent watering schedules, even when you’re busy or away, preventing both under and over-watering. Digital timers offer greater precision and flexibility for programming.
- Adjust Emitter Placement: Over time, as plants grow, their root systems expand. Periodically check your emitter placement and adjust them to deliver water directly to the active root zone. For larger plants, you might need two emitters.
- Mulch Heavily: Applying a thick layer of organic mulch (like straw, wood chips, or shredded leaves) over your raised beds after installing the drip system is highly beneficial. Mulch conserves soil moisture, suppresses weeds, and regulates soil temperature, making your drip system even more efficient.
- Install a Shut-Off Valve: Consider adding a separate shut-off valve at the beginning of your drip system, after the timer. This allows you to easily turn off water to the drip system for maintenance without disconnecting the timer or interfering with your main spigot.
- Zone Your Beds: If you have multiple raised beds with different plant types (e.g., herbs needing less water, vegetables needing more), consider creating separate zones. This allows for customized watering schedules and amounts for each zone, maximizing efficiency and plant health. You can achieve this with additional timers or specific zone valves.
- Regular Maintenance Checks: Make a habit of checking your system weekly during the growing season. Look for clogged emitters, leaks, damaged tubing, or misdirected water. Early detection prevents larger problems.
Common Mistakes to Avoid:
- Skipping the Pressure Regulator: This is a critical error. Without a pressure regulator, the high pressure from your household spigot will likely burst your drip tubing or blow off emitters, leading to extensive leaks and system failure. Always install a 25 PSI pressure regulator.
- Forgetting the Filter: Sediment and small particles in your water supply will inevitably clog your drip emitters, rendering them useless. A filter is a small investment that saves a lot of headaches and maintenance time.
- Over-Complicating the Design: While detailed planning is good, try to keep your initial design simple. You can always add more emitters or lines later if needed. A complex system is harder to troubleshoot and maintain.
- Not Flushing the System Initially: As mentioned in Step 5, failing to flush the system before capping lines allows debris from installation to clog emitters immediately, leading to poor performance.
- Improper Emitter Selection: Using the wrong type or flow rate of emitters can lead to either under-watering or over-watering specific plants. Research your plants’ needs and choose emitters accordingly. For instance, a shallow-rooted plant won’t need a deep-watering emitter.
- Leaving Tubing Exposed to Sun: Prolonged exposure to direct sunlight can degrade drip tubing over time, making it brittle and prone to cracking. While some exposure is inevitable, try to bury main lines shallowly or cover them with mulch whenever possible to prolong their life.
- Ignoring Leaks: Even small leaks add up to wasted water and reduced system efficiency. Address any leaks promptly by patching holes with goof plugs or replacing damaged sections of tubing or fittings.
Eco-Friendly Variations for a Greener Garden
Embracing a DIY drip irrigation system is already a step towards eco-friendly gardening, primarily due to its water-saving capabilities. However, you can enhance its environmental benefits even further with a few thoughtful modifications and practices. These variations not only reduce your ecological footprint but can also improve the overall health and sustainability of your raised beds.
Rain Barrel Integration:
One of the most impactful eco-friendly upgrades is connecting your drip system to a rain barrel. Rainwater is free, naturally soft, and devoid of the chlorine and other chemicals often found in municipal water supplies, which can be beneficial for some plants and soil microbes. To integrate a rain barrel, you’ll need; a sturdy rain barrel with a spigot at the bottom, an adapter to connect your drip system’s main line to the rain barrel spigot, and potentially a small, low-pressure pump if the barrel’s gravity feed isn’t sufficient for your system’s flow requirements. Ensure the rain barrel has a fine mesh screen over the inlet to prevent debris from clogging your drip filter.
Solar-Powered Timers:
While standard digital timers require batteries, which eventually need replacement and disposal, solar-powered timers offer a sustainable alternative. These timers have a small solar panel that recharges an internal battery, eliminating the need for regular battery changes. They function identically to their battery-powered counterparts, providing automated watering on your schedule, but with a reduced environmental impact.
Compost Tea Dosing:
For an extra boost to your plants and soil, consider incorporating a compost tea injector into your drip system. A venturi injector or a simple bucket siphon can slowly introduce diluted compost tea directly into your irrigation water. This delivers beneficial microbes and nutrients right to the root zone, improving soil health and plant vitality naturally, reducing the need for chemical fertilizers. Ensure your compost tea is well-filtered to prevent clogging emitters.
Recycled Materials:
Whenever possible, opt for components made from recycled plastics. Many manufacturers now offer drip irrigation tubing and fittings produced from post-consumer recycled content. While new materials are often necessary, seeking out recycled options for non-pressure-bearing components can contribute to a circular economy. Consider repurposing materials for stakes or tube anchors where safe and appropriate. You can also explore options for sustainable garden practices more broadly.
Permeable Landscaping Cloth:
Instead of traditional plastic weed barriers, consider using permeable landscaping cloth beneath your main drip lines or even above the soil surface. This material allows water and air to penetrate while suppressing weeds, degrading slower than plastic alternatives, and offering longer-term benefits. It also helps in keeping your raised beds tidy and weed-free, reducing the need for herbicides.
Seasonal Considerations for Drip Systems
While a DIY drip irrigation system automates watering, its effectiveness and longevity are highly dependent on seasonal adjustments and proper care. Understanding how to manage your system throughout the year ensures it performs optimally and withstands the elements. Different seasons bring different challenges and opportunities for maintenance.
Spring Readiness:
As spring approaches and temperatures rise, it’s time to bring your drip system back to life. Begin by reattaching it to your spigot, timer, and rain barrel (if applicable). Turn on the water slowly and conduct a thorough system check. Look for any damage that might have occurred during winter storage, such as cracked tubing, disconnected fittings, or rodent chew marks. Flush the system again to eliminate any debris that might have accumulated. Replace any worn-out emitters or damaged sections of tubing. Test the timer to ensure it’s functioning correctly and set your initial watering schedule based on spring planting needs and local weather forecasts. Gradually increase watering as plants grow and temperatures rise.
Summer Optimization:
Summer is peak growing season, and your drip system will be working hard. Monitor your plants and soil moisture daily, especially during hot spells or periods of low rainfall. You may need to adjust your timer settings to water more frequently or for longer durations. Keep an eye on emitter performance; clogs are more common when the system is in constant use. Regularly check for leaks, as sun exposure can soften fittings or tubing, leading to drips. Ensure emitters are still optimally placed at the base of growing plants. Maintaining a thick layer of mulch will significantly reduce the amount of water needed during intense summer heat, making your system even more efficient. Check your local gardening resources for region-specific advice on summer watering.
Autumn Adjustment:
As the weather cools and plants begin to slow their growth, it’s time to gradually reduce your watering schedule. Over-watering in autumn can lead to root rot and fungal diseases. Transition your timer settings to less frequent or shorter watering cycles. Harvest your remaining crops, and consider leaving the drip lines in place if you plan for a quick spring turnaround, but ensure they are clean. Prepare for winterization by cleaning out any remaining debris and making a mental note of any repairs needed for the following season. This transitional phase is crucial for plant health and system preparation.
Winter Winterization:
For regions with freezing temperatures, winterizing your drip irrigation system is absolutely essential to prevent damage. Water left in the lines will freeze, expand, and crack tubing, fittings, and emitters, rendering your system useless. Start by disconnecting the system from your spigot and removing the timer, pressure regulator, and filter for indoor storage. Open any drain valves or disconnect the end caps/flush valves on your main lines to allow all water to drain out. If your lines have low points, lift them to encourage drainage. Use an air compressor (with a low-pressure setting, around 20 PSI) to blow out any remaining water from the lines, being careful not to exceed the system’s pressure rating. Store components in a dry, frost-free location. This preventative measure will save you significant repair costs and hassle next spring. Check the RHS website for tips on winter garden care relevant to your plants.
Expert Resources and Further Learning
While this guide provides a comprehensive foundation for building your DIY drip irrigation system, the world of gardening and water management is vast and ever-evolving. To deepen your knowledge and hone your skills, I highly recommend exploring these expert resources. They offer valuable insights, detailed studies, and practical advice on various aspects of irrigation, plant health, and sustainable gardening practices.
- Gardening Know How – Irrigation Section: This website is a treasure trove of practical gardening information. Their irrigation section covers everything from basic drip system components to troubleshooting common issues and optimizing watering for specific plant types. It’s an excellent resource for beginners and experienced gardeners alike, offering accessible articles on virtually any gardening topic.
- The Royal Horticultural Society (RHS) – Irrigation Advice: As one of the world’s leading horticultural organizations, the RHS provides authoritative and scientifically-backed advice. Their section on irrigation offers detailed guidance on choosing the right system for different garden types, water conservation techniques, and the science behind efficient watering. It’s particularly useful for those looking for in-depth, research-based information.
- University of Minnesota Extension – Drip Irrigation: University Extension offices across the United States are fantastic sources of unbiased, research-based information, often tailored to specific regional climates and conditions. The University of Minnesota Extension’s guide on drip irrigation is a prime example, offering detailed technical information, design considerations, and practical tips from agricultural experts. They often include helpful diagrams and scientific explanations for efficacy. Starting your garden might also benefit from their advice.
By regularly consulting these reputable sources, you can stay informed about the latest best practices, troubleshoot advanced problems, and continuously improve the efficiency and sustainability of your DIY drip irrigation system. Learning is a continuous process in gardening, and these resources will undoubtedly become invaluable companions on your journey to a more productive and water-wise garden.
Conclusion: Water Smarter, Not Harder!
Congratulations! You’ve traversed the comprehensive path to understanding and building your very own DIY drip irrigation system for raised beds. From the initial planning stages to the final flush, you now possess the knowledge and confidence to transform your gardening routine. No longer will you be tethered to a watering can or hose, spending precious hours on a repetitive chore that often leads to inefficient water use and stressed plants.
Embracing a DIY drip system means embracing a more efficient, sustainable, and frankly, more enjoyable way of gardening. You’ll conserve significant amounts of water, reduce weed growth, and provide your plants with the consistent, targeted hydration they truly thrive on. This translates to healthier plants, higher yields, and more vibrant produce, all while freeing up your valuable time for other pursuits – perhaps even more gardening!
Remember that gardening is a journey of continuous learning and adaptation. Your drip irrigation system, like your garden itself, will benefit from regular observation, minor adjustments, and seasonal care. Don’t be afraid to experiment, tweak, and expand your system as your garden evolves. The initial effort you invest in planning and installation will pay dividends for years to come, offering you the profound satisfaction of a thriving, self-sufficient, and water-wise raised bed garden. So go forth, build your system, and enjoy the fruits (and vegetables!) of your smart labor. Happy gardening!
Frequently Asked Questions (FAQs) about DIY Drip Irrigation for Raised Beds
<h4>Q1: How often should I run my drip irrigation system for raised beds?</h4>
<p>A1: The frequency and duration depend on several factors: plant type, soil type, weather conditions, and the GPH (gallons per hour) of your emitters. Generally, it's better to water less frequently but for longer durations to encourage deeper root growth. For raised beds with well-draining soil, deep watering 2-3 times a week might be sufficient during peak summer. Start by observing your soil moisture 6-8 inches deep and adjust as needed. Aim for moist, not waterlogged, soil. More frequent watering for shorter periods might be needed for heat-sensitive plants or very sandy soils, while heavier soils can go longer between waterings.</p>

<h4>Q2: Can I expand my DIY drip system later if I add more raised beds?</h4>
<p>A2: Absolutely! One of the great advantages of DIY drip irrigation is its flexibility and modularity. You can easily add more main tubing lines, T-connectors, micro-tubing, and emitters to accommodate new raised beds or additional plants. When designing your initial system, it's a good idea to slightly overbuy on main tubing or include a few extra T-junctions with capped ends to make future expansion even simpler. Just ensure your water pressure and filter can handle the increased demand when expanding.</p>

<h4>Q3: What are common causes of clogging in drip emitters and how do I prevent them?</h4>
<p>A3: The most common causes of clogging are sediment in the water supply, algae growth, and mineral deposits (like calcium from hard water). Prevention is key:
    <ul>
        <li><strong>Install a Filter:</strong> This is the first line of defense against sediment. Clean the filter regularly.</li>
        <li><strong>Flush System Regularly:</strong> Especially at the beginning of the season and after any maintenance, flush the main lines to clear debris.</li>
        <li><strong>Use Clean Water Source:</strong> If using a rain barrel, ensure it has a good mesh screen to filter out leaves and other organic matter.</li>
        <li><strong>Consider Acidic Flush:</strong> For mineral buildup, some gardeners periodically run a diluted acidic solution (like white vinegar) through the system, followed by a thorough water flush. Be cautious and research this method thoroughly before attempting.</li>
        <li><strong>Replace Clogged Emitters:</strong> If an emitter is persistently clogged, it's often easiest to replace it with a new one.</li>
    </ul>
</p>

<h4>Q4: Is it better to bury the drip tubing or leave it exposed in raised beds?</h4>
<p>A4: For raised beds, a shallow burial (1-2 inches) or covering with a layer of mulch is generally recommended. Leaving tubing completely exposed to the sun can lead to several issues:
    <ul>
        <li><strong>UV Degradation:</strong> Sunlight's UV rays can make the tubing brittle over time, leading to cracks and leaks.</li>
        <li><strong>Algae Growth:</strong> Water in exposed tubing can heat up and encourage algae growth, which can clog emitters.</li>
        <li><strong>Accidental Damage:</strong> Exposed tubing is more prone to damage from garden tools, foot traffic, or curious pets.</li>
        <li><strong>Aesthetics:</strong> Buried or mulched tubing looks tidier and less intrusive in your garden.</li>
    </ul>
    Burying or mulching helps protect the tubing, maintains a more consistent water temperature, and extends the life of your system.
</p>