7 Essential Signs Your Plant Needs Repotting Right Now
Every plant enthusiast, from novice to seasoned gardener, eventually faces a universal truth: plants grow. This growth, while a joyous testament to your green thumb, often leads to a crucial juncture – the need for repotting. Ignoring these subtle or sometimes blatant repotting plants signs can lead to stunted growth, nutrient deficiencies, and even the demise of your beloved green companions. Understanding when and why to repot is not just a chore; it’s a vital act of plant care that ensures continued vitality and flourishing beauty.
In this comprehensive guide, we’ll delve deep into the seven unmistakable indicators that your plant is crying out for a new home. We’ll equip you with the knowledge and confidence to recognize these signs, understand their implications, and take timely action. By the end, you’ll be an expert at identifying when your plant has truly outgrown its current abode and be ready to provide it with the space and nutrients it deserves to thrive.
[lwptoc]
Why This Matters for Your Garden, Indoors and Out
Repotting isn’t merely about aesthetic appeal; it’s a fundamental aspect of plant health that impacts growth, nutrient absorption, and overall vigor. For indoor plants, a cramped pot can lead to a host of problems, including root bound issues that choke off essential water and nutrient uptake. For outdoor plants, especially those in containers, timely repotting prevents them from becoming root-locked, making them more susceptible to temperature fluctuations and drought.
Think of a plant’s roots as its lifeline. They anchor the plant, absorb water, and draw in vital nutrients from the soil. When these roots run out of space, they begin to circle around the container, creating a dense, tangled mass. This condition, known as being “root-bound,” severely limits the plant’s ability to take up what it needs to survive and flourish. Ultimately, neglecting to repot can lead to significantly reduced growth, yellowing leaves, and a general decline in plant health, making all your other care efforts less effective.
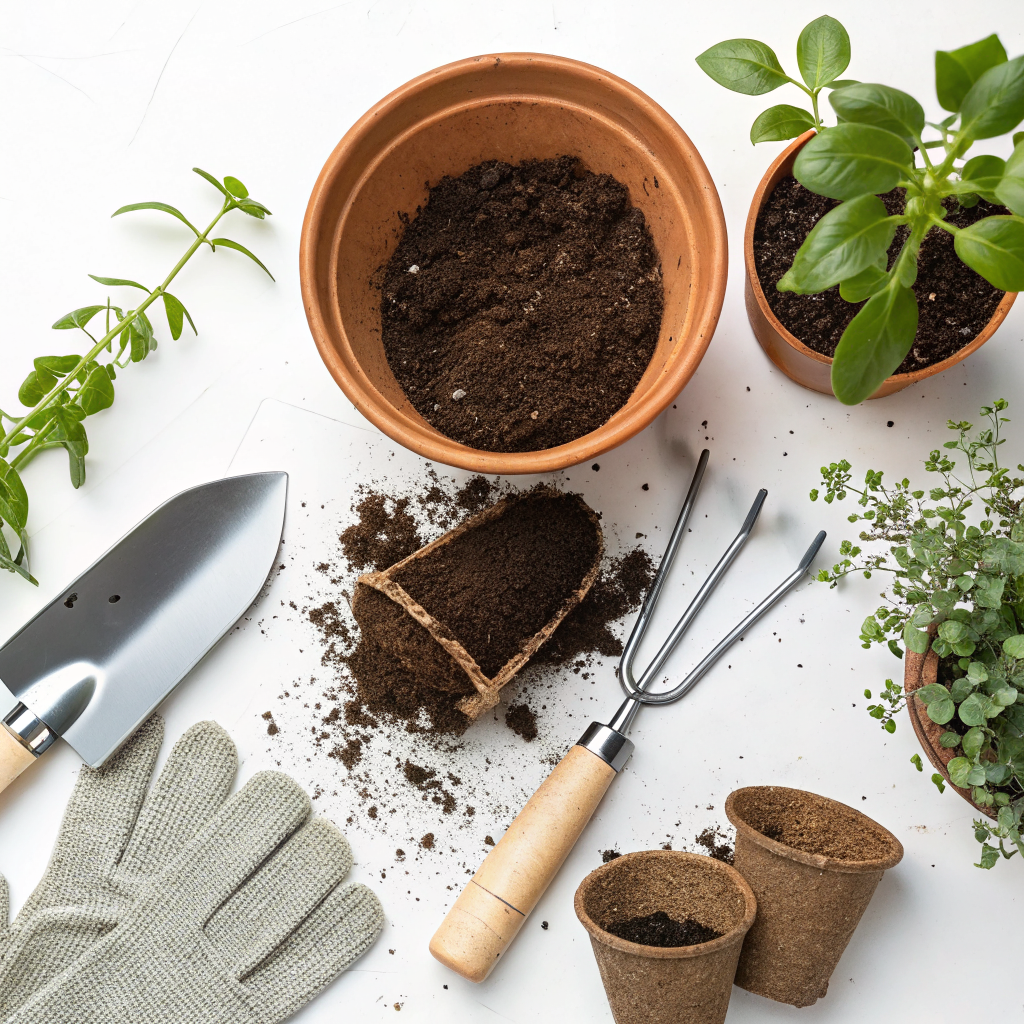
What You Need: Essential Tools and Materials for Repotting
Before you embark on your repotting adventure, gathering the right tools and materials will make the process smooth and stress-free for both you and your plant. Preparation is key to a successful repotting, ensuring minimal shock and a quick recovery for your green friend.
Tools You’ll Need:
- New Pot (1-2 inches larger in diameter): Choose a pot made from terracotta, plastic, or ceramic. Ensure it has drainage holes! Clay pots are ideal for plants that prefer drier conditions, while plastic helps retain moisture.
- Trowel or Small Shovel: For gently loosening the old soil and adding new soil.
- Gardening Gloves: To protect your hands from soil and potential irritants.
- Pruning Shears or Scissors: For trimming old or circling roots, if necessary. Make sure they are clean and sharp.
- Watering Can: To thoroughly water the plant before and after repotting.
- Newspaper or Tarp: To protect your work surface from soil spills.
Materials You’ll Need:
- Fresh Potting Mix: Select a high-quality potting mix appropriate for your specific plant type. For example, cacti and succulents need a well-draining mix, while houseplants often prefer a general-purpose mix with good aeration. Never reuse old potting soil, as it can be depleted of nutrients and harbour pests or diseases.
- Drainage Material (Optional but Recommended): A layer of gravel, broken pottery, or mesh can be placed at the bottom of the pot to prevent soil from washing out of the drainage holes and improve aeration. However, recent research suggests that a large layer of drainage material can sometimes create a perched water table, so a small mesh screen over the drainage hole is often sufficient to prevent soil loss.
- Optional: Plant Food/Fertilizer: A slow-release fertilizer can be incorporated into the new potting mix, or you can wait a few weeks before fertilizing the newly repotted plant, allowing it to acclimate.
7 Signs Your Plant Needs Repotting Right Now: A Detailed Guide
Now, let’s dive into the core of our discussion – the undeniable signals your plant sends when it’s desperately seeking a larger home. Recognizing these signs early can make all the difference in maintaining a healthy, vibrant plant.
1. Roots Growing Out of Drainage Holes
This is perhaps the most obvious and indisputable sign that your plant is root-bound. If you see roots peeking out from the drainage holes at the bottom of the pot, it means the roots have completely filled the current container and are searching for more space and moisture. It’s a clear indication that the plant’s root system has exhausted the available soil volume and is actively trying to expand beyond its confines. Ignoring this can lead to the roots becoming entangled and suffocated, hindering the plant’s ability to absorb water and nutrients efficiently. This can manifest as yellowing leaves and stunted growth, even if you’re diligently watering and fertilizing.
2. Water Drains Straight Through
When you water your plant and the water rushes straight out of the drainage holes without being absorbed by the soil, it’s a strong indicator of a root-bound plant. A dense mass of roots takes up so much space that there’s little room left for the soil to hold moisture effectively. Consequently, the soil dries out extremely quickly between waterings, regardless of how frequently you water. This rapid drainage means your plant isn’t getting adequate hydration, leading to consistent thirst and potential dehydration stress. You might notice the plant wilting shortly after watering, or the soil feeling bone dry within a day or two, even in moderate temperatures.
3. Stunted Growth or Lack of New Growth
Healthy plants, especially during their active growing season, should be putting out new leaves, stems, or flowers. If your plant, which was once a vigorous grower, has suddenly stalled, stopped producing new growth, or appears to be shrinking despite adequate light and water, it could be a cry for a larger pot. A limited root system in a small pot restricts the plant’s ability to take up sufficient nutrients to fuel new growth. The plant is essentially in “survival mode,” dedicating its resources to maintaining its existing structure rather than expanding. This can also manifest as smaller-than-usual new leaves or a general lack of overall vigor. Often, a plant grown in a pot that is too small for too long will never reach its full potential size or splendor.
4. The Plant Looks Top-Heavy or Tips Over Easily
As a plant grows, its foliage and stems expand, increasing its overall mass. If the root system, confined to a small pot, cannot adequately anchor this growing superstructure, the plant will become unstable. You might find it frequently tipping over, especially if it has tall stems or large leaves. This top-heavy appearance is a clear sign of an imbalance between the plant’s above-ground mass and its below-ground support system. Not only is this annoying, but it can also damage the plant by breaking stems or even the pot itself if it falls frequently. A larger pot provides a broader base for stability and allows the roots to spread out and firmly anchor the plant, preventing future tumbles.
5. Salt or Mineral Buildup on the Pot Surface
Over time, salts and minerals present in tap water or fertilizers can accumulate on the surface of the potting mix and on the outside of terracotta pots, forming a white or crusty residue. While a slight accumulation is normal, excessive buildup, particularly if it’s thick and widespread, indicates that the plant isn’t effectively absorbing water and flushing out these minerals. This often goes hand-in-hand with root-bound conditions, where the tightly packed roots prevent proper water distribution and drainage. High levels of salt can be toxic to plant roots, burning them and hindering nutrient uptake, leading to leaf tip burn and overall plant decline. Repotting with fresh soil helps to remove this harmful buildup and provides a fresh start for the plant.
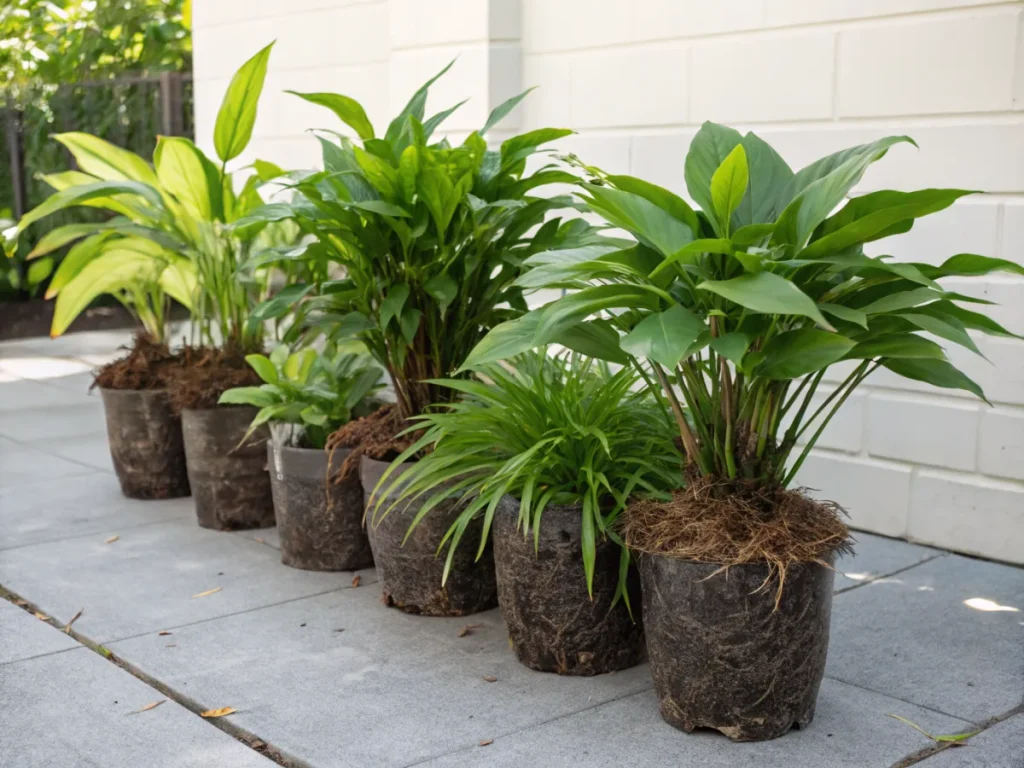
6. Roots Visible on the Soil Surface
If you see a dense mat of roots right at the surface of the potting mix, or even emerging above the soil line, it’s a definite indicator that your plant has outgrown its pot. The roots are literally running out of downward and lateral space, forcing them upwards in search of oxygen and moisture. These exposed roots are more vulnerable to drying out and damage. It also means there’s very little soil left to hold water and nutrients around the roots. This can be particularly noticeable when the soil level itself seems to be dropping, even if you haven’t removed any soil, because the roots have taken up so much volume. Gently pushing the soil aside can confirm the extensive root network just beneath the surface, revealing a tight, interwoven web.
7. Soil Dries Out Too Quickly, Even After Thorough Watering
This sign is closely related to “water drains straight through” but focuses more on the speed of drying. If you find yourself watering your plant almost constantly, and the soil still feels dry to the touch just a day or two later, even in moderate conditions, it’s a strong sign of a pot-bound plant. With a dense network of roots taking up most of the space, there’s insufficient soil volume to retain moisture. The small amount of water that is absorbed is quickly taken up by the thirsty, crowded roots, leaving the plant perpetually parched. This constant state of drought stress can severely weaken the plant and make it more susceptible to pests and diseases. A larger pot with more soil will provide a greater reservoir for water, allowing for more consistent moisture levels between waterings and giving the plant ample time to absorb hydration. For more tips on soil health, check out our guide to improving garden soil health.
Step-by-Step Repotting Guide: Giving Your Plant a New Lease on Life
Once you’ve identified that your plant needs repotting, follow these steps for a smooth transition to its new home. Remember, gentle handling is key to minimizing stress.
- Prepare Your Workspace: Lay down newspaper or a tarp to catch any spilled soil. Gather all your tools and the new pot and fresh potting mix.
- Water the Plant: Thoroughly water your plant a day or a few hours before repotting. This helps loosen the soil from the roots and makes it easier to remove the plant from its old pot, reducing root shock.
- Gently Remove the Plant: Turn the plant on its side, or even upside down while supporting the base of the stems, and gently tap the bottom of the pot. If it’s still stuck, you might need to run a thin knife or trowel around the inner edge of the pot to loosen the soil. Never pull the plant by its stems; always support the root ball.
- Inspect and Loosen Roots: Once out of the pot, gently examine the root ball. If it’s a dense, circling mass, carefully tease some of the outer roots apart with your fingers or a small trowel. You can also prune away any dead, mushy, or excessively long circling roots. Aim to untangle the roots slightly to encourage outward growth in the new pot.
- Add Fresh Potting Mix to the New Pot: Place a small amount of new potting mix at the bottom of the larger pot. If using, place a screen over the drainage hole to prevent soil loss. Ensure there’s enough soil so that when the plant is placed on top, the base of the plant sits at the same level as it did in the old pot, with about an inch or two of space from the top rim of the new pot. This space is crucial for watering.
- Position the Plant and Fill with Soil: Center the plant in the new pot. Hold it steady with one hand and begin to fill around the root ball with fresh potting mix. Gently firm the soil around the roots, removing large air pockets, but avoid compacting it too tightly. You want the soil to be snug but still allow for air and water penetration.
- Water Thoroughly: Once the pot is filled, water the plant generously until water drains from the bottom. This helps settle the soil around the roots and removes any remaining air pockets. You may need to add a little more soil after the first watering if it significantly settles. Place the plant in a spot with indirect light for a few days to help it recover from the shock.
Pro Tips and Common Mistakes to Avoid
Even with a step-by-step guide, certain nuances can make or break your repotting success. Keep these tips in mind, and avoid these common pitfalls!
Pro Tips:
- Choose the Right Time: Repot during the plant’s active growing season (typically spring or early summer). This allows the plant to recover quickly and establish roots in its new environment. Avoid repotting during dormancy or when the plant is stressed.
- Gradual Pot Size Increase: Don’t jump from a tiny pot to a massive one. Increase the pot size by only 1-2 inches in diameter. Too large a pot can lead to excess moisture retention, causing root rot, as the roots won’t be able to absorb all the water from the large volume of soil.
- Consider Pot Material: Terracotta pots are porous and allow for better airflow and quicker drying, great for plants that prefer dry feet. Plastic pots retain moisture longer, ideal for water-loving plants. Ceramic pots are decorative but less breathable.
- Observe for Stress: After repotting, your plant might show some temporary signs of stress like drooping leaves. This is normal. Provide consistent care (appropriate watering, indirect light) and avoid fertilizing for a few weeks to allow it to recover.
- Soil Level is Key: Always leave an inch or two of space between the soil line and the rim of the pot. This “headroom” prevents water and soil from overflowing when you water.
Common Mistakes to Avoid:
- Using Old or Garden Soil: Never reuse old potting mix as it’s depleted of nutrients and might harbor pests or diseases. Garden soil is too dense for most container plants and lacks proper drainage, leading to compaction and root suffocation.
- Over-Compacting Soil: While you want to firm the soil gently, pressing it down too hard removes vital air pockets necessary for root respiration. This can lead to anaerobic conditions and root rot.
- Planting Too Deep or Too Shallow: Planting too deep can cause stem rot, while planting too shallow can expose roots and make the plant unstable. Always aim for the original soil line.
- Forgetting Drainage Holes: This is a cardinal sin of container gardening. Without drainage, water accumulates at the bottom, leading to inevitable root rot. Ensure any new pot has adequate drainage.
- Over-Fertilizing Immediately After Repotting: New potting mix usually contains enough nutrients for the first few weeks. Fertilizing immediately can stress the plant’s recovering roots and lead to nutrient burn. Wait a few weeks before resuming your fertilizing schedule. For more insights on feeding your plants, explore our guide to natural fertilizers.
Eco-Friendly Variations for Repotting
Embracing sustainable practices in your gardening not only benefits the environment but can also lead to healthier plants. Here are some eco-conscious repotting considerations.
- Composting Old Potting Mix: Instead of discarding old potting mix, add it to your compost pile. While it might be depleted of nutrients for potted plants, it will break down and enrich your compost, turning into valuable organic matter for your garden beds. If you’re concerned about pests, solarizing the old soil first can help.
- Upcycling Pots: Before buying new, consider if existing containers can be reused. Clean old nursery pots thoroughly with a bleach solution (1 part bleach to 9 parts water) to sterilize them and prevent disease spread. Get creative with unconventional containers like old buckets, colanders, or even tire planters – just ensure they have adequate drainage.
- DIY Potting Mix: For the truly eco-conscious, making your own potting mix can reduce your carbon footprint and ensure you know exactly what goes into your soil. A basic recipe might include coir (a sustainable alternative to peat moss), compost, perlite, and vermiculite. Adjust ratios based on your plant’s needs.
- Sustainable Potting Materials: When buying new, opt for pots made from recycled plastics, terracotta, or biodegradable materials like coconut fiber or natural clay. Avoid single-use plastic pots where possible.
- Water Conservation: During and after repotting, be mindful of water usage. Water thoroughly but avoid excess runoff. Collect any overflow water from saucers and reuse it for other plants. Learn more about water conservation in your garden.
Seasonal Considerations for Repotting
Timing isn’t just about identifying the signs; it’s also about understanding the cyclical nature of plant life. Repotting at the right time of year can significantly impact your plant’s recovery and future growth.
- Spring: The Prime Repotting Season: For most houseplants and container-grown outdoor plants, late winter to early spring is the ideal time to repot. This is when plants are naturally emerging from dormancy and entering their most active growth phase. Their increased metabolic rate allows them to recover more quickly from the stress of repotting and readily establish new roots in their larger home.
- Early Summer: Still Feasible: Repotting can still be done in early summer, especially for fast-growing plants, as long as temperatures aren’t excessively hot. Provide extra shade and consistent moisture to mitigate transplant shock during warmer periods.
- Autumn and Winter: Generally Avoid: Avoid repotting most plants during autumn and winter. This is typically when plants are slowing down their growth or entering dormancy. Repotting during these times can cause undue stress from which the plant may struggle to recover, potentially leading to decline or even death. The plant’s energy reserves are lower, and it’s less equipped to heal root damage or establish itself in new soil.
- Exceptions: Emergencies Only: If a plant is severely root-bound, suffering from root rot, or experiencing a pest infestation that necessitates a soil change, an emergency repot might be necessary regardless of the season. In such cases, take extra precautions like providing warmth and humidity (for indoor plants) and minimizing root disturbance.
Expert Resources for Further Learning
To deepen your understanding of plant care and repotting, consider these reputable external resources:
- Gardening Know How: An excellent website with a vast library of articles covering almost every aspect of gardening. Their sections on houseplant care and repotting are particularly informative.
- Royal Horticultural Society (RHS): A world-renowned gardening charity based in the UK. Their website, rhs.org.uk, offers scientifically backed advice on all gardening topics, including detailed guides on potting and repotting specific plant types.
- University of Minnesota Extension: University extension services provide research-based information for home gardeners. The University of Minnesota Extension has comprehensive articles on houseplant care, including practical tips for successful repotting.
Conclusion
Observing the health and behavior of your plants is paramount to their longevity and vibrancy. The seven signs we’ve discussed – roots escaping drainage holes, water draining too quickly, stunted growth, top-heaviness, salt buildup, surface roots, and perpetually dry soil – are critical indicators that your plant is ready for a new home. By actively looking for these signals and understanding the implications of ignoring them, you empower yourself to be a more responsive and effective plant parent.
Repotting, while sometimes daunting, is a refreshing act of rejuvenation for your plant. It offers a fresh supply of nutrients, ample space for root expansion, and renewed stability, allowing your green companions to thrive and reach their full potential. With the right tools, knowledge, and a little bit of care, you can confidently give your beloved plants the upgrade they deserve, ensuring they continue to beautify your home and garden for years to come. Happy repotting!
Frequently Asked Questions About Repotting Plants
Q1: How often should I repot my plants?
A1: The frequency of repotting varies greatly depending on the plant type, its growth rate, and its current pot size. Fast-growing plants might need repotting annually, while slow growers might only need it every 2-3 years, or even less frequently. Always look for the specific repotting signs discussed in this article rather than sticking to a rigid schedule. Smaller pots generally require more frequent repotting than larger ones.
Q2: What is the best type of potting mix to use?
A2: The “best” potting mix depends on your specific plant. General-purpose indoor potting mixes work well for most houseplants. For succulents and cacti, choose a specialized mix designed for excellent drainage. Orchids require a very airy, bark-based mix. Always read the label and select a high-quality mix that matches your plant’s needs. Ingredients like peat moss (or sustainable coir), compost, perlite, and vermiculite contribute to good aeration and drainage.
Q3: Can I cut the roots when repotting?
A3: Yes, judicious root pruning can be beneficial, especially for severely root-bound plants. Trim away any dead, mushy, or circling roots with clean, sharp shears. The goal is to encourage new, outward growth rather than letting old, compacted roots continue to hog space. Avoid removing more than about one-quarter of the root mass, as this can severely shock the plant. For sensitive plants, just gently teasing the roots apart is sufficient.
Q4: My plant looks droopy after repotting. Is this normal?
A4: Yes, some temporary wilting or drooping after repotting is very common and known as transplant shock. The roots have been disturbed, and the plant needs time to adjust to its new environment and re-establish water uptake. Provide consistent, but not excessive, moisture, and place the plant in a spot with indirect light for a few days to ease its transition. Avoid fertilizing immediately, as this can add further stress. Most plants recover within a week or two.


