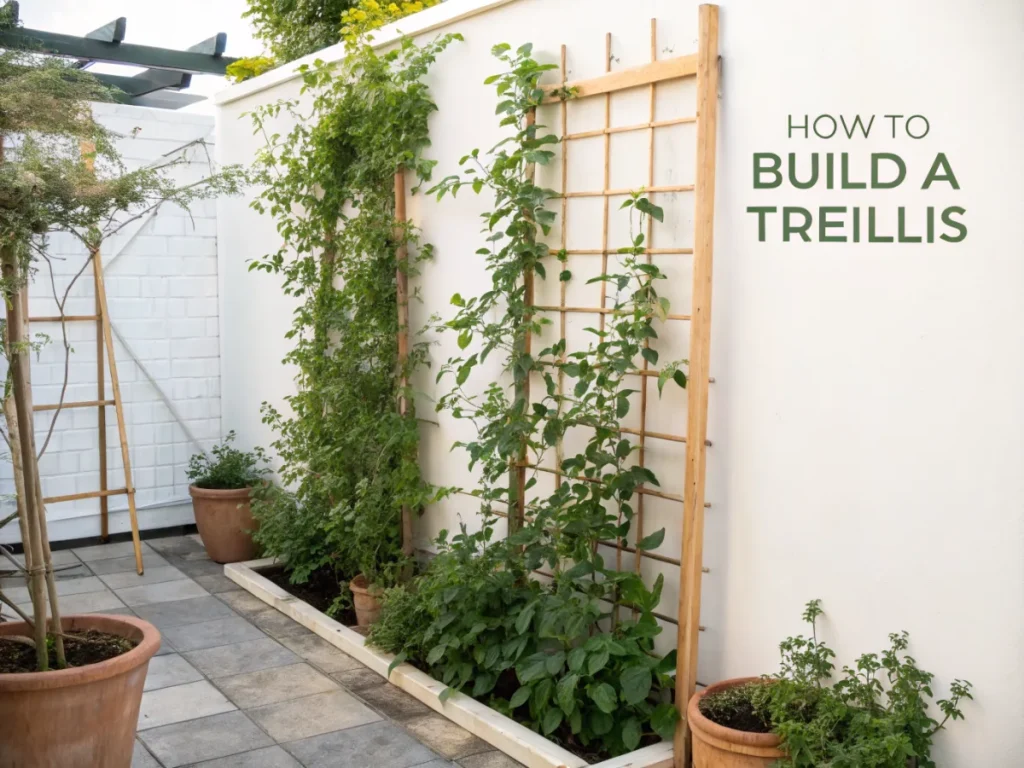
The Ultimate Guide: 7 Easy Steps to Build a Trellis for Climbing Plants
Transform your garden into a vertical masterpiece and maximize your growing space by learning how to build a trellis for climbing plants. This comprehensive DIY guide will walk you through everything you need to create sturdy, beautiful supports for your beans, cucumbers, peas, and flowering vines. Not only will a well-placed trellis enhance your garden’s aesthetic, but it will also promote healthier plant growth, improve air circulation, and make harvesting significantly easier. Get ready to embark on a rewarding weekend project!
[lwptoc]
Why This Matters for Your Garden
Incorporating trellises into your garden design offers a multitude of benefits, both practical and aesthetic. Foremost, vertical gardening allows you to cultivate a much larger yield in a smaller footprint. This is especially valuable for urban gardeners or those with limited space, transforming what would otherwise be a horizontal sprawl into an efficient, productive vertical display.
For many climbing plants, particularly fruiting varieties like cucumbers and indeterminate tomatoes, growing vertically keeps the fruits off the soil. This drastically reduces the risk of rot, pest infestations from slugs and other ground-dwelling creatures, and fungal diseases that thrive in moist, still conditions. Elevated air circulation around the foliage further contributes to plant health, making your garden more resilient.
Harvesting becomes a breeze when your produce is hanging at an accessible height, rather than sprawling on the ground. No more back-breaking searches under dense foliage! Aesthetically, trellises add significant visual interest and structure to your garden. They can be used to create living walls, provide privacy screens, or simply add height and drama to your plant arrangements. Imagine a wall of sweet peas or morning glories, bursting with color and fragrance!
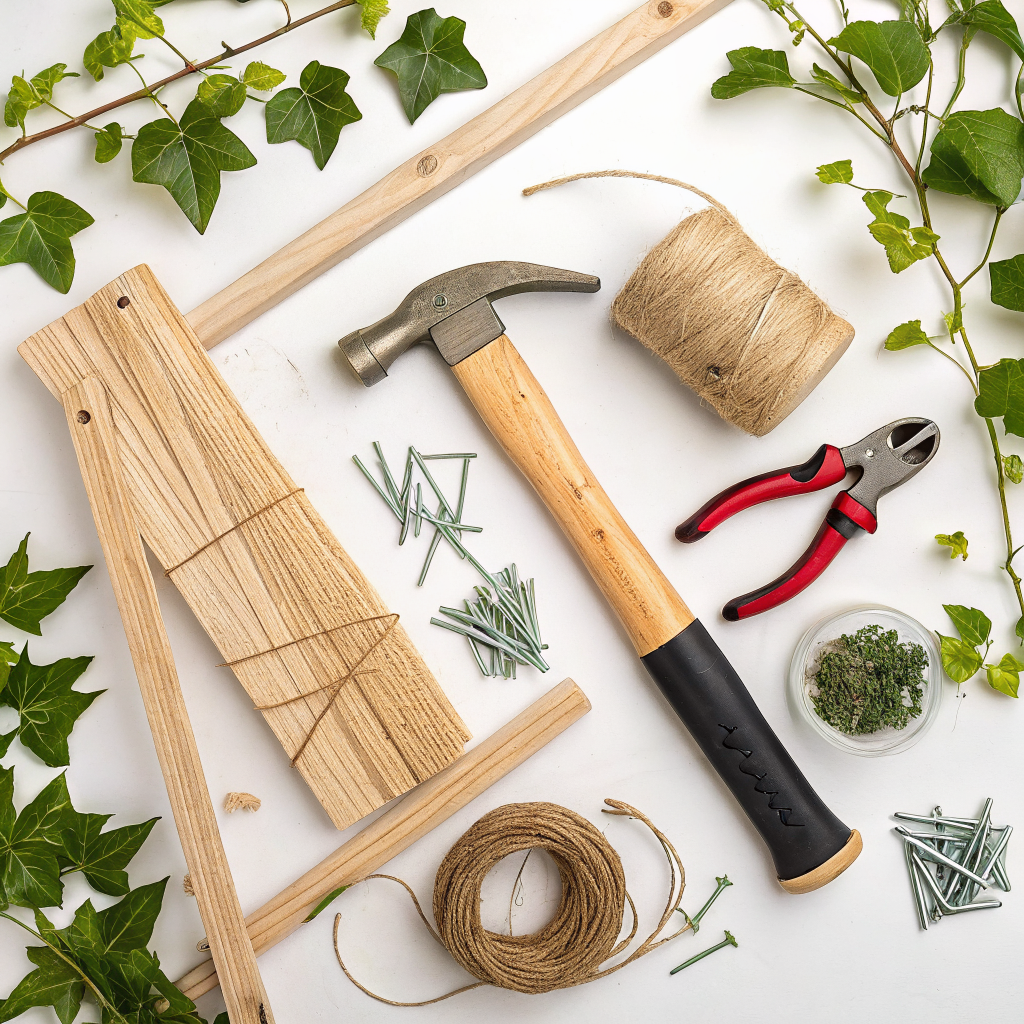
What You Need: Tools, Materials, and the Right Plants
Before you dive into construction, gathering all your tools and materials will ensure a smooth and efficient process. Selecting the right plants for your trellis is equally crucial; not all plants climb in the same way, and matching them to your trellis design will guarantee success.
Essential Tools:
- Measuring Tape: For accurate dimensions.
- Saw: Hand saw, miter saw, or circular saw for cutting lumber.
- Drill: With appropriate drill bits for pre-drilling and driving screws.
- Impact Driver (optional but recommended): Makes driving screws much easier.
- Pencil: For marking cuts and drill holes.
- Safety Glasses and Gloves: Always prioritize safety!
- Level: To ensure your trellis is plumb and square.
- Staple Gun or Wire Cutters: Depending on your chosen climbing material.
Materials for a Simple Wooden A-Frame Trellis:
- Lumber:
- (4) 2×2 or 1×2 cedar or pressure-treated lumber posts, 6-8 feet long (for the main frame).
- (2-3) 2×2 or 1×2 cedar or pressure-treated lumber pieces, 2-3 feet long (for crossbars).
- Screws: 2.5-inch exterior-grade wood screws (deck screws are ideal).
- Hinges (optional): For a foldable A-frame, choose heavy-duty outdoor hinges.
- Climbing Material:
- Garden Twine: Jute twine, sisal twine, or even cotton string.
- Hardware Cloth/Chicken Wire: Small mesh for peas, larger for cucumbers.
- Fishing Line: Strong and virtually invisible.
- Nylon Netting: Durable and reusable.
- Staples or U-nails: To attach climbing material to the frame.
- Wood Preservative/Sealer (optional): To extend the life of untreated lumber.
Best Plants for Trellises:
Understanding how plants climb is key to successful trellis design. Some twine, some cling with tendrils, and some are natural scramblers.
- Twining Plants: Wrap their stems around supports.
- Pole Beans
- Morning Glories
- Scarlet Runner Beans
- Honeysuckle
- Wisteria (needs very sturdy support)
- Tendril Climbers: Use specialized structures (tendrils) to grip.
- Cucumbers
- Peas (sugar snap, shelling)
- Gourds (smaller varieties)
- Passion Flowers
- Scramblers/Leaners: Need to be tied as they don’t climb actively.
- Indeterminate Tomatoes (require regular tying)
- Many varieties of Climbing Roses (tie to supports)
Pro Tip: When choosing lumber, cedar is naturally rot-resistant and doesn’t require chemical treatment. If using pressure-treated wood, ensure it’s rated for ground contact if your trellis will be partially buried.
Step-by-Step Guide: Building Your A-Frame Trellis
This guide focuses on building a versatile and sturdy A-frame trellis, perfect for a wide range of climbing plants. It’s relatively simple to construct and provides excellent stability.
Step 1: Measure and Cut Your Lumber
Begin by cutting your lumber according to your desired trellis dimensions. For a typical A-frame around 6 feet tall, you’ll need four main uprights and two to three crossbars. Ensure all cuts are straight and accurate. Mark your cutting lines clearly before you saw.
- Cut four pieces of 2×2 or 1×2 lumber to 6 feet each. These will be your main vertical supports.
- Cut two or three pieces of 2×2 or 1×2 lumber to 2-3 feet each. These will be your horizontal crossbars, providing stability and attachment points for the climbing material.
Step 2: Assemble the Side Frames
Lay two of your 6-foot posts parallel on a flat surface, spaced roughly 2-3 feet apart at the bottom. This will form one side of your A-frame. Place one of your shorter crossbars near the top of these two posts, leaving about 6-12 inches overhang from the top. Position another crossbar horizontally about 2 feet from the bottom. If you have a third crossbar, place it in the middle.
Using your drill, pre-drill pilot holes at each joint to prevent wood splitting. Secure the crossbars to the uprights with 2.5-inch exterior screws, driving two screws per joint for strength. Repeat this process for the second side of your A-frame.
Step 3: Connect the Two Sides (Forming the “A”)
Stand your two assembled side frames upright. If using hinges for a foldable trellis, attach a hinge to the top of one upright on each side frame, then connect them together. This allows the trellis to fold flat for storage. If not using hinges, align the tops of the two frames and secure them together with screws, effectively creating the peak of your “A”. You might need a helper to hold the frames steady during this step.
Once the tops are secured, you can temporarily brace the trellis open to its desired width at the base. The base width will determine the angle and stability of your A-frame. A wider base generally means more stability.
Step 4: Add Stability and Base Support
To enhance stability, especially if your A-frame doesn’t have hinges, you can add another crossbar near the bottom, connecting the two bottom rails that are now on the ground. This creates a more rigid structure.
Consider adding short footings or simply burying the bottom few inches of your vertical posts into the soil for extra stability. This helps prevent the trellis from tipping over in strong winds or when heavily laden with plants. Alternatively, you can use stakes driven into the ground next to the legs and secured with screws or heavy-duty zip ties.
Step 5: Attach Your Climbing Material
Now it’s time to add the “climbing” element. The choice of material depends on your plants:
- For Twining Plants (beans, morning glories): Run strong twine (jute, sisal) vertically from the bottom crossbar up to the top crossbar, or even directly to the peak of the “A”. Secure the twine tightly with staples or by tying knots. Space lines 6-12 inches apart. You can also run twine horizontally to create a grid.
- For Tendril Climbers (cucumbers, peas): Hardware cloth or nylon netting works exceptionally well. Cut your chosen material to fit the open sections of your A-frame. Stretch it taut and secure it to the wooden frame using U-nails or a staple gun. Ensure there are no sharp edges that could damage plant stems or hands. The mesh size should be appropriate for the tendrils to grip easily. A 2×4 inch mesh is excellent for cucumbers.
Remember: Think about the mature size and weight of your plants. Heavier plants like gourds might require a stronger mesh or thicker twine.
Step 6: Placement and Planting
Carefully move your completed trellis to its final location in your garden. Position it to face the sun optimally for your chosen plants, usually south-facing for maximum sunlight. If you plan to grow plants on both sides of an A-frame, orient it so both sides get good light.
Once in place, if you didn’t bury the legs, consider driving wooden stakes or metal rebar posts into the ground next to each leg and securing the legs to these stakes with screws or strong ties. This anchors the trellis firmly.
Finally, plant your seeds or seedlings at the base of the trellis. Gently guide the young plants towards the climbing material as they grow, helping them get established. For some plants, like tomatoes, you’ll need to periodically tie the main stem to the trellis as it grows.
You can find more detailed planting instructions and care tips for specific climbing plants on nouvelles-technologie.com/garden-plant-care-guides/.
Pro Tips and Common Mistakes
Building a trellis is straightforward, but a few expert tips can make your project even more successful and durable. Avoiding common pitfalls will save you time and frustration in the long run.
Pro Tips:
- Pre-Drill Pilot Holes: Always pre-drill holes in wood before driving screws, especially close to the ends of boards. This prevents splitting and ensures a stronger joint.
- Use Exterior Grade Hardware: Only use screws, hinges, and staples that are rated for outdoor use. Galvanized or stainless steel hardware resists rust and prolongs the life of your trellis.
- Consider Location Carefully: Think about sunlight, prevailing winds, and access for watering and harvesting. A trellis heavily laden with plants can act like a sail in strong winds, so ensure it’s securely anchored.
- Match Trellis to Plant: Ensure the support structure (mesh size, twine thickness) is appropriate for the climbing mechanism and mature weight of your plants. Fine tendrils need thin supports; heavy gourds need robust mesh.
- Paint or Stain for Longevity: If using untreated wood, applying an exterior paint or wood sealer will protect it from the elements and extend its lifespan. Choose non-toxic, plant-safe options.
- Foldable for Storage: An A-frame trellis with hinges at the top is easy to fold flat and store over winter, protecting it from snow and ice and prolonging its life.
Common Mistakes to Avoid:
- Insufficient Anchoring: A common oversight is not securing the trellis firmly to the ground. A strong gust of wind can topple a heavily laden trellis, damaging both the structure and your plants. Always anchor it well.
- Using Untreated or Indoor Wood/Hardware: Standard untreated pine or indoor screws will quickly rot and rust outdoors, leading to premature failure of your trellis. Invest in exterior-grade materials.
- Too-Small Trellis: Underestimating the mature size of your plants is easy to do. A trellis that’s too small will quickly become overrun, leading to crowding, poor air circulation, and a stressed plant. Aim for a trellis that’s adequately sized for the mature plant.
- Wrong Climbing Material: Using thick twine for delicate pea tendrils or fine mesh for heavy melons will not work. Research your plants and choose appropriate climbing aids.
- Ignoring Maintenance: Even the sturdiest trellis benefits from annual inspection. Check for loose screws, frayed twine, or signs of rot. Make repairs promptly.
Eco-conscious Note: When choosing wood preservatives or paints, look for low-VOC (Volatile Organic Compound) options to minimize environmental impact.
Eco-Friendly Variations and Materials
Gardening is inherently about nurturing nature, and building your trellis with eco-friendly materials takes this a step further. You can reduce your environmental footprint while still creating a beautiful and functional support structure.
- Reclaimed Wood: Source discarded pallets, old fence panels, or construction scraps. Always ensure the wood is free of harmful chemicals (especially if it’s an older pallet, which might have been treated with pesticides). Disassemble carefully and sand away any splinters. Check out nouvelles-technologie.com/upcycling-garden-ideas/ for more creative ideas.
- Bamboo: A highly sustainable and fast-growing resource, bamboo canes make excellent trellis materials. You can tie them together with twine to create a tepee, A-frame, or ladder-style trellis. They are naturally strong and moderately rot-resistant.
- Willow Branches: If you have access to willow, its flexible branches can be woven into beautiful, rustic trellises. This is a biodegradable option that blends seamlessly with natural garden aesthetics.
- Natural Twine: Opt for jute, hemp, or sisal twine instead of synthetic nylon. These biodegrade at the end of the season and can often be composted.
- Metal Rebar/Electrical Conduit: While not a wood option, salvaged rebar or electrical conduit can be bent and welded (or simply lashed together with heavy-duty ties) into extremely durable, long-lasting trellises. These can be painted to protect against rust. Consider checking local metal scrap yards.
- Living Trellises: Consider growing a sturdy, perennial woody vine (like a grape vine or certain climbing roses) to eventually act as a “living” trellis for smaller annual climbers. This is a long-term project but incredibly rewarding.
Sustainability Tip: When using natural materials like bamboo or willow, remember they will eventually break down. This is part of their eco-friendliness, but it means they might need replacement every few years compared to more durable materials.
Seasonal Considerations for Your Trellis
A trellis is not just a seasonal structure; its care and management vary throughout the year to maximize its lifespan and plant productivity. Understanding these seasonal tasks will ensure your trellis serves you well for many growing cycles.
Spring: Installation and Planting
- Install/Set Up: If you built your trellis over winter or stored a foldable one, spring is the time to set it up. Ensure it’s sturdy and well-anchored before planting.
- Inspect and Repair: Check for any winter damage – loose screws, frayed netting, or signs of rot. Make necessary repairs before plants begin to grow.
- Planting: Plant seeds or seedlings at the base of the trellis according to your local last frost date. Gently guide new growth towards the supports.
Summer: Growth and Maintenance
- Guiding Plants: As plants grow, continue to gently guide their tendrils or stems onto the trellis. Some plants (like indeterminate tomatoes) will need to be tied regularly with soft ties or twine to prevent them from flopping over.
- Pest and Disease Check: Vertical growth generally improves air circulation, reducing disease pressure, but always be vigilant. Inspect both sides of the leaves and stems.
- Harvesting: Enjoy the ease of harvesting! Regular harvesting encourages more production from fruiting plants.
- Watering: Plants on trellises can sometimes dry out faster, especially if exposed to more wind. Monitor soil moisture carefully.
Autumn: Harvest and Takedown/Cleaning
- Final Harvest: Gather all remaining produce before the first hard frost.
- Plant Removal: Once plants are done for the season, cut them down at the base. For annuals, remove them completely from the trellis and compost them (unless they show signs of disease, in which case dispose of them to prevent spread).
- Cleaning: For reusable climbing materials like nylon netting or hardware cloth, clean them thoroughly with a dilute bleach solution or soapy water to kill any lingering pathogens before storing.
- Takedown/Winterize: If your trellis is foldable, clean it thoroughly and store it in a shed or garage to protect it from winter elements. If it’s a permanent structure, ensure all parts are secure, and consider applying a fresh coat of sealant or paint if needed.
Winter: Planning and Repairs
- Planning: Use the dormant season to plan your next growing season. What worked well on the trellis? What could be improved? Research new climbing plant varieties.
- Repairs (for permanent structures): If your trellis remains outside, winter is a good time to make any major structural repairs without disrupting plants. Check for frost heave or damage from heavy snow.
- Build New: If you’re expanding your vertical garden, winter is the perfect time to build new trellises indoors, ready for spring planting. You can discover more DIY projects for your garden at nouvelles-technologie.com/diy-garden-projects/.
Expert Resources for Advanced Trellis Building and Climbing Plant Care
To deepen your knowledge and refine your vertical gardening skills, here are some excellent resources from trusted gardening organizations:
- Royal Horticultural Society (RHS) – Climbers and Wall Shrubs: A comprehensive guide from the RHS on various types of climbing plants, their growth habits, and appropriate supports. This resource is invaluable for selecting the right plant for your trellis design and understanding specialized care.
- University of Minnesota Extension – Vegetable Gardening for Beginners (Support and Staking Section): This university extension site offers practical, research-based advice on supporting vegetable plants, including diagrams and explanations of different trellising methods suitable for common garden vegetables.
- Gardening Know How – Trellising Container Plants: If you’re exploring vertical gardening in pots or raised beds, this article from Gardening Know How provides specific tips and considerations for trellising plants grown in containers, which often require lighter-weight or specialized supports.
Conclusion
Building a trellis for climbing plants is an incredibly rewarding DIY project that offers both practical benefits and aesthetic appeal to your garden. From maximizing your growing space and improving plant health to making harvesting a joy, a well-constructed trellis is a true garden asset. By following these steps and incorporating eco-friendly practices, you can create a durable and beautiful support system that will serve your climbing plants for seasons to come. So, gather your materials, put on your work gloves, and get ready to elevate your gardening experience!
FAQ: Building a Trellis for Climbing Plants
Q1: What’s the best wood for a DIY trellis?
A1: Cedar is an excellent choice due to its natural rot resistance and attractive appearance. Pressure-treated lumber is also durable for outdoor use. If you opt for untreated pine or fir, ensure you apply a good quality exterior wood sealer or paint to prolong its life.
<p><strong>Q2: How tall should my trellis be?</strong></p>
<p>A2: The ideal height depends on the mature size of the plants you intend to grow. For most beans, peas, and cucumbers, a 5-7 foot tall trellis is sufficient. For vigorous climbers like certain gourds or indeterminate tomatoes, you might need 7-8 feet or more. Always check the plant's mature height on the seed packet or plant tag.</p>

<p><strong>Q3: Can I use a trellis for tomatoes?</strong></p>
<p>A3: Yes! Trellises are fantastic for indeterminate tomato varieties. However, tomatoes don't "climb" in the traditional sense; they are scramblers. You'll need to periodically tie the main stem of the tomato plant to the trellis as it grows to provide support. A sturdy A-frame or ladder-style trellis works well for tomatoes.</p>

<p><strong>Q4: How do I make my trellis last longer?</strong></p>
<p>A4: To extend your trellis's lifespan, use exterior-grade, rot-resistant wood and hardware. Apply a wood sealer or exterior paint every few years. If possible, clean and store foldable trellises indoors during the harshest winter months. Ensure it's well-anchored to prevent damage from wind.</p>