The Ultimate 7-Step Guide to Urban Beekeeping: Getting Started in the City
The hum of a healthy bee colony is a symphony of nature, and increasingly, city dwellers are discovering the joy and benefit of hosting these incredible pollinators. Urban beekeeping getting started might seem daunting at first glance, but with the right knowledge and a dash of dedication, it’s an incredibly rewarding endeavor. This comprehensive guide will walk you through everything you need to know to establish your own buzzing oasis amidst the concrete jungle, contributing to local biodiversity and perhaps even harvesting your own golden honey.
[lwptoc]
Why Urban Beekeeping Matters for Your Garden and Beyond
Bees are crucial keystone species, responsible for pollinating a significant portion of the world’s food crops and wild plants. In urban environments, natural habitats are fragmented, and traditional pollinator populations often struggle due to pesticide use and lack of forage. By engaging in urban beekeeping getting started, you directly contribute to strengthening local ecosystems.
For your own garden, the benefits are immediate and tangible. Bees enhance the pollination of fruit trees, berry bushes, and vegetable plants, leading to higher yields and healthier produce. Imagine plump tomatoes, abundant squash, and sweet berries, all thanks to your buzzing companions.
Beyond the garden gate, urban bees help diversify the genetic pool of local pollinators and raise public awareness about their plight. They encourage a deeper connection to nature and foster a sense of environmental stewardship within your community. Plus, there’s the undeniable allure of fresh, raw honey, infused with the unique floral essence of your neighborhood.
What You Need: Essential Tools, Materials, and Pollinator Plants
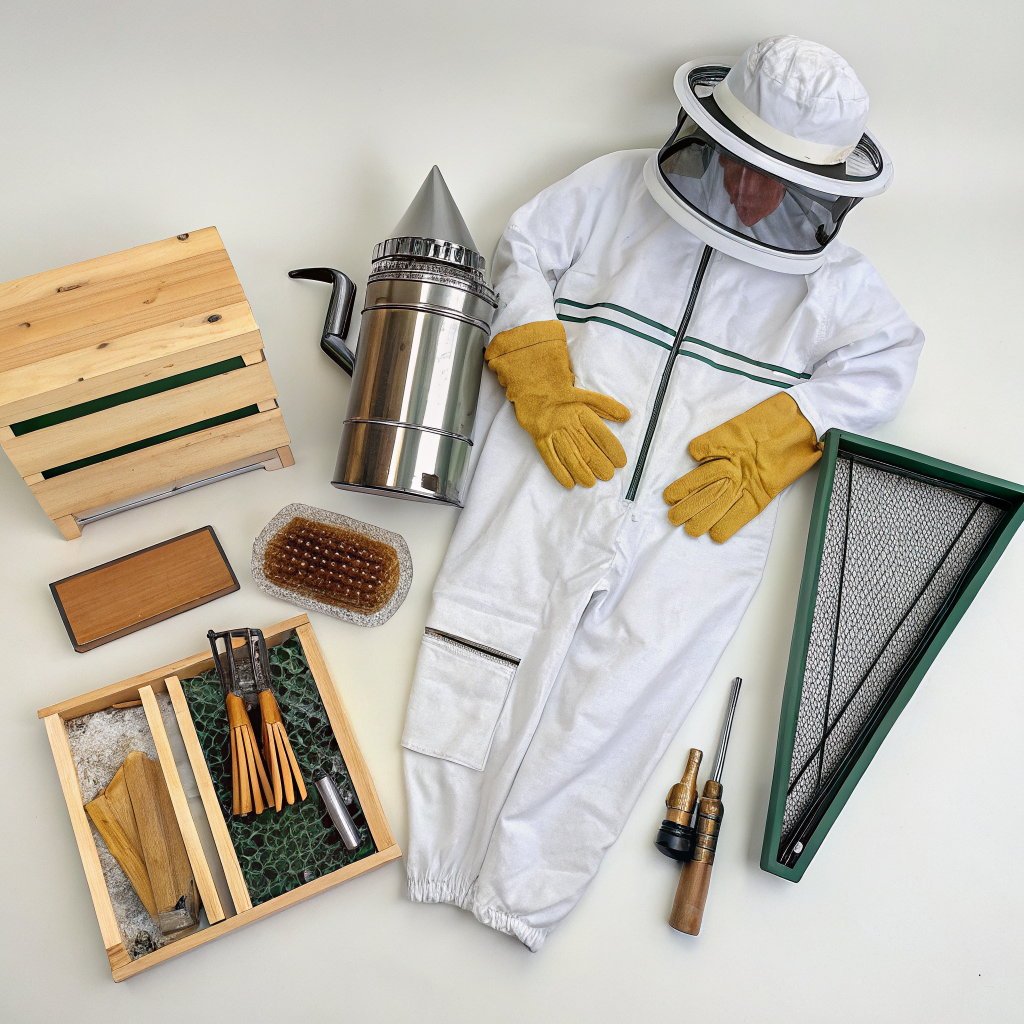
Before welcoming your first colony, you’ll need to gather some essential equipment. Investing in quality gear from the outset will make your beekeeping journey smoother and safer. Prioritizing safety and the well-being of your bees is paramount.
Essential Beekeeping Gear:
- Hive Components:
- Hive Body (Brood Boxes): This is where the queen lays eggs and the young bees develop. You’ll typically start with one or two deep boxes.
- Supers (Honey Boxes): Shallower boxes placed above the brood boxes where bees store surplus honey.
- Frames and Foundation: Each box contains frames, which hold the wax foundation where bees build their comb.
- Inner Cover: Provides insulation and creates a bee space above the frames.
- Outer Cover: Protects the hive from weather elements.
- Bottom Board: The base of the hive, often with a screened option for ventilation and pest monitoring.
- Protective Gear:
- Beekeeping Suit or Jacket: Essential for preventing stings. Look for good ventilation.
- Gloves: Thick, elbow-length gloves protect your hands and wrists.
- Veil: Crucial for protecting your face and neck from stings.
- Tools:
- Hive Tool: A versatile metal tool used for prying hive components apart, scraping propolis, and lifting frames.
- Smoker: Used to calm bees by mimicking a forest fire, prompting them to fill their bellies with honey.
- Bee Brush: Gently moves bees without crushing them.
- Feeder: For providing sugar syrup, especially important when establishing a new colony or during dearth periods.
- Entrance Reducer: Controls the size of the hive entrance, useful for protecting weak colonies from robbers.
Sourcing Your Bees:
You can acquire bees as a Nuc (nucleus colony), a package, or even by catching a swarm. A Nuc is often recommended for beginners as it’s a small, established colony with a queen, brood, and resources, giving them a head start. Purchase from reputable local suppliers to ensure healthy, locally adapted bees.
Pollinator-Friendly Plants for Your Urban Oasis:
Even if you don’t have a large yard, container gardens, window boxes, and small perennial beds can make a big difference. Focus on plants that provide continuous bloom from early spring to late autumn. Consider a beginner’s guide to urban gardening to maximize your space.
- Herbs: Lavender, Rosemary, Thyme, Borage, Mint, Basil, Sage.
- Wildflowers: Coneflowers (Echinacea), Black-Eyed Susans, Asters, Goldenrod, Sunflowers.
- Flowering Shrubs and Trees: Lilac, Serviceberry, Redbud, Fruit trees (apple, cherry, pear).
- Annuals: Zinnias, Cosmos, Marigolds, Phacelia.
- Clover: White clover and crimson clover are excellent ground cover and forage.
Ensuring a consistent food source is vital for your colony’s health, particularly in urban areas where natural foraging opportunities can be patchy. For more on creating diverse habitats, check out this guide on small space gardening ideas.
Step-by-Step Guide: Your Journey into Urban Beekeeping
Step 1: Check Local Regulations and Permit Requirements
This is arguably the most crucial initial step. Beekeeping in urban areas is subject to local ordinances, which vary widely by city, county, and even neighborhood associations. Some cities welcome urban beekeeping with open arms, while others have strict rules regarding hive placement, number of hives, or require permits and inspections. For example, some may mandate specific fence heights or water sources. Contact your local city council, agricultural extension office, or urban beekeeping associations for precise guidelines. Ignoring this step could lead to fines or the forced removal of your bees.
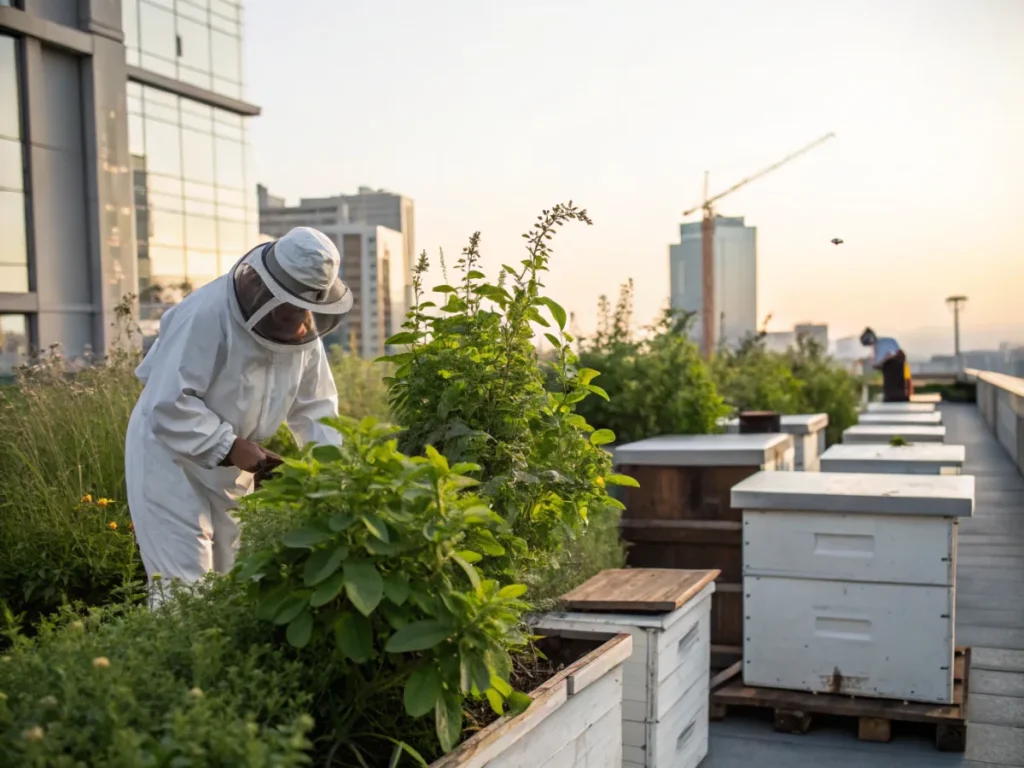
Step 2: Find the Perfect Location for Your Hive
Selecting the right spot for your hive is critical for both the bees’ well-being and your convenience. Consider these factors:
- Sunlight: Hives need morning sun to encourage early foraging and help warm the hive. Afternoon shade can prevent overheating in hot climates. Aim for 6-8 hours of sunlight.
- Accessibility: You’ll need easy access for inspections and maintenance. Don’t place it somewhere you have to move heavy objects or navigate tricky terrain.
- Water Source: Bees need a constant, clean water source. If one isn’t naturally available nearby, provide a shallow dish with pebbles or moss so they don’t drown.
- Flight Path: The hive entrance should face away from high-traffic areas like doorways, sidewalks, or children’s play areas. Bees typically fly out and up, so ensure their flight path isn’t obstructed or put them in direct conflict with human activity.
- Wind Protection: Shield your hive from strong winds, especially in winter. A fence or hedge can provide a good windbreak.
- Neighborly Considerations: Even with regulations met, consider your neighbors. A tall fence or hedging around the hive can direct bee flight paths upwards, making them less noticeable. A sign informing them of your hobby can also help.
Step 3: Assemble and Set Up Your Hive
Once you have your equipment, it’s time to assemble your hive. Most hive components come as flat-pack kits. Follow the manufacturer’s instructions carefully for assembly. Ensure all joints are tight and secure. Painting the exterior of your hive with light-colored, non-toxic, outdoor paint will help protect it from the elements and regulate internal temperature. It’s best to set up your hive in its final location before your bees arrive. Use a hive stand to keep the bottom board off the ground, preventing moisture and pest issues.
Step 4: Introduce Your Bees to Their New Home
This is an exciting moment! If you’ve purchased a Nuc, the process is relatively straightforward. Gently transfer the frames from the Nuc box into your hive body, ensuring the queen and all bees are moved. If you have a package, you’ll need to transfer the queen cage first, allowing the worker bees a day or two to accept her before releasing her into the hive. Always wear your protective gear and use a smoker during this process to keep the bees calm. Provide sugar syrup immediately to help them establish themselves.
Step 5: Regular Inspections and Colony Management
Regular hive inspections are crucial for monitoring colony health and productivity. Aim for inspections every 1-2 weeks during the active season, less frequently in cooler weather. During inspections, you’ll be looking for:
- Presence of the Queen: Look for the queen herself, or evidence of her presence, such as eggs and young brood.
- Brood Pattern: A healthy queen lays eggs in a solid, consistent pattern.
- Food Stores: Ensure they have enough honey and pollen.
- Pests and Diseases: Check for signs of Varroa mites, wax moths, American foulbrood, or other issues. Learn about common bee diseases.
- Space: Add more supers as the colony grows to prevent swarming due to overcrowding.
Record your observations in a beekeeping journal; this helps you track progress and identify trends. Educate yourself on common bee concerns through reliable sources such as Gardening Know How’s beekeeping section.
Pro Tips and Common Mistakes to Avoid
Pro Tips for a Thriving Urban Apiary:
- Join a Local Beekeeping Association: This is invaluable. Experienced beekeepers can offer tailored advice, mentorship, and support specific to your region’s challenges.
- Start Small: Begin with one or two hives. This allows you to learn the ropes without being overwhelmed.
- Educate Yourself Continuously: Beekeeping is a lifelong learning process. Read books, attend workshops, and stay updated on best practices.
- Mind the Neighbors: Good communication (and perhaps a jar of fresh honey!) can go a long way in fostering good relationships. A well-placed tall fence or tall shrubs can direct bees upwards and away from direct contact with curious neighbors.
- Provide Water: As mentioned, a consistent, shallow water source prevents your bees from seeking it in less desirable spots like swimming pools or pet bowls.
- Plant for Pollinators: Even small contributions of bee-friendly plants in containers can significantly help your colony and others.
- Practice IPM (Integrated Pest Management): This holistic approach helps manage pests and diseases with minimal chemical intervention, crucial for healthy bees.
Common Mistakes to Avoid:
- Skipping Local Regulations: This can lead to serious headaches and the potential loss of your hives.
- Not Wearing Protective Gear: Even the calmest colony can surprise you. A single sting can make you jittery for future inspections. Safety first!
- Over-inspecting: While regular checks are necessary, opening the hive too often stresses the bees, disrupts their work, and can lead to cooling of the brood.
- Under-inspecting: Conversely, neglecting inspections can allow problems like mites, disease, or swarming preparations to go unnoticed until it’s too late.
- Not Providing Adequate Resources: Especially for new colonies, ensure they have sufficient food (sugar syrup) and space to grow. Without enough room, they’ll swarm, leaving you with a smaller colony.
- Using Pesticides in Your Garden: This is a direct threat to your bees. Choose organic pest control methods.
- Giving Up Too Soon: Beekeeping has its challenges. Expect some setbacks, learn from them, and persevere.
Eco-Friendly Variations for the Urban Beekeeper
For those committed to sustainable practices, several eco-friendly variations can enhance your urban beekeeping experience. These methods often focus on minimizing intervention and fostering resilient, self-sufficient colonies.
- Top Bar Hives and Warre Hives: These alternative hive designs are often preferred by natural beekeepers. Top bar hives consist of a single long box with bars on which bees build natural comb without foundation. Warre hives mimic a tree cavity and encourage bees to build downward. Both require less equipment and allow bees to build comb naturally, though honey harvesting can be different.
- Foundationless Beekeeping: Even with Langstroth hives, you can opt for foundationless frames. This allows bees to draw out comb naturally, which some believe leads to healthier bees and a more natural hive environment.
- Treatment-Free Beekeeping: This approach avoids chemical treatments for pests like Varroa mites. Instead, it relies on selecting resilient bee genetics, strong colony management, and hygienic practices. This is often an advanced technique, and beginners should proceed with caution and expert guidance.
- Native Bee Hotels: While urban beekeeping focuses on honey bees (Apis mellifera), don’t forget about native pollinators. Installing a native bee hotel (for solitary bees like mason bees and leafcutter bees) complements your honey bee efforts and supports local biodiversity without the need for intensive management.
Embracing these eco-friendly methods aligns perfectly with the principles of urban permaculture. They reduce your environmental footprint and support the natural instincts of bees.
Seasonal Considerations for Urban Beekeepers
Beekeeping is a year-round commitment, with different tasks and considerations for each season, even in the city.
Spring: Growth and Swarming
Spring is a time of rapid growth. Your queen will begin laying eggs prolifically, and the colony will expand quickly. This is when you need to be vigilant about swarming. Provide ample space by adding supers as needed. Continue feeding sugar syrup if nectar flows are low. Inspect frequently for swarm cells. This is also a good time to introduce new packages or Nucs.
Summer: Nectar Flow and Honey Harvest
Summer is the peak nectar flow season in most regions. Bees will be working tirelessly, bringing in nectar and pollen. Ensure your colonies have enough space for honey storage. This is when you’ll likely perform your first honey harvest! Continue monitoring for pests and diseases, especially after a strong nectar flow which can mask weaker colonies. Think about your sustainable gardening practices to help your bees thrive.
Autumn: Preparation for Winter
As summer wanes, bees begin preparing for winter. They will reduce brood rearing, and the colony size will shrink. Your focus shifts to ensuring they have enough honey stores to survive the cold months. Consolidate your hives, remove any excess supers, and consider mite treatments if necessary. Protect the hive from robbing by reducing the entrance. Provide a protein supplement if natural pollen sources become scarce.
Winter: Survival and Protection
In most urban environments, bees cluster tightly to stay warm. Resist the urge to open the hive too often, as this releases precious heat. Ensure the hive is well-insulated, protected from wind, and has adequate ventilation to prevent moisture buildup. You might need to provide emergency sugar candy or fondant. Monitor for signs of starvation or dwindling populations. Winter often presents the greatest challenge for colony survival, so thorough autumn preparation is key.
Expert Resources for Your Urban Beekeeping Journey
Learning from experienced beekeepers and reputable organizations is crucial for success. Here are some excellent resources:
- Your Local Beekeeping Association: Often the best first point of contact. They offer classes, mentorship, and advice tailored to your specific climate and urban environment.
- National Beekeeping Organizations: For comprehensive guides, research, and best practices.
- University Extension Services: Many universities have excellent apiculture programs and resources. For example, the University of Minnesota Extension offers extensive information on bees and pollinators.
- Reputable Books and Websites: Look for authors with decades of experience. Websites like The Royal Horticultural Society (RHS) provide valuable insights into supporting bee health through gardening. For general gardening and beekeeping topics, Gardening Know How is another excellent resource.
Conclusion
Embarking on the journey of urban beekeeping getting started is a profound commitment to environmental stewardship and a deeply rewarding personal experience. It brings a unique connection to nature right to your doorstep, enriching your garden and contributing to the ecological health of your city. While it requires dedication, continuous learning, and adherence to local regulations, the benefits far outweigh the challenges.
From the first sight of your bustling colony to the sweet taste of your homegrown honey, each stage of beekeeping offers insights into the intricate world of these incredible insects. By providing a safe haven and a steady food source, you become a vital part of the solution to pollinator decline, demonstrating that even in the heart of urbanity, nature can thrive. So, gather your gear, educate yourself, and prepare to welcome the wonderful world of bees into your life!
Frequently Asked Questions About Urban Beekeeping
Q: Is urban beekeeping legal everywhere?
A: No, beekeeping regulations vary significantly by city, county, and even homeowners’ associations. It is crucial to check your local ordinances before acquiring bees. Some areas ban it, some restrict it (e.g., number of hives, fence height), and others welcome it.
<p><strong>Q: How much space do I need for urban beekeeping?</strong></p>
<p>A: You don't need a huge yard. A small patch of ground for one or two hives, or even a rooftop, can suffice. The key is to have enough space for the hive itself, a clear flight path for the bees, and some open area for you to work comfortably and safely during inspections.</p>

<p><strong>Q: Will my urban bees sting my neighbors?</strong></p>
<p>A: Bees are generally docile and only sting when they feel threatened, or their hive is in danger. Good hive placement (facing away from busy areas, with an upward-directed flight path) and proper management significantly reduce the chances of stings. Informing your neighbors and offering them honey can also foster understanding.</p>

<p><strong>Q: How much honey can I expect from an urban hive?</strong></p>
<p>A: Honey yields vary greatly depending on factors like colony strength, local forage availability, weather, and hive management. A strong, healthy urban hive can produce between 30-60 pounds (13-27 kg) of surplus honey in a good year, after the bees have stored enough for themselves. Some years may yield less, and the first year typically focuses on colony establishment rather than a large harvest.</p>


