The Ultimate 7-Step Guide to Your DIY Vertical Pallet Garden for Small Spaces
Are you yearning for a vibrant garden but space is a constant constraint? Do you dream of fresh herbs, colorful flowers, or even a small salad patch, but your balcony or patio feels too tiny? Look no further! This comprehensive guide will walk you through creating your very own DIY vertical pallet garden, transforming an overlooked corner into a lush, productive green space. It’s an eco-friendly, budget-conscious project perfect for any DIY enthusiast, whether you’re a seasoned gardener or just starting out. Get ready to breathe new life into your small outdoor area and enjoy the satisfaction of growing your own greens!
[lwptoc]
Why a DIY Vertical Pallet Garden Matters for Your Space
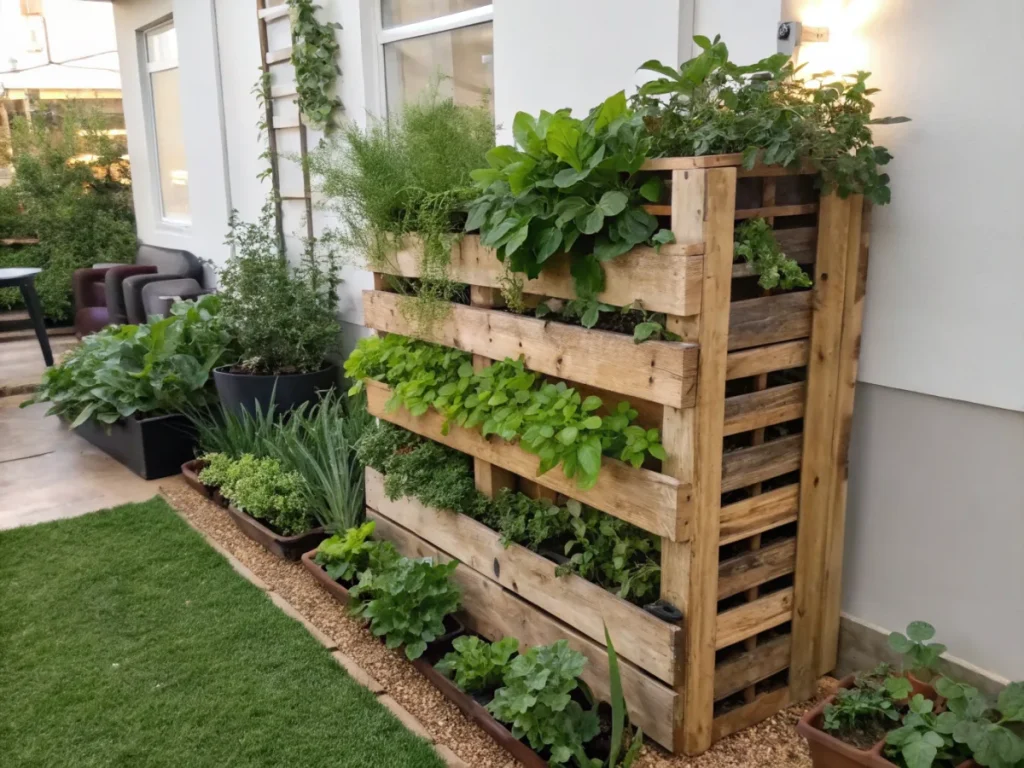
Creating a vertical garden from a repurposed pallet offers a multitude of benefits, especially for those living in urban environments or with limited outdoor square footage. It’s an ingenious solution that maximizes your growing area without occupying precious horizontal real estate. Imagine a wall of blooming petunias, a cascade of strawberries, or an accessible herb collection, all neatly arranged and taking up minimal room.
Beyond space-saving, this project champions sustainability. You’re giving a second life to a discarded pallet, diverting waste from landfills and reducing your environmental footprint. It’s a testament to the power of upcycling and a fantastic way to embrace eco-conscious living. Plus, the aesthetic appeal of a living wall adds natural beauty and a unique focal point to any balcony, patio, or small backyard.
Vertical gardening also makes maintenance easier for many. It can reduce bending and kneeling, making gardening more accessible for individuals with mobility challenges. Plants in vertical arrangements often experience better air circulation, which can help prevent certain diseases. Furthermore, having plants at eye level brings them closer for observation and appreciation, fostering a deeper connection with nature right outside your door.
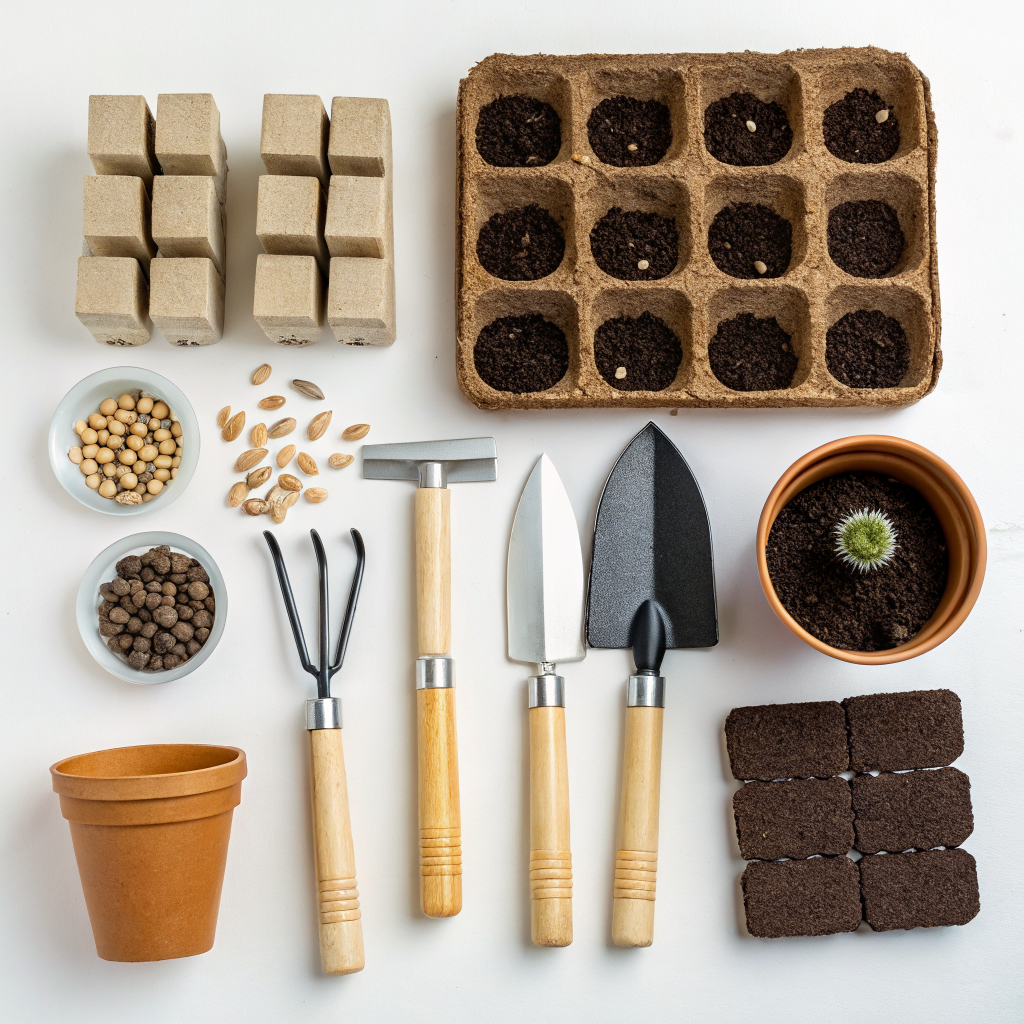
What You Need: Tools, Materials, and Plants
Before you dive into building your beautiful pallet garden, gathering all the necessary tools and materials will ensure a smooth and efficient process. Most items are readily available, and many can even be found for free or at a low cost. Careful selection of your pallet and planting materials is key to success.
Essential Tools:
- Cordless Drill: For screwing, pre-drilling, and attaching components.
- Impact Driver: Optional, but excellent for driving screws quickly.
- Screws: Exterior-grade wood screws (1.5 to 2 inches) are crucial for durability.
- Staple Gun: Manual or electric, for attaching landscape fabric or weed barrier.
- Staples: Heavy-duty staples, around 1/2 inch in length.
- Jigsaw or Hand Saw: If you need to cut or modify pallet slats.
- Sandpaper or Electric Sander: To smooth rough edges and prevent splinters.
- Measuring Tape: For accurate sizing.
- Pencil or Marker: For marking cuts and drill points.
- Safety Glasses and Gloves: Always prioritize personal safety when working with tools and wood.
Materials You’ll Need:
- One Wooden Pallet: This is the heart of your project. Look for pallets marked with “HT” (Heat Treated) to ensure they haven’t been chemically treated (avoid “MB” – Methyl Bromide). Free pallets can often be found at local businesses, construction sites, or nurseries; always ask permission before taking one. Ensure it’s sturdy and in good condition. You can learn more about pallet safety at Gardening Know How.
- Heavy-Duty Landscape Fabric or Weed Barrier: Approximately 3-4 yards, depending on pallet size. This will create the “pockets” for your plants. A sturdy Pond liner can also work.
- Potting Mix: High-quality, well-draining potting mix is essential for healthy plant growth. You’ll need several large bags. Consider a mix formulated for containers.
- Optional – Wood Sealer/Stain: If you want to prolong the life of your pallet or achieve a specific aesthetic. Choose an eco-friendly, plant-safe option if possible.
- Optional – Caster Wheels: If you want your garden to be mobile. Ensure they are heavy-duty and locking.
- Optional – Drip Irrigation System: For easy watering, especially in sunny locations. Learn more about simple irrigation setup here on Nouvelles Technologie.
Choosing Your Plants:
The best plants for a vertical pallet garden are those with shallow root systems, a bushy or trailing habit, and similar water/sun requirements. Consider your garden’s sun exposure when making your choices.
- Herbs: Basil, mint (in its own pocket!), thyme, rosemary, oregano, parsley, cilantro, chives.
- Leafy Greens: Lettuce varieties, spinach, arugula, kale (baby leaves).
- Strawberries: Trailing varieties are excellent for the top or front pockets.
- Flowers: Petunias, impatiens, pansies, violas, trailing nasturtiums, alyssum.
- Small Vegetables: Cherry tomatoes (dwarfing varieties), radishes, bush beans (compact varieties).
- Succulents: If your pallet garden is in a very sunny, dry spot and you prefer low-maintenance options.
Step-by-Step Guide to Building Your DIY Vertical Pallet Garden
Now that you have all your materials, let’s get building! This project is highly customizable, so feel free to adapt these steps to suit your specific pallet and design preferences. Remember to take your time and enjoy the process.
Step 1: Prepare Your Pallet
Begin by thoroughly inspecting your pallet. Remove any loose nails or splinters with a hammer or pry bar. If the wood is very rough, use sandpaper or an electric sander to smooth down surfaces, especially where you’ll be handling it frequently. This step ensures safety and gives your garden a more polished look. If you plan to stain or seal the wood, now is the time to do it, allowing it to dry completely before proceeding. Ensure any treatment is non-toxic to plants and humans.
Step 2: Determine Your Orientation and Create “Pockets”
Decide which way your pallet will face. Most people position it so the wider gaps between the slats face upwards, forming natural planting troughs. For a vertical garden, you’ll want to enclose the bottom of each “shelf” to hold soil. Lay the pallet flat on the ground. Using the landscape fabric, measure pieces that are wide enough to drape through the gaps and long enough to create a deep pocket. You’ll essentially be creating slings or pouches. For a standard pallet, this usually means cutting strips that are about 18-24 inches wide and then folding them to create a double layer for extra strength. Consider the depth you want for your plant roots.
Step 3: Secure the Landscape Fabric
Start from the lowest intended planting shelf. Drape your cut fabric piece through the gap, letting it hang down. Fold up the bottom edge of the fabric inside the pallet gaps to create a solid base for your soil. Use your staple gun to securely attach the fabric to the undersides of the pallet slats, forming a strong pocket. Overlap the fabric by a few inches on the sides to prevent soil leakage. Repeat this process for each planting tier. Ensure the fabric is taut and securely fastened; loose fabric will sag under the weight of soil and water. Continue working your way up the pallet, creating a new pocket for each level. The key here is to make the fabric pockets strong enough to support the weight of wet soil and plants.
Step 4: Add Drainage (Optional but Recommended)
While landscape fabric provides some drainage, adding a few small holes in the lowest part of each fabric pocket can prevent waterlogging, especially important for plants that dislike “wet feet.” You can use a knife or the tip of a drill to carefully make small slits. Alternatively, you can add a thin layer of gravel at the bottom of each pocket before adding soil, though this adds weight. For a more sophisticated setup, consider installing a simple drip irrigation system at this stage, laying the tubing before filling with soil. You can find more DIY smart watering solutions on this site.
Step 5: Fill with Potting Mix
Now for the fun part: filling your pockets! Use a high-quality potting mix that’s suitable for containers. Fill each pocket to about 1-2 inches below the top edge. This leaves room for the plants and for watering without overflowing. Don’t compact the soil too much; you want it to remain light and airy for good root development. For heavier soil mixes, you might want to add some perlite or vermiculite to improve drainage and aeration. Ensure an even fill across each pocket.
Step 6: Plant Your Garden!
Carefully remove your chosen plants from their nursery pots, gently tease out any circling roots, and plant them into your prepared pockets. Space them appropriately according to their mature size, remembering that they will grow. Water them in immediately after planting to help settle the soil and reduce transplant shock. Consider the spill-over effect for trailing plants; place them near the edge for a beautiful cascading look. For a visually appealing arrangement, mix different plant textures and colors, but always grouping plants with similar light and water requirements together within the same pocket.
Step 7: Position and Maintain Your Vertical Garden
Once planted, carefully move your pallet garden to its final location. If it’s heavy, enlist help or use a hand truck. Ensure it’s in a spot that receives the appropriate amount of sunlight for your chosen plants. If you added casters, moving it should be easy. Water regularly, checking the soil moisture daily, especially during hot weather. Vertical gardens tend to dry out faster than traditional beds. Fertilize according to your plant’s needs and prune regularly to encourage bushy growth and prevent overcrowding. Your vertical pallet garden is now complete, ready to flourish!
Pro Tips and Common Mistakes to Avoid
While building a DIY vertical pallet garden is a rewarding project, a few insider tips can elevate your success, and being aware of common pitfalls can save you from frustration. Learning from others’ experiences is always a smart approach to DIY.
Pro Tips:
- Pre-Drill Pilot Holes: Before driving screws, especially near the ends of slats, drill small pilot holes. This prevents the wood from splitting, which is common with aged pallet wood.
- Angle Your Staples: When stapling the landscape fabric, angle your staples slightly. This provides a stronger hold than straight staples, which can pull out easier.
- Consider an Automatic Watering System: Vertical gardens can dry out quickly. A simple drip irrigation system dramatically reduces watering time and ensures consistent moisture. You can even find solar-powered options.
- Rotate Your Pallet (if mobile): If your garden is on casters, periodically rotate it to ensure all plants receive adequate sunlight, especially if one side is partially shaded.
- Use Companion Planting: Pair plants that benefit each other. For example, marigolds can deter pests, and basil can improve tomato flavor.
- Mulch Your Pockets: A thin layer of mulch (straw, wood chips) on top of the soil in each pocket can help retain moisture, suppress weeds, and regulate soil temperature.
Common Mistakes to Avoid:
- Using Chemically Treated Pallets: This is crucial. Always verify your pallet is “HT” (Heat Treated). “MB” (Methyl Bromide) treated pallets release harmful chemicals that can contaminate your plants and pose health risks. If in doubt, don’t use it.
- Insufficient Drainage: Without proper drainage, roots will sit in water, leading to root rot and plant death. Ensure your fabric pockets have some way for excess water to escape.
- Overwatering or Underwatering: Because of their exposed nature, vertical gardens can dry out faster but are also susceptible to overwatering if drainage isn’t perfect. Check soil moisture with your finger before watering.
- Overcrowding Plants: While it’s tempting to fill every available space, give your plants room to grow. Overcrowding leads to poor air circulation, increased humidity (fostering diseases), and competition for nutrients.
- Neglecting Sunlight Requirements: Placing sun-loving plants in shade or shade-loving plants in full sun will lead to disappointment. Know your plants’ needs and place your pallet accordingly.
- Using Garden Soil: Garden soil is too heavy for containers and vertical gardens. It compacts easily, impeding drainage and root growth. Always use a high-quality, lightweight potting mix.
- Poor Anchoring: If your pallet garden is tall and heavy, especially when wet, it can be top-heavy. Ensure it’s securely anchored to a wall or has a wide, stable base to prevent tipping, particularly in windy conditions.
Eco-Friendly Variations and Enhancements
Embracing the spirit of upcycling, there are even more ways to make your DIY vertical pallet garden super eco-friendly and enhance its functionality. These variations not only reduce waste but can also improve your garden’s performance and aesthetics.
- Rainwater Harvesting Integration: Install a small rain barrel connected to a downspout near your pallet garden. You can then use this harvested water for irrigation, significantly reducing your tap water consumption. A simple bucket under your downspout can also work, with a watering can for distribution.
- Compost Tea Fertilization: Instead of synthetic fertilizers, create your own “compost tea” from kitchen scraps and garden waste. This nutrient-rich liquid is a fantastic, organic boost for your plants and closes the loop on your waste stream. Consider setting up a small desktop composter for convenience.
- Non-Toxic Wood Treatment: If you choose to treat your pallet, opt for natural, food-safe oils (like linseed oil) or milk paint instead of chemical stains. These protect the wood and are safe for edibles. Alternatively, just embrace the weathered look of natural wood.
- Container Inserts: Instead of permanent fabric pockets, create individual planting containers from repurposed plastic bottles, tin cans (with drainage holes), or even old plastic food containers. Line your pallet with these, making it easier to rotate plants or change them out season to season.
- Burlap Sacks or Old Jeans: For the truly resourceful, instead of landscape fabric, use old burlap coffee sacks or cut up sturdy old denim jeans to create your pockets. Ensure they are clean and free of excessive dyes. They will decompose faster but add an interesting texture.
- Integrated Worm Farm (Advanced): For the adventurous, you could integrate a small vermicomposting bin at the very top of your pallet. The nutrient-rich leachate (“worm tea”) can be collected and used to fertilize the plants below, creating a self-sustaining system.
- Solar-Powered Lighting: Add small, decorative solar-powered LED lights to your pallet garden for evening ambiance without consuming electricity. This extends the enjoyment of your vertical space beyond daylight hours.
Seasonal Considerations for Your Pallet Garden
A DIY vertical pallet garden isn’t just a summer project; with a little planning, it can provide beauty and bounty through multiple seasons. Understanding how to adapt your garden to seasonal changes is key to its longevity and success. Different climates will have different considerations, so always tailor these tips to your local conditions.
Spring:
- Preparation: If stored over winter, bring your pallet garden out, clean it, and refresh the potting mix. Top up any pockets where soil may have settled.
- Planting: This is prime planting time. Start with cool-season crops like lettuce, spinach, radishes, and pansies. As the threat of frost passes, gradually introduce warmer-season plants.
- Watering: Start with moderate watering; soil tends to stay moist longer in cooler spring temperatures.
Summer:
- High Growth: This is when your garden will be most productive and vibrant. Ensure adequate water and nutrients.
- Watering: Daily watering, sometimes twice a day in extreme heat, will likely be necessary, especially for plants in exposed upper pockets. Consider a drip system.
- Fertilizing: Regular feeding (every 2-4 weeks) with a balanced liquid fertilizer will support vigorous growth.
- Pest Control: Keep an eye out for pests and diseases. Vertical gardens can be easier to inspect. Use organic pest control methods if needed.
- Harvesting: Harvest frequently to encourage more production, especially for herbs and leafy greens.
Autumn:
- Transition: As temperatures cool, replace summer annuals with autumn-friendly plants like kale, Swiss chard, decorative cabbage, and mums.
- Harvesting: Continue harvesting any remaining summer crops before the first hard frost.
- Reducing Water: Gradually reduce watering frequency as temperatures drop and evaporation slows.
- Protection: For areas with light frosts, you might protect tender plants by covering the pallet garden with a sheet or frost cloth overnight.
Winter:
- Dormancy or Storage: In colder climates, annuals will die back. You can either remove all plants and store the pallet indoors or in a sheltered area.
- Hardy Plants: If you live in a mild climate, you might be able to grow some very hardy greens like winter lettuce, spinach, or certain herbs.
- Evergreens: Consider planting small, cold-tolerant evergreens or succulents if your winter is mild and you want year-round greenery.
- Maintenance: If left outdoors, ensure the pallet is not sitting in standing water, which can cause wood to rot. Minimize watering to avoid root damage from freezing.
Expert Resources for Further Learning
To deepen your understanding and ensure the long-term success of your DIY vertical pallet garden, leveraging expert knowledge is invaluable. These resources offer comprehensive information on various aspects of vertical gardening, plant care, and sustainable practices.
- Royal Horticultural Society (RHS): The RHS is a leading gardening charity dedicated to advancing horticulture. Their website offers extensive advice on plant selection, care, and specific gardening techniques relevant to vertical gardens. Explore their resources at RHS – Wall Gardens. They cover everything from plant health to soil science.
- University of Minnesota Extension: University extension services provide research-backed, localized gardening information. They often have excellent guides on container gardening, pest management, and plant selection suitable for various climates. The University of Minnesota Extension, for instance, offers a wealth of knowledge on urban gardening and small spaces. Check out some of their general gardening advice at University of Minnesota Extension.
- Gardening Know How: This popular online resource offers practical, easy-to-understand articles on almost every gardening topic imaginable. They have specific categories for container gardening and vertical gardening that can provide tailored advice for your pallet project. They also often address common DIY questions and issues. Find more tips at Gardening Know How.
These resources can help you troubleshoot issues, discover new plant varieties, and continually improve your gardening skills. Don’t hesitate to consult them as your pallet garden grows and evolves.
Conclusion
Embarking on the journey to create your own DIY vertical pallet garden is more than just a home improvement project; it’s a step towards sustainable living, space optimization, and a deeper connection with nature. You’ve learned how to transform a simple, often discarded pallet into a vibrant, productive, and beautiful green space, even in the smallest of areas. From selecting the right materials and plants to following the step-by-step construction guide and mastering seasonal care, you now possess the knowledge to build a flourishing vertical oasis.
Remember the satisfaction of growing your own herbs, enjoying fresh leafy greens, or simply admiring a vertical array of colorful flowers. This project is a testament to the power of upcycling and creative problem-solving. So go ahead, gather your tools, unleash your inner gardener, and watch your small space come alive with the beauty and bounty of your very own vertical pallet garden. Happy gardening!
FAQ: DIY Vertical Pallet Garden
Q1: How do I ensure my pallet is safe to use for gardening?
A: Always look for the “HT” (Heat Treated) stamp on the pallet, which indicates it was treated with heat and is generally safe. Avoid pallets marked “MB” (Methyl Bromide), which indicates chemical treatment. If there’s no stamp or you’re unsure, it’s best to err on the side of caution and find another pallet, especially if you plan to grow edibles.
Q2: What’s the best way to water a vertical pallet garden?
A: Vertical gardens tend to dry out faster. Manual watering with a watering can is common, but a simple drip irrigation system attached to a timer is highly recommended for consistency and efficiency, especially during hot weather. Water until you see a little drainage from the bottom of each pocket, ensuring the entire root ball is moistened.
Q3: Can I grow vegetables other than leafy greens in a pallet garden?
A: Yes, absolutely! Small, compact vegetables with shallow root systems do well. Good options include cherry tomatoes (dwarfing varieties), radishes, bush beans, and strawberries. Ensure your plants have enough space to grow and that the pockets are deep enough to accommodate their roots. Avoid large, deep-rooted vegetables like potatoes or squash.
Q4: How do I protect my vertical pallet garden during winter?
A: For colder climates, annual plants will die back. You can either remove all plants and store the pallet in a sheltered area (shed, garage) to prevent wood rot and extend its life. If you have perennial herbs or hardy plants, you can cover them with frost cloth or move the entire pallet to a more protected spot if it’s on casters. In milder climates, some hardy greens can continue to grow with minimal protection.


