Introduction
Harnessing nature’s bounty for delicious, long-lasting treats is incredibly satisfying, and with apple drying strings hanging in outdoor kitchens, you can reduce your energy consumption by up to 80% compared to electric dehydrators, saving significantly on utility bills. This traditional method not only preserves your autumn harvest but also adds a rustic, charming aesthetic to your outdoor living space.
[lwptoc]
This guide will walk you through creating an efficient and beautiful apple drying station, transforming your freshly picked apples into healthy snacks or baking ingredients. You’ll discover how simple tools and natural elements can yield impressive results without a significant financial outlay.
Embrace the joy of DIY and sustainable living, extending the lifespan of your fruit and minimizing food waste. This project offers practical benefits and a rewarding experience, connecting you more deeply with your garden's output.
Quick Summary
- Benefits: Extended apple shelf life, reduced energy consumption, rustic outdoor kitchen aesthetic.
- Time: Project completion in under 2 hours, drying time 3-7 days.
- Cost: Budget-friendly, typically under $30 for materials.
Context & Ideal Conditions
The optimal time for apple drying is during late summer and early autumn (August to October), correlating with the peak apple harvest. Choose a location in your outdoor kitchen that receives at least 6-8 hours of direct sunlight (full sun exposure) daily, ideally with good air circulation to promote even drying and prevent mold. Consistent temperatures between 70-85°F (21-29°C) and relative humidity below 60% are perfect. Avoid hanging strings in areas prone to dampness or stagnant air.
apple, drying, strings, hanging, outdoor: Tools & Materials

To set up your apple drying station, you will need a few simple items.
- Cutting Board: A sturdy, clean surface, at least 12 x 18 in (30 x 45 cm).
- Sharp Knife: A chef’s knife or serrated knife with a 6-8 in (15-20 cm) blade for even apple slices.
- Apple Corer: A 0.75-1 in (2-2.5 cm) diameter corer for quick core removal.
- Kitchen Twine: Untreated cotton or linen twine, 1.5 mm (1/16 in) diameter. Approximately 50-100 ft (15-30 m) depending on desired capacity.
- Large Sewing Needle: A darning needle with a large eye, at least 2.5 in (6.4 cm) long, for threading apples.
- Rubbing Alcohol: Isopropyl alcohol (70%) for sterilizing equipment.
- White Vinegar: 1 cup (240 ml) for apple pre-treatment.
- Water: 4 cups (960 ml) for apple pre-treatment.
- Drying Rack/Hooks: A suitable structure in your outdoor kitchen, such as S-hooks, cup hooks (rated for 5-10 lbs / 2.3-4.5 kg), or a simple wooden dowel (1 in / 2.5 cm diameter, 3-4 ft / 90-120 cm long, of treated pine or cedar) firmly secured.
- Slicer (Optional): A mandoline slicer for consistent 1/8 to 1/4 in (0.3-0.6 cm) thick slices.
- Gloves: Food-safe gloves (e.g., nitrile, ANSI/ISEA 105-2016 standard) for handling apples.
apple, drying, strings, hanging, outdoor: Time, Difficulty & Budget
| Prep | 15–30 min |
| Build/Plant | 45–90 min |
| Total | 60–120 min |
| Skill Level | Beginner |
| Budget | ≈ $15–$50 (materials/tools) |
This DIY project is approximately 50-70% cheaper than purchasing a dedicated electric food dehydrator, which can range from $50 to $200+, not to mention the ongoing electricity costs.
Step-by-Step Tutorial
Step 1 — Layout & Prep
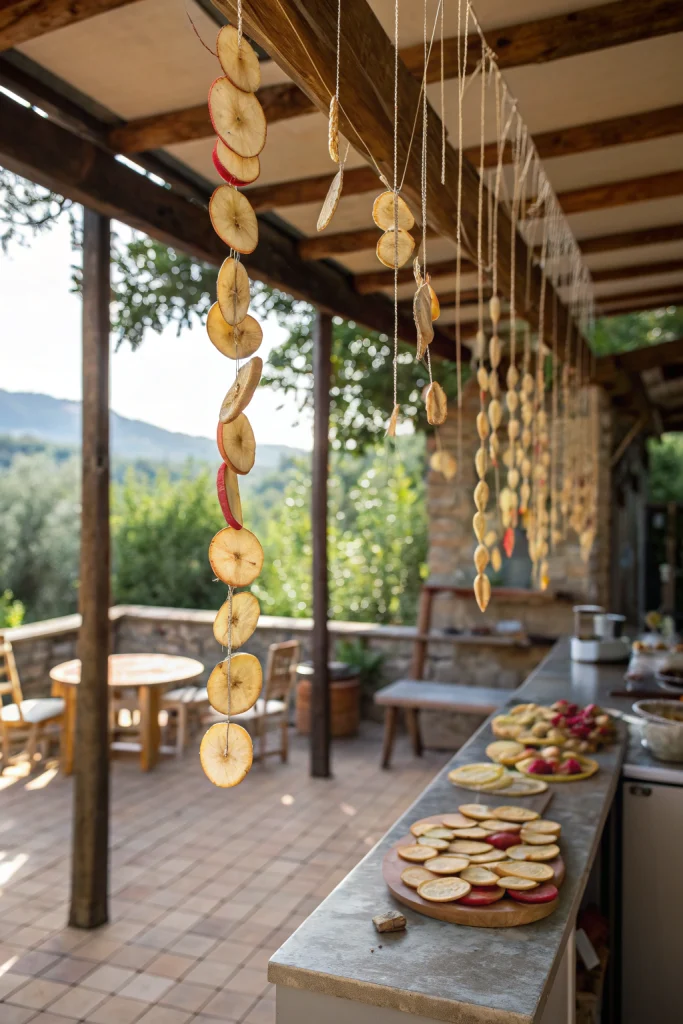
First, choose the ideal spot in your outdoor kitchen or a sheltered, sunny area. Ensure it’s protected from rain and strong winds, and that there’s good air circulation. You’ll need enough vertical clearance for the apple strings to hang freely, typically 2.5-3 ft (75-90 cm) from the attachment point to the ground or counter. Sterilize all cutting tools (knife, corer, mandoline) and the cutting board with rubbing alcohol before use to prevent contamination.
Step 2 — Cutting & Assembly
Wash your apples thoroughly under cool running water. For best results, use varieties suitable for drying like ‘Honeycrisp’, ‘Fuji’, or ‘Gala’. Core each apple, then slice them horizontally into uniform rounds about 1/8 to 1/4 inch (0.3-0.6 cm) thick. Thicker slices will take longer to dry, while thinner ones might become too brittle. Prepare a pre-treatment solution by mixing 1 cup (240 ml) white vinegar with 4 cups (960 ml) water. Briefly dip apple slices into this solution for 30 seconds to prevent browning and deter insects. Pat them dry with a clean cloth.
Step 3 — Installation/Planting
Thread the large sewing needle with one end of the prepared twine. Carefully thread each apple slice through its center hole, pushing it down to rest above the knot. Leave about 1/2-1 inch (1.3-2.5 cm) of space between each slice to allow for optimal air circulation. Continue adding slices until the string holds about 15-20 slices, or until it reaches a manageable length for your hanging setup. Tie a loop at the top of the string for easy hanging.
Step 4 — Finishing & QA
Hang your apple strings from the designated hooks, dowels, or racks in your outdoor kitchen. Ensure that each string hangs freely without touching other strings or surfaces. Inspect the setup for stability and verify that the apples are receiving good air exposure from all sides. The drying process typically takes 3-7 days, depending on ambient temperature, humidity, and apple slice thickness. They are fully dried when they are leathery and pliable, not brittle or sticky.
Care & Schedule
During the drying process, monitor your apples daily. Rotate the strings if necessary to ensure even exposure to sun and air. If humidity increases or rain is expected, bring the strings indoors to a dry, well-ventilated area, then return them outdoors when conditions improve. Once fully dried, store the apple slices in airtight containers or Ziploc bags in a cool, dark place. They can last for several months to a year.
| Season  | Action                                    | Frequency     | Notes                                   |
|---------|-------------------------------------------|---------------|-----------------------------------------|
| Autumn  | Prepare & Hang Apple Strings              | Once          | Ideal during peak harvest               |
| Autumn  | Rotate & Inspect Apple Slices             | Daily         | Ensure even drying, check for mold      |
| Autumn  | Bring Indoors (if High Humidity/Rain)     | As needed     | Prevent moisture damage                 |
| Winter  | Storage in Airtight Containers            | After drying  | Keep in cool, dark place                |
Variations & Adaptations
For small spaces or balconies, consider a compact, multi-tiered drying rack that can be folded away when not in use. In hot, arid climates (USDA Zone 8b and higher), drying times may be shorter, while in humid regions, you might need to combine outdoor drying with a brief stint indoors under a fan. Experiment with different apple varieties; tart apples like ‘Granny Smith’ offer a different flavor profile when dried. You can also make a “knock-down” version by using a lightweight, portable clothes drying rack with added hooks for easy setup and storage.
Common Mistakes to Avoid
- Slicing Unevenly: Leads to some apples drying faster than others, resulting in inconsistent texture and potential spoilage of under-dried pieces. Use a mandoline for uniform slices.
- Overlapping Slices: Prevents proper air circulation, creating damp spots where mold can grow. Ensure adequate spacing, at least 1/2 inch (1.3 cm), between each slice.
- Insufficient Air Circulation: Slows drying and encourages mold. Choose an open, breezy location and avoid hanging too many strings in one small area.
- Exposure to Rain/Dampness: Rehydrates apples, promoting spoilage. Always bring strings indoors during wet weather or high humidity.
- Overloading Strings: Can cause strings to break or sag, leading to apples touching and hindering airflow. Keep string lengths manageable and weights appropriate for your chosen twine.
- Forgetting Pre-treatment: Not dipping apples in a vinegar solution can result in excessive browning, though still edible, the aesthetic and flavor may be impacted.
- Poor Storage: Storing dried apples incorrectly can lead to rehydration, mold, or pest infestation. Use truly airtight containers in a cool, dark, dry place.
Sustainability, Safety & Regulations
Embrace eco-friendly practices by using salvaged wood for your drying rack, if possible, or opt for sustainably sourced materials. Rainwater harvesting can be used for cleaning tools and apples (if filtered). Always wear appropriate PPE, such as cut-resistant gloves (ANSI/ISEA 105-2016 Level A3) when using sharp knives or mandolines. Ensure your hanging structure is securely mounted to prevent accidental falls, especially if children or pets are around. Consider your neighbors – ensure your apple drying strings aren’t obstructing their views or creating a nuisance. Green waste (apple cores and peels) can be easily composted.
Measure the Outcome
Quantify your success! Track the survival rate of your dried apples, aiming for 95% or greater without spoilage. Note the average drying time, which should ideally be between 3-7 days. Estimate your water savings if you’re using collected rainwater for cleaning. The most satisfying metric will be the visible reduction in food waste and the delicious, healthy snacks you’ve created. Calculate the cost per ounce (or gram) of your homemade dried apples versus store-bought for a clear financial benefit.
Conclusion
Creating apple drying strings hanging in outdoor kitchens is an accessible, sustainable, and rewarding DIY project. By following these steps, you’ll extend the enjoyment of your apple harvest, enhance your outdoor space, and embrace a greener lifestyle. This method offers significant energy savings and produces a delightful, healthy snack.
We encourage you to try this project and experience the satisfaction of preserving your own produce. Share your creations and tips in the comments below, and inspire others to get started on their own apple drying journey!
FAQ
A: ‘Honeycrisp’, ‘Fuji’, ‘Gala’, ‘Granny Smith’, and ‘Rome Beauty’ are excellent choices due to their firm flesh and balanced flavor when dried.
A: When stored in an airtight container in a cool, dark place, properly dried apples can last for 6 months to 1 year.
A: Yes, natural, untreated cotton or linen twine is best. Avoid synthetic strings that might leach chemicals or have an unpleasant odor. Fishing line can also work and is very durable.
A: You can use any sheltered outdoor area with good sun exposure and airflow, like a porch, balcony, or even a covered patio. Just ensure it’s protected from rain and pests.
A: Hanging apples in a screened-in porch or covering them loosely with a fine mesh cloth (like cheesecloth) can deter insects. The vinegar pre-treatment also helps.
A: A simple wooden dowel suspended between two points, or even sturdy tree branches, can serve as an effective, low-cost drying rack.
A: This usually indicates high humidity or insufficient airflow. Move your strings to a drier, breezier location, or consider bringing them indoors briefly with a fan.
A: Absolutely! Dried apples can be rehydrated by soaking them in warm water or juice for about 15-30 minutes before use in recipes.
Internal & External Links
To elevate your outdoor space, consider these ideas for a rustic apple crate planter, or adding wooden shelves displaying seasonal gourds and apples to complement your kitchen. For general outdoor ambiance, explore concepts for rustic garden tables with autumn flower displays. You can also get creative with wooden crates for fall decor, perfect for holding your harvested apples.


