Introduction
Did you know that proper fall planting can increase bloom quantity by up to 30% next spring? As we approach the crisp days of autumn, many gardeners are eager to extend their season and ensure a vibrant display when winter finally loosens its grip. This comprehensive guide will equip you with essential planting tips for autumn bulbs, transforming your garden into a springtime spectacle. From selecting robust bulbs to strategic placement, we'll cover everything you need to know for a successful planting endeavor. Getting those bulbs into the ground now sets the stage for a dazzling floral show, making your effort in the cooler months truly pay off.
Table of Contents
- Introduction
- Materials & Tools Needed
- Project Time
- Step-by-Step Instructions
- Maintenance & Care Tips
- Eco-Friendly Alternatives
- Design & Styling Ideas
- Common Mistakes to Avoid
- Storage & Seasonal Tips
- Conclusion
- FAQ
Materials & Tools Needed
To ensure a successful autumn bulb planting, gathering the right supplies makes all the difference.
- Premium Quality Bulbs: Choose firm, plump bulbs free from any mold, soft spots, or cuts. Think vibrant tulips, delicate crocuses, fragrant daffodils, and charming hyacinths. Consider a mix of early, mid, and late-spring bloomers for a prolonged display.
- Gardening Trowel or Bulb Planter: A sturdy, comfortable trowel is essential for digging individual holes. For larger areas, a long-handled bulb planter can save your back and speed up the process. A soil auger attachment for a drill is an even faster alternative.
- Gardening Gloves: Protect your hands from dirt, thorns, and potential irritants. Opt for breathable, durable gloves that offer a good grip.
- Well-Draining Potting Mix or Compost: Rich, dark compost provides vital nutrients and improves soil structure. Alternatively, a good quality all-purpose potting mix will suffice for container planting. This is crucial for optimal bulb growth.
- Slow-Release Bulb Fertilizer (Optional but Recommended): A specialized bulb food provides consistent nourishment, encouraging robust root development and stunning blooms. Look for formulations with phosphorus, which is excellent for root growth.
- Garden Fork or Spade: For loosening and aerating larger soil areas before planting. A sharp spade can cut through tough sod with satisfying ease.
- Watering Can or Hose: To gently drench the newly planted area, settling the soil around the bulbs.
- Mulch (Straw, Wood Chips, or Shredded Leaves): A comforting blanket for your bulbs, protecting them from temperature fluctuations and conserving moisture. The earthy scent of decomposing leaves signals healthy soil.
- Measuring Tape or Ruler: Essential for ensuring correct planting depth and spacing, preventing overcrowding and promoting healthier growth.
Project Time
Autumn bulb planting is a satisfying task that yields beautiful results.
- Preparation time: 30-60 minutes (for selecting bulbs, preparing soil amendments, and organizing tools).
- Build/Plant time: 1-2 hours per 100 square feet (depending on bulb density and soil conditions).
- Total duration: Varies widely, from a quick 45-minute pot planting to several hours for a full garden bed.
This method is approximately 40% faster than spring direct seeding of many annuals, as bulbs require less immediate follow-up care and offer a more defined planting schedule.
Step-by-Step Instructions
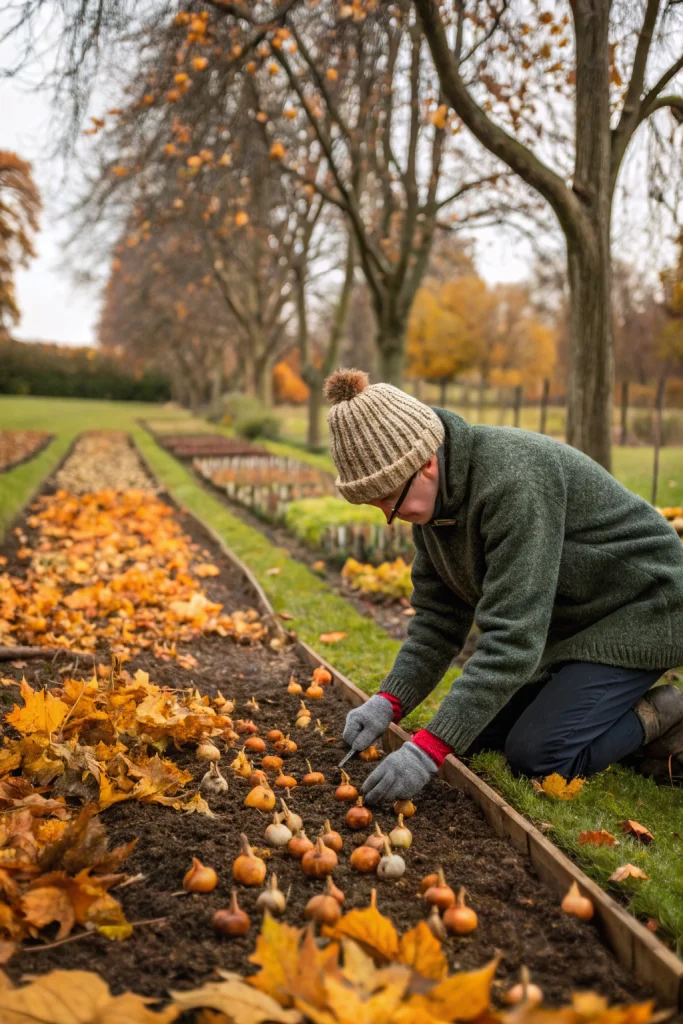
Step 1: Select Your Bulbs Wisely
When choosing your bulbs, prioritize those that are plump and firm to the touch, indicating good health and energy reserves. Avoid any with visible mold, soft spots, or an off-putting odor, as these are signs of disease or decay.
Practical Tip: Look for larger bulbs within a species, as they often produce more robust plants and larger, more abundant flowers.
Step 2: Prepare Your Planting Site
Assess your soil for drainage and texture. Most bulbs prefer well-draining soil, so amend heavy clay with organic matter like compost or grit to prevent rot. For sandy soils, adding compost can help retain moisture and nutrients.
Practical Tip: Test your soil's pH; most bulbs thrive in slightly acidic to neutral soil (6.0-7.0 pH). A simple home kit can provide this insight.
Step 3: Digging the Perfect Hole
A general rule for depth is to plant bulbs two to three times their height deep. For instance, a 2-inch bulb should be planted 4-6 inches deep. Use a trowel, bulb planter, or even a drill with an auger attachment for efficient hole creation.
Practical Tip: For a naturalistic look, scatter bulbs lightly over the planting area and plant them where they fall. This mimics nature's random distribution for a less formal display.
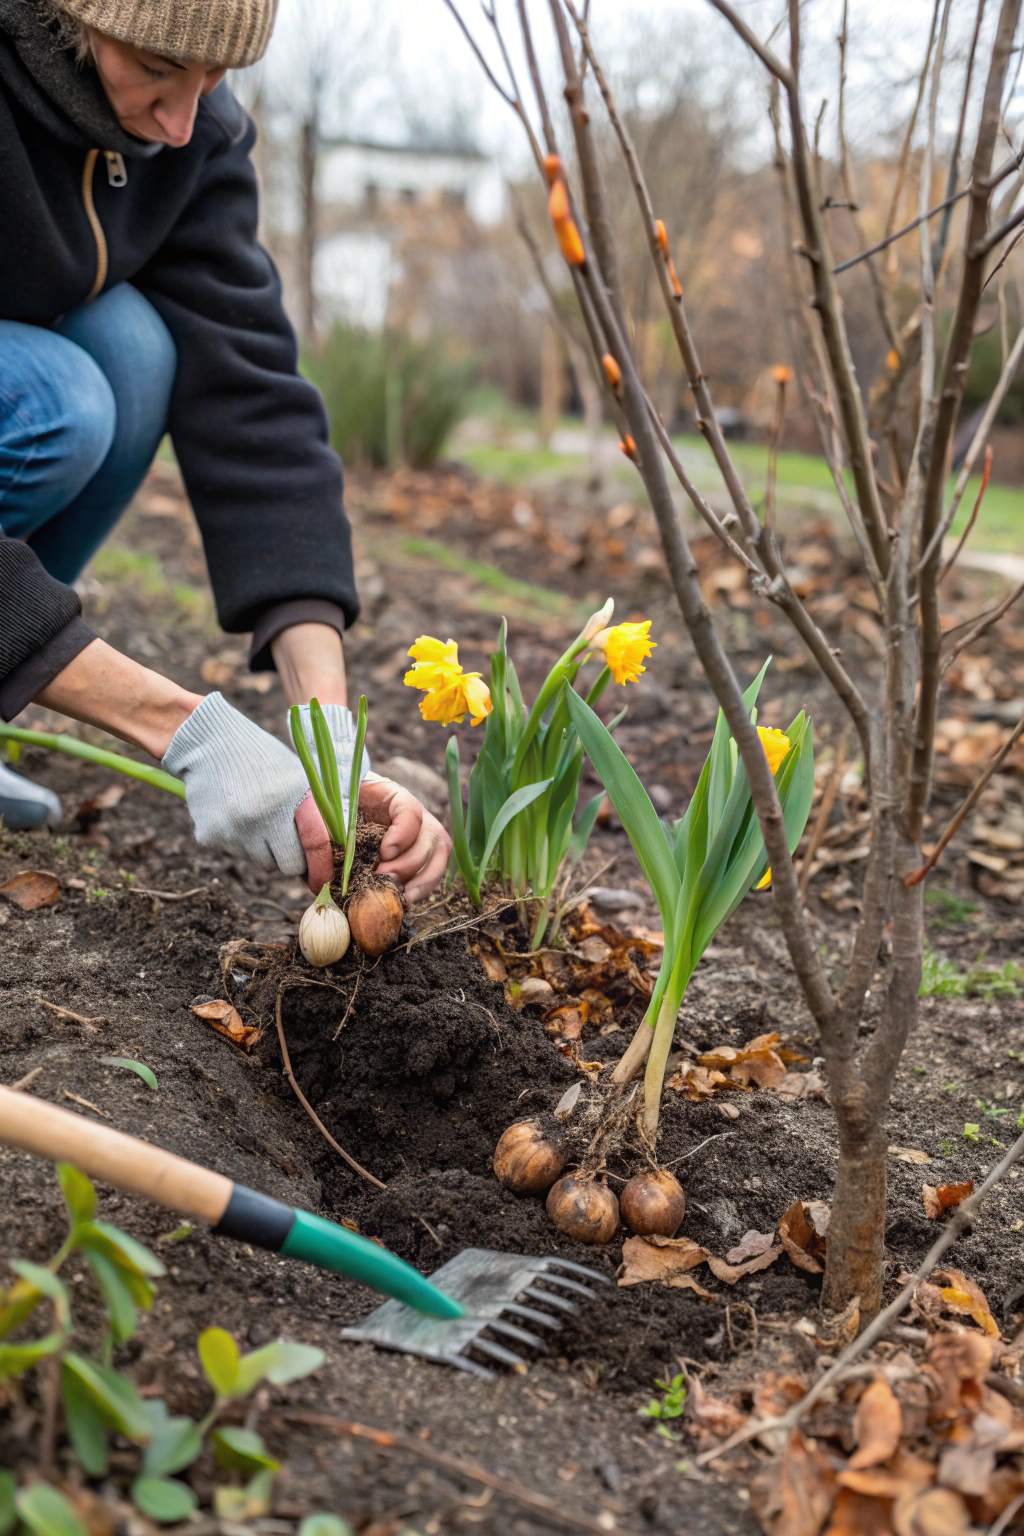
Step 4: Position Your Bulbs Correctly
Place each bulb in the hole with the pointed end facing upwards, as this is where the new shoot will emerge. If unsure which end is up, plant the bulb on its side; it will naturally orient itself.
Practical Tip: If your soil is particularly poor, add a small handful of bone meal or a slow-release bulb fertilizer at the bottom of the hole. This provides essential phosphorus for strong root development.
Step 5: Backfill and Water
Gently cover the bulbs with the excavated soil, ensuring no air pockets remain. Lightly pat the soil down. After planting, give the area a thorough watering to settle the soil around the bulbs and kickstart root growth.
Practical Tip: Label your planting areas with markers or stakes, especially if you're planting multiple varieties, so you remember what's where come spring, preventing accidental disturbance.
Step 6: Mulch for Protection
Apply a 2-4 inch layer of organic mulch, such as shredded leaves, straw, or wood chips, over the planted area once the ground begins to cool significantly but before a hard freeze. This insulates the bulbs from extreme temperature fluctuations and conserves moisture.
Practical Tip: Mulch can also deter pests like squirrels and rodents, which might be tempted by your newly planted treasures.
Maintenance & Care Tips
Consistent care is key to ensuring your autumn bulbs flourish into spectacular spring blooms.
Watering: After the initial planting, bulbs generally require minimal watering during their dormant period, especially in regions with regular autumn and winter rainfall. However, in drier climates or during prolonged dry spells, a deep watering once every 2-3 weeks can be beneficial until the ground freezes. Overwatering, particularly in heavy soils, is a common cause of rot, accounting for up to 20% of bulb failures. Once spring arrives and shoots emerge, water regularly if there's less than 1 inch of rain per week.
Pruning: "Pruning" for bulbs primarily involves deadheading (removing spent flowers) and allowing the foliage to die back naturally. Once a bloom fades, snip off the flower stalk to prevent seed formation, which diverts energy from the bulb. Crucially, leave the green leaves intact. The foliage acts as an energy factory, photosynthesizing sunlight to replenish the bulb for the following year's bloom. Premature removal of foliage can reduce next year's bloom size by 50% or more. Wait until the leaves turn yellow and wither (typically 6-8 weeks after flowering) before cutting them back.
Soil: Good soil health is paramount. Ensure your soil maintains excellent drainage. Bulbs thrive in loose, fertile soil. Annually, consider top-dressing the area with 1-2 inches of well-rotted compost. This enriches the soil, improves its structure, and provides a slow release of nutrients. A soil pH between 6.0 and 7.0 is ideal for most common spring-flowering bulbs.
Schedule:
- Autumn (Post-planting): Monitor for very dry spells and water if necessary. Apply mulch.
- Winter: Generally hands-off during dormancy.
- Early Spring (Emergence): Ensure adequate moisture, especially if rainfall is sparse.
- Mid-Spring (Blooming): Enjoy the show! Deadhead as flowers fade.
- Late Spring/Early Summer (Post-bloom): Allow foliage to naturally die back. Consider a light feeding with a low-nitrogen, high-phosphorus fertilizer after blooming to boost bulb recovery.
Eco-Friendly Alternatives
Embracing sustainable practices in your autumn bulb planting enhances your garden's health and reduces environmental impact.
Recycled Materials: Instead of new plastic pots for forcing or temporary displays, repurpose old terra cotta pots, ceramic containers, or even well-drained tin cans. Cardboard egg cartons can serve as excellent temporary bulb storage or dividers during planting. Consider creating raised beds from reclaimed timber or stone rather than new materials that require more resources.
Organic Inputs:
- Compost: Make your own nutrient-rich compost from kitchen scraps and garden waste. This "black gold" improves soil structure, aeration, and water retention, significantly reducing reliance on synthetic fertilizers. Home composting can divert up to 30% of household waste from landfills. The EPA provides excellent resources on composting basics for beginners.
- Mulch: Instead of bagged wood chips, use shredded leaves collected from your yard or neighbours. This local, free resource insulates bulbs, suppresses weeds, and slowly enriches the soil as it breaks down, fostering a healthy ecosystem. Straw from local farms is another biodegradable option.
- Natural Pest Deterrents: Companion planting with certain herbs (like chives or alliums) can deter common bulb pests. For rodent issues, consider placing sharp gravel around bulbs, which makes digging less appealing.
Low-Water Options:
- Drought-Tolerant Bulbs: Select bulbs known for their resilience in drier conditions, such as certain varieties of allium, iris reticulata, and grape hyacinths (Muscari). These vibrant choices thrive with less supplemental watering once established.
- Water-Smart Irrigation: Apply water directly to the soil surface around newly planted bulbs using a watering can or drip irrigation, avoiding wasteful overhead sprinkling. This efficient method delivers moisture where it's needed most, reducing water usage by up to 50% compared to traditional sprinklers.
- Rainwater Harvesting: Collect rainwater in barrels to use for garden irrigation. This reduces your reliance on municipal water and is free from chlorine and other chemicals that can be present in tap water.
Design & Styling Ideas
Transforming bare earth into a vibrant spring tableau requires thoughtful design choices for your autumn bulbs.
- Drifts and Swathes: Move beyond single rows. Plant bulbs in organic, flowing drifts, mimicking natural landscapes. For example, a sweeping "river" of blue Muscari weaving through a bed of sunny yellow daffodils creates a breathtaking, cohesive visual statement. Aim for groups of odd numbers (5, 7, 9) for a more organic feel.
- Layering for Extended Bloom: Extend your spectacle by planting bulbs at different depths, a technique known as "lasagna planting" or "bulb layering." Place larger, later-blooming bulbs (like tulips or daffodils) at the deepest layer, followed by mid-spring bloomers (hyacinths), and finally, early spring jewels (crocus, snowdrops) closer to the surface. This creates a continuous parade of blooms from late winter through late spring, maximizing your garden's impact.
- Color Harmonies and Contrasts: Experiment with color palettes. Soft pastels (pale pink tulips with white daffodils) create a serene, harmonious look. Bold contrasts (deep purple hyacinths against bright orange tulips) offer dramatic flair. Consider the color wheel for inspiring combinations. The Royal Horticultural Society's advice pages offer fantastic inspiration for plant combinations and design principles.
- Underplanting and Companions: Bulbs shine even brighter when paired with complementary plants. Underplant taller bulbs with low-growing ground covers or early-spring perennials like primroses or forget-me-nots. As the bulbs emerge and bloom, the companion plants provide a lush green carpet or a contrasting textural element.
- Container Masterpieces: Don't limit bulbs to the ground. Oversized terracotta pots or weathered wooden barrels filled with layered bulbs create stunning focal points on patios, balconies, or near entryways. Choose containers with good drainage and position them where they'll receive ample sunlight in spring. These can be easily moved to highlight their blooms then relocated to a less prominent spot as foliage fades.
- Naturalized Areas: For a truly wild and enchanting look, naturalize hardy bulbs like daffodils, crocuses, and snowdrops in lawns or under deciduous trees. Plant them randomly by gently tossing them and planting where they land. Over time, these bulbs will multiply and spread, creating meadows of color with minimal intervention.
Common Mistakes to Avoid
Successful autumn bulb planting hinges on avoiding a few critical pitfalls that can derail your spring display.
Planting too late: Delaying planting until after the first hard freeze significantly reduces the bulbs' ability to establish roots before winter dormancy. This can lead to weakened plants and fewer, smaller blooms. Prevention: Aim to plant bulbs when soil temperatures are consistently below 60°F (15°C) but before the ground freezes solid. This typically means September to early November in most temperate zones.
Planting at the wrong depth: Bulbs planted too shallow are susceptible to frost heave and drying out, while those planted too deep may struggle to emerge or exhaust their energy trying. Prevention: A reliable rule of thumb is to plant bulbs two to three times their height deep. For instance, a 2-inch tulip bulb should be planted 4-6 inches deep.
Poor drainage: This is arguably the biggest killer of bulbs. Waterlogged soil causes bulbs to rot, as their fleshy layers are highly prone to fungal diseases in stagnant moisture. Prevention: Always ensure your planting site has excellent drainage. Amend heavy clay soils with ample organic matter like compost, grit, or sand to improve porosity. If your area is naturally waterlogged, consider raised beds or container planting.
Ignoring bulb orientation: While some bulbs are forgiving and will right themselves, planting upside down can force the sprout to expend extra energy curving around, delaying emergence or weakening the plant. Prevention: Always try to plant bulbs with the pointed end facing upwards, as this is where the new shoot emerges. If you're unsure, planting them on their side is a safer bet than upside down.
Cutting foliage too soon: After blooming, it's tempting to snip off the yellowing leaves for a tidy garden. However, these leaves are crucial for photosynthesis, which replenishes the bulb's energy reserves for next year's bloom. Removing them prematurely significantly weakens the bulb. Prevention: Allow the foliage to die back naturally, until it's completely yellow or brown, typically 6-8 weeks after flowering. The green leaves are busy storing energy!
Not protecting from pests: Squirrels, voles, and other critters find freshly planted bulbs a delightful snack, especially tulips and crocuses. This can decimate your spring display before it even begins. Prevention: Plant bulbs within wire cages (hardware cloth) for persistent pests. Alternatively, try incorporating unpalatable bulbs like daffodils or alliums. A layer of sharp gravel above the bulbs or a motion-activated deterrent can also help.
Storage & Seasonal Tips
Proper care of your tools and bulbs through the seasons ensures longevity and success.
Tool Storage:
After a session of bulb planting, clean all gardening tools thoroughly. Remove caked-on soil with a stiff brush and wipe metal surfaces clean. For trowels, spades, and pruners, a light oiling with linseed or mineral oil prevents rust during storage. Store tools in a dry, organized space like a shed or garage. Keeping them sharp and clean not only extends their life but also makes future gardening tasks more efficient and enjoyable.
Plant Protection:
Once bulbs are planted and mulched, nature generally takes over for the winter. However, in regions with extremely cold winters or fluctuating temperatures, an additional layer of mulch (up to 6 inches) can provide extra insulation, preventing frost heave where bulbs are pushed out of the ground. For container-planted bulbs, move pots to a sheltered, unheated location like a garage or against a warm foundation wall. This protects them from extreme cold while allowing them to experience the necessary chilling period.
Season Prep:
As winter approaches, take stock of your garden. Consider preparing next year's planting areas by removing weeds and adding compost, allowing it to break down over the colder months. Plan your spring garden layout now while the memory of this season’s blooms (or lack thereof) is fresh. Reviewing plant labels and bloom times in a garden journal can inform your future bulb selections. This proactive approach ensures you're ready when spring arrives, avoiding last-minute rushes.
Conclusion
Autumn bulb planting is more than just a chore; it's an investment in future joy, a promise of vibrant spring color during the subdued days of fall. By meticulously following these planting tips—from careful bulb selection and proper site preparation to thoughtful design and diligent aftercare—you lay the groundwork for a spectacular floral display. Remember, every bulb tucked into the earth is a tiny capsule of potential, waiting for the warmth of spring to unleash its beauty. Don't let this crucial window pass; embrace the opportunity to create a breathtaking garden that rewards your efforts with a burst of life and color.
Ready to transform your garden? Dig in this autumn and prepare for an unforgettable spring!
FAQ
Q1: When is the best time to plant autumn bulbs?
A1: Plant autumn bulbs when the soil temperature consistently drops below 60°F (15°C) but before the first hard ground freeze, typically from September to early November in most temperate climates.
Q2: How deep should I plant my bulbs?
A2: A good rule of thumb is to plant bulbs two to three times their height deep. For example, a 2-inch bulb should be planted 4-6 inches deep.
Q3: What if I plant a bulb upside down?
A3: Most bulbs are resilient and will eventually reorient themselves, though it might take more energy and result in a slightly delayed or weaker bloom. If unsure, planting on its side is a safe bet.
Q4: Do I need to fertilize my bulbs?
A4: While not strictly necessary in rich soil, a slow-release granular bulb fertilizer (low nitrogen, high phosphorus) added at planting time can encourage stronger root development and more vigorous blooms.
Q5: Can I plant bulbs in containers?
A5: Absolutely! Container planting is excellent for bulbs, especially for layering. Ensure pots have drainage holes and provide adequate winter protection in colder zones.
Q6: What should I do after the bulbs have finished blooming?
A6: Deadhead spent flowers to prevent seed formation, but do not remove the foliage. Allow the leaves to yellow and die back naturally (6-8 weeks) as they gather energy for next year's bloom.
Q7: How do I deter squirrels and other pests from eating my bulbs?
A7: Options include planting in wire cages, scattering sharp gravel around bulbs, using unpalatable bulbs like daffodils, or applying a repellent.
For more insightful gardening projects and seasonal inspiration, explore our guide on creating an Autumn Living Wall Garden Decor, adding vertical interest to your outdoor space. Looking to protect your plants through colder months? Our DIY Cold Frame guide offers creative solutions for extending your growing season, showing you how to build a simple structure to shelter delicate plants. And if you're keen on embracing a natural, unmanicured aesthetic, delve into the charm of Wild Gardening in Autumn for tips on fostering biodiversity. Consider planting Native Drought-Tolerant Plants for Fall to minimize water usage and support local ecosystems. Finally, discover how to enhance your outdoor ambiance with Moonlit Autumn Garden Lighting, perfectly complementing your beautiful bulb displays.
For further in-depth knowledge on specific plants and gardening techniques, the Royal Horticultural Society (RHS) Advice section is an invaluable resource. Additionally, the USDA Forest Service provides extensive information on plant materials and ecological considerations for gardeners. If you’re interested in supporting pollinators, consider choosing bulb varieties from the RHS Plants for Pollinators list.


