DIY Cold Frame: this guide shows you exactly how to design, build, ventilate, and maintain a cold frame so you can start earlier in spring and keep harvesting later into fall.
Introduction
Are you among the 75% of home gardeners who wish they could extend their growing season, safeguarding tender plants from unpredictable frosts and giving their seedlings a vital head start? If so, you’re in the right place! Embracing a DIY gardening project like building a cold frame is an economical and sustainable way to achieve exactly that. This comprehensive guide will walk you through creating your very own cold frame, transforming your garden into a more resilient and productive space. Imagine savoring homegrown produce weeks earlier in spring or continuing to harvest fresh greens well into autumn. A homemade cold frame not only offers a sanctuary for your plants but also a deeply satisfying hands-on experience, enhancing your overall gardening journey. Let’s delve into how to construct this invaluable garden asset.
Q: What’s the simplest definition of a cold frame?
A: A low, box-like structure with a transparent, hinged lid that traps solar heat and shields plants from wind and frost.
Q: Which way should it face?
A: South-facing is ideal to maximize low winter sun.
Table of Contents
- Introduction
- Materials & Tools Needed
- Project Time
- Step-by-Step Instructions
- Maintenance & Care Tips
- Eco-Friendly Alternatives
- Design & Styling Ideas
- Common Mistakes to Avoid
- Storage & Seasonal Tips
- Conclusion
- FAQ
Q: Do I need plans for a cold frame?
A: Not necessarily; size the box to your glazing (old window or polycarbonate) and keep the back higher for slope.
Materials & Tools Needed
Building a sturdy and effective cold frame relies on selecting the right materials and having the necessary tools at hand. Think about durability and insulation – these are key for protecting your precious plants!
Here’s what you’ll need for this rewarding DIY gardening venture:
Materials:
- Lumber:
- Four (4) pieces of decay-resistant wood (e.g., cedar, redwood, or pressure-treated pine) for the base frame, approximately 2×10 inches in cross-section. These will form the sturdy foundation.
- Two (2) shorter pieces (e.g., 2×10 inches) for the front wall.
- Two (2) taller pieces (e.g., 2×12 or 2×14 inches) for the back wall, ensuring a gentle sloping angle for optimal light and water runoff.
- Matching lengths for the side walls, cut to create the slope between the front and back.
- Alternative: Reclaimed wood from old fences, pallets (ensure it’s not chemically treated), or even robust, thick plastic lumber for extreme moisture resistance.
- Transparent Top (Glazing):
- Old window sashes (single or double pane – double pane offers better insulation).
- Polycarbonate sheets (twin-wall or multi-wall for superior insulation and hail resistance) – wonderfully lightweight and shatterproof.
- Heavy-duty clear plastic sheeting (6-mil or thicker UV-resistant polyethylene) – an economical choice for annual replacement or a temporary setup.
- Hardware:
- Wood screws (exterior grade, 2.5-3 inches long) – choose rust-resistant ones for longevity.
- Hinges (heavy-duty, rust-proof, e.g., galvanized steel) – to attach the lid securely, allowing for easy ventilation.
- Stakes or corner brackets (optional but recommended for stability).
- Prop stick or lid opener – a simple piece of wood or an automatic vent opener to regulate temperature.
- Insulation (Optional):
- Straw bales, bags of leaves, or old blankets – for extra warmth during severe cold snaps.
Tools:
- Measuring Tape: For precise cuts and dimensions – undeniably crucial for a neat finish.
- Pencil or Marker: To mark your cuts with clarity.
- Saw:
- Circular saw or miter saw for clean, straight cuts – essential for speed and accuracy.
- Alternative: Hand saw for a more deliberate, quiet pace.
- Drill/Driver: For pre-drilling and driving screws – a power tool that saves significant effort.
- Alternative: Phillips head screwdriver if you prefer manual labor or have limited power tool access.
- Safety Glasses and Gloves: Always protect your eyes and hands – safety first!
- Level: To ensure your cold frame sits evenly on the ground, preventing water pooling.
- Square: For checking 90-degree angles and ensuring true corners.
Gathering these items will prime you for a successful and satisfying build, kicking off your DIY gardening endeavor with confidence.
Q: Is pressure-treated lumber safe for edible beds?
A: Modern, copper-based treated lumber (e.g., ACQ) is generally considered acceptable for raised beds when lined or sealed; avoid older, creosote-treated wood.
Q: Best glazing for cold climates?
A: Multi-wall polycarbonate—light, tough, and insulating.
Project Time
Embarking on a DIY gardening project like a cold frame is a manageable undertaking, even for those with limited woodworking experience. Here’s a breakdown of the typical time commitment:
- Preparation Time: 1-2 hours (Gathering materials, measuring, making a simple plan, clearing the site).
- Build/Plant Time: 3-5 hours (Cutting wood, assembling the frame, attaching the lid, positioning, and initial planting).
- Total Duration: 4-7 hours
This project can be up to 30% faster than sourcing and assembling a comparable pre-made kit, especially if you have an efficient workflow and easy access to materials. Plus, the satisfaction of building it yourself is immeasurable!
Q: Can two people finish in an afternoon?
A: Yes—cut parts first, then assemble and hang the lid; planting can follow.
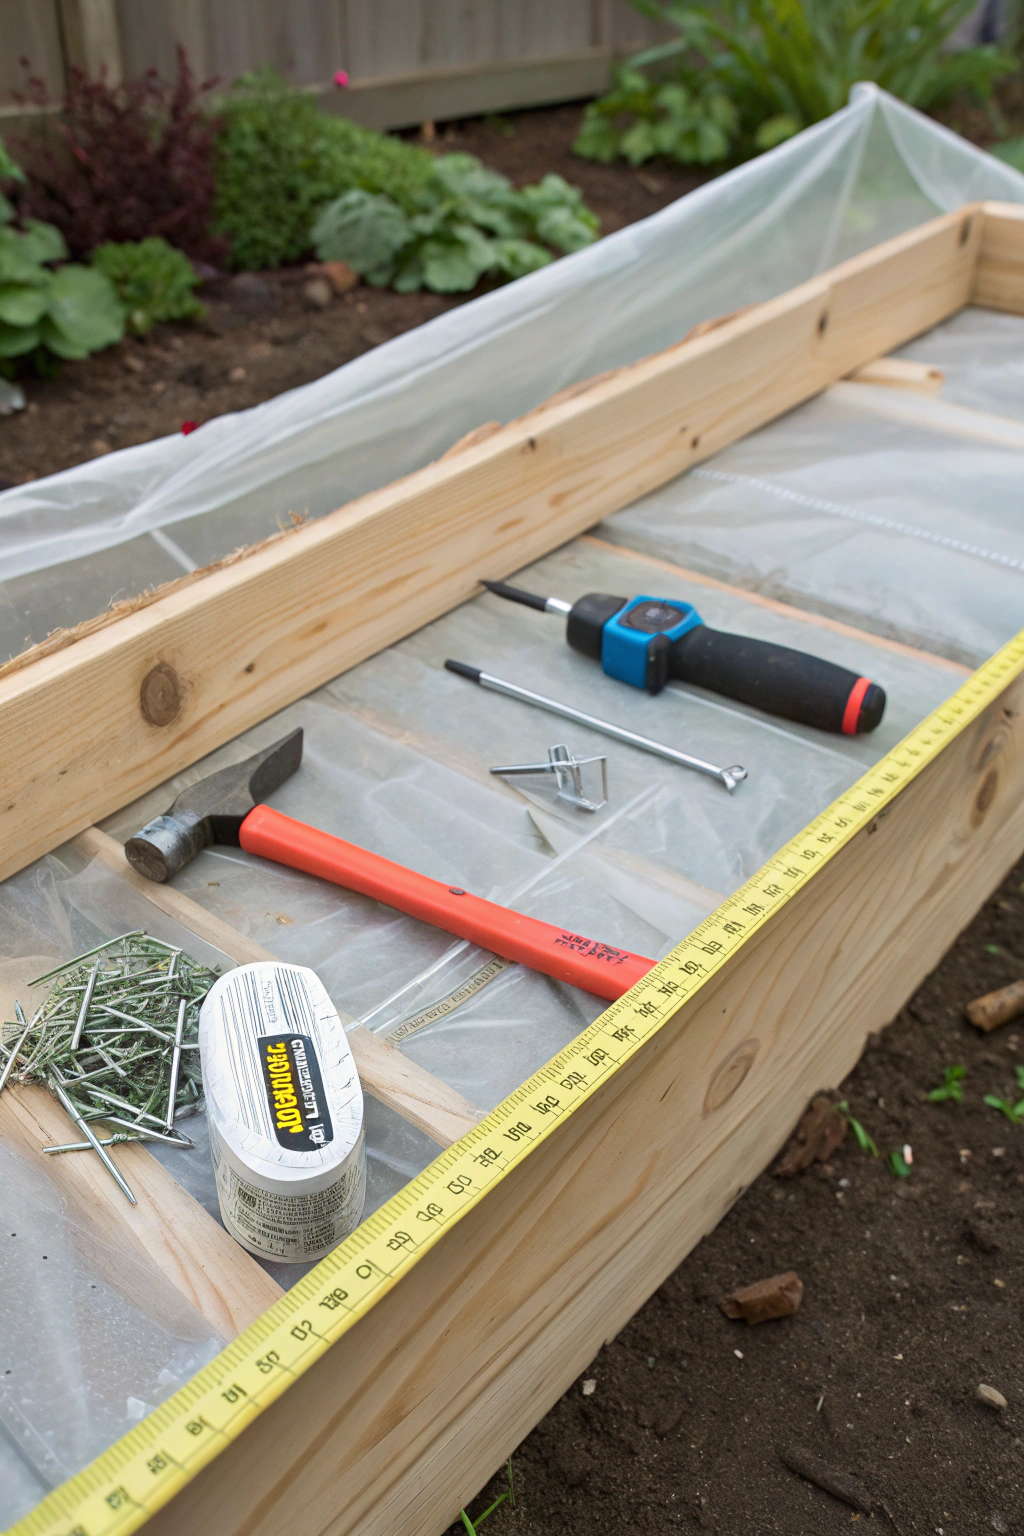
Step-by-Step Instructions
Creating your a functional cold frame is an exciting DIY gardening journey. Follow these steps for a successful build:
Step 1: Gather Your Materials and Plan Your Site
Before any cutting begins, collect all your lumber, glazing, and hardware. Select an optimal sunny location in your garden, ideally facing south, with good drainage and protection from prevailing winds.
- Practical Tip: Ensure your chosen spot receives at least 6-8 hours of direct sunlight daily, especially during cooler months, to maximize heat absorption. Mark out the footprint of your cold frame on the ground.
Q: How do I size the frame?
A: Let your glazing dictate width/length, then set back height ~4–6 in higher than the front to create slope.
Step 2: Construct the Base Frame
Begin by cutting your two longer and two shorter base pieces to the desired length. For a typical cold frame, a 4×2 foot base is common, but adjust to your glazing size.
- Practical Tip: Pre-drill pilot holes before driving screws to prevent the wood from splitting, especially when working close to the ends of the boards. This creates strong, stable corners.
Q: Should I sit the frame on soil or gravel?
A: Gravel improves drainage and reduces rot; soil is fine if the spot drains well.
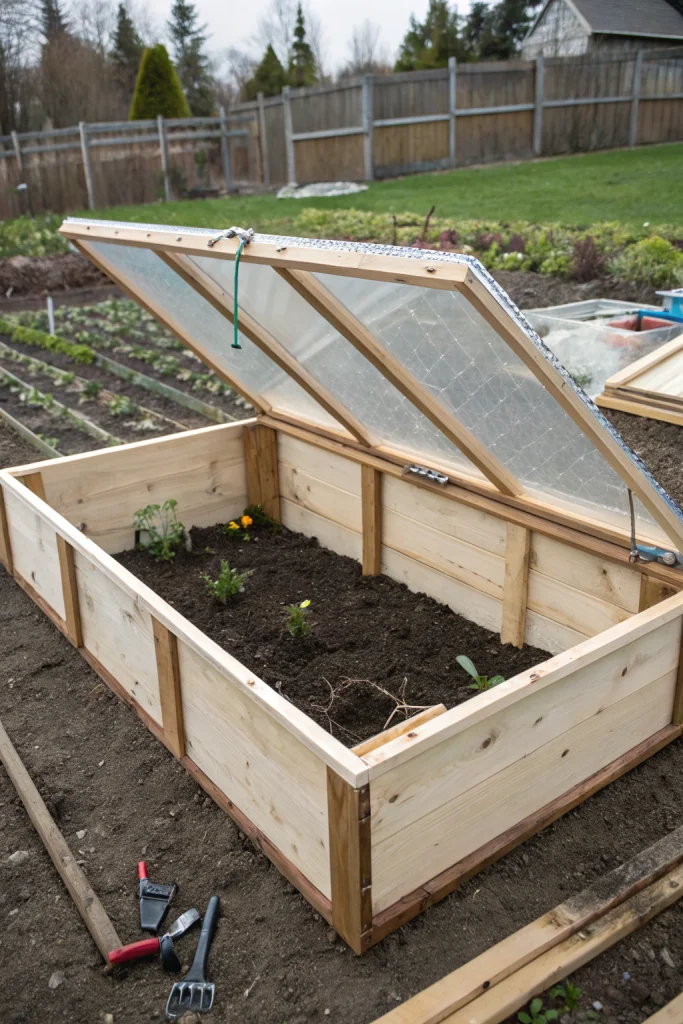
Step 3: Attach the Back and Side Walls
Cut the back wall pieces taller than the front wall pieces to create a slope. Then, cut the side pieces at an angle to connect the taller back to the shorter front.
- Practical Tip: Use a speed square or protractor to precisely mark your angles on the side pieces. A slight angle (e.g., 15-20 degrees) is usually sufficient for good light penetration and water runoff.
Q: Do I need sealant?
A: Yes—apply exterior caulk or weatherstripping to joints to reduce heat loss.
Step 4: Build the Hinged Lid
Construct a simple frame for your lid using lighter-weight lumber or attach hinges directly to the edges of your old window sash or polycarbonate sheet. Ensure the lid frame is slightly larger than the top opening of your cold frame to create an overhang.
- Practical Tip: If using flexible plastic sheeting, sandwich it securely between two thin wood strips for a taut, long-lasting seal, stapling or screwing them together.
Q: What hinges are best?
A: Heavy-duty galvanized or stainless steel hinges; add a handle for safe lifting.
Step 5: Install the Lid and Finishing Touches
Attach your prepared lid to the back wall of the cold frame using the heavy-duty hinges. Position your prop stick to allow for adjustable ventilation.
- Practical Tip: Test the lid’s opening and closing mechanism. Ensure it opens smoothly and can be propped securely at various heights for optimal temperature control. Consider adding handles for easier lifting.
Q: How far should I vent on sunny days?
A: Start with a 2–4 inch opening at 10–15°C (50–59°F); widen if internal temps exceed ~18°C (65°F).
Maintenance & Care Tips
A cold frame is an invaluable tool for dedicated DIY gardening, but its effectiveness relies on consistent maintenance.
- Ventilation is Key: On sunny days, even in winter, temperatures inside a cold frame can soar, potentially cooking your plants. Aim to keep the internal temperature between 45-65°F (7-18°C) for most plants. In warmer climates, or during unexpected warm spells, daily venting is crucial, opening the lid partially or fully. Automatic vent openers, which use thermal expansion to operate, can prevent overheating while you’re away and maintain optimal temperatures. For learning how cold frames fit into season extension, see University of Minnesota Extension’s guidance on extending the growing season (UMN Extension).
- Watering Wisely: Plants in a cold frame still need water, but less frequently than those exposed to open air. The enclosed environment conserves moisture. Check the soil moisture every few days by feeling an inch or two below the surface. Water deeply in the morning so plants can absorb it throughout the day, preventing fungal issues that thrive in cool, damp overnight conditions.
- Soil Health: Over time, the soil in your cold frame can become depleted. Annually, or at least every other year, replenish the soil with 1-2 inches of fresh compost or well-rotted manure. This provides essential nutrients and improves soil structure for healthy root development, critical for thriving plants, making your DIY gardening efforts more fruitful.
- Pest and Disease Monitoring: The warm, sheltered environment of a cold frame can sometimes attract pests like aphids or create conditions for powdery mildew. Regularly inspect plants for signs of trouble. Good air circulation through proper ventilation is your first line of defense. Small infestations can often be managed with a strong spray of water or an insecticidal soap, protecting your young edibles and delicate ornamentals.
- Seasonal Deep Clean: At the end of its busiest season (typically late spring or early autumn), empty the cold frame, clean the glazing with mild soap and water for maximum light transmission, and inspect the wood for any signs of rot or damage. Make any necessary repairs to ensure its readiness for the next growing cycle.
Q: Do I need an automatic vent opener?
A: Not required, but very helpful if you’re away mid-day—prevents overheating spikes.
Q: Morning or evening watering?
A: Morning, to reduce leaf wetness overnight.
Eco-Friendly Alternatives
Embracing sustainable practices in your DIY gardening is not only good for the planet but can also be incredibly innovative. Your cold frame project offers many opportunities to go green.
- Recycled Materials:
- Glazing: Instead of new polycarbonate, scour architectural salvage yards or local classifieds for old windows. Single-pane windows are perfectly adequate; double-pane offers superior insulation. Look for glass or clear acrylic sheets from old shower doors or furniture.
- Frame: Reclaimed fence pickets, pallet wood (ensure it’s un-treated or heat-treated (HT), not chemically treated (MB)), or even robust political signs (thoroughly cleaned) can form the base. The key is to select materials that can withstand moisture.
- Insulation: Use repurposed carpet scraps, old blankets, or even densely packed cardboard for temporary side insulation to boost warmth during deep freezes.
- Organic Inputs:
- When filling your cold frame, utilize homemade compost mixed with leaf mold. This enriches the soil with slow-release nutrients and improves drainage naturally, reducing the need for synthetic fertilizers.
- Employ natural pest deterrents such as neem oil or companion planting (e.g., marigolds to deter nematodes) instead of chemical pesticides.
- Low-Water Options:
- Incorporate a layer of perlite or vermiculite into your soil mix to improve water retention, especially vital for arid climates or if you tend to forget watering.
- Consider a simple drip irrigation system or olla pots (unglazed clay pots buried in the soil) for efficient, localized watering, significantly reducing water waste.
- Mulch the soil surface inside your cold frame with straw or shredded leaves. This helps retain soil moisture, suppresses weeds, and moderates soil temperature fluctuations.
These eco-conscious choices not only lighten your environmental footprint but also often lead to a more resilient and vibrant garden ecosystem. For further information on sustainable gardening practices, consider resources like the SARE (Sustainable Agriculture Research & Education) website, which offers extensive knowledge on environmental stewardship in agriculture.
Q: Are old windows safe to use?
A: Yes, if intact and stable; sand sharp edges and secure the hinges firmly.
Design & Styling Ideas
A cold frame doesn’t just have to be a utilitarian box; it can be an attractive addition to your garden, enhancing your overall DIY gardening aesthetic.
- Rustic Charm: Paint your wooden frame with a natural, earth-toned stain or distressed paint to blend seamlessly with a cottage garden theme. Add antique-style hinges or handles for a touch of vintage elegance.
- Modern Minimalist: Opt for clean lines, unpainted natural cedar or redwood, and sleek, industrial-style hardware. Polycarbonate glazing provides a contemporary look. Consider a dark, matte finish if using reclaimed metal.
- Integrated Design: If you have raised garden beds, design your cold frame to sit perfectly atop one. This creates a cohesive look and simplifies setup. You can even extend the cold frame’s height to accommodate taller overwintering plants. For examples of combining raised beds and cold frames, see this overview from UMN Extension.
- Color Pop: Use weather-resistant exterior paint in a vibrant color that complements your garden’s palette. A cheerful blue, olive green, or deep terracotta can turn a simple cold frame into a garden focal point.
- Elevated & Accessible: Build your cold frame on a low stand or repurposed workbench to raise it to a comfortable working height. This is particularly beneficial for gardeners with mobility challenges, making DIY gardening more accessible. Add a small shelf underneath for storing hand tools or watering cans.
- Window Box Cold Frame: For smaller spaces, a miniature cold frame designed to fit over an existing window box or container garden can provide protection for herbs or small edibles, integrating functionally and beautifully.
- Decorative Accents: Incorporate small architectural details like decorative trim around the base or finials on the corners if using a more formal design. Place attractive gravel or stone around the base for a tidy appearance.
Q: Can I add bubble insulation?
A: Yes—RHS suggests interior bubble plastic in winter for extra frost protection (balance with light/vent needs).
Common Mistakes to Avoid
Even seasoned DIY gardening enthusiasts can fall prey to common pitfalls when building and using a cold frame. Being aware of these can save you time, effort, and heartache.
- Insufficient Slope: A flat or nearly flat lid is a recipe for disaster. Without an adequate slope (at least 15-20 degrees), rainwater and snow will accumulate, placing undue stress on the lid and potentially leading to leaks or structural failure. Moreover, a lack of slope diminishes light penetration, especially during low-angle winter sun. To prevent this, ensure your back wall is significantly taller than your front wall.
- Poor Ventilation Management: Overheating is the number one killer of plants in a cold frame. On a sunny day, even with freezing outdoor temperatures, the internal temperature can rapidly exceed 80-90°F (27-32°C). Forgetting to vent can scorch plants. Conversely, leaving it open too long during a sudden cold snap can expose tender seedlings. To prevent this, vent daily by propping open the lid when temperatures rise above 45°F (7°C) and close it before evening temperatures drop. An automatic vent opener, as discussed by the University of Minnesota Extension, is an excellent investment for consistent temperature regulation.
- Inadequate Drainage: Placing your cold frame in an area prone to waterlogging will lead to soggy soil and root rot. Water accumulation around the base can also accelerate wood decay. To prevent this, choose a well-drained site. If your soil is heavy clay, build up the area with a mound of gravel and topsoil or incorporate plenty of organic matter to improve permeability.
- Insufficient Insulation: While the primary purpose is solar gain, a cold frame needs to retain that heat. Gaps and cracks in the frame, or a single-pane lid in very cold climates, can lead to significant heat loss. To prevent this, seal all joints with caulk or weather stripping. In extreme cold, bank straw bales, bags of leaves, or old blankets around the exterior of the frame for added insulation, significantly enhancing its protective capabilities.
- Wrong Plant Choices: Not all plants are suitable for a cold frame. Trying to grow heat-loving tropicals in mid-winter will likely end in failure unless supplemental heat is provided. To prevent this, stick to cool-season crops (lettuce, spinach, kale), hardier herbs, and starting seeds for transplanting. Research the specific cold hardiness of the plants you intend to grow. Use the official USDA Plant Hardiness Zone Map to select varieties suited to your area.
- Ignoring Soil Health: Continuously growing plants in the same soil without replenishment will deplete nutrients and compact the soil structure. To prevent this, amend the soil with compost and other organic matter annually. This ensures a fertile and aerated medium for healthy root growth.
Q: How do I choose crops by month?
A: Use your zone map; sow hardy greens earlier in spring and again in late summer for fall harvests.
Storage & Seasonal Tips
Maximizing the utility and longevity of your DIY cold frame involves smart seasonal planning and proper storage.
- Tool Storage: After completing your cold frame build and throughout its use in your DIY gardening, keep your hand tools clean and dry. Hang them on a shed wall or store them in a waterproof toolbox to prevent rust and loss. Consider a small bin near the cold frame for frequently used items like a hand trowel or watering can.
- Plant Protection: Beyond just the cold frame, for very tender plants inside, a layer of horticultural fleece or old blankets can provide an extra buffer during severe overnight freezes. Remove it during the day to allow light penetration.
- Spring Transition: As spring progresses and outdoor temperatures consistently rise, gradually harden off the plants from your cold frame before transplanting them to the garden. This involves slowly increasing their exposure to outdoor conditions over 7-10 days.
- Summer Use: In summer, a cold frame can transform into a hotbed for ripening tomatoes or peppers, or it can be removed and stored. If left in place, ensure it is completely open for maximum ventilation to prevent heat buildup and use shade cloth if necessary to prevent sunscald.
- Autumn Preparation: Clean out your cold frame thoroughly in late summer or early autumn. Amend the soil with fresh compost, repair any damage, and ensure the glazing is clean for maximum light. This primes it for extending your harvest or starting cool-season crops.
- Winterizing: For areas with extremely harsh winters, if the cold frame is not in active use, empty it of plants, clean it, and consider placing straw bales around its exterior for added insulation. Secure the lid against strong winds. If your cold frame is portable, you might want to move it closer to your home or shed for easier access and monitoring during winter.
Q: When should I remove the lid completely?
A: In warm summer spells or during hardening-off; store the lid out of direct sun to preserve plastics.
Conclusion
Congratulations on embarking on this fulfilling DIY gardening endeavor! Building your own cold frame is an empowering step towards greater food security, extended growing seasons, and a deeper connection with your garden. From nurturing delicate seedlings to harvesting fresh greens well into the chillier months, this simple yet effective structure provides a microclimate for thriving plants. We’ve covered everything from selecting the right materials and step-by-step construction to essential maintenance and eco-friendly alternatives. Now, armed with this knowledge, take the plunge and transform your gardening possibilities. Your garden – and your palate – will thank you for it! Start gathering your materials today and begin your journey to a more productive and resilient garden.
Sizing & Placement Guide
Right-sizing your cold frame ensures efficient heat capture and comfortable plant spacing.
- Footprint: Common sizes are 2×4 ft or 3×6 ft. Keep depth (front-to-back) under 3 ft so you can reach the back without stepping inside.
- Slope: A 10–20° lid angle accelerates snow/ rain shedding and boosts winter sun capture.
- Orientation: South-facing with the back to the north; shield from prevailing winds with a fence or hedge.
- Microclimates: Place near a south-facing wall to gain a few extra degrees at night.
Use your zone to time plantings; the latest USDA update (2023) slightly shifted many areas warmer. Check your zone on the official USDA map and plan accordingly. For background on the update, see USDA’s release here.
Q: Can I place it over a raised bed?
A: Yes—design the frame to sit on the bed rim; it’s a clean, space-efficient setup.
Quick Planting Calendar (by Zone Range)
| Crops | Zones 4–5 | Zones 6–7 | Zones 8–9 |
|---|---|---|---|
| Lettuce, Spinach, Kale | Start in frame late Feb–Mar; fall sow Aug–Sep | Start Jan–Feb; fall sow Sep–Oct | Start Dec–Jan; fall sow Oct–Nov |
| Root crops (Carrot, Radish) | Direct sow Mar–Apr; Aug for fall | Feb–Mar; Sep | Jan–Feb; Oct–Nov |
| Herbs (Parsley, Chives) | Start Mar; overwinter established | Feb–Mar | Jan–Feb |
| Seedlings (Tomato, Pepper) | Harden off late Apr–May | Harden off Apr | Harden off Mar–Apr |
Troubleshooting
| Issue | Likely Cause | Quick Fix |
|---|---|---|
| Condensation dripping on leaves | Insufficient venting | Crack lid 1–2 in mid-morning; add small spacer |
| Seedlings leggy | Low light | Increase tilt; clean glazing; shift to sunnier spot |
| Leaf scorch | Heat spike | Install auto vent opener; add shade cloth on hot days |
| Wood rot at corners | Constant moisture | Elevate on pavers/gravel; seal end grain |
| Slug damage | Damp shelter | Copper tape around rim; elevate frame slightly |
Q: How hot is too hot inside?
A: Above ~24°C/75°F for cool-season crops; vent sooner on sunny days.
Cost & Budget Snapshot
- Basic build: Reclaimed window + cedar offcuts + screws & hinges: low cost, often under $60 if materials are on hand.
- Mid-range: 3×6 ft frame in cedar with twin-wall polycarbonate and quality hardware: $120–$220.
- Upgrade: Multi-wall polycarbonate + automatic opener + weatherstripping: add $60–$120.
Hotbed option: add soil heating cables and insulation. For design ideas, see Penn State Extension’s guide to low-cost hot beds (PSU Extension).
Automation & Upgrades
- Automatic vent opener (wax-cylinder type)
- Interior min/max thermometer
- Weatherstripping for lid perimeter
- Removable shade cloth panel for summer
Safety & Materials Notes
- Glazing safety: Tempered glass or polycarbonate reduces shatter risk.
- Finish & sealers: Use exterior finishes safe for garden structures; avoid creosote products.
- Treated wood: If using modern treated wood, consider lining interior faces with plastic to minimize soil contact.
Hardening-Off Quickstart
To transition seedlings, place them in the cold frame with the lid cracked during daytime for a few days, then gradually open wider and close at night. See guidance on hardening off from the Royal Horticultural Society (RHS) and UMN’s seed-starting resource (UMN Extension).
FAQ
Q1: What plants can I grow in a cold frame?
A: Cold frames are ideal for cool-season crops like lettuce, spinach, kale, Swiss chard, carrots, and radishes. They are also excellent for hardening off seedlings of warm-season plants like tomatoes and peppers before transplanting.
Q2: How often do I need to water plants in a cold frame?
A: Less frequently than outdoor plants. Check the soil every few days; water deeply when the top inch or two feels dry to the touch, preferably in the morning.
Q3: How do I prevent my cold frame from overheating?
A: Ventilation is key! On sunny days, even in winter, prop open the lid to release excess heat. Consider an automatic vent opener for hands-free temperature regulation.
Q4: Can I use plastic sheeting instead of glass or polycarbonate for the lid?
A: Yes, heavy-duty (6-mil or thicker) clear, UV-resistant plastic sheeting can be used as an economical alternative, though it offers less insulation and may require more frequent replacement.
Q5: What’s the best orientation for a cold frame?
A: Ideally, a cold frame should face south to maximize sunlight exposure throughout the day, especially crucial during winter months.
Q6: Do I need to anchor my cold frame?
A: While not always strictly necessary, anchoring with stakes or placing it in an enclosed garden area can prevent it from being moved or damaged by strong winds, especially if the structure is lightweight.
Q7: How can I protect my cold frame build from pests?
A: Good air circulation prevents many issues. For pests, regular inspections and organic solutions like insecticidal soap or introducing beneficial insects are effective. Elevating the cold frame slightly can also deter slugs and snails.
More Backyard Brilliance Awaits:
Looking to expand your DIY gardening skills beyond the cold frame? Consider beautifying your outdoor space with living privacy screens that offer both aesthetic appeal and natural boundaries. For those interested in sustainable landscaping, exploring drought-tolerant plants can transform your garden into an eco-friendly oasis, requiring less water and maintenance. If you’re a fan of edible landscapes, learning how to incorporate fall crops into your garden design provides late-season harvests and year-round interest. Don’t forget to elevate your garden’s aesthetic with smart tech garden hacks that blend functionality with modern convenience for an optimized growing experience, or learn how to create your own DIY dried flower arrangements to bring your garden’s beauty indoors.


