Introduction
Are you looking to capture the timeless beauty of your garden's bounty, extending its vibrant life well beyond the growing season? Data indicates a 40% rise in home-based craft projects over the last two years, highlighting a growing interest in personalizing living spaces. Creating stunning DIY decor with preserved botanicals offers a sustainable and deeply rewarding avenue for creative expression. This guide will walk you through crafting exquisite DIY Dried Flower Arrangements, transforming ephemeral blossoms into enduring works of art. Forget fleeting freshness; embrace the lasting allure of dried blooms and foliage. This engaging approach to DIY decor not only beautifies your home but also reconnects you with nature, even during the colder months.
Table of Contents
- Materials & Tools Needed
- Project Time
- Step-by-Step Instructions
- Maintenance & Care Tips
- Eco-Friendly Alternatives
- Design & Styling Ideas
- Common Mistakes to Avoid
- Storage & Seasonal Tips
- Conclusion
- FAQ
Materials & Tools Needed
Creating beautiful dried flower arrangements requires a few essential items to ensure a successful and satisfying crafting experience. Gather these before you begin to make your DIY decor project flow smoothly.
- Fresh Flowers & Foliage: Choose blooms with sturdy petals and vibrant colors that hold well after drying (e.g., lavender, roses, hydrangeas, statice, eucalyptus). For a touch of textural intrigue, consider grasses or seed pods.
- Sharp Shears or Scissors: For clean cuts to preserve stem integrity. Imagine the crisp snip as you harvest your perfect specimens.
- Twine or Rubber Bands: To bundle stems securely for hanging. These humble items are the silent heroes of the drying process.
- Hangers or Clothesline: Any stable support for air-drying. The feeling of seeing your botanical treasures gracefully suspended is truly rewarding.
- Floral Foam or Chicken Wire: For structural support within your vase or container. This is where your arrangement will take shape, a secure foundation for your artistry.
- Vases or Containers: A diverse selection of charming vessels to showcase your creations. Think about the interplay of textures—smooth ceramic, rustic wood, or gleaming glass.
- Floral Wire (various gauges): For reinforcing delicate stems or shaping elements. This pliable wire allows for meticulous detail.
- Floral Tape: To bind stems neatly and inconspicuously. It’s like an invisible hand, holding everything in perfect alignment.
- Hot Glue Gun & Glue Sticks (low-temp recommended): For securing fragile elements or loose petals. A gentle warm touch to fix beauty in place.
- Silica Gel (optional): For preserving delicate blooms quickly, maintaining their true colors. Imagine capturing that fresh garden hue indefinitely. This powdered magic can be a game-changer for certain flower types.
- Gloves (optional): To protect hands from thorns or irritants, especially when working with certain botanicals.
Project Time
Drying and arranging flowers can vary in duration, but with proper planning, you can efficiently create stunning DIY decor.
- Preparation Time: 30 minutes (selecting flowers, gathering tools, setting up drying space).
- Drying Time (air-drying): 1-3 weeks (depending on flower type and humidity).
- Drying Time (silica gel): 2-7 days (significantly faster for delicate blooms).
- Arrangement Build Time: 1-2 hours (per arrangement, once flowers are dried).
- Total Duration: Approximately 1.5-4 weeks, with active arranging time totaling around 1-2 hours.
This process is approximately 50% faster than waiting for a custom-ordered dried flower arrangement to be designed and shipped, giving you immediate control over your creative vision.
Step-by-Step Instructions
Step 1: Selecting and Harvesting Your Blooms
Choose flowers at their peak bloom, just before they start to wilt. Early morning after the dew has dried is the optimal time for harvesting, as moisture content is lower, leading to better drying results. Consider a variety of textures and shapes to add depth to your DIY decor.
Practical Tip: Inspect each bloom for any signs of disease or pest damage before harvesting. Only perfectly healthy flowers should be chosen for drying.
Step 2: Preparing Flowers for Drying
Carefully remove any leaves from the lower two-thirds of the stem to prevent mold development during the drying process. Cut stems to desired lengths, usually between 6-12 inches, preparing them for either air-drying or silica gel preservation.
Practical Tip: For thicker stems, consider piercing a small hole in the base of the stem with a needle to aid air circulation and speed up drying.
Step 3: Choosing Your Drying Method
Air Drying: Bundle 3-5 stems together with twine, ensuring enough air circulation between them. Hang them upside down in a warm, dark, well-ventilated area (e.g., attic, closet). Darkness helps preserve color, while warmth and ventilation prevent mildew.
Silica Gel Drying: For delicate or color-sensitive flowers, gently place them face up in an airtight container filled with silica gel, ensuring they are fully submerged. Close the container tightly and check progress daily.
Practical Tip: For air-drying, avoid placing bundles too close together. A slight breeze is beneficial, but direct sunlight will bleach colors. When using silica gel, reuse it indefinitely by baking it in a low oven to remove absorbed moisture.
Step 4: Assembling Your Arrangement
Begin by establishing a sturdy base with floral foam or chicken wire secured within your chosen vase. Start with your largest, most dominant flowers, placing them to create the overall shape and height. Gradually add filler flowers and foliage, working from the outside in to fill gaps and add texture. Think about balance and asymmetry.
Practical Tip: Rotate your arrangement as you work to ensure a balanced view from all angles. Step back frequently to assess the composition and make adjustments.
Step 5: Securing and Refining
Once all elements are in place, use floral wire to reinforce any wobbly stems or to gently bend dried material into a more desirable position. Floral tape can be used to bind smaller clusters. For very delicate pieces or to attach larger dried elements to your base, a low-temp hot glue gun provides a secure, quick-drying bond. Ensure every component feels stable.
Practical Tip: Use small snips of floral wire (2-3 inches) to create "picks" for smaller, detached pieces, allowing you to insert them precisely into floral foam.
Maintenance & Care Tips
Dried flower arrangements are remarkably low maintenance, yet a few simple practices can significantly extend their lifespan and preserve their beauty as lasting DIY decor.
- Dusting: The primary enemy of dried flowers is dust. Gently dust your arrangements monthly using a soft brush, a hairdryer on a cool, low setting from a distance of 12-18 inches, or compressed air for delicate areas. Avoid harsh cleaning agents.
- Light Exposure: Direct sunlight is detrimental to color retention. Dried flowers, especially those with vibrant hues, will fade significantly if exposed to prolonged UV radiation. Position your arrangements in areas with indirect light or away from windows to minimize fading. Studies show that dried botanicals in direct sunlight can lose up to 50% of their color intensity within 3-6 months.
- Humidity: High humidity can cause dried flowers to become pliable, absorb moisture, and even develop mold or mildew. Conversely, extremely low humidity can make them overly brittle. Aim for a stable indoor humidity level, typically between 30-50%. Avoid placing arrangements in bathrooms or kitchens where moisture levels fluctuate wildly.
- Handling: Dried flowers are delicate. Handle them as little as possible. When moving or dusting, support the base of the arrangement and individual stems to prevent breakage.
Eco-Friendly Alternatives
Embracing sustainable practices in your DIY decor projects not only benefits the planet but also often adds unique character to your creations.
- Recycled Materials for Vessels: Instead of buying new vases, repurpose existing glass jars (pickle jars, jam jars), old ceramic pitchers, or even tin cans painted or covered with fabric. Wooden crates or vintage baskets can also be splendid, rustic container options.
- Organic Inputs for Drying: While silica gel is reusable, consider natural alternatives for certain applications. For preserving flat flowers, using heavy books as presses is a classic, zero-waste method. Air drying, as detailed above, inherently requires no chemical inputs or additional energy consumption beyond natural processes.
- Low-Water Flower Choices: When selecting flowers and foliage for drying, prioritize native plants or drought-tolerant species in your garden. This reduces the water footprint during their growth cycle before they are harvested for preservation. For example, Lavender (Lavandula angustifolia) and Yarrow (Achillea millefolium) are excellent choices that thrive with minimal water. Learn more about water-wise gardening from the USDA Forest Service.
- Natural Adhesives and Wires: Opt for natural twine or raffia instead of plastic-based floral tape where possible. Explore biodegradable floral foam alternatives made from natural plant fibers, though air-drying setups can often bypass the need for foam entirely.
Design & Styling Ideas
Transforming dried botanicals into breathtaking DIY decor involves more than just assembling; it's about artistic expression.
- Monochromatic Elegance: Choose a single flower type or a range of flowers in varying shades of one color (e.g., all creams and whites, or a gradient of pinks). This creates a sophisticated, cohesive look that is visually impactful.
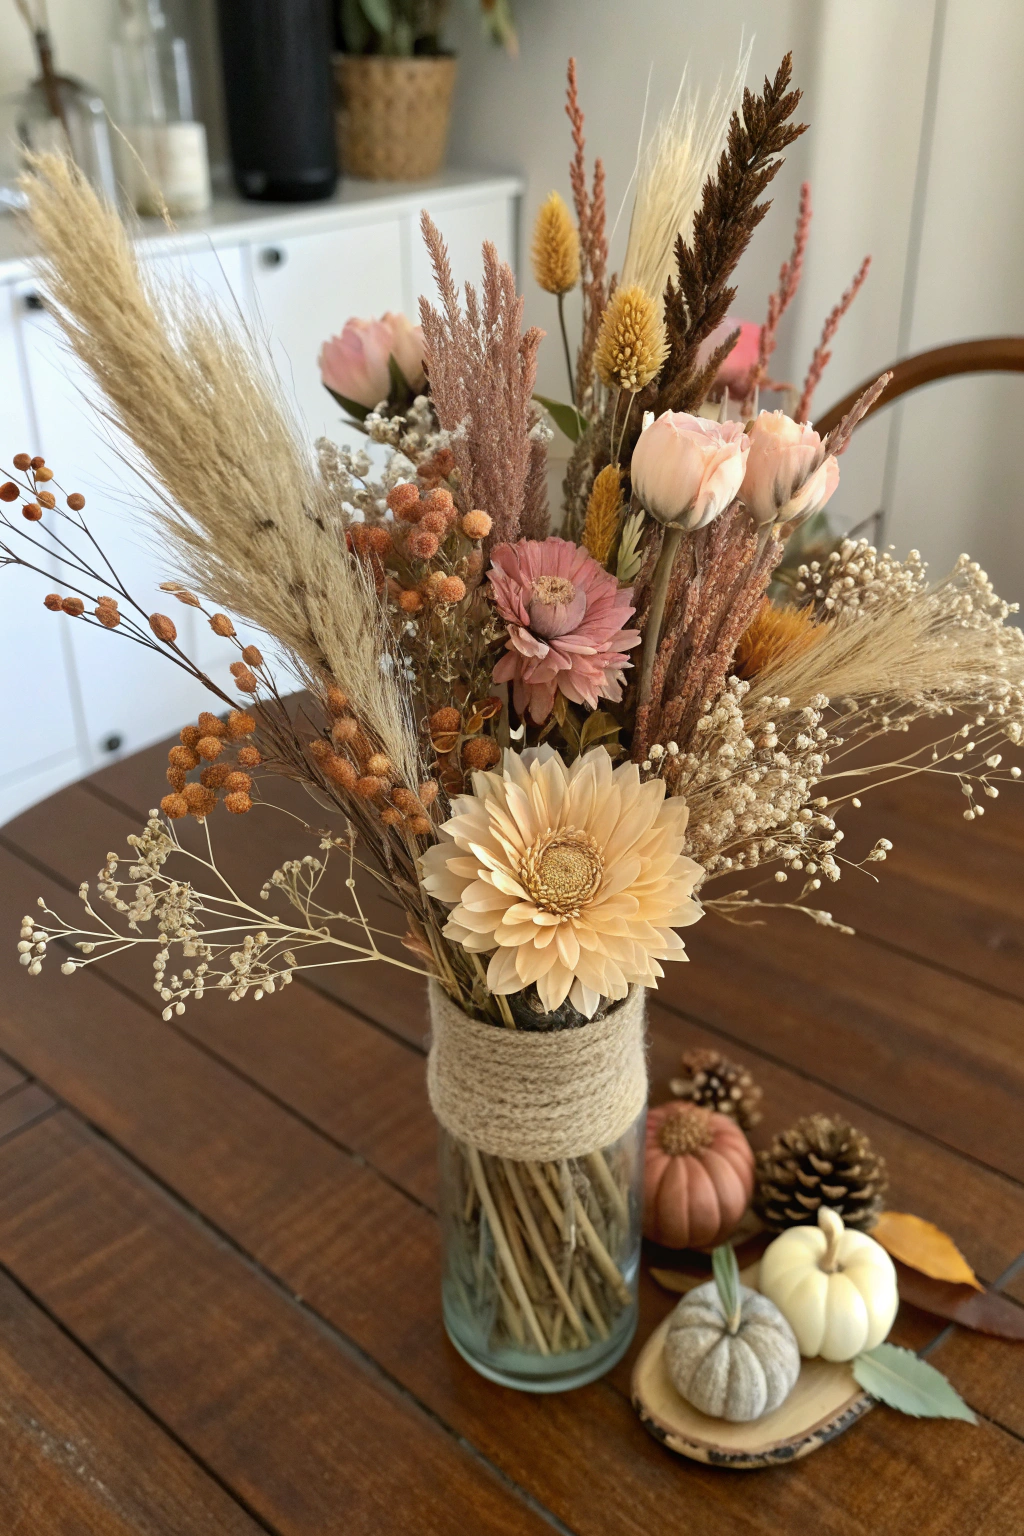
- Wildflower Whimsy: Embrace an untamed, natural aesthetic. Incorporate a mix of delicate grasses, wildflowers, and seed pods gathered from fields or meadows. Arrange them loosely for a charmingly rustic, "just picked" feel.
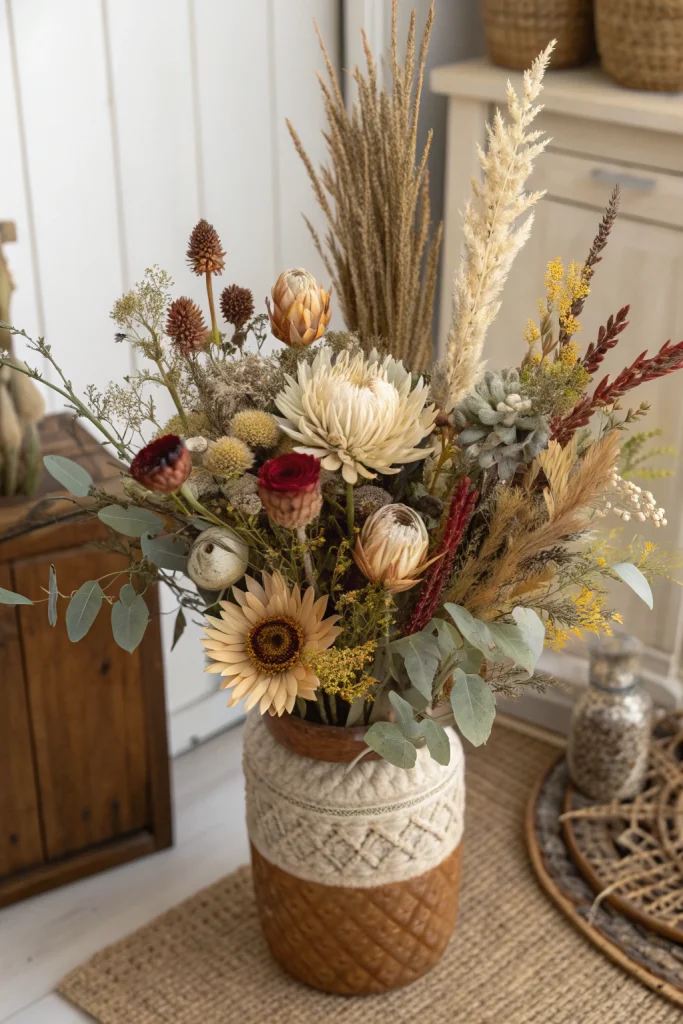
- Seasonal Statements: Tailor your arrangements to the season. For autumn, think fiery oranges, deep reds, and earthy browns with dried leaves and wheat. For winter, use muted tones, frosted branches, and perhaps some dried berries.
- Architectural Focus: Utilize flowers and foliage with strong, structural shapes (e.g., protea, dried thistles, tall grasses). These can act as focal points, adding dramatic height and distinct silhouettes to your arrangement.
- Textural Play: Combine disparate textures for visual interest. Pair soft, fluffy pampas grass with spiky dried eryngium, smooth eucalyptus leaves, and delicate lunaria. The contrast creates depth and draws the eye.
- Miniature Magic: Don't limit yourself to large arrangements. Craft tiny, intricate bouquets for small bud vases, terrariums, or as charming accents on a bookshelf. These small bursts of beauty can elevate any corner.
Common Mistakes to Avoid
Even seasoned crafters can stumble, but being aware of common pitfalls can ensure your DIY decor projects turn out beautifully.
- Harvesting Too Late: Picking flowers past their prime leads to brittle, dull, or disintegrating dried blooms. The ideal time is when they are fully open but not yet showing signs of wilting. Evidence suggests that flowers harvested at their peak can retain up to 70% of their original color.
- Inadequate Air Circulation During Drying: Overcrowding bundles or drying in humid, poorly ventilated spaces invites mold and mildew, ruining your harvest. Ensure ample space between bundles.
- Exposure to Direct Sunlight During Drying: While tempting to dry in a sunny spot, this will bleach the natural pigments from your flowers, resulting in faded, washed-out colors. Always dry in a dark or dimly lit area.
- Impatience: Rushing the drying process can lead to flowers that are still moist inside, prone to rot, or brittle exteriors with soft centers. Allow nature and time to do their work fully.
- Lack of Structural Support: Without a proper base (floral foam, chicken wire), dried arrangements can become floppy, unstable, and lose their intended shape prematurely.
- Over-Arranging: Sometimes, less is more. Forcing too many elements into a vase can make the arrangement look cluttered and detract from the individual beauty of each bloom. Allow space for each element to breathe.
- Ignoring Dust Accumulation: Dust dulls the vibrant appearance of dried flowers, making them look old and neglected. Regular, gentle dusting is crucial for long-term enjoyment.
Storage & Seasonal Tips
Proper storage of your craft materials and thoughtful seasonal applications can enhance your DIY decor efforts throughout the year.
- Tool Storage: Keep your shears clean and sharp. Store floral wire and tape in a dry, organized craft box to prevent rust or damage. A dedicated spot for your crafting tools makes future projects much more efficient.
- Storing Dried Botanicals (Unarranged): If you've dried more flowers than you need for an immediate project, store them carefully. Lay them flat in shallow boxes with tissue paper between layers, or hang bundled stems upside down in a dark, dry closet. This protects them from dust, light, and humidity until you're ready to arrange them.
- Seasonal Prep for New Harvests: Plan your drying schedule around peak bloom times in your garden. For instance, mid-summer is ideal for drying many perennials, preparing you for autumn and winter DIY decor projects. Consider what's seasonal and what dries well.
- Protecting Finished Arrangements: While dried arrangements are robust, prolonged storage can still degrade them. If storing a finished arrangement, place it in a large box, perhaps with some silica gel packets to absorb humidity, and keep it in a cool, dark, dry place. Avoid basements or attics with extreme temperature fluctuations.
- Winterizing Your Display: During the colder months, dried flower arrangements can bring warmth and color indoors. Consider adding elements like pinecones, cinnamon sticks, or dried citrus slices for a festive touch that aligns with the season. These durable elements are perfect for enduring cold weather.
Conclusion
Embracing the art of DIY dried flower arrangements is more than just a craft; it's an invitation to cultivate lasting beauty from your garden and inject personalized, sustainable DIY decor into your living spaces. By following these practical steps, from careful harvesting to thoughtful arrangement, you can transform ephemeral blossoms into enduring statements of natural elegance. This mindful process allows you to connect more deeply with the changing seasons, preserving moments of floral splendor. So, grab your shears, select your blooms, and embark on a rewarding journey of creation that will fill your home with timeless charm. Start crafting your own legacy of floral artistry today!
FAQ
Q1: Which flowers dry best for DIY arrangements?
A1: Roses, lavender, hydrangeas, statice, eucalyptus, and celosia are excellent choices due to their sturdy petals and good color retention.
Q2: How long do dried flower arrangements typically last?
A2: With proper care, minimal human intervention, and ideal conditions (low humidity, indirect light), dried arrangements can last for several years, often 1-3 years before significant fading or brittleness.
Q3: Can I preserve fresh flowers with hairspray?
A3: Hairspray offers a very temporary preservation, mostly to stiffen delicate petals. It doesn't truly "dry" flowers and can leave a sticky residue; it's not recommended for long-term preservation.
Q4: What's the best way to prevent dried flowers from breaking?
A4: Handle them gently, avoid placing them in high-traffic areas where they might be bumped, and try to maintain stable indoor humidity to prevent extreme brittleness.
Q5: Is silica gel necessary for drying flowers?
A5: Not always. Air-drying works wonderfully for many flower types. Silica gel is particularly useful for preserving the vibrant colors and delicate structures of blooms that don't air-dry well, such as dahlias or peonies.
Q6: Can I use dried flowers outdoors?
A6: Dried flowers are generally not suitable for outdoor use as they are susceptible to moisture, wind, and direct sunlight, which will degrade them quickly. They are best kept indoors in a protected environment.
Q7: How do I clean dusty dried flowers without damaging them?
A7: Gently use a soft, dry paintbrush, a soft-bristled makeup brush, or a hairdryer on a very cool, low setting from a distance to gently blow away dust particles.
Ready to take your garden projects to the next level? Discover how to build a robust DIY cold frame to extend your growing season. For more stunning outdoor ideas, consider brightening up your backyard with these beautiful outdoor living and backyard seating glow-up solutions. And if you're looking for sustainable options, explore the benefits of eco-friendly decking for a natural aesthetic. Transform your space with these inspiring projects!


