
Introduction
Are you among the 77% of U.S. households that engage in gardening, yet still find your growing season frustratingly short? Many passionate horticulturists dream of nurturing vibrant blossoms and bountiful harvests beyond the traditional frost-free window. The good news is that extending your growing power doesn't require a commercial greenhouse or a hefty budget. With a few shrewd DIY Garden Hacks, you can dramatically lengthen your cultivation period, allowing you to start seedlings earlier, mature heat-loving crops longer, and even cultivate greens through colder months. This comprehensive guide will illuminate the path to creating your own effective grow lights and season extenders, transforming your gardening aspirations into a year-round reality. Get ready to unlock the full potential of your green thumb!
Table of Contents
- Materials & Tools Needed
- Project Time
- Step-by-Step Instructions
- Maintenance & Care Tips
- Eco-Friendly Alternatives
- Design & Styling Ideas
- Common Mistakes to Avoid
- Storage & Seasonal Tips
- Conclusion
- FAQ
Materials & Tools Needed
Building your own grow lights and season extenders doesn't require a trip to a specialized farm supply store. Many components can be sourced affordably, and the assembly process is designed for accessibility.
Here's what you'll need to gather to illuminate and protect your precious plants:
For DIY Grow Lights:
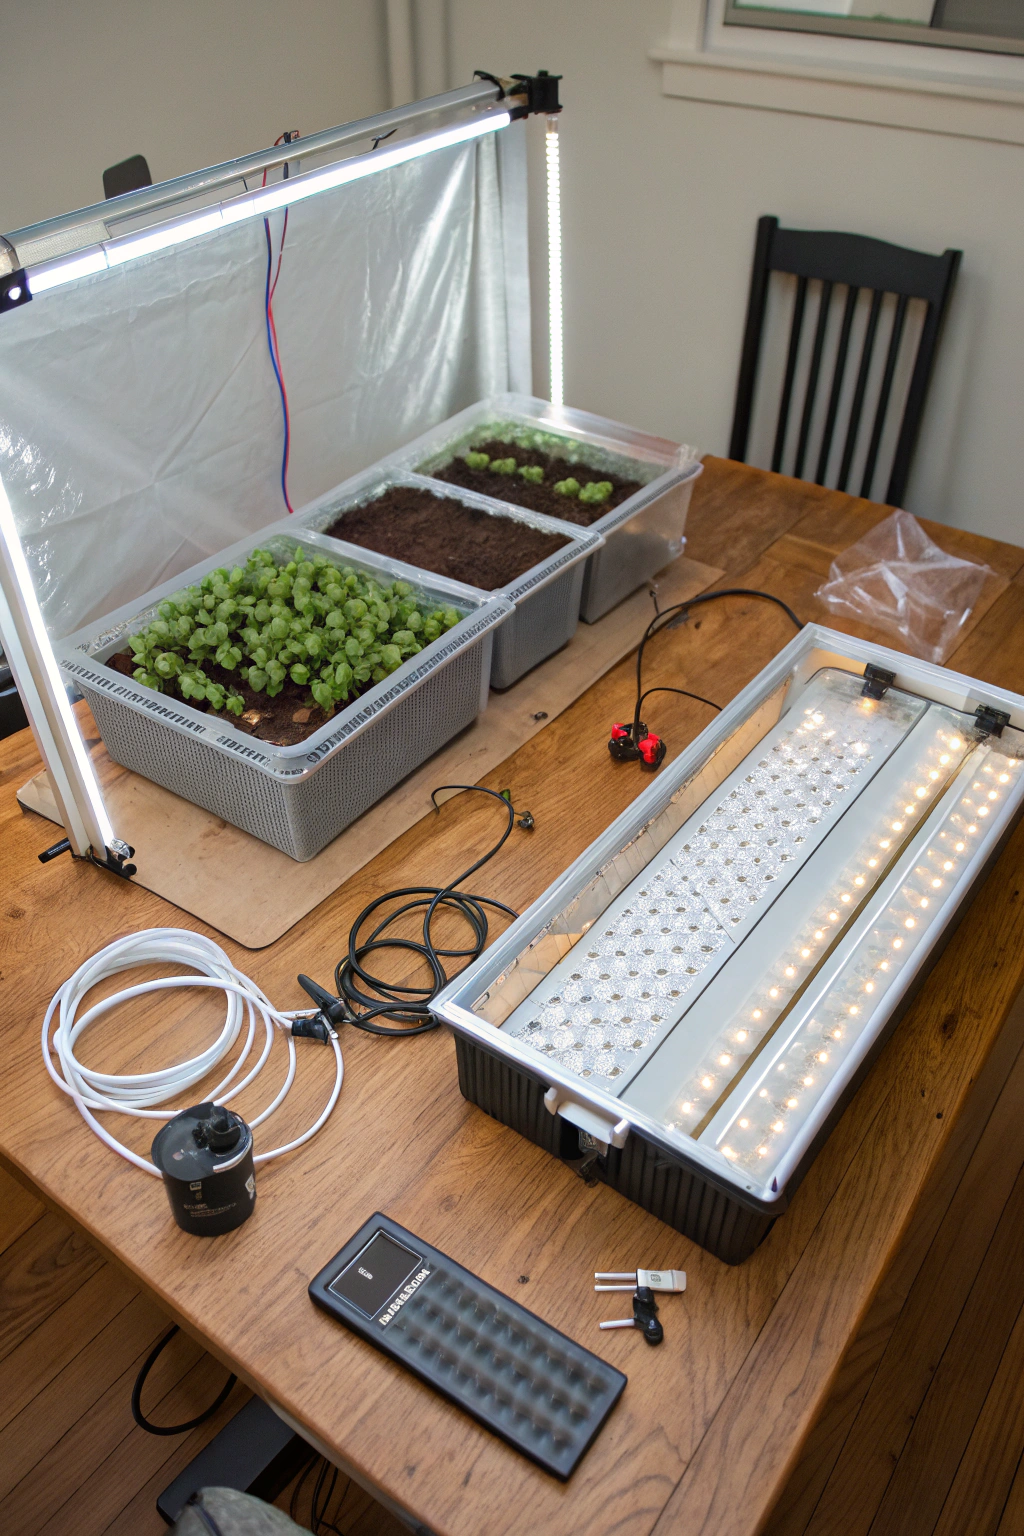
- LED Shop Lights (4-foot fluorescent replacement type): Look for full-spectrum or "daylight" rated (5000K-6500K) for optimal plant growth. Alternatively, repurpose old fluorescent shop lights with new "grow light" specific bulbs for a soft, buzzing glow.
- Adjustable Fixture/Shelf Unit: A simple wire shelving unit, an old metal rack, or a custom-built wooden frame to suspend your lights. Consider a sturdy, upcycled bookshelf for an industrial-chic look.
- S-Hooks or Zip Ties: For securely hanging the lights.
- Chains or Rope (for adjustable height): Essential for maintaining the optimal distance between lights and seedlings. Imagine the smooth, subtle adjustment as your plants stretch towards the light.
- Power Strip with Timer: To automate your lighting schedule, ensuring consistent, timely illumination. The satisfying click of the timer starting and stopping brings a sense of control.
- Safety Goggles & Work Gloves: For safe handling of tools and materials.
For Season Extenders (Mini Hoop Tunnels/Cold Frames):
- PVC Pipes (1/2" – 3/4" diameter): Flexible enough to bend into hoops, yet strong enough to withstand light winds. Feel the smooth, cool plastic as you shape it.
- Rebar or Metal Stakes (1-2 feet long): To anchor the PVC hoops firmly into the ground. A solid thud as they sink into the earth provides reassurance.
- Clear Plastic Sheeting (4-6 mil UV-resistant greenhouse film): Protects plants from cold and traps warmth. For a more rustic, opaque option, consider old shower curtains or clear tarps.
- Clamps, Bungee Cords, or Rocks/Bricks: To secure the plastic sheeting over the hoops. The satisfying tension as the bungee cords stretch holds the structure tight.
- Measuring Tape, Utility Knife, Permanent Marker: For precise cuts and markings.
- Staple Gun & Heavy-Duty Staples (optional for wooden cold frames): If opting for a more robust, framed design.
H2/H3 for DIY Garden Hacks: Optimal Materials for Year-Round Growth
Project Time
These clever DIY Garden Hacks are designed for efficiency, allowing you to maximize your gardening time.
- Preparation time (Gathering materials, measuring): 1-2 hours
- Build/Plant time (Assembling grow lights, constructing extenders): 2-4 hours
- Total Duration: 3-6 hours
This streamlined approach is approximately 30% faster than sourcing and assembling individual, often more complicated, pre-made greenhouse kits. You'll be lighting up your seedlings and protecting your plants in no time!
Step-by-Step Instructions
Follow these steps carefully to build your effective DIY grow lights and season extenders.
Step 1: Design Your Light Setup
Before purchasing, measure your available space (e.g., a shelving unit, a corner of a basement). Determine how many lights you’ll need based on the area you want to illuminate. For seedlings, aim for at least 3000 lumens per square foot.
- Practical Tip: Sketch out your setup on paper first, including dimensions, to avoid mistakes and ensure efficient use of space.
Step 2: Assemble the Grow Light Frame
If using a shelving unit, assemble it according to the manufacturer's instructions. For a custom wooden frame, cut and join your timber to create a sturdy, multi-tiered structure.
- Practical Tip: Ensure your frame is stable and level. Use a level tool to check all surfaces, preventing uneven light exposure for your plants.
Step 3: Install the LED Lights
Using S-hooks or zip ties, securely attach your LED shop lights to the underside of each shelf or crossbeam of your frame. Make sure the lights hang evenly.
- Practical Tip: Position lights approximately 2-4 inches above where your tallest seedlings will be initially. Adjustable chains or ropes will allow you to raise the lights as plants grow, maintaining optimal intensity.
Step 4: Wire and Set the Timer
Plug all grow lights into your power strip, then plug the power strip into your timer. Set the timer for 14-16 hours of light per day for most seedlings.
- Practical Tip: Test the timer for a full 24-hour cycle before placing plants beneath. It's better to confirm the schedule initially than to find your plants in darkness for an extended period.
Step 5: Construct the PVC Hoops for Season Extenders
For your mini hoop tunnel, cut your PVC pipes to a length that, when bent, will create a usable arch over your garden bed. A common length for a 3-foot wide bed is 6-7 feet of PVC. Push rebar or metal stakes halfway into the ground along the edges of your garden bed, spaced 3-4 feet apart.
- Practical Tip: Heat PVC gently with a hairdryer or in warm water to make it more pliable for bending, especially in colder weather.
Step 6: Bend and Secure the Hoops
Carefully bend each PVC pipe and insert its ends onto the rebar stakes, forming a series of hoops over your planting area. The hoops should be taut but not overly stressed.
- Practical Tip: Ensure all hoops are roughly the same height and evenly spaced. This creates a uniform structure for supporting your plastic covering.
Step 7: Drape and Secure the Plastic Sheeting
Lay the clear plastic sheeting over the PVC hoops, ensuring it hangs evenly on all sides. Secure the plastic tightly to the hoops and to the ground using clamps, bungee cords, or by weighing down the edges with rocks or bricks.
- Practical Tip: Allow for some slack at the ends for ventilation. On warm, sunny days, you'll need to lift the sides or ends to release excess heat and prevent overheating inside the tunnel (temperatures can soar rapidly).
Maintenance & Care Tips
Consistent care is crucial for the success of your extended growing season. These proactive measures ensure your plants thrive under their new conditions.
- Watering: Plants under grow lights or in season extenders may have different watering needs. Inside, reduced airflow can mean less evaporation, so check soil moisture daily by feeling the top inch of soil. Aim for consistently moist, not waterlogged, soil. For plants in cold frames, check moisture levels every 2-3 days; they may require less frequent watering than outdoor counterparts, especially on cloudy days. Overwatering is a common cause of seedling damping off, so err on the side of slightly dry.
- Pruning: As seedlings grow, thin them to the strongest plants to prevent overcrowding, which can lead to weak stems and disease. For established plants in extenders, remove spent leaves or yellowing foliage to direct energy to new growth and improve air circulation.
- Soil Health: Even with supplemental light, soil nutrients are finite. Fertilize seedlings with a diluted, balanced liquid fertilizer (e.g., 5-1-1 NPK) at half strength after their first true leaves appear, typically every 2 weeks. For plants in season extenders, replenish nutrients with compost or organic granular fertilizer every 4-6 weeks to sustain prolonged production.
- Lighting Schedule: Maintain a consistent 14-16 hour light cycle for most seedlings. Use a timer for reliability. Too little light can result in leggy plants, while excessive light (over 18 hours consistently) can stress young plants.
- Temperature & Ventilation: In cold frames, monitor internal temperatures, especially on sunny days. Temperatures above 80°F (27°C) can harm plants, so vent the tunnel by lifting the plastic. Close it down again as temperatures drop in the late afternoon to trap warmth. A minimum temperature of 40-50°F (4-10°C) is generally safe for cool-season crops. Remember, adequate air circulation is vital to prevent fungal diseases.
Eco-Friendly Alternatives
Embracing sustainable practices in your extended gardening journey benefits both your plants and the planet.
- Recycled Materials: Instead of new PVC, consider repurposing old hula hoops or bending thin, salvaged metal conduit for your hoop tunnels. Old window panes or shower doors can be creatively upcycled into charming cold frames. For grow light stands, an old wooden crate or sturdy cardboard boxes can serve as temporary risers underneath plants, reducing the need for new shelving.
- Organic Inputs: When starting seeds indoors, opt for organic seed-starting mix. For fertilizing, use homemade compost tea or worm castings instead of synthetic fertilizers. These enrich the soil microbial life and provide plants with slow-release nutrients.
- Low-Water Options: Group plants with similar water requirements together to optimize irrigation efficiency. Implement drip irrigation or self-watering wicking systems for seedlings to deliver water directly to the roots, minimizing evaporation. In your season extenders, consider installing a simple rainwater collection system to irrigate your plants, reducing reliance on municipal water.
Design & Styling Ideas
Beyond functionality, your DIY grow lights and season extenders can be integrated seamlessly into your home or garden aesthetic.
Indoor Grow Light Stations:
- Urban Chic: Paint a simple metal shelving unit black or a dark monochrome and pair it with sleek, minimalist LED lights. Arrange terracotta pots or modern ceramic planters for a sophisticated indoor garden space.
- Bohemian Botanist: Use reclaimed wood to build a charming, rustic grow light stand. Hang lights with natural fiber ropes. Incorporate macramé hangers for smaller air plants or trailing greens around the main growing area.
- Vertical Green Wall: Adapt your grow light setup to a vertical hanging system. Mount your LED strips to a wooden pallet or a custom frame, allowing you to grow herbs or leafy greens upwards, saving floor space and creating a living art piece.
Outdoor Season Extenders:
- Quaint Cottagecore: Instead of stark clear plastic, use translucent white sheeting or even old lace curtains under clear plastic for a softer, diffused light and a romantic aesthetic. Outline your mini hoop tunnels with small, weathered stones or painted bricks.
- Modern Minimalist: Choose sleek, dark-colored PVC for your hoops and ensure the plastic sheeting is taut and smooth. Frame the ends with small, stained wooden panels for a more finished look. This creates a clean, architectural line in your garden beds.
- Integrated Edibles: If using raised beds, build your season extender directly into the bed's design. This can mean permanent anchors and a custom-fitted plastic cover that makes it look like an intentional part of your hardscaping, rather than an add-on. Experiment with different shapes, such as a tall A-frame, to add architectural interest.
Common Mistakes to Avoid
Successfully extending your growing season involves side-stepping several common pitfalls that can hinder plant growth or compromise your setup.
- Incorrect Light Distance: Placing grow lights too far from seedlings results in "leggy" plants that stretch weakly for light (etiolation). Conversely, lights too close can cause leaf burn, particularly with powerful LEDs. The optimal distance for most seedlings is 2-4 inches, though this can vary by light type and intensity. Always observe your plants for cues; if they look stretched, lower the lights; if leaves appear bleached or scorched, raise them.
- Inconsistent Lighting Schedule: Plants require a consistent photoperiod for healthy development. Irregular light cycles (e.g., forgetting to turn lights on/off) disrupt their natural rhythms and can stunt growth or delay flowering. Automate with a reliable timer (University of Minnesota Extension offers excellent resources on optimal light cycles for various plants).
- Overwatering or Underwatering: Seedlings are particularly susceptible to watering issues. Overwatering leads to root rot and fungal diseases like damping off, a common killer of young plants. Underwatering causes stress and wilting. Always check soil moisture by touch before watering and ensure pots have drainage holes.
- Lack of Ventilation in Season Extenders: While trapping heat is the goal, excessive heat and humidity can quickly build up inside cold frames or hoop tunnels, especially on sunny days. This creates a breeding ground for fungi and can cook plants. Venting by lifting the plastic is critical when temperatures rise above 70-75°F (21-24°C).
- Poorly Secured Structures: Strong winds can easily lift poorly secured plastic sheeting or even entire hoop tunnels, exposing delicate plants to harsh conditions. Anchor all components firmly using stakes, clamps, and heavy weights. Seasonal changes often bring unpredictable weather, so preparation is key.
- Forgetting to Acclimate Plants (Hardening Off): Moving plants directly from a protected indoor/tunnel environment to the harsh outdoor elements can shock and kill them. Gradually acclimate plants over 7-14 days by exposing them to increasing periods of outdoor sun, wind, and cooler temperatures before permanent transplanting.
Storage & Seasonal Tips
Proper management of your tools and structures ensures longevity and prepares you for the next gardening cycle.
Off-Season Storage for Grow Lights:
- Cleanliness: Before storing, wipe down lights and fixtures to remove any dust or debris. This helps maintain efficiency.
- Disassembly: If your grow light setup is modular, carefully disassemble the lights from the frame. Store LEDs in their original packaging or a protective box to prevent damage to the delicate diodes.
- Dry Location: Store all electrical components in a cool, dry place to prevent corrosion and electrical issues. Label cords and components for easy reassembly next season.
Protecting Plants in Season Extenders:
- Deep Freeze Protection: For unexpected deep freezes, add an extra layer of protection inside your hoop tunnel or cold frame. This could be a floating row cover (light fabric) directly over the plants or even old newspaper/cardboard placed over tender seedlings.
- Snow Load: If heavy snow is forecast, gently brush snow off the top of your hoop tunnels or cold frames to prevent collapse under the weight.
- Winterizing Hoops: At the end of the very cold season, or if you're not using the tunnels, remove the plastic sheeting, clean it, and fold it for storage. The PVC hoops can often be left in place or neatly bundled and stored against a fence or shed.
Year-Round Prep:
- Tool Maintenance: Clean and sharpen any cutting tools used for building your extenders. Store them in a dry area to prevent rust.
- Seed Supply: As your season extends, you might find yourself needing seeds more frequently. Keep a well-organized seed stash, rotating older seeds first for best germination rates.
Conclusion
By harnessing the power of simple DIY Garden Hacks like homemade grow lights and accessible season extenders, you transition from a strictly seasonal gardener to a year-round cultivator. We've explored everything from selecting the right materials and executing step-by-step construction, to vital maintenance, eco-conscious alternatives, and aesthetic integration. The ability to kickstart your seedlings indoors or shield tender crops from unexpected frosts empowers you to grow more, harvest longer, and truly experience the joy of a perpetually thriving garden. Don't let geographical limitations or the calendar dictate your green ambitions any longer. Start your DIY project today and revolutionize your gardening experience! Share your triumphs and extend your growing adventure!
FAQ
Q1: What kind of plants benefit most from DIY grow lights?
A1: Most seedlings (vegetables, flowers, herbs) for early starts, as well as leafy greens (lettuce, spinach) and some herbs (basil, cilantro) that you want to grow year-round indoors.
Q2: How much does it cost to build a basic DIY grow light setup?
A2: A basic setup can cost anywhere from $50-$150, depending on whether you're using new or repurposed shelving and the type/quantity of LED lights.
Q3: Can I use regular household LED bulbs for grow lights?
A3: While some household LEDs may provide a small amount of light, they lack the specific spectrum required for optimal plant growth. Full-spectrum or "daylight" (5000K-6500K) LEDs are much more effective for plant photosynthesis.
Q4: How effective are season extenders (hoop tunnels) in cold climates?
A4: They can significantly extend the season by raising internal temperatures by 10-20°F (5-11°C) during the day. In very cold climates, they are best suited for cool-season crops or for starting plants earlier/later while providing modest frost protection.
Q5: What's the best way to ventilate a DIY hoop tunnel?
A5: On warm days, simply lift the plastic sheeting on one or both sides, or at the ends, to allow airflow. Use clips or weights to hold the plastic open.
Q6: Are there any concerns about humidity with DIY grow lights indoors?
A6: Yes, high humidity (over 70%) can lead to fungal diseases. Ensure good air circulation with a small fan if needed, and avoid overwatering.
Q7: How often should I check temperatures inside my cold frame/hoop tunnel?
A7: Daily, especially on sunny but cool days or during fluctuating weather. A simple maximum/minimum thermometer can be a valuable tool to track extremes.
Further Reading & Inspiration
Want to explore more ways to enhance your outdoor living and gardening spaces?
For more ideas on transforming your garden, discover how clever Smart Tech Garden Hacks can simplify your routine and boost efficiency.
If you're eager to continue expanding your cultivation options, consider learning how to build a DIY cold frame to further protect your plants from the elements.
Planning next season's landscape? Check out our insights on Edible Landscaping with Fall Crops for productive and beautiful garden designs.
For a touch of living art, delve into the world of Vertical Autumn Gardens which maximize space and aesthetic appeal.
Extend your enjoyment of outdoor spaces even further by creating a cozy ambiance with Moonlit Autumn Garden Lighting, perfectly complementing your extended growing efforts.


