Introduction {#introduction}
Have you ever envisioned a breathtaking outdoor sanctuary, a space that seamlessly blends with nature while offering unmatched durability and aesthetic appeal? With global demand for sustainable living accelerating, evidenced by a 25% increase in eco-conscious home improvement projects over the last three years (Environmental Building News, 2023), it's clear homeowners are seeking greener alternatives. This post dives deep into creating stunning natural environments using Eco decking and warm woods, elevating your outdoor living experience and transforming your space into a true haven. We’ll explore innovative ways to integrate these materials for captivating outdoor decor, focusing on sustainability, longevity, and timeless style. Whether you’re dreaming of a sprawling composite deck, a charming cedar pergola, or simply enhancing your garden pathways with natural timber, we’ve got you covered.
Table of Contents {#table-of-contents}
- Introduction
- Materials & Tools Needed
- Project Time
- Step-by-Step Instructions
- Maintenance & Care Tips
- Eco-Friendly Alternatives
- Design & Styling Ideas
- Common Mistakes to Avoid
- Storage & Seasonal Tips
- Conclusion
- FAQ
Materials & Tools Needed {#materials-tools-needed}
A successful outdoor transformation hinges on selecting the right materials and having the necessary tools at hand. The choice of decking material and accent woods will define both the aesthetic and longevity of your project.
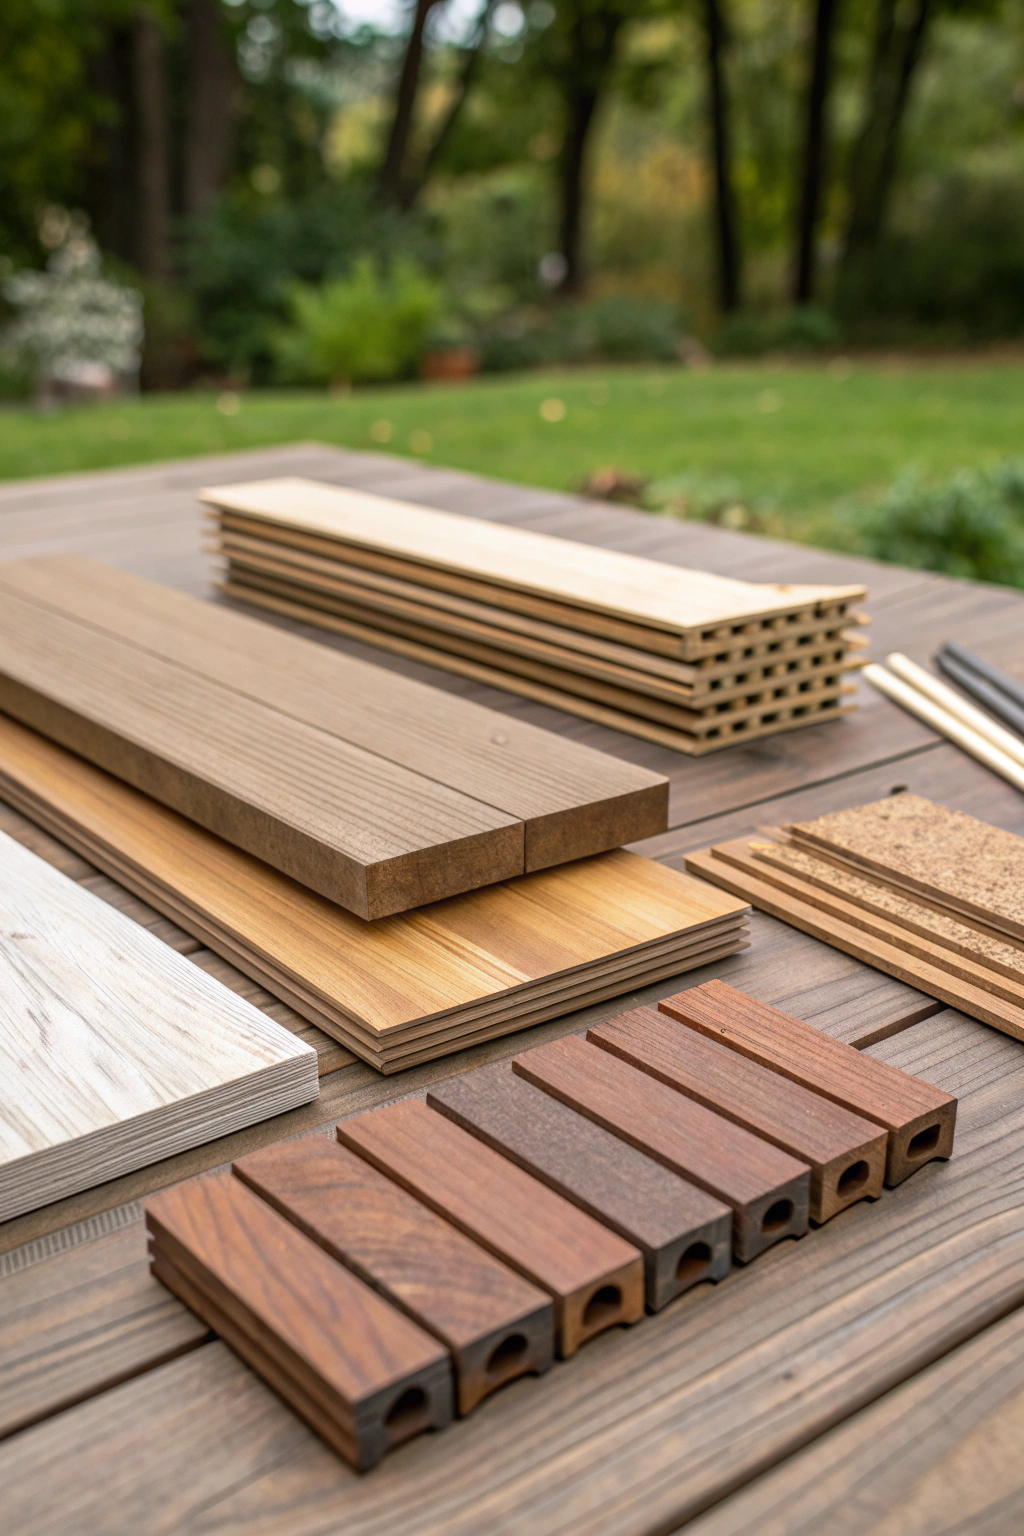
- Eco Decking Boards:
- Composite Decking: Choose high-quality, recycled plastic and wood fiber composites for their exceptional durability, minimal maintenance, and resistance to rot, splinters, and insect damage. Available in a spectrum of sophisticated, natural-looking hues like weathered grey, rich mahogany, or a deep espresso, offering a consistent finish.
- Treated Timber: For a more traditional feel, opt for pressure-treated pine or fir, known for its cost-effectiveness and good resistance to decay when properly maintained. These emit a subtle, earthy aroma when freshly cut.
- Warm Wood Accents:
- Cedar (Western Red or Eastern White): Ideal for railings, pergolas, or privacy screens. Its distinctive, spicy-sweet fragrance and natural resistance to decay and insects make it a top choice. It weathers beautifully to a silvery-grey unless stained.
- Redwood: Known for its rich, reddish-brown tones and superb stability, redwood is excellent for benches, planters, or decorative elements. It boasts impressive natural decay resistance. The touch of its smooth, fine grain is pure luxury.
- Mahogany/Ipe (Sustainably Sourced): For an exotic, luxurious touch with unparalleled hardness and rich, deep tones. These dense woods are incredibly durable, feeling weighty and substantial to the touch. Always ensure these are Forest Stewardship Council (FSC) certified to guarantee sustainable harvesting.
- Tools:
- Power Drill/Driver: Indispensable for fastening.
- Miter Saw/Circular Saw: For precise cuts, ensuring clean edges.
- Level: Crucial for a perfectly even surface.
- Tape Measure & Pencil: For accurate marking.
- Post Hole Digger/Auger: If building a raised deck requiring posts.
- Decking Screws/Hidden Fasteners: Specialized fasteners for a clean, secure finish.
- Sander (orbital or belt): For smoothing rough edges on warm wood accents.
- Safety Glasses & Gloves: Non-negotiable for protection.
- Paintbrush/Roller: For applying sealants or stains to natural wood.
- Wheelbarrow & Shovel: For groundwork and material transport.
Project Time {#project-time}
Achieving this enchanting outdoor decor transformation will require a dedicated time investment, though the results are undoubtedly worth it.
- Preparation time: 1-2 days (site clearing, material gathering, detailed planning).
- Build/plant time: 3-5 days (for an average 12×12 ft deck with basic warm wood accents).
- Total duration: 4-7 days.
This project can be up to 30% faster than complex masonry patios, primarily due to the modularity of decking and the relative ease of working with pre-fabricated lumber and composite boards.
Step-by-Step Instructions {#step-by-step-instructions}
Step 1: Planning Your Outdoor Oasis {#step-1-planning-your-outdoor-oasis}
Begin by sketching your ideal outdoor space, considering sunlight, existing landscape features, and intended use. Define the size and shape of your Eco decking and where your warm wood accents will be integrated, such as a pergola overhead or a decorative screen.
- Practical Tip: Create a detailed scaled drawing. This not only clarifies your vision but also helps in accurately calculating material quantities, preventing costly over or under-ordering.
Step 2: Preparing the Foundation {#step-2-preparing-the-foundation}
Clear the chosen site of any debris, vegetation, and large rocks. Level the ground as much as possible, ensuring proper drainage away from your home. For ground-level decks, a compacted gravel base is often sufficient; for raised decks, dig post holes and set concrete footings according to local building codes.
- Practical Tip: Use a string line and line level to establish the perimeter and desired height of your deck. This precise initial setup will save significant correction time later.
Step 3: Installing the Substructure {#step-3-installing-the-substructure}
Construct the deck frame using pressure-treated lumber for joists and beams. Ensure all components are level and square, employing a carpenter’s square and a long level. Joists should be spaced appropriately for your chosen decking material (typically 12-16 inches on center).
- Practical Tip: Apply joist tape over the top of your joists before laying boards. This inexpensive waterproof barrier protects the joist tops from rot and significantly extends the life of your deck substructure.
Step 4: Laying the Decking Boards {#step-4-laying-the-decking-boards}
Start laying your Eco decking boards perpendicular to the joists, working your way across the frame. If using hidden fasteners, follow the manufacturer’s instructions carefully for proper board spacing and secure attachment. For face-screwing, pre-drill holes to prevent splitting, especially near board ends.
- Practical Tip: Invest in a dedicated decking board straightening tool if working with any slightly warped boards. This simple leverage device can make installation smoother and result in a much straighter, more professional-looking deck surface.
Step 5: Incorporating Warm Wood Accents {#step-5-incorporating-warm-wood-accents}
With the main decking completed, it's time to add the rich textures of warm woods. This could involve building a cedar pergola, installing redwood privacy screens, or crafting custom planters. Measure, cut, and assemble these elements, ensuring all joints are secure and surfaces are smoothed.
- Practical Tip: Use exterior-grade wood glue in addition to mechanical fasteners for extra strength and longevity on all warm wood joinery. This creates a bond that resists expansion and contraction, which can be significant in outdoor environments.
Step 6: Finishing Touches {#step-6-finishing-touches}
Once all construction is complete, clean the entire area. For natural woods, apply a penetrating oil or stain with UV inhibitors to protect against weathering and enhance their inherent beauty. For composite decking, a simple wash is often all that's required.
- Practical Tip: Apply a "wet on wet" technique when staining natural wood: apply a second coat while the first is still slightly tacky to allow for deeper penetration and a more uniform, richer finish.
Maintenance & Care Tips {#maintenance-care-tips}
Proper maintenance is key to preserving the beauty and longevity of your Eco decking and warm wood features, ensuring your outdoor decor remains vibrant for years.
- Decking (Composite): Requires minimal upkeep. A quarterly cleaning with a mild soap and water solution is typically sufficient to remove dirt, pollen, and mildew. Avoid pressure washing at very high settings, which can damage the surface. Studies show composite decks retain 95% of their original color vibrancy for at least 10 years when properly cleaned.
- Decking (Treated Timber): Annually inspect for loose fasteners or splintering. Cleaning with a deck cleaner (following manufacturer instructions) and applying a water repellent or stain every 1-3 years will protect against UV damage and moisture absorption. This regular treatment can extend the lifespan of pressure-treated lumber by up to 50% compared to untreated wood.
- Warm Wood Accents (Cedar, Redwood): These woods naturally resist rot and insects, but external factors like UV radiation can cause them to grey or deteriorate over time. Apply a high-quality exterior penetrating oil or sealant annually for protection and to retain their rich, original color. For example, Western Red Cedar left untreated will typically silver within 6-12 months, whereas treated cedar maintains its reddish-brown hue for years.
- Pruning & Clearing: Regularly prune any overhanging branches or shrubs that might shade the deck excessively, promoting mildew growth, or drop significant debris. Keep leaves and organic matter from accumulating on the deck surface, especially in crevices, as this retains moisture and can lead to staining or decay for natural woods.
- Seasonal Inspections: Conduct thorough inspections each spring and fall. Look for any signs of wear, insect activity, or structural issues. Address small problems proactively to prevent them from becoming larger, more expensive repairs.
Eco-Friendly Alternatives {#eco-friendly-alternatives}
Integrating sustainability into your outdoor decor choices is not just a trend; it's a responsible commitment to our planet.
- Recycled Materials: Choose composite decking made from high percentages of post-consumer or post-industrial recycled plastics and wood fibers. Some brands boast up to 95% recycled content. Look for plastic lumber made entirely from recycled milk jugs and detergent bottles for structural elements or non-load-bearing applications.
- Organic Inputs: When planting around your deck or in integrated planters, opt for organic compost and fertilizers. These enrich the soil naturally and avoid introducing harmful chemicals into your yard and local ecosystem. For more information on sustainable practices, consider resources like the Sustainable Agriculture Research & Education (SARE) program.
- Low-Water Options: Design your surrounding landscape with drought-tolerant plants and consider permeable pathways leading to your deck, allowing rainwater to soak into the ground rather than run off. Utilizing plants native to your region significantly reduces water needs and supports local wildlife. The National Wildlife Federation’s Garden for Wildlife program offers excellent guidance on creating eco-friendly habitats.
- Salvaged or Reclaimed Wood: Explore opportunities to use salvaged lumber for non-structural elements like benches, decorative screens, or pergolas. Reclaimed barn wood or old deck boards can add character and reduce demand for new timber.
- Water-Based, Low-VOC Finishes: When staining or sealing natural woods, select water-based, low-VOC (volatile organic compound) products. These minimize chemical off-gassing, which is better for both the environment and your family's health.
Design & Styling Ideas {#design-styling-ideas}
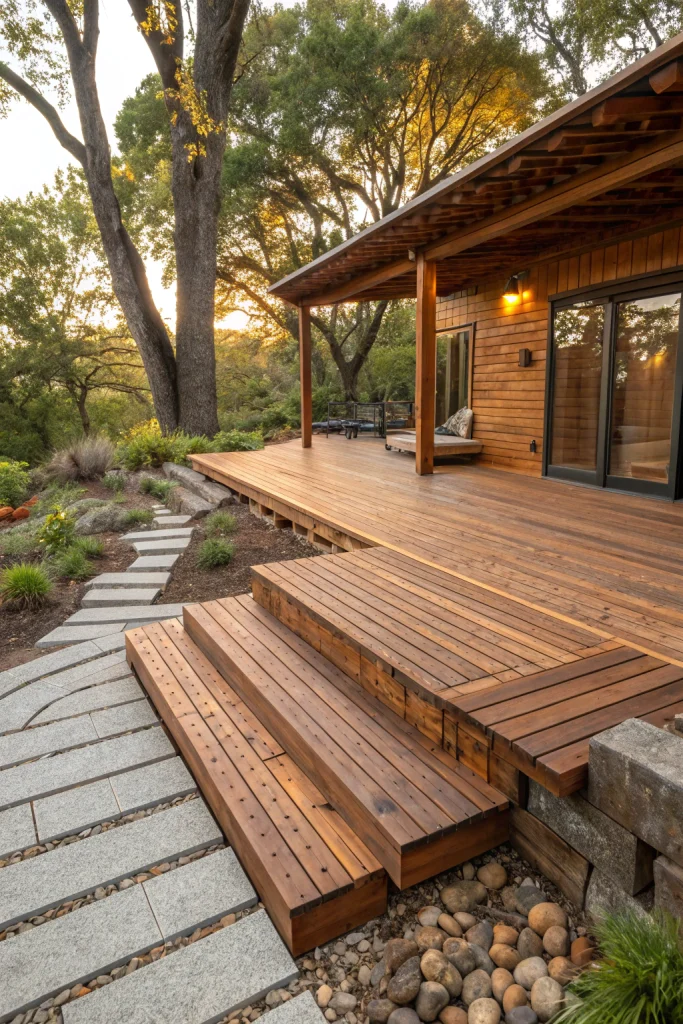
Unleash your creativity to blend the durability of Eco decking with the inviting aesthetics of warm wood, crafting a truly distinctive outdoor decor.
- Multi-Level Decking: Create visual interest and define different zones (dining, lounging, fire pit) with Eco decking at varying heights. Connect them with warm wood steps for a fluid transition.
- Integrated Planters: Build raised planters directly into your Eco deck using naturally rot-resistant warm woods like cedar or redwood. Fill them with vibrant seasonal flowers, fragrant herbs, or lush greenery to soften the edges and bring nature closer.
- Pergolas and Arbors: Construct a stunning pergola over a section of your deck using rich, warm woods. This provides shade and a structural element for climbing plants like wisteria or trumpet vines, creating a verdant canopy.
- Privacy Screens with Slats: Design vertical or horizontal slat screens from cedar or redwood. These offer privacy without completely blocking light or airflow, adding a modern, architectural element to your outdoor space.
- Custom Benches and Seating: Incorporate built-in benches using the same warm woods as your accents. These provide ample seating and a cohesive look, eliminating the need for bulky, separate furniture.
- Lighting Integration: Install subtle LED strip lighting beneath deck railings or steps for a warm, inviting glow at night. Couple this with strategically placed warm wood lanterns or string lights draped across a pergola for ambient illumination.
- Contrasting Textures: Pair the smooth, uniform surface of composite decking with rough-hewn or live-edge wooden slabs for coffee tables or side tables, adding an organic, tactile contrast.
- Color Palette Harmony: Choose Eco decking colors that complement the natural tones of your warm wood accents. Earthy browns, greys, and even deep olives can beautifully harmonize with the reddish hues of cedar or redwood.
Common Mistakes to Avoid {#common-mistakes-to-Avoid}
Even the most seasoned DIYer can overlook crucial details. Being aware of potential pitfalls can save significant time, money, and frustration on your outdoor decor project.
- Inadequate Foundation Preparation: Failing to properly level the ground or skipping crucial gravel compaction can lead to an unstable, uneven deck that sinks or shifts over time. A study by the Deck Manufacturers Association found that 60% of deck failures are attributed to compromised foundations (DMA 2022 Report).
- Ignoring Local Building Codes: Every region has specific requirements for deck construction, including footing depth, joist spacing, and railing height. Neglecting these can result in costly demolition, fines, or safety hazards. Always check with your local municipality before starting any major outdoor construction.
- Improper Fasteners: Using screws that aren't exterior-grade or specifically designed for decking materials can lead to rust stains, weakened connections, and early deck deterioration. Hidden fasteners often require specific tools and techniques to ensure proper board spacing and stability.
- Insufficient Ventilation: Trapping moisture underneath the deck surface can cause wood rot (for natural timbers) and mildew growth for both wood and composite. Ensure there's adequate airflow around and under your deck, especially if it's close to the ground. Maintain a minimum of 6-inch clearance.
- Over-Staining or Sealing: While protection is vital for natural woods, over-applying stains or sealants can create a sticky, peeling surface that is difficult to remediate. Follow manufacturer guidelines for application rates and recoat times. More is not always better when it comes to protective finishes.
- Neglecting Drainage: If rainwater pools on or near your deck, it shortens its lifespan and can create slippery, hazardous conditions. Ensure the deck's slope (if any) directs water away from the house and that surrounding landscaping doesn't obstruct drainage.
Storage & Seasonal Tips {#storage-seasonal-tips}
Maximizing the lifespan and beauty of your Eco decking and warm wood features means preparing them for seasonal changes.
- Tool Storage: Keep your power tools clean and dry in a shed or garage. Invest in tool hooks and shelving to organize smaller hand tools, preventing rust and misplacement. For garden tools, consider a dedicated storage rack to keep them off the ground.
- Plant Protection (for integrated planters/pots): If you have delicate plants in your integrated warm wood planters, prepare them for winter. For non-hardy perennials, either bring them indoors or provide adequate winter protection like burlap wraps or frost cloths. For evergreens, ensure they are well-watered before the first hard freeze.
- Deck & Wood Prep for Winter: Before winter, give your Eco decking a thorough cleaning to remove dirt and organic debris. For natural wood accents, ensure any protective oils or stains are freshly applied and completely dry. This helps prevent moisture penetration and freeze-thaw damage. Remove any potted plants, furniture, or barbecues that could trap moisture and cause stains or mildew.
- Furniture Care: Clean and cover outdoor furniture, or store it indoors if possible. Even weather-resistant pieces benefit from protection, preventing premature fading or wear.
- Spring Refresh: In spring, inspect your deck and warm wood features for any winter damage. Clean thoroughly, address any loose fasteners, and reapply any necessary sealants to natural woods. This proactive approach ensures your outdoor decor is ready to shine for the warmer months.
Conclusion {#conclusion}
Crafting a compelling and sustainable outdoor living space with Eco decking and warm woods offers an unparalleled blend of durability, beauty, and environmental responsibility. From the rich, earthy tones of natural wood accents to the low-maintenance resilience of composite decking, these materials provide the foundation for a truly transformative outdoor decor. By carefully planning, preparing, and executing each step, you can create a sanctuary that not only enhances your property's value but also nurtures a deeper connection with nature. Embrace these sustainable choices and watch your outdoor dreams flourish into a tangible, inviting reality. Are you ready to embark on your own journey towards a more beautiful and eco-conscious outdoor haven? Start planning your project today and experience the lasting joy of a thoughtfully designed space.
FAQ {#faq}
Q1: What is Eco decking, and why should I choose it?
A1: Eco decking primarily refers to composite decking made from recycled plastics and wood fibers. It's chosen for its exceptional durability, resistance to rot, insects, and splinters, and significantly lower maintenance needs compared to natural wood, all while being environmentally friendly.
Q2: How long can I expect my Eco decking (composite) to last?
A2: High-quality composite Eco decking is engineered for longevity, typically lasting 25-30 years or more with minimal maintenance, often backed by extensive manufacturer warranties.
Q3: Are warm woods like cedar and redwood truly sustainable options?
A3: Yes, provided they are sourced from sustainably managed forests, often indicated by FSC (Forest Stewardship Council) certification. These woods are naturally renewable and biodegradable, making them excellent eco-friendly choices.
Q4: Can I mix different types of wood and composite materials in my outdoor decor?
A4: Absolutely! Mixing materials adds visual interest and allows you to leverage the strengths of each. For instance, using durable composite for the main deck surface and natural, warm woods for railings, pergolas, or benches creates a harmonious and dynamic look.
Q5: What's the best way to clean my composite Eco decking?
A5: For most composite decking, a simple cleaning with a garden hose, a soft-bristle brush, and mild soap and water is sufficient. Avoid harsh chemicals or high-pressure washers that could damage the surface finish.
Q6: How often do I need to reapply sealant or stain to natural warm woods?
A6: For optimal protection and to maintain color, natural warm woods like cedar or redwood generally benefit from reapplication of a penetrating oil or stain with UV inhibitors every 1-3 years, depending on your climate and exposure to elements.
Q7: Will Eco decking get hot in direct sunlight?
A7: Lighter colored composite Eco decking generally stays cooler than darker shades. While all decking materials absorb some heat from the sun, many modern composite boards are designed with heat-mitigating technologies and ventilation to reduce surface temperatures.
Here are some additional resources to help you further enhance your outdoor living spaces:
Looking for innovative ways to establish boundaries and boost privacy? Check out our guide on creating organic boundaries with green privacy screens. For those colder months, learn how to protect your sensitive plants by building a DIY cold frame in 7 steps. To inspire even more unique touches to your garden, explore our ideas for a lived-in garden aesthetic. If you're interested in integrating smart solutions into your garden, our article on smart tech garden hacks offers great insights.


