Introduction
Creating charming garden entrances with autumn-themed arches doesn’t just add curb appeal; it can surprisingly boost your home’s perceived value by 5-10% according to real estate analyses, far eclipsing the cost of materials. This statistic challenges the common belief that significant landscape upgrades require extensive financial output.
[lwptoc]
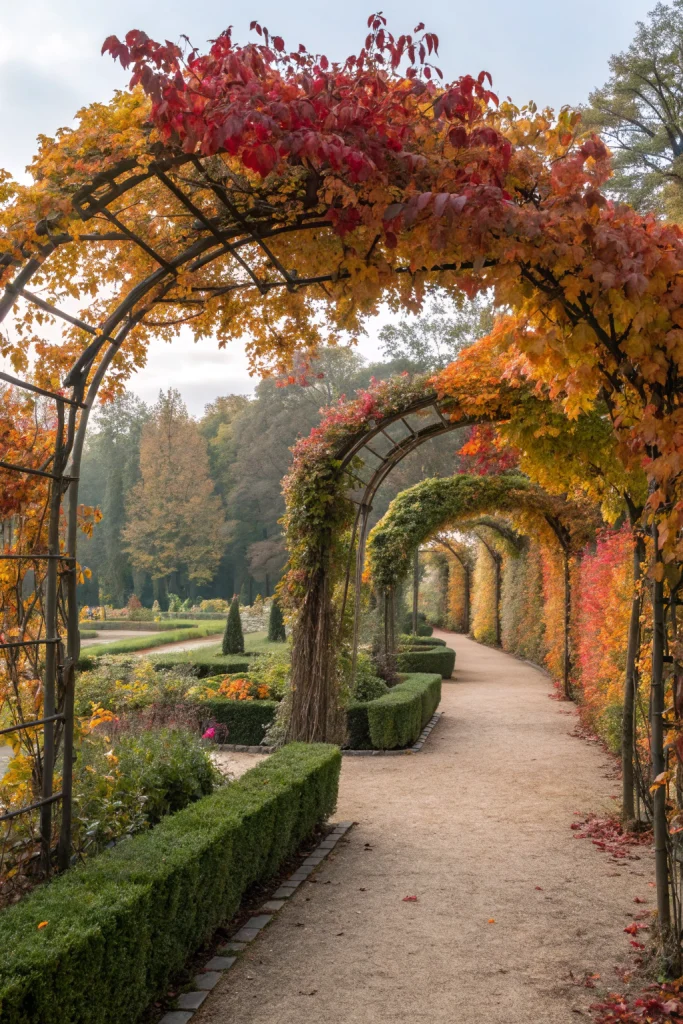
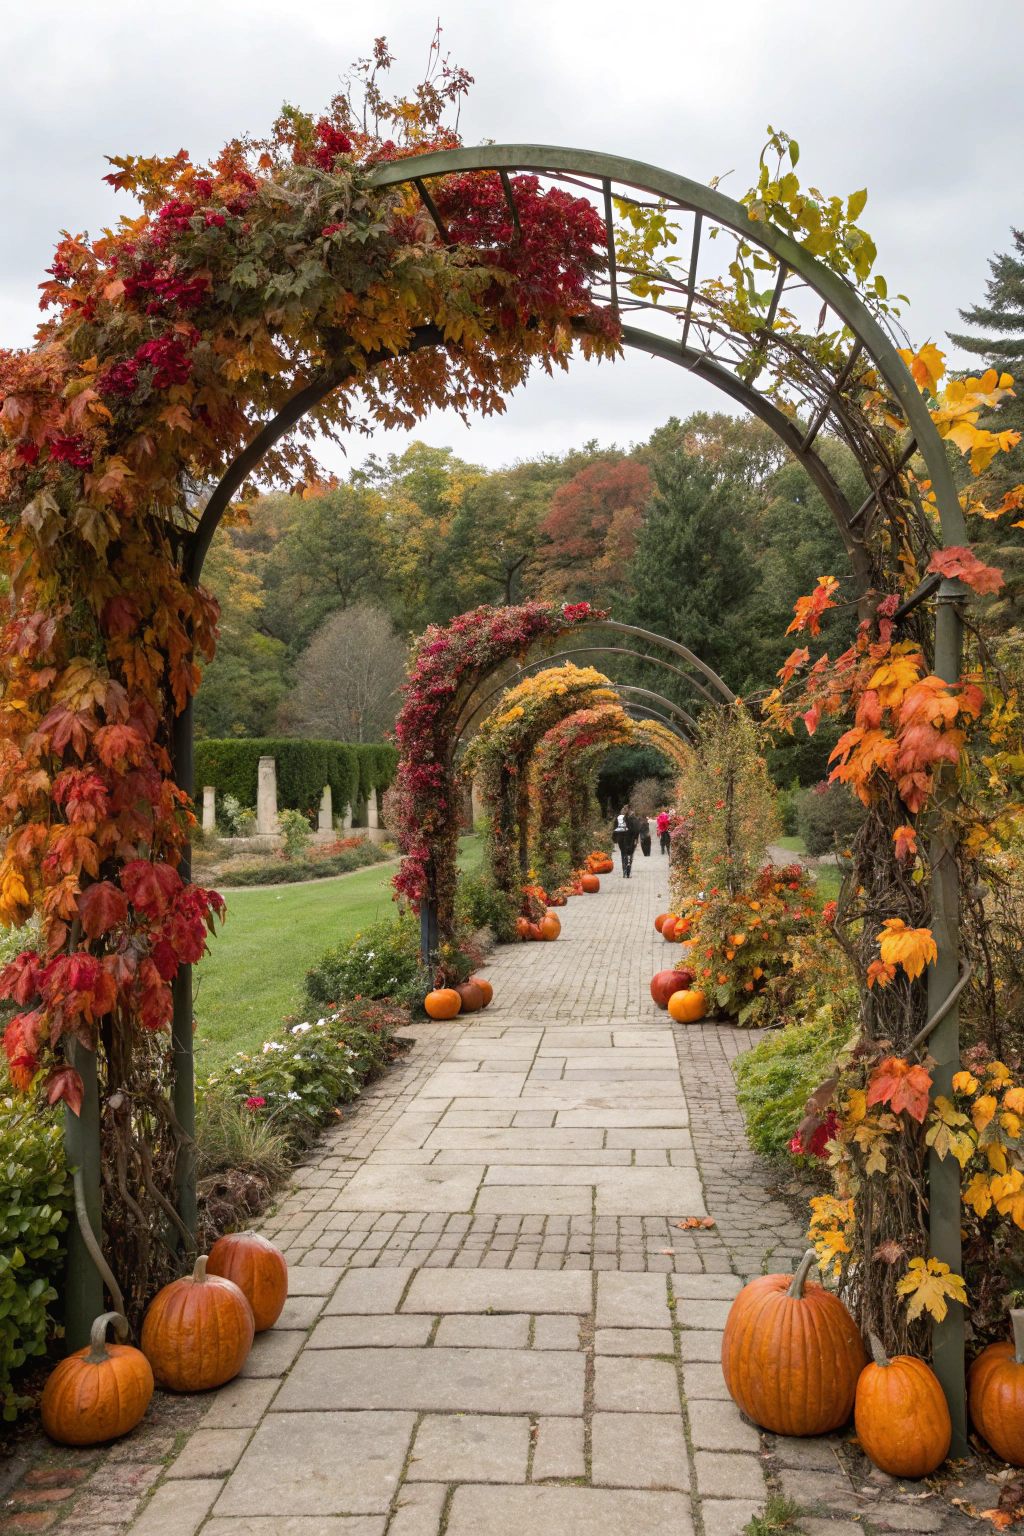
Adorning your garden approach with the rich hues and textures of fall foliage instantly elevates the aesthetic. Imagine welcoming guests through an archway draped in vibrant vines and festive gourds, a living testament to the season's bounty. This project is a fantastic way to celebrate autumn and enhance your outdoor living space.
This guide provides a practical, step-by-step approach to building and decorating a durable, beautiful autumn arch. We'll focus on sustainable materials and methods, ensuring your creation is not only stunning but also eco-friendly and long-lasting. You'll gain measurable results, transforming a simple garden entrance into an impressive seasonal statement.
Quick Summary
- Benefit: Enhances curb appeal and outdoor decor with seasonal charm, potentially increasing home value.
- Time: Approximately 4–8 hours for construction and initial decoration.
- Cost: Roughly $100–$350, depending on materials and chosen embellishments.
Context & Ideal Conditions
The best time to construct and decorate your garden entrance arch with an autumn theme is generally late summer to early fall, from late August through September. This timing allows for peak availability of seasonal decorative elements and offers cooler, more comfortable working conditions. Ideal temperatures range from 50–75°F (10–24°C).
For structural stability and flourishing climbing plants, the arch should be positioned in an area that receives at least 6 hours of full sun dialy for part or full season, especially if live plants are incorporated into the design. A slightly acidic to neutral soil pH (6.0-7.0) is optimal for most climbing plants used for arches, including clematis or climbing roses. Ensure the area has well-draining loam or sandy loam soil to prevent waterlogging.
The ground where the arch will stand should be relatively level, or you'll need to account for slight gradient variations. If using a heavy wooden arch, the soil must be firm enough to support the weight, ideally a load-bearing capacity of at least 20 pounds per square inch (1.4 kg per square cm). Avoid areas prone to strong winds unless you plan for additional anchoring.
garden, entrances, with, autumn, themed: Tools & Materials
To build a standard 4 ft (1.2 m) wide by 7 ft (2.1 m) tall arched entryway with autumn flair, you’ll need the following:
- Treated Lumber: Four 2x4s (38×89 mm) of 8 ft (2.4 m) length for vertical posts, and two 2x6s (38×140 mm) of 8 ft (2.4 m) length for the arch frame and horizontal supports. Pressure-treated Southern Yellow Pine is a good, durable choice.
- Bender Board/Flexible Plywood: One 1/4 in (6 mm) thick, 4 ft (1.2 m) x 8 ft (2.4 m) sheet of flexible plywood or composite bender board for the arch curve.
- Fasteners: Box of 2.5 in (6.4 cm) exterior-grade deck screws (e.g., #8, Phillips head) and a box of 1.25 in (3.2 cm) exterior-grade wood screws. Approximately 100-150 screws in total.
- Concrete Mix: Two 50 lb (22.7 kg) bags of fast-setting concrete for securing posts, or a volume equivalent to 1 cu ft (28.3 L) per post hole.
- Gate Hinges: Two heavy-duty, rust-resistant gate hinges, 6 in (15 cm) long, if adding a gate.
- Deck Stain/Sealer: 1 gallon (3.8 L) exterior-grade, clear or tinted wood stain/sealer.
- Assorted Autumn Decorations:
- Natural Grapevine Garland: Approximately 20-30 ft (6-9 m) of flexible garland.
- Artificial Fall Foliage: 6-8 bunches of faux maple leaves, oak leaves, or berries.
- Small Pumpkins/Gourds: 8-12 diverse miniature pumpkins or decorative gourds (e.g., ‘Jack Be Little’, ‘Wee-B-Little’, or ‘Autumn Wings’).
- Corn Stalks: 2-4 dried corn stalks, 5-7 ft (1.5-2.1 m) tall.
- Floral Wire/Zip Ties: 100 ft (30 m) roll of green floral wire (20-gauge) or a pack of 50 zip ties, 8 in (20 cm) length.
- Tools: Tape measure (25 ft/7.6 m), pencil, level (2 ft/60 cm), post-hole digger, circular saw or jigsaw, drill/driver with appropriate bits, rubber mallet, work gloves, safety glasses (ANSI Z87.1 certified).
garden, entrances, with, autumn, themed: Time, Difficulty & Budget
| Prep | 60–90 min |
| Build/Plant | 180–360 min |
| Total | 240–450 min |
| Skill Level | Intermediate |
| Budget | ≈ $100–$350 (materials/tools) |
This DIY arch comes in at approximately 40-60% cheaper than purchasing a pre-built, equivalent quality arch kit, which often costs $500–$900 without decoration. The savings increase significantly if you already own most of the basic tools.
Step-by-Step Tutorial
Step 1 — Layout & Prep
Begin by selecting the precise location for your arch. Mark the positions of the four vertical posts, ensuring they create a rectangle or square for your arch base. For a 4 ft (1.2 m) wide arch, posts should be spaced parallel at 4 ft (1.2 m) apart, on either side of the entrance pathway.
Use your tape measure to mark the post holes. For optimal stability, dig four post holes that are 10 in (25 cm) in diameter and 24-30 in (60-75 cm) deep, ensuring they penetrate below your local frost line if applicable (check with your local building codes). A post-hole digger is essential for this task.
Step 2 — Cutting & Assembly
Cut your four 8 ft (2.4 m) 2x4s into specific lengths if needed, but typically they can serve as full posts. For the arch top, take one of the 2x6s and cut it to the desired length (e.g., 4 ft / 1.2 m if your arch width is 4 ft). You will create the curve using bender board.
Attach the bender board to the 2x6s, forming the arch. You may need to create a simple jig or use clamps to hold the curve while you attach it with 1.25 in (3.2 cm) wood screws every 6 in (15 cm). Pre-drilling with a 7/64 in (2.8 mm) bit is recommended to prevent splitting, especially near edges. For structural integrity, use a drill/driver set to a medium torque of 100-150 in-lbs (11-17 Nm) to ensure screws are flush but not overtightened.
Step 3 — Installation/Planting
Carefully place the 2×4 posts into the prepared holes. Use a level on all sides of each post to ensure they are perfectly vertical. Pour in the fast-setting concrete mix around each post, following manufacturer instructions for water addition (typically 1 quart (0.9 L) per 50 lb (22.7 kg) bag). Tamp down the concrete to remove air pockets and ensure a solid base. Allow the concrete to cure for at least 24 hours before adding the arch structure.
Once the posts are secure, attach the pre-assembled arch top to the vertical posts using 2.5 in (6.4 cm) deck screws. Ideally, the arch's lowest point should be at least 7 ft (2.1 m) above ground for comfortable passage. If you plan to incorporate climbing autumn plants like Clematis tangutica (Golden Clematis) or Boston Ivy (Parthenocissus tricuspidata), prepare the soil at the base of each post. Amend the soil in a 1 ft (30 cm) radius around each post with 2 in (5 cm) of organic compost to improve drainage and nutrients.
Step 4 — Finishing & QA
After the arch is structurally sound, sand any rough edges on the wood using 120-grit sandpaper for a smooth finish. Apply two coats of exterior-grade wood stain or sealer to protect the wood from weathering and moisture. Ensure the product has UV protection to prevent sun damage. Allow at least 4 hours drying time between coats, or as per manufacturer instructions.
Now, for the autumn theme! Begin by wrapping the grapevine garland around the arch structure, securing it with floral wire or natural twine every 12-18 in (30-45 cm). Weave in artificial fall foliage for added color and volume. Attach miniature pumpkins or gourds using floral wire, staggering them for visual interest and ensuring they are securely fastened to prevent them from falling. Corn stalks can be propped and wired to the vertical posts.
Care & Schedule
Maintaining your garden arch, especially if it includes live plants, requires ongoing attention. If you’ve planted climbing vines, they will need consistent care.
Watering: Newly planted perennial vines typically require 1-2 gallons (3.8-7.6 L) of water weekly, especially during dry spells or if rainfall is less than 1 inch (2.5 cm) per week. Reduce watering as autumn progresses and temperatures drop, usually to once every two weeks. Deciduous vines will naturally require less water as they enter dormancy.
Fertilization: For best results with established perennial climbers, apply a balanced granular fertilizer (e.g., 5-10-5 N-P-K) in early spring, at a rate of 1 lb (0.45 kg) per 100 sq ft (9.3 m²). Avoid fertilizing in late autumn to prevent new growth that might be vulnerable to frost.
Pruning/Cleaning: Prune climbing plants according to their specific needs. For aggressive growers like Wisteria, winter pruning removes excess growth, while summer pruning maintains shape. Remove any faded or damaged decorative gourds and foliage as needed to keep the arch looking fresh.
Mulch Top-ups: Apply a 2-3 inch (5-7.5 cm) layer of organic mulch (like shredded bark or wood chips) around the base of any plants annually in spring, or as needed to maintain depth. This helps retain moisture, suppress weeds, and regulate soil temperature.
Fastener Checks: Periodically, at least once a year in early spring, inspect all screws and connections for tightness. Environmental factors like temperature changes can cause wood to expand and contract, potentially loosening fasteners. Re-tighten as necessary. If using a wood preservative, reapply every 2-3 years, or as recommended by the manufacturer.
Variations & Adaptations
This autumn-themed arch design is highly adaptable for various scenarios and aesthetics. For small spaces or balconies, consider a scaled-down version, perhaps using a pre-made metal arch frame and decorating it with smaller gourds, grapevine wreaths, and compact fall foliage.
In hot climates (USDA Zones 8-11), focus on drought-tolerant climbing plants like Bougainvillea or Passion Flower (Passiflora spp.) that can be trained to the arch. For cold climates (USDA Zones 3-6), select hardy vines like Virginia Creeper (Parthenocissus quinquefolia) or Arctic Kiwi (Actinidia kolomikta) for their autumn colors. Ensure any natural decorative elements are frost-resistant or can be easily replaced after a hard freeze.
For alternative materials, consider using reclaimed barn wood for a rustic look, or PVC pipes painted to resemble wood for a lightweight, weather-resistant, and budget-friendly option. A "knock-down" version can be created by attaching posts to metal ground spikes instead of concrete, allowing for easier seasonal removal and storage.
Aesthetically, you can vary the theme. Instead of traditional orange and brown, opt for a "harvest moon" theme with white pumpkins, silvery eucalyptus, and muted tones. For a more vibrant display, incorporate brightly colored ornamental peppers or corn varieties. Incorporating solar-powered string lights adds a magical glow for evening enjoyment.
Common Mistakes to Avoid
1. Undersized Foundation: Using shallow post holes or insufficient concrete leads to instability. The arch can wobble or even collapse, especially with heavy decorations or strong winds. Ensure post holes are at least 24-30 in (60-75 cm) deep and below the frost line.
Ignoring Wood Treatment: Untreated wood, especially pine, will quickly rot and deteriorate when exposed to outdoor elements. Always use pressure-treated lumber or apply a high-quality exterior-grade stain/sealer to all wood components.
Overloading the Arch: While autumn decor is beautiful, excessive weight from too many large pumpkins or heavy garlands can strain the structure. Distribute weight evenly and opt for lighter artificial elements for volume. The arch is designed for decorative loads, not structural support beyond itself.
Incorrect Plant Selection: Choosing plants that are not suited to your local climate (hardiness zone) or light conditions will lead to poor growth or plant death. Research appropriate climbing plants for your region and arch's sun exposure (e.g., full sun vs. partial shade).
Poor Drainage for Plants: Compacted or clay-heavy soil around climbing plants can cause root rot. Amend the soil with compost and ensure good drainage, especially if planting perennial vines.
Neglecting Safety: Failing to sand rough edges can result in splinters. Not checking for stability during construction can lead to hazards. Always wear appropriate PPE (safety glasses, gloves) and ensure all connections are secure.
Ignoring Local Regulations: Check with your HOA or local municipality for any height restrictions, setback requirements from property lines, or specific construction codes for outdoor structures. This prevents potential fines or forced removal.
Sustainability, Safety & Regulations
Embracing sustainable practices ensures your autumn arch is not only beautiful but also environmentally responsible. Consider using salvaged materials like reclaimed wood for the frame (ensure it’s structurally sound and treated for outdoor use). If planting, collect rainwater in a rain barrel to irrigate your climbing vines, significantly reducing overall water consumption. For seasonal decorations, prioritize natural elements like dried corn stalks, gourds, and leaves, which are biodegradable. After the season, compost these materials to enrich your garden soil.
Safety is paramount during construction and enjoyment. Always wear personal protective equipment (PPE) such as safety glasses (ANSI Z87.1 certified) when cutting or drilling, and durable work gloves to protect hands from splinters and minor abrasions. Ensure all power tools meet current safety standards and use them according to manufacturer instructions. If working with concrete, wear gloves and eye protection to prevent skin and eye irritation. Young children and pets should be kept away from the construction area.
Consider child and pet safety once the arch is complete. Ensure all decorative elements are securely fastened to prevent them from falling and becoming choking hazards. Avoid using toxic plants if pets or small children frequent the area. For example, some ornamental berries can be poisonous if ingested. Regularly inspect the arch for any loose parts or sharp edges that could cause injury.
Before beginning, always check local zoning regulations and homeowners' association (HOA) rules. Some communities have height restrictions for outdoor structures or require specific setbacks from property lines. A standard garden arch usually falls within permitted limits, but it’s always best to confirm. Proper disposal of green waste (leaves, spent plants) and construction debris (wood scraps) should follow local guidelines, preferably through composting or recycling programs.
Measure the Outcome
To truly appreciate the value of your efforts, measure the outcome of your garden arch project.
- Survival Rate %: If you’ve planted climbing vines, track their survival rate. A high percentage indicates successful plant selection and care, contributing to the arch’s longevity.
- Growth (in/cm per month): For live plants, monitor their growth rate. Healthy vines should show noticeable growth, for example, 3-6 inches (7.5-15 cm) per month during peak growing season, indicating good health and suitable conditions.
- Cost Savings: Compare your actual expenditure to the estimated cost of a store-bought alternative. For instance, if your DIY cost was $200 and a comparable retail arch was $600, you achieved a 67% cost saving.
- Time Savings: Track the time spent on decoration and compare it to previous years if you decorated without a permanent structure. An arch can streamline annual decorating by providing a ready-made framework, potentially saving hours.
- Satisfaction: This is subjective but crucial. Gauge your personal satisfaction and feedback from family and friends. A high level of satisfaction means the project was a success in enhancing your outdoor space and experience.
Conclusion
Creating garden entrances with autumn-themed arches is a rewarding DIY project that significantly enhances your home’s aesthetic appeal and seasonal charm. From careful planning and precise construction to thoughtful decoration, each step contributes to a stunning and inviting entryway. By embracing sustainable practices and mindful maintenance, your arch will provide lasting beauty and enjoyment.
We encourage you to embark on this project and transform your garden entrance. Share your creations in the comments below, or tell us about your unique autumn decorating ideas!
FAQ
Q: What’s the best time of year to build an autumn-themed arch?
A: Ideally, build the arch in late summer or early fall (August-September) to easily integrate fresh autumn-themed decorations and establish any climbing plants before winter.
Q: Can I build this arch with minimal tools?
A: Yes. While power tools make the job quicker, you can cut wood with a hand saw and use a manual drill. Many lumber yards offer cutting services for a small fee, reducing the need for specialized tools.
Q: What plants are best for autumn arches?
A: Hardy climbing plants like Virginia Creeper (Parthenocissus quinquefolia) and Golden Clematis (Clematis tangutica) offer vibrant fall foliage. For annual options, try trailing nasturtiums or scarlet runner beans, which also produce edible harvests.
Q: My arch decorations are wilting. What's wrong?
A: Natural elements like gourds and leaves will eventually dry. Ensure they are picked at maturity. If using live plants, check for under-watering, especially in warm weather, or consider if they are past their seasonal prime.
Q: How can I prevent wood rot in the arch?
A: Use pressure-treated lumber, apply an outdoor-grade wood sealer or paint, and ensure posts are set in concrete to prevent direct soil contact with the wood above ground. Regular reapplication of sealant every 2-3 years helps.
Q: What if my arch starts to lean or loosen?
A: This usually indicates issues with the post foundation. Re-tighten any visible fasteners. If sinking or significant leaning occurs, you might need to re-dig and reset the posts with more concrete or deeper footings.
Q: Are there low-cost alternatives for pumpkin and gourd decorations?
A: Absolutely! Collect vibrant fall leaves and branches, dry them, and weave them into garlands. Pinecones, acorns, and dried corn husks gathered from walks can also create stunning, free decorations.
Internal & External Links
Explore more ways to enhance your autumn garden with ideas for rustic garden tables and autumn flower displays, or learn about creating a living pumpkin arch. For additional sustainable garden inspiration, check out our guide on recycled garden decor ideas. You can also find more DIY projects and gardening tips by browsing our featured articles.


