The Ultimate 7-Day Guide: How to Grow Microgreens at Home in Just One Week
Imagine harvesting fresh, nutrient-dense greens from your kitchen counter in less than a week. This isn’t a gardener’s fantasy; it’s the reality of growing microgreens at home. These tiny powerhouses pack a concentrated punch of vitamins, minerals, and antioxidants, making them a fantastic addition to any diet. Forget waiting months for a harvest; with microgreens, instant gratification is part of the process.
[lwptoc]
Why This Matters for Your Garden (and Your Health!)
Growing microgreens offers a multitude of benefits, extending far beyond merely adding greenery to your plate. For urban dwellers or those with limited outdoor space, microgreens provide an accessible entry point into gardening. They require minimal equipment and can thrive indoors, making fresh produce a year-round possibility, regardless of climate or season.
From a culinary perspective, microgreens elevate dishes with their intense flavors and vibrant textures. A sprinkle of radish microgreens can add a peppery zest to your salad, while a handful of broccoli microgreens boosts the nutritional profile of your smoothie. They are not just garnishes; they are integral components of healthy, delicious meals.
Nutritionally speaking, microgreens often boast higher concentrations of vitamins, minerals, and antioxidants compared to their mature counterparts. Studies have shown they can contain up to five times more nutrients by weight. This makes them an incredibly efficient way to boost your daily intake of essential goodness, contributing to overall well-being and potentially reducing the risk of chronic diseases.
Furthermore, the act of growing microgreens is incredibly rewarding. It provides a daily connection to nature, even if it’s just a small tray on your windowsill. This simple DIY project can reduce stress, foster a sense of accomplishment, and introduce children to the wonders of plant growth. It’s a sustainable, healthy, and engaging hobby that truly matters.
What You Need to Grow Microgreens at Home
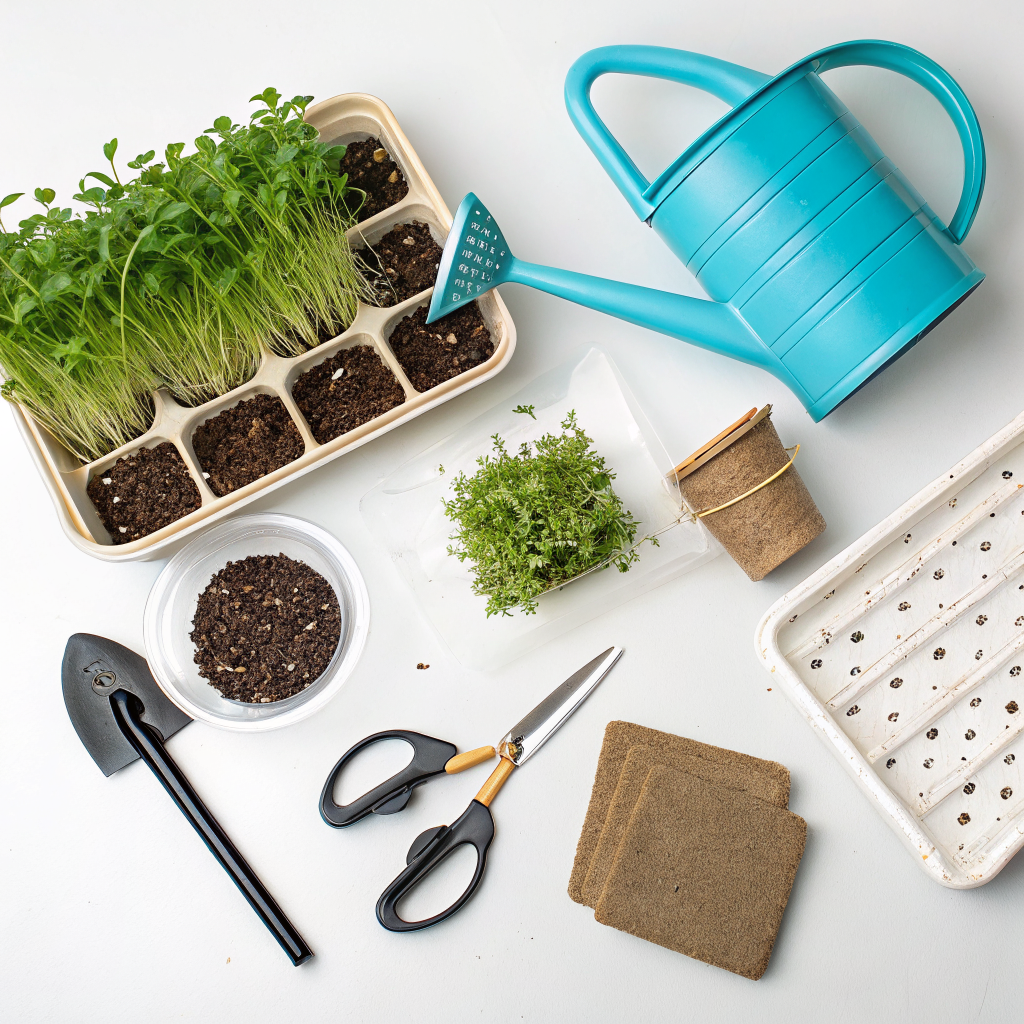
One of the beauties of growing microgreens is how little you need to get started. Most of these items you might already have around your home, or they are readily available at any garden supply store or online retailer. Let’s break down the essential components to achieve a successful harvest.
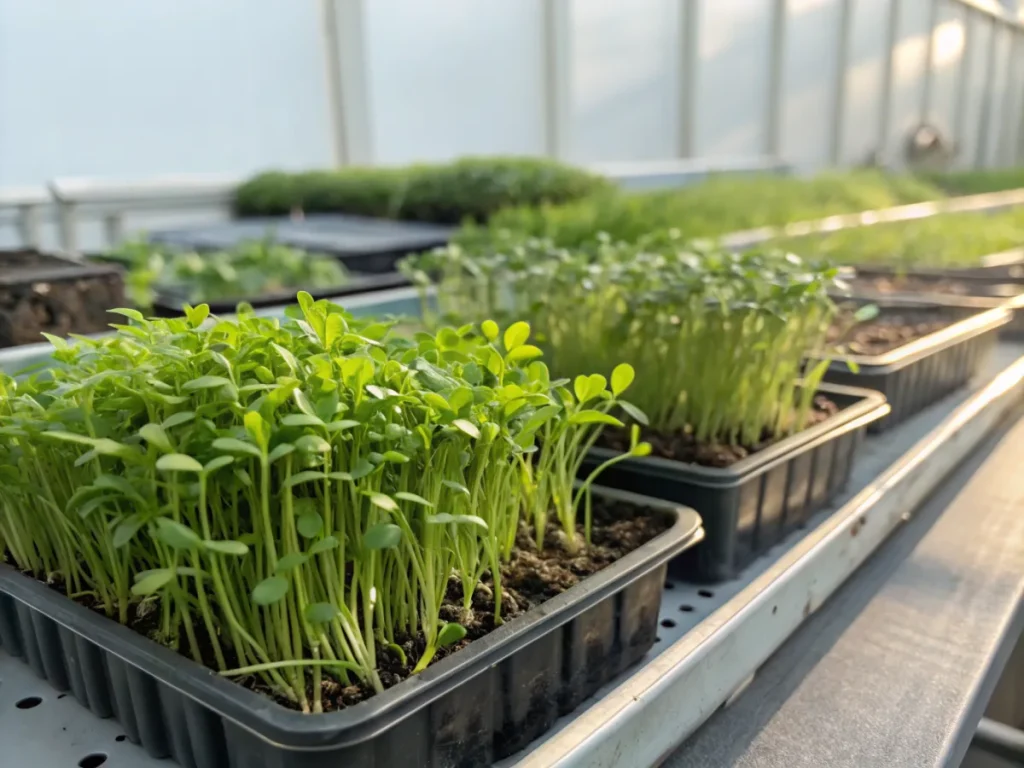
1. Trays or Containers
You’ll need shallow trays, preferably with drainage holes for one tray and a solid tray to catch excess water. Standard nursery trays or even repurposed plastic containers (like takeaway containers or berry punnets) can work, as long as they are shallow and allow for proper drainage. A depth of 1-2 inches is usually sufficient for microgreens roots.
2. Growing Medium
A good quality growing medium is crucial. Avoid standard garden soil, which can introduce pests or diseases. Opt for a fine-textured, sterile seed-starting mix or a coir-based medium. Some growers even use specialized microgreen growing mats made from hemp or felt, which can simplify the process and reduce mess.
3. Quality Microgreen Seeds
This is perhaps the most important ingredient. Not all seeds are created equal for microgreen production. You’ll want to purchase seeds specifically labeled for microgreens, as these typically have higher germination rates and are untreated with fungicides. Popular choices include radish, broccoli, kale, arugula, cress, and even sunflower or pea shoots for larger varieties.
4. Spray Bottle
A simple spray bottle filled with water is essential for gentle and even watering, especially during the initial germination phase. This prevents disturbing the tiny seeds or delicate seedlings.
5. Light Source (Optional but Recommended)
While microgreens can technically grow with indirect sunlight, a dedicated light source will yield much better results. A simple fluorescent shop light or an LED grow light positioned a few inches above your trays will ensure consistent, strong growth and vibrant color. This is especially important during darker months or if you don’t have a bright south-facing window.
6. Weight/Cover (Optional)
For some microgreen varieties, covering the tray with another tray or a suitable weight for the first few days can improve germination by creating a dark, humid environment. This technique, often called “blackout,” encourages seeds to root down deeply before reaching for light.
7. Scissors or Sharp Knife
For harvesting your precious greens cleanly and efficiently.
Step-by-Step Guide: How to Grow Microgreens at Home in 7 Days
Growing microgreens is a straightforward process, but following these steps carefully will ensure a bountiful and quick harvest. Get ready to enjoy fresh greens in about a week!
Step 1: Prepare Your Trays and Medium (Day 1)
Start by filling your chosen growing tray with about 1-1.5 inches of your sterile seed-starting mix or coir. Gently pat it down to create a level surface, but don’t compact it too much. You want the soil to be firm but still able to drain well. Mist the soil thoroughly with your spray bottle until it’s damp but not waterlogged. This pre-moistening is crucial for consistent germination.
Step 2: Sow Your Seeds (Day 1)
This is where the magic begins. Sprinkle your chosen microgreen seeds generously and evenly across the entire surface of the moistened soil. The goal is to have the seeds close together but not overlapping too much. Think of it like a dense carpet. For smaller seeds like broccoli or kale, you can use a salt shaker. For larger seeds like sunflowers, space them a little more. You do not need to cover most microgreen seeds with additional soil. However, for some varieties like peas, a very thin layer (1/4 inch) of soil can be beneficial. After sowing, mist the seeds again lightly to settle them into the soil.
Step 3: Encourage Germination (Days 1-3)
Immediately after sowing, place a second, inverted tray directly on top of your seeded tray. If using a weight, place it on the top tray. This creates a dark, humid environment that signals the seeds to germinate and establish strong root systems. This “blackout” period typically lasts for 2-3 days, depending on the seed variety. During this time, you won’t need to water. Check periodically after 2 days for signs of germination; tiny white roots might appear.
Step 4: Provide Light and Water (Days 3-6)
Once you see significant germination (tiny sprouts pushing up the top tray), remove the cover. Now it’s time to provide light! Place your tray under a dedicated grow light or in the brightest spot possible, ideally a south-facing window. Position the grow light about 2-4 inches above the seedlings. Water your microgreens daily or every other day, depending on evaporation rates, using your spray bottle. Aim to keep the soil consistently moist but never soggy. Bottom watering (where you place the tray with drainage holes into a solid tray filled with a small amount of water) can also be very effective as the roots draw up the moisture they need.
Step 5: Monitor Growth and Prepare for Harvest (Day 7)
Over the next few days, you’ll observe rapid growth. The tiny sprouts will develop their first set of true leaves (the second set of leaves to appear after the two initial seed leaves, or cotyledons). This is generally the best time to harvest microgreens, as their flavor and nutritional content are at their peak. Ensure they continue to receive plenty of light and consistent moisture. You’ll likely notice the greens standing tall and vibrant, ready for their culinary debut.
Step 6: Harvest Your Microgreens (Day 7)
Harvesting is the most satisfying part of the process! Using clean, sharp scissors or a knife, simply cut the microgreens just above the soil line. Try to avoid getting too much growing medium on your harvest. You can harvest the entire tray at once or cut small sections as needed. Once harvested, they are ready to be rinsed gently and enjoyed immediately. Microgreens do not typically regrow after being cut this way, so you’ll need to replant for a continuous supply. For tips on extending your harvest, check out this guide on sustainable gardening practices like composting your spent growing medium.
Pro Tips and Common Mistakes When You Grow Microgreens at Home
While growing microgreens is generally straightforward, a few expert tips can elevate your success, and being aware of common pitfalls can save you from disappointment. Let’s ensure your microgreen journey is smooth and productive.
Pro Tips for Success:
- Bottom Watering: Once your seeds have germinated and started to grow, consider switching to bottom watering. Place your tray with drainage holes into a larger, solid tray filled with about half an inch of water. The growing medium will wick up the water, encouraging deeper root growth and preventing issues like damping off or fungal gnats often associated with top watering.
- Air Circulation: Good airflow is important to prevent mold and mildew, especially in humid environments. A small fan providing gentle circulation for a few hours a day can make a significant difference, particularly when growing dense trays of microgreens.
- Experiment with Varieties: Don’t limit yourself to just one type! Radish, broccoli, and pea shoots are excellent for beginners due to their fast growth and robust nature. Once comfortable, branch out to more gourmet options like basil, cilantro, or even sunflower microgreens. Each offers a unique flavor profile and nutritional benefits.
- Succession Planting: To ensure a continuous supply of fresh microgreens, practice succession planting. Start a new tray every 2-3 days. By the time you harvest one tray, another will be well on its way, providing an uninterrupted flow of greens.
- Optimal Lighting: While natural light is good, supplementary lighting, especially LED grow lights, provides consistent intensity and spectrum crucial for strong, vibrant, and deep-colored microgreens. Position lights close to the plants (~2-4 inches) to prevent them from becoming leggy.
Common Mistakes to Avoid:
- Overwatering: This is arguably the most common killer of microgreens, leading to fungal diseases like damping off. Always ensure proper drainage and allow the top layer of soil to just begin to dry before re-watering. Mist rather than drench, especially in the early stages.
- Under-seeding/Over-seeding: Too few seeds will result in a sparse harvest. Too many seeds, however, can lead to overcrowding, poor air circulation, and a higher risk of mold or disease. Aim for a dense but single layer of seeds for most varieties.
- Ignoring Blackout Period: Skipping the initial dark period can result in uneven germination and leggy seedlings. The weight and darkness encourage roots to establish firmly before upward growth begins.
- Harvesting Too Late: Microgreens are best harvested when they have developed their first set of true leaves (after the cotyledons). Harvesting too late can lead to tougher textures and a decline in their unique concentrated flavors and nutrients.
- Using the Wrong Soil: Garden soil is often too heavy and can contain pathogens, weed seeds, or pests. Always use a sterile, fine-textured seed-starting mix or coir. This provides a clean slate for your delicate microgreens. For more information on soil health, visit our article on understanding soil health for beginners.
- Lack of Air Circulation: Stagnant, humid air creates a perfect breeding ground for mold. Ensure good air movement, especially after germination, to keep your greens healthy and clean.
Eco-Friendly Variations for Growing Microgreens
Embracing eco-friendly practices in your microgreen cultivation not only benefits the planet but often leads to healthier, more sustainable harvests. Incorporating these variations can significantly reduce your environmental footprint.
1. Reusable Growing Trays
Instead of single-use plastic trays, invest in durable, food-grade plastic or stainless steel trays designed for repeated use. These can be easily cleaned and sanitized between harvests, reducing plastic waste. Consider upcycling common household items like plastic clam-shell containers from berries or even old baking trays, ensuring they have drainage holes.
2. Sustainable Growing Mediums
Move beyond peat moss, which has environmental concerns related to its extraction. Opt for coconut coir, a renewable byproduct of the coconut industry, known for its excellent water retention and aeration. Hemp mats or felt growing pads are excellent soil-less options that can often be composted after use, eliminating soil disposal altogether. Learn more about eco-friendly soil alternatives and composting.
3. Organic and Heirloom Seeds
Always choose organic, non-GMO seeds. These are grown without synthetic pesticides or fertilizers, ensuring a purer product for your consumption. Heirloom varieties also contribute to biodiversity preservation, supporting a more robust agricultural ecosystem.
4. Composting Spent Medium
After harvesting, don’t just toss your used growing medium. If you used coir or a seed-starting mix, it can be added to your compost bin. The spent soil, along with any remaining roots, will break down and enrich your compost, reducing landfill waste and creating valuable nutrients for other plants. This closes the loop on your gardening efforts.
5. Water Conservation Techniques
Utilize bottom watering to minimize water waste and prevent evaporation from the surface. Collect rainwater for watering your microgreens, if feasible. This reduces reliance on treated tap water and conserves municipal resources.
6. Natural Pest and Mold Prevention
Instead of chemical treatments, focus on prevention. Good air circulation, proper watering, and using sterile growing mediums are your best defenses against mold and pests. If issues arise, natural remedies like a diluted neem oil spray or hydrogen peroxide solution can be effective. This avoids introducing harmful chemicals into your food system or the environment.
Seasonal Considerations for Growing Microgreens
While microgreens can be grown year-round indoors, understanding seasonal variations can help you optimize your growing conditions and yield. Adapting your approach slightly based on the time of year ensures consistent success.
Winter Months:
During winter, natural light levels are significantly lower and days are shorter. This is when a dedicated grow light becomes almost essential. Without adequate light, microgreens can become leggy, pale, and less flavorful. Position your lights closer to the trays to compensate for the lack of natural intensity. Indoor humidity might also drop due to heating systems; monitor your watering closely and consider placing trays near a humidifier if your space is particularly dry.
Spring and Autumn:
These seasons often offer more moderate temperatures and reasonable natural light, making them excellent times for microgreen cultivation. You might find you can rely more on bright windowsills during these periods. Keep an eye on temperature fluctuations if your growing area is near a window, as cold drafts can slow growth. Humidity is often higher than in winter, so ensure good air circulation to prevent mold.
Summer Months:
Summer brings abundant natural light, often making grow lights less critical (though they still ensure consistent, optimal growth). However, overheating can become an issue. Avoid placing trays in direct, intense sunlight behind glass, as this can scorch delicate seedlings or dry out the soil too quickly. If your indoor space gets very warm, you might need to water more frequently. Increased humidity can also be a factor, so again, prioritize excellent air circulation to prevent fungal issues.
Understanding these seasonal nuances will allow you to fine-tune your environment and continue enjoying a fresh supply of microgreens, no matter what the weather outside is doing.
Expert Resources for Advanced Microgreen Growers
Once you’ve mastered the basics of how to grow microgreens at home, you might want to delve deeper into the science and art of microgreen cultivation. These external resources offer a wealth of information, from troubleshooting advanced issues to exploring new varieties and techniques.
- Gardening Know How: For a comprehensive database of gardening articles, including specific guides on various microgreen types, pest management, and advanced growing techniques, Gardening Know How is an invaluable resource.
- RHS (Royal Horticultural Society): The RHS Website provides authoritative advice on all things horticulture. While primarily focused on traditional gardening, their principles of plant care, disease identification, and soil science are directly applicable to microgreen success.
- University Extension Programs: Many university extension programs offer research-backed information on small-scale agriculture and indoor growing. For example, the University of Minnesota Extension often publishes guides on topics like urban farming and sustainable cultivation, which can be highly beneficial for advanced microgreen growers seeking scientific insights.
Conclusion: Your Journey to Growing Microgreens at Home
Congratulations! You are now equipped with the knowledge and steps required to successfully grow microgreens at home in just 7 days. This journey from seed to harvest is incredibly rewarding, offering fresh, nutrient-dense produce right from your kitchen.
By following our detailed guide, from preparing your trays to the final satisfying snip of the scissors, you’ll discover the simplicity and efficiency of microgreen cultivation. Remember the importance of quality seeds, proper lighting, consistent moisture, and good air circulation – these are the pillars of success.
Embrace the challenge, experiment with different varieties, and don’t be afraid to make minor adjustments based on your specific environment. The beauty of microgreens lies in their quick turnaround, allowing for rapid learning and continuous improvement.
Beyond the personal satisfaction, growing microgreens contributes to a healthier lifestyle and supports sustainable practices. You’re reducing your carbon footprint, minimizing food waste, and ensuring a year-round supply of vibrant, flavorful greens. So, gather your supplies, sow your first seeds, and prepare to elevate your culinary creations and well-being with your very own homemade microgreens!
Frequently Asked Questions About Growing Microgreens
<div class="faq-item">
    <strong>Q: Can I grow microgreens without a grow light?</strong>
    <p>A: Yes, you can grow microgreens without a dedicated grow light, especially if you have a very bright, south-facing window. However, a grow light will almost always yield better results, producing stronger, more vibrantly colored, and less leggy microgreens due to consistent light intensity and appropriate spectrum.</p>
</div>

<div class="faq-item">
    <strong>Q: Do microgreens regrow after harvesting?</strong>
    <p>A: Most microgreen varieties, when cut just above the soil line, do not regrow. They are typically a one-time harvest product. Pea shoots and some types of wheatgrass can sometimes produce a second, smaller flush if left in ideal conditions, but the quality and quantity are usually significantly reduced.</p>
</div>

<div class="faq-item">
    <strong>Q: Why are my microgreens getting moldy?</strong>
    <p>A: Mold is a common issue often caused by overwatering, insufficient air circulation, or overcrowding of seeds. Ensure proper drainage, mist lightly instead of drenching, use a small fan to improve airflow, and avoid planting seeds too densely. Using a sterile growing medium also helps prevent mold.</p>
</div>

<div class="faq-item">
    <strong>Q: What are the easiest microgreens to grow for beginners?</strong>
    <p>A: For beginners, radish, broccoli, arugula, and cress are excellent choices. They germinate quickly, grow rapidly, and are quite forgiving, making them ideal for a first-time microgreen grow. Pea shoots and sunflower microgreens are also relatively easy but require slightly larger seeds and may take a day or two longer.</p>
</div>