The Ultimate Guide to Growing Potatoes in Bags: 10 Steps to Bountiful Harvests
Dreaming of fresh, homegrown potatoes but lack a traditional garden plot? Fret not, aspiring urban farmers and patio gardeners! Growing potatoes in bags is a revolutionary, space-saving, and incredibly rewarding method that allows anyone to cultivate delicious spuds, regardless of their living situation. This comprehensive guide will walk you through every step, from selecting your potato varieties to harvesting a thriving crop, ensuring your success with this simple yet effective gardening hack.
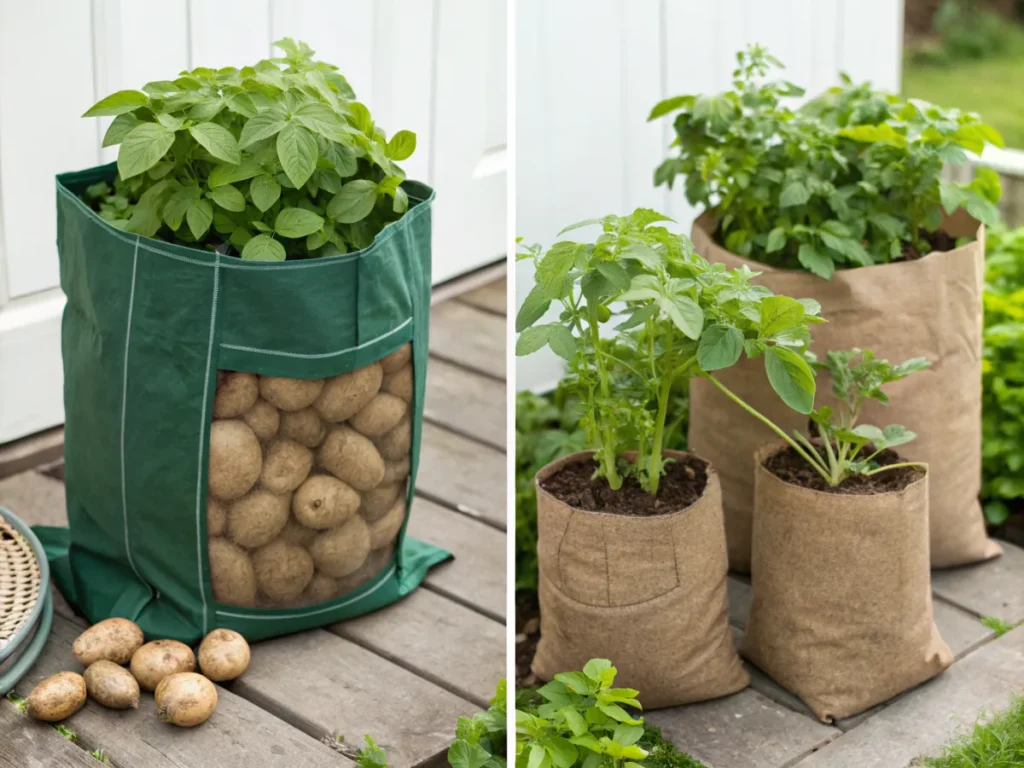
Imagine pulling vibrant, earthy potatoes from a bag right on your balcony or small backyard. This method not only maximizes your yield in confined spaces but also offers protection against soil-borne diseases and simplifies harvesting. Whether you’re a seasoned gardener looking for a new technique or a complete beginner, learning how to grow potatoes in bags will redefine your gardening experience.
[lwptoc]
Why This Matters for Your Garden (and Your Plate!)
Growing potatoes in bags isn’t just a clever trick; it’s a game-changer for many gardeners. This method addresses several common gardening challenges, making fresh, organic produce accessible to a wider audience.
Firstly, it’s a phenomenal space saver. Traditional potato rows demand significant acreage, but a bag garden can thrive on a small patio, balcony, or even a sunny corner of your driveway. This makes it perfect for urban dwellers, apartment residents, or anyone with limited outdoor space.
Secondly, container growing offers superior control over your soil. You start with fresh, disease-free potting mix, reducing the risk of pests and pathogens that can plague in-ground potato crops. This precise control also allows for optimal nutrient management, leading to healthier plants and more abundant harvests.
Finally, harvesting becomes a joy rather than a chore. Instead of laboriously digging through compacted soil, you can simply empty the bag, revealing your bounty with minimal effort. This gentle harvesting process also reduces the likelihood of damaging your precious tubers.
What You’ll Need: Tools, Materials, and the Perfect Plants
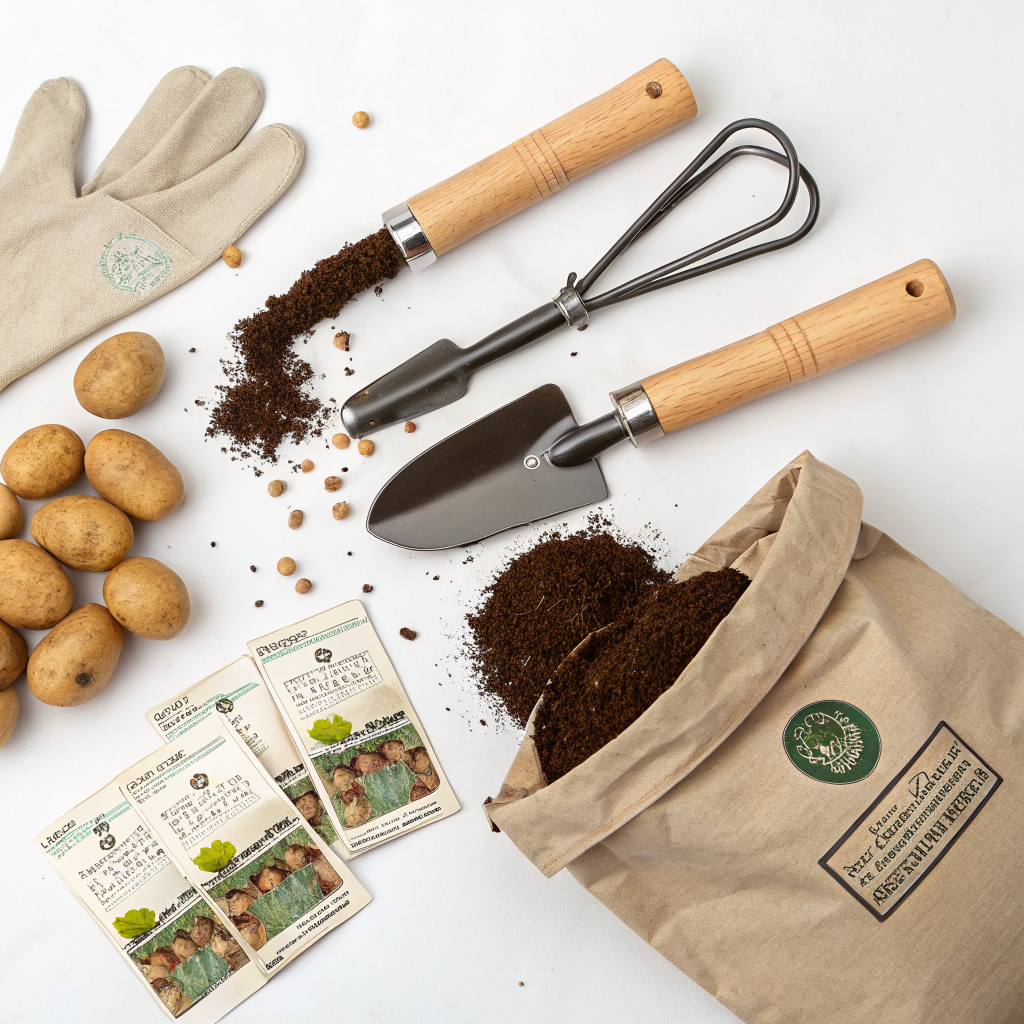
To successfully grow potatoes in bags, you’ll need to gather a few essential items. Most of these are readily available at garden centers or even around your home.
1. The Right Container: Potato Grow Bags or Buckets
The star of our show! While dedicated potato grow bags are ideal, offering excellent drainage and aeration, you can also use large fabric grow bags (10-15 gallon capacity for best results), sturdy plastic containers, or even 5-gallon buckets. Ensure any non-fabric container has ample drainage holes drilled into the bottom to prevent waterlogging.
Fabric grow bags are particularly beneficial as they allow for “air pruning” of roots, which encourages a healthier, more fibrous root system. They also prevent the soil from becoming too compacted, promoting better tuber development.
2. Seed Potatoes: The Foundation of Your Harvest
This is crucial: always use certified seed potatoes from a reputable supplier. Do NOT use potatoes from the grocery store, as they are often treated with sprout inhibitors and may carry diseases that will spread to your garden. Seed potatoes are specifically grown to be disease-free and vigorous.
Choose varieties suited for container growing. Early maturing varieties like ‘Yukon Gold’, ‘Red Norland’, or ‘Kennebec’ are often excellent choices for quick harvests. For a complete guide to choosing the right seeds for your climate, check out Choosing the Right Seeds for Your Climate.
3. Potting Mix: The Lifeblood of Your Plants
A high-quality, well-draining potting mix is essential. Avoid heavy garden soil, which can compact and hinder tuber development. Look for mixes containing compost, perlite, and peat moss or coco coir for optimal aeration and moisture retention.
Enrich your potting mix with some well-rotted compost or a balanced organic fertilizer to provide a slow release of nutrients throughout the growing season. This ensures your potatoes have a steady supply of food as they grow.
4. Fertilizers and Amendments
- Balanced Organic Fertilizer: A slow-release granular fertilizer formulated for vegetables will provide essential nutrients.
- Compost: Adds organic matter, improves soil structure, and provides a gentle nutrient boost.
- Optional: Bone meal or rock phosphate can be added to encourage tuber development.
5. Tools and Watering Equipment
- Gardening Gloves: Protect your hands.
- Trowel or Small Shovel: For planting and adding soil.
- Watering Can or Hose with a Gentle Sprayer: Consistent moisture is key.
- Pruners or Scissors: For harvesting and clipping any diseased foliage.
Step-by-Step Guide: How to Grow Potatoes in Bags
Now that you have all your supplies, let’s dive into the exciting process of growing your own potatoes! Follow these steps carefully for a successful harvest.
Step 1: Chitting Your Seed Potatoes (Optional, but Recommended)
Chitting is the process of encouraging seed potatoes to sprout before planting. This gives them a head start and can lead to earlier and larger harvests. About 2-4 weeks before planting, place your seed potatoes in a cool (around 50-60°F / 10-15°C), bright area, but out of direct sunlight. An egg carton or a shallow tray works well.
Small, sturdy green sprouts (chits) will emerge. Aim for sprouts about 1/2 to 1 inch long. If your seed potatoes are large (larger than a golf ball), you can cut them into pieces, ensuring each piece has at least 1-2 “eyes” (sprouts). Allow the cut pieces to “cure” for a day or two in a dry, cool place to form a protective callus, which prevents rot.
Step 2: Preparing Your Bag and Initial Planting
Fold down the sides of your grow bag or bucket to form a cuff, making it about 6-8 inches tall. This initial shallow setup is crucial for the hilling process later. Fill the bottom of the bag with about 4-6 inches of your prepared potting mix. Make sure the mix is loose and airy.
Place 2-4 chitted seed potato pieces (depending on the bag size; 10-gallon bags can usually accommodate 3-4) on top of the soil, sprouts facing upwards. Space them evenly. Cover the seed potatoes with another 4-6 inches of potting mix.
Water thoroughly until moisture drains from the bottom of the bag. This initial watering helps settle the soil and provides essential moisture for root development.
Step 3: Finding the Perfect Spot
Potatoes are sun-loving plants! Choose a location that receives at least 6-8 hours of direct sunlight per day. A south-facing patio or a bright, open area in your yard is ideal. Ensure the bags are placed on a stable surface where drainage can occur without causing a mess.
Consider the weight of the bags when full, as they can become quite heavy. If you might need to move them later, place them on a plant caddy with wheels.
Step 4: The Hilling Process: Foundation for More Potatoes
This is the most critical step for maximizing your potato yield. As the potato plants grow, new tubers form along the buried stem. “Hilling” (or earthing up) involves continually adding more soil around the growing plant to encourage more tuber development.
Once your potato plants have grown to about 8-10 inches tall, unfold the sides of the bag a bit and add another 4-6 inches of potting mix around the stems, leaving the top 2-3 sets of leaves exposed. Water well. Repeat this process every time the plants grow another 6-8 inches, until the bag is filled to within a few inches of the top. This continuous hilling ensures you get multiple layers of potatoes throughout the bag.
Step 5: Watering and Feeding Your Potato Plants
Potatoes are thirsty plants, especially when grown in containers. Monitor the moisture level of your potting mix regularly, sticking your finger about 2 inches deep. If it feels dry, it’s time to water.
Water deeply and consistently, especially during flowering and tuber formation. Avoid overwatering, which can lead to rot, but never let the soil dry out completely. Regular watering is key to preventing common issues like hollow heart and scab.
As for feeding, if you incorporated a slow-release fertilizer or compost at planting, your plants should be good for the first few weeks. Generally, a balanced liquid organic fertilizer applied every 2-4 weeks after hilling begins will support vigorous growth. Look for fertilizers with slightly higher potassium content as the plants mature to promote tuber growth.
Step 6: Pest and Disease Management
While growing in bags reduces some risks, it doesn’t eliminate them entirely. Keep an eye out for common potato pests like Colorado potato beetles, aphids, and flea beetles. Hand-picking smaller infestations is often effective. For more persistent issues, consider organic pest control methods.
Fungal diseases like early or late blight can also occur. Ensure good air circulation around your plants, avoid overhead watering, and consider organic fungicides if necessary. Remove any yellowing or diseased leaves promptly to prevent spread. For a detailed guide on common garden pests and how to combat them organically, visit Organic Pest Control in Your Garden.
Step 7: The Waiting Game: Flowering and Senescence
After about 6-8 weeks, your potato plants will begin to flower. This is an exciting sign that tubers are starting to form underground! Resist the urge to harvest at this stage; those small flowers indicate the beginning of the potato’s reproductive cycle.
As the growing season progresses (usually 10-14 weeks from planting, depending on the variety), the foliage will start to yellow, wither, and eventually die back. This process, called senescence, is a natural signal that the plant is directing all its energy into maturing the tubers in the soil. Once the foliage has completely died back, it’s almost harvest time!
Step 8: Harvesting Your Bountiful Bags
Once the foliage has completely died back and ideally, after a period of about 2 weeks from when the leaves withered, your potatoes are ready for harvest. This resting period allows the potato skins to “set” or harden, which improves their storage life.
To harvest, simply tip the entire contents of the grow bag onto a tarp, newspaper, or directly into a wheelbarrow. Gently sift through the soil to find your precious potatoes. It’s like a treasure hunt!
Be careful not to bruise or damage the potatoes, as this can lead to rot during storage. Discard any potatoes that look diseased or damaged.
Step 9: Curing Your Potatoes for Storage
After harvesting, “cure” your potatoes by spreading them in a single layer in a cool (50-60°F / 10-15°C), dark, and humid (85-90% humidity) location for 1-2 weeks. This process allows any nicks or bruises to heal and further toughens the skin, significantly improving their storage longevity.
For more details on preserving your harvest, you might find Seasonal Food Preservation Techniques a helpful read.
Step 10: Storing Your Harvested Potatoes
Once cured, store your potatoes in a cool, dark, well-ventilated area, ideally between 40-50°F (4-10°C). Burlap sacks, paper bags, or slatted crates are excellent for storage, as they allow for air circulation. Avoid storing them in plastic bags, which can trap moisture and promote spoilage.
Check your stored potatoes periodically and remove any that show signs of sprouting or spoilage to prevent them from affecting other tubers.
Pro Tips and Common Mistakes to Avoid
Even with a clear guide, a few insider tips can make all the difference. Understanding common pitfalls can save you from frustration and ensure a more abundant harvest.
Pro Tips:
- Choose the Right Variety: Early-to-mid-season varieties generally perform best in bags. Research varieties suited for container growing in your area.
- Consistent Watering is Key: Fluctuations in moisture can lead to misshapen potatoes or cracking. Use a moisture meter if unsure.
- Rotate Your Bags: Even though you’re using fresh soil, it’s good practice to move your bags to a slightly different spot each year if possible, to avoid any potential lingering pathogens.
- Companion Planting: Consider planting marigolds or nasturtiums nearby. They can deter pests and add a splash of color to your potato patch.
- Don’t Be Afraid to Experiment: Try different sized bags or containers. A 15-gallon fabric grow bag will generally yield more potatoes than a 10-gallon one.
Common Mistakes to Avoid:
- Using Grocery Store Potatoes: As emphasized earlier, these are treated and prone to disease. Stick to certified seed potatoes.
- Overwatering or Underwatering: Both extremes are detrimental. Overwatering leads to rot, while underwatering stresses the plant and affects tuber development.
- Skipping Hilling: This is critical! Without hilling, you’ll dramatically reduce your yield, as potatoes form along the buried stem.
- Harvesting Too Early: Resist the temptation! Waiting until the foliage has fully died back and the skins have set improves storage quality and yield.
- Poor Drainage: Ensure your bags or buckets have adequate drainage holes. Waterlogged soil is a death sentence for potatoes.
Eco-Friendly Variations for Sustainable Potato Growing
Embracing sustainable practices in your garden benefits both the environment and your plants. Growing potatoes in bags offers several opportunities for eco-conscious gardening.
Recycled Containers: Instead of buying new grow bags, consider repurposing sturdy containers like old laundry baskets (line with landscape fabric), large burlap coffee bean sacks, or even feed bags. Just ensure good drainage and food-safe materials if using plastic.
Homemade Potting Mix: Create your own nutrient-rich potting mix using compost, aged wood chips/mulch, some coir or peat, and perlite. This reduces reliance on commercially produced mixes and allows you to control the ingredients.
Compost Tea: Supplement your feeding regimen with compost tea. It’s a gentle, natural fertilizer that boosts soil microbes and plant health. You can easily brew it at home using finished compost and water.
Water Conservation: Place a saucer or tray under your grow bags to catch excess water, which can then be reabsorbed by the plant or used to water other plants. Mulch the top of your bags with straw or shredded leaves to reduce evaporation and maintain soil moisture.
Seasonal Considerations for Potato Cultivation
While growing potatoes in bags offers flexibility, understanding seasonal timing is still important for optimal success.
Spring Planting: Most regions will plant potatoes in early to mid-spring, once the danger of hard frost has passed and the soil begins to warm up. Aim for soil temperatures around 45-55°F (7-13°C). Planting too early in cold, wet soil can lead to rot.
Summer Care: During the hot summer months, consistent watering is paramount. Monitor your bags daily. Apply any necessary organic pest control methods as insect activity increases with warmer weather.
Late Season: For varieties with longer maturity rates, you might be harvesting into late summer or early autumn. Pay attention to weather forecasts; a sudden cold snap or heavy, prolonged rain near harvest time can affect your tubers. For comprehensive advice on cold weather gardening, explore Cold Weather Gardening Tips.
Succession Planting (Optional): In regions with long growing seasons, you can plant a second batch of early-maturing potatoes a few weeks after your first planting for a continuous harvest.
Expert Resources for Deeper Dives
To further enhance your knowledge and troubleshoot any specific issues, these reputable external resources offer a wealth of information:
- Gardening Know How: For a broad range of gardening advice, including specific information on potato varieties and care, Gardening Know How is an excellent resource.
- Royal Horticultural Society (RHS): The RHS provides detailed, science-backed guidance on growing various plants, including potatoes, with a focus on sustainable practices. Visit their site at RHS.org.uk.
- University of Minnesota Extension: University extension offices often offer regionally specific advice, which can be invaluable for local planting times and common issues. The University of Minnesota Extension is a great example.
Conclusion
Growing potatoes in bags is more than just a gardening technique; it’s an opportunity to embrace sustainable living, utilize small spaces, and enjoy the unparalleled satisfaction of harvesting your own food. From the initial chitting of seed potatoes to the joyous moment of emptying a bag full of earthy treasures, each step is rewarding.
By following this comprehensive guide, you’re well-equipped to cultivate a thriving potato patch right on your patio or balcony. Remember the key principles: quality seed potatoes, well-draining soil, consistent hilling, and attentive watering. With a little care and patience, you’ll be enjoying fresh, homegrown potatoes in no time. Happy growing!
FAQ: Your Potato Bag Questions Answered
Q: How many potatoes can I expect from one grow bag?
A: The yield varies significantly based on bag size, potato variety, and care. A 10-gallon grow bag typically yields 2-5 pounds (1-2.5 kg) of potatoes, while a 15-gallon bag can yield 5-10 pounds (2.5-4.5 kg) or more.
Q: Can I reuse the soil in my potato grow bags?
A: It’s generally not recommended to reuse the exact same soil for potatoes in consecutive seasons, especially if you encountered any disease issues. However, you can amend the old soil with fresh compost, fresh potting mix, and nutrients, then use it for other non-potato crops like leafy greens or herbs. This helps prevent the buildup of potato-specific diseases.
Q: What if my potatoes turn green? Are they safe to eat?
A: Green potatoes indicate the presence of solanine, a natural toxin. This usually happens when tubers are exposed to sunlight. While small green spots can be peeled away, heavily greened potatoes should not be eaten, as solanine can cause digestive upset. Proper hilling prevents greening by keeping potatoes covered.
Q: How do I know when to start hilling my potato plants?
A: Start hilling when your potato plants are about 8-10 inches tall. Add soil around the stems, leaving the top 2-3 sets of leaves exposed. Continue this process every time the plant grows another 6-8 inches, until the bag is nearly full.


