The Ultimate 7-Step Guide to Building a DIY Compost Bin from Pallets
Composting is nature’s recycling program, turning organic waste into nutrient-rich soil amendment that your garden will utterly adore. Not only does it reduce landfill waste and your carbon footprint, but it also enriches your garden soil, leading to healthier plants and bountiful harvests. If you’ve been dreaming of a practical, cost-effective, and environmentally friendly way to manage your organic waste, building a DIY compost bin from pallets is an excellent solution. This guide will walk you through creating a robust, multi-bay composting system using readily available, often free, pallets. Get ready to transform your kitchen scraps and yard waste into “black gold”!
[lwptoc]
Why Building a DIY Compost Bin from Pallets Matters for Your Garden and Wallet
There are countless reasons why embracing composting, especially with a DIY compost bin made from pallets, is a game-changer for any gardener. Firstly, it provides your garden with a continuous supply of nutrient-dense compost. This organic matter improves soil structure, water retention, and microbial activity, leading to stronger, more resilient plants that require less synthetic fertilizer.
From a financial perspective, building your own compost bin from pallets is incredibly budget-friendly. Pallets are frequently given away for free by businesses, making the primary material cost virtually zero. Compare this to purchasing pre-made compost bins or bags of commercial compost, and the savings quickly add up. This frugality extends beyond the bin itself; with a steady supply of homemade compost, you’ll significantly reduce your need to buy soil amendments, potting mixes, and even some fertilizers.
Beyond the garden’s immediate benefits, a pallet compost bin contributes to significant environmental advantages. By diverting food scraps and yard waste from landfills, you’re directly reducing methane gas emissions, a potent greenhouse gas. Composting completes the natural cycle, returning valuable organic matter back to the earth rather than letting it decompose anaerobically in landfills. It fosters a more sustainable lifestyle, encouraging you to be more mindful of your waste and its potential.
Furthermore, a multi-bay pallet system, which we’ll focus on, offers superior efficiency. It allows you to have distinct stages of composting: one bay for fresh additions, another for active decomposition, and a third for finished, curing compost. This separation ensures a continuous cycle, meaning you’ll always have finished compost available when you need it, without disturbing the active composting process. It’s a system designed for maximum yield and ease of management, making composting less of a chore and more of a rewarding part of your gardening routine.
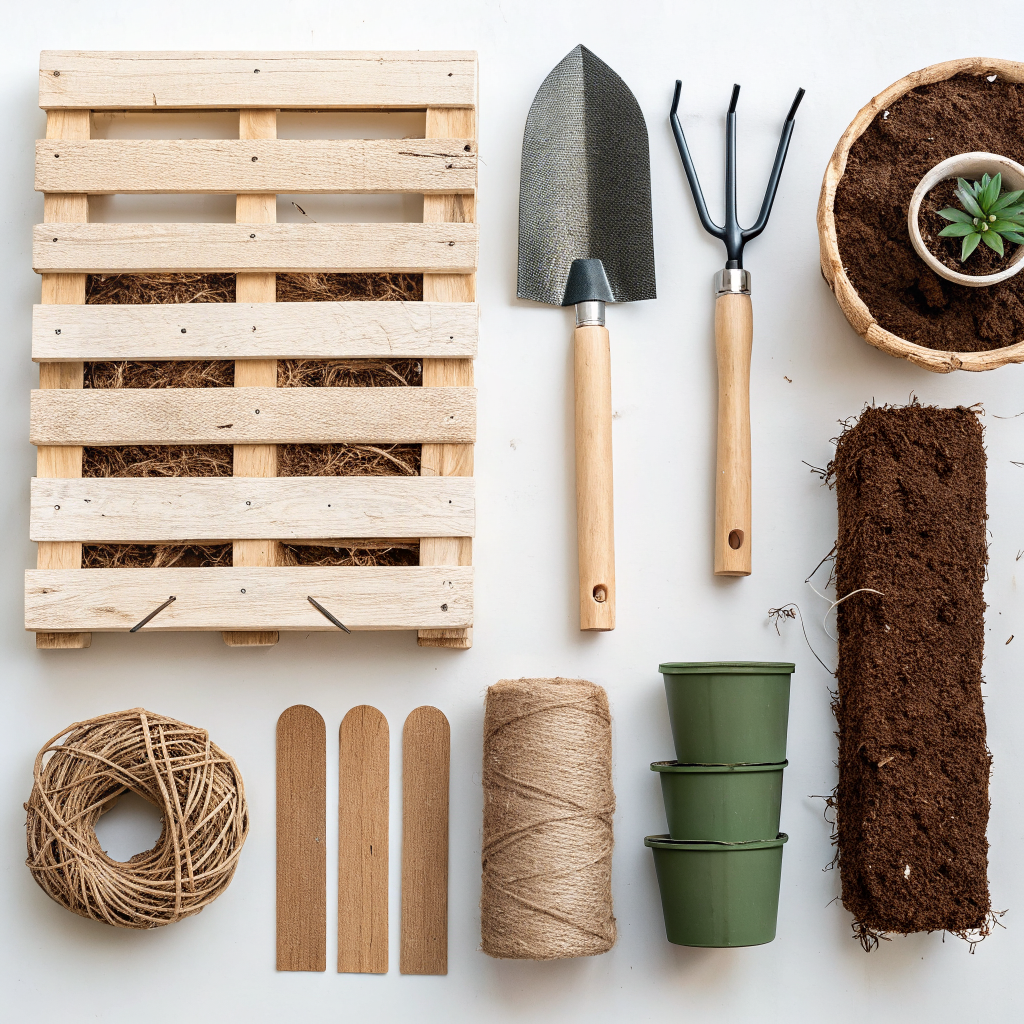
What You Need: Tools and Materials for Your Pallet Compost Bin
Before you embark on this exciting DIY project, it’s crucial to gather all the necessary tools and materials. Having everything on hand will ensure a smooth and efficient build.
Materials:
- 9-12 Wooden Pallets: Look for “HT” (Heat Treated) stamps, not “MB” (Methyl Bromide treated), which can be toxic. Free pallets can often be found at local businesses, construction sites, or by asking on community groups. Aim for pallets of similar size for easier construction. Consider checking out essential tools for every DIY enthusiast if you need to build up your toolkit.
- Exterior Grade Screws (3-inch): Approximately 100-150 screws will be needed for robust construction.
- Corner Braces or Galvanized Strapping (Optional but Recommended): For added stability, especially if your pallets are not perfectly uniform.
- Hardware Cloth or Chicken Wire (Optional): To line the inside walls or bottom, preventing rodents from entering, especially useful for food scraps.
- Landscaping Fabric (Optional): To line the bottom if you have very loose soil or want to prevent weeds from growing into your compost pile.
- Plastic Sheeting or Tarp (Optional): To cover the compost pile during heavy rain or to retain heat.
Tools:
- Cordless Drill/Driver: Essential for driving screws quickly and efficiently. Make sure you have fully charged batteries.
- Safety Gloves: Protect your hands from splinters and rough pallet edges.
- Safety Glasses: Always wear eye protection when cutting or drilling.
- Measuring Tape: To ensure accurate placement and alignment.
- Level: For keeping your base and uprights straight.
- Pry Bar or Hammer with Claw (Optional): If you need to remove any stubborn nails or reshape pallet planks.
- Jigsaw or Reciprocating Saw (Optional): If you need to cut pallets to size or remove damaged sections.
- Shovel and Rake: For preparing the site and eventually turning your compost.
- Marker or Pencil: For marking drilling spots.
When sourcing pallets, always prioritize safety and check for the HT stamp. Avoid painted or chemically treated pallets. A quick online search for local businesses or pallet recycling centers can often yield a good supply. Building your own compost bin is a rewarding way to incorporate effective garden pest control tips by keeping your garden healthier naturally.
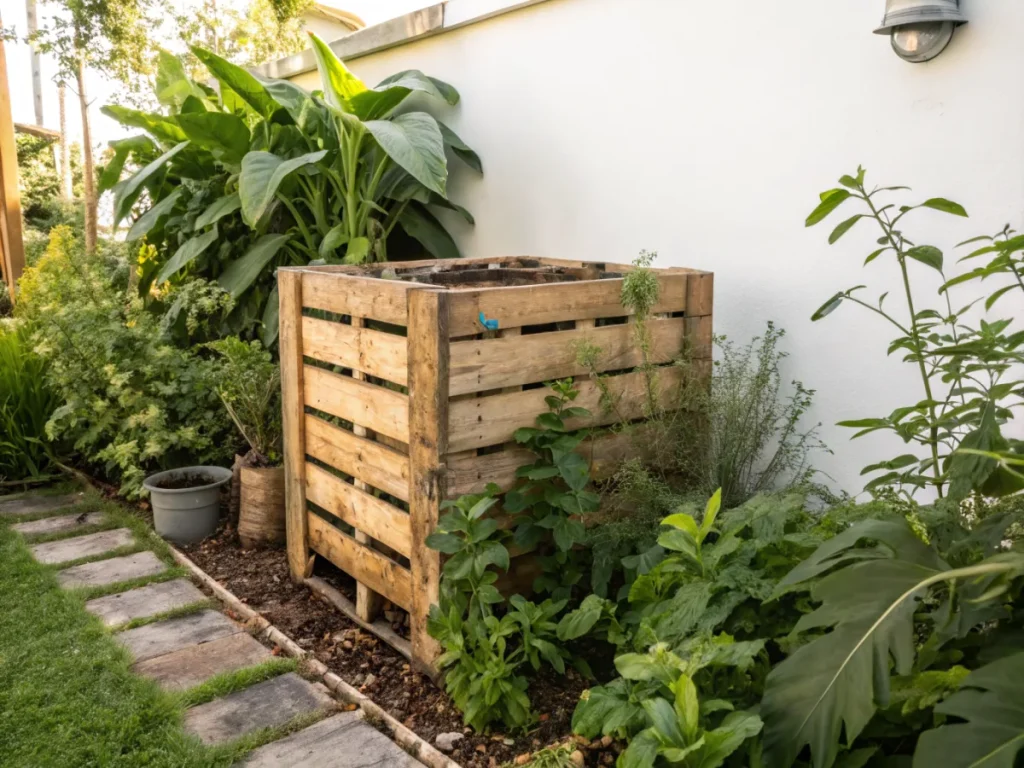
Step-by-Step Guide: Crafting Your Three-Bay Pallet Compost System
This detailed guide will walk you through constructing a robust three-bay compost bin, optimized for efficiency and ease of use. Each step is designed to be straightforward, even for novice DIY enthusiasts.
Step 1: Site Selection and Preparation
Choosing the right location is paramount for a successful compost bin. Select a level, well-drained area of your yard that is easily accessible but not directly in the path of strong winds. It should be close enough to your garden for convenient compost transport, but not so close that odors (if any) become an issue. Consider partial shade to prevent the compost from drying out too quickly, especially in hot climates. Once your spot is chosen, clear any grass, weeds, or debris, and level the ground as much as possible. A solid, level foundation is crucial for stability.
Step 2: Constructing the Back Wall
Begin by standing three pallets upright in a line. These will form the back wall of your three-bay system. Ensure they are aligned flush against each other. Using your cordless drill and 3-inch exterior screws, securely fasten the pallets together. Drive screws through the thickest parts of the pallet planks where they overlap, ensuring a strong connection. Use at least four screws per joint (two at the top, two at the bottom) to create a sturdy, unified back structure. This forms the primary support for your entire composting system.
Step 3: Adding the Side Walls
Next, take two more pallets and position one at each end of your back wall, perpendicular to it. These will form the outer side walls of your compost bin. Stand them upright so their edges meet the edges of the back wall pallets, forming a corner. Securely attach each side pallet to the back wall using multiple 3-inch exterior screws. Again, focus on driving screws through the thickest parts of the wood at solid contact points to maximize structural integrity. Repeat this process for both ends, creating two open “U” shapes.
Step 4: Installing the Internal Dividers
Now, it’s time to create the internal bays. Take two more pallets and place one between the first and second back wall pallets, and another between the second and third. These will serve as your internal dividing walls. They should be positioned perpendicular to the back wall, parallel to your outer side walls. Securely attach these internal divider pallets to the back wall using the same method as before, driving plenty of screws through connecting points. This completes the basic structure of your three distinct bays.
Step 5: Reinforcing and Finishing Touches (Optional but Recommended)
While the basic structure is complete, adding reinforcement can significantly extend the life and stability of your bin. For enhanced rigidity, consider adding corner braces or galvanized strapping where pallets meet, especially at the top and bottom. If you are concerned about rodents, especially when composting food scraps, line the inside walls and potentially the bottom of your bins with hardware cloth or chicken wire. Simply staple or screw the wire mesh to the inside of the pallets. If you want to prevent weeds from growing up into your compost pile from the bottom, lay down a layer of landscaping fabric. Finally, for an extra touch, you might use a jigsaw to round off any sharp edges on the top planks of the pallets for safety and aesthetics. This prepares your pallet compost bin for years of efficient composting, making it an invaluable asset for your garden and an excellent example of beginner garden layout tips.
Pro Tips and Common Mistakes to Avoid with Your Pallet Compost Bin
Building your DIY pallet compost bin is just the first step; maintaining an effective composting system requires ongoing attention and knowledge. Here are some pro tips to maximize your composting success and common pitfalls to sidestep.
Pro Tips for Optimal Composting:
- Maintain the Ratio: Composting thrives on a balance of “greens” (nitrogen-rich, like fresh grass clippings, food scraps) and “browns” (carbon-rich, like dried leaves, shredded cardboard). Aim for a ratio of roughly 1 part green to 2-3 parts brown in volume. This balance is critical for microbial activity and preventing odor.
- Chop it Up: Smaller pieces break down faster. Chop larger kitchen scraps, shred leaves, and break up garden waste. This increases the surface area for microorganisms to work on.
- Keep it Moist, Not Soggy: Your compost pile should feel like a damp sponge – moist but not dripping wet. Too dry, and decomposition slows to a halt; too wet, and it can become anaerobic and stinky. Add water if it’s dry, or more brown materials if it’s too wet.
- Turn Regularly: Aeration is vital! Turning your compost pile periodically (once a week or every few weeks) introduces oxygen, prevents compaction, and speeds up decomposition. This is where a multi-bay system shines; you can easily ‘turn’ compost from one bay into the next.
- Cover Your Pile (Sometimes): While open-air is generally good, consider covering your compost pile with a tarp during heavy rains (to prevent waterlogging) or during dry spells (to retain moisture and heat).
- Monitor Temperature: An active compost pile generates heat. If you stick your hand in, it should feel warm to hot. This indicates good microbial activity. If it’s cold, it might need more greens, moisture, or turning.
Common Mistakes to Avoid:
- Adding Prohibited Items: Avoid meat, dairy, oily foods, diseased plants, pet waste (from carnivorous animals), and chemically treated wood. These can attract pests, smell foul, or introduce pathogens.
- Neglecting Airflow: A common oversight is a lack of oxygen, which leads to anaerobic decomposition, resulting in foul smells (like rotten eggs). Regular turning prevents this.
- Ignoring Moisture Levels: Both too dry and too wet conditions will hinder the composting process. Consistent monitoring and adjustment are key.
- Not Shredding Materials: Throwing in large, whole materials significantly slows down decomposition. A little prep work goes a long way.
- Impatience: Composting takes time. While a hot pile can produce compost in a few months, a slower, cooler pile might take a year. Be patient, and trust the process.
- Using Pressure-Treated Pallets: Always ensure pallets are “HT” (Heat Treated) and NOT “MB” (Methyl Bromide) or pressure-treated. Chemical treatments can leach into your compost and ultimately your garden.
Eco-Friendly Variations and Enhancements for Your Pallet Bin
While a basic pallet compost bin is inherently eco-friendly, there are several ways to enhance its sustainability and efficiency further. These variations integrate beautifully with the existing design and can adapt to different needs and resources.
- Worm Composting Integration (Vermicomposting): For a supercharged, nutrient-rich compost, consider dedicating one bay (or a section within a bay) to vermicomposting. You’d need to line the bottom and sides of that section with fine mesh to prevent worms from escaping and add bedding material. This is particularly effective for kitchen scraps, producing worm castings that are a gardener’s gold.
- Removable Front Panels: Instead of fixed front pallets, design the front of each bay with removable slats or pallets that slide into channels. This allows for easier turning, access to finished compost, and loading new materials. You could use simple wooden posts secured to the corners, with wooden boards cut to size that slide in horizontally.
- Rainwater Collection Integration: Position your compost bin strategically below a gutter downspout. You can direct rainwater directly into a designated bay for moisture, or even incorporate a small rainwater harvesting barrel nearby to manually water your compost. This conserves water and automatically moistens your pile.
- Integrated Sifter: Build a simple screen sifter (made from wood and hardware cloth) that can sit across the top of one of your bays. As you shovel material from one bay to the next, you can pause to sift out larger, unfinished chunks back into the active pile, leaving you with beautifully fine compost in the receiving bay.
- Living Cover: While not part of the bin itself, consider planting beneficial plants (like herbs or flowering annuals) around the base of your compost bin once it’s established. This can help deter pests, attract pollinators, and integrate the bin more seamlessly into your garden landscape.
- Utilizing Scrap Wood: If you have additional scrap wood pieces from other projects, use them to create a lid for your compost bins. A lid can help retain heat, prevent excess moisture from rain, and deter curious animals.
- Shredder/Chipper Integration: For gardeners with a large volume of woody waste, a small electric shredder or chipper can be a fantastic eco-friendly investment. Shredding branches and tough plant material significantly speeds up their decomposition in your pallet bin, turning what would be unusable waste into valuable browns.
Seasonal Considerations for Your Pallet Compost Bin
Composting is a year-round activity, but the effectiveness and speed of decomposition can vary significantly with the seasons. Understanding these seasonal nuances will help you manage your pallet compost bin more efficiently.
Spring: The Reawakening
Spring is an ideal time to start a new compost pile or rejuvenate an existing one. As new growth emerges, you’ll have an abundance of “greens” like fresh grass clippings, weeded garden plants, and early garden trimmings. However, be mindful of an overabundance of greens, which can make your pile too wet and anaerobic. Ensure you have a good supply of “browns” stockpiled from autumn leaves or shredded cardboard to balance the nitrogen-rich spring materials. Turning your pile frequently in spring will help kickstart microbial activity as temperatures rise.
Summer: The Hot and Humid Hustle
Summer is peak composting season. Warm temperatures mean decomposition happens rapidly, especially if your pile is well-aerated and moist. The challenge in summer is often preventing the pile from drying out too quickly, particularly in hot, arid climates. You may need to add water regularly to maintain a damp sponge consistency. Keep an eye out for an imbalance of “greens” if you’re frequently adding fresh produce scraps or grass cuttings; balance this with shredded paper or dry leaves. Consider covering your pile during heatwaves to retain moisture.
Autumn: The Brown Gold Rush
Autumn is arguably the most critical season for composters, as it provides a massive influx of “browns” in the form of fallen leaves. Collect as many leaves as you can – they are invaluable carbon sources that you’ll rely on throughout the year, especially in spring. Shredding leaves before adding them will prevent matting and speed up decomposition. You can also add spent annuals, vegetable plant remnants (ensure they are disease-free), and small branches. Start a new bay specifically for leaves if you have enough space. Autumn is also a great time to harvest finished compost before winter sets in.
Winter: The Slow Slumber
Composting slows down significantly in winter, especially in colder climates. Microbial activity decreases, and decomposition can almost halt in freezing temperatures. However, you can still add food scraps and other materials to your bin. The materials will simply remain largely undecomposed until spring. To keep the process going, albeit slowly, try to build a larger pile, which retains heat better. You can also insulate your bin with straw bales around the outside. Ensure you have a good mix of greens and browns going into winter so the pile is ready to reactivate when warmer weather returns. Avoid adding excessive moisture during winter, as it can freeze.
Expert Resources for Advanced Composting
To further deepen your composting knowledge and troubleshoot any issues, these expert resources offer comprehensive information and practical advice:
- Gardening Know How: Composting Tips – How To Make Compost Work Best – An excellent resource for fundamental composting principles, common problems, and solutions.
- Royal Horticultural Society (RHS): Compost – The RHS offers detailed guidance on various composting methods, what to compost, and how to use it in your garden.
- University of Minnesota Extension: Composting Yard and Garden Waste – Provides science-backed information on composting techniques, suitable materials, and environmental benefits.
Conclusion: Your Journey to Black Gold Begins
Building a DIY compost bin from pallets is more than just a weekend project; it’s an investment in the health of your garden, your wallet, and the planet. You’ve now learned how to construct a robust, multi-bay system using readily available and often free materials, transforming what would otherwise be waste into invaluable “black gold.” This practical guide has equipped you with the knowledge to select the right materials, meticulously build your bin, optimize your composting process with pro tips, and understand the seasonal rhythms of decomposition.
Embracing composting reduces landfill waste, mitigates greenhouse gas emissions, and enriches your soil naturally, fostering stronger plants and more vibrant ecosystems. The three-bay design ensures a continuous supply of finished compost, making it an efficient and rewarding endeavor for any gardener. As you begin your composting journey, remember that consistency and patience are key. Soon, you’ll be reaping the benefits of your labor, enjoying healthier plants, and contributing to a more sustainable world, all thanks to your homemade pallet compost bin.
So, gather your pallets, don your gloves, and get ready to transform your organic waste into a treasure for your garden. Happy composting!
Frequently Asked Questions About DIY Pallet Compost Bins
Q1: Are all pallets safe to use for a compost bin?
A1: No, not all pallets are safe. You should only use pallets stamped with “HT” (Heat Treated). Avoid pallets marked “MB” (Methyl Bromide), which are chemically treated and can leach toxins into your compost. Also, steer clear of pallets that have visible spills, stains, or strong chemical odors.
Q2: How many pallets do I need for a three-bay system?
A2: For a standard three-bay compost bin, you will need approximately 9 to 12 pallets. This accounts for the three back walls, two outer side walls, and two internal dividing walls. Some designs might use an additional pallet for a front panel or lid per bay, depending on your preference.
Q3: How often should I turn my compost pile in a pallet bin?
A3: The frequency of turning depends on how quickly you want compost and how active your pile is. For a faster decomposition, aim to turn your pile every 1-2 weeks. If you’re less concerned about speed, turning it every 3-4 weeks is sufficient. Regular turning aerates the pile, prevents odors, and speeds up decomposition.
Q4: Can I add all kitchen scraps to my pallet compost bin?
A4: Most vegetable and fruit scraps, coffee grounds, and tea bags are excellent additions. However, avoid adding meat, bones, dairy products, oily foods, and pet waste (from carnivorous animals). These items can attract pests, create foul odors, and introduce harmful pathogens. Also, avoid diseased plants, as the disease might survive and spread to your garden.


