
The Ultimate Guide: 7 Steps to Make Your Own Seed Tape for Perfect Spacing
Are you tired of uneven plant rows, wasted seeds, and the tedious task of thinning seedlings? Imagine a garden where every plant has its ideal space, thriving without competition, and all your hard work is rewarded with abundant yields. This isn’t a dream; it’s a reality you can create with a simple, eco-friendly DIY project: making your own seed tape!
This comprehensive guide will walk you through everything you need to know to create biodegradable seed tape using everyday household items like toilet paper. Not only will you achieve perfectly spaced rows, but you’ll also embrace a sustainable gardening practice that saves time, conserves resources, and boosts your gardening success. Get ready to transform your planting experience!
[lwptoc]
Why This Matters for Your Garden: The Benefits of Seed Tape
Gardening is often a labor of love, but some tasks, like precision seed spacing, can be frustrating. Seed tape eliminates much of this frustration, offering a multitude of benefits for both novice and experienced gardeners. It’s a game-changer for anyone looking to optimize their garden’s performance and reduce their workload.
Firstly, seed tape guarantees perfect plant spacing right from the start. This means each seedling has ample room to grow, access to nutrients, and sufficient sunlight, leading to stronger, healthier plants. No more guesswork, no more overcrowding, and significantly less need for time-consuming thinning later in the season. Think of all the time you’ll save!
Secondly, it’s a fantastic solution for handling tiny, hard-to-manage seeds. Have you ever tried planting carrot or radish seeds individually? It can be a real challenge! Seed tape makes this process incredibly easy, allowing you to space even the most minute seeds accurately and efficiently. This precision ensures a higher germination rate for those tricky varieties.
Beyond spacing, seed tape is a brilliant way to extend the lifespan of older seeds. Sometimes, we have seed packets that are a year or two past their prime, but still viable. By consolidating these on tape, you can ensure they get planted directly, rather than being forgotten in a drawer. This practice is also perfect for saving seeds from your own harvests, ensuring you utilize every precious seed.
From an ecological perspective, making your own seed tape is inherently eco-conscious. You’re reusing materials like toilet paper that would otherwise be discarded, turning waste into a valuable gardening tool. This reduces your environmental footprint and aligns perfectly with sustainable living principles. Furthermore, by ensuring optimal plant growth, you minimize wasted water and fertilizer, contributing to a more efficient garden overall. It’s a win-win for your garden and the planet.
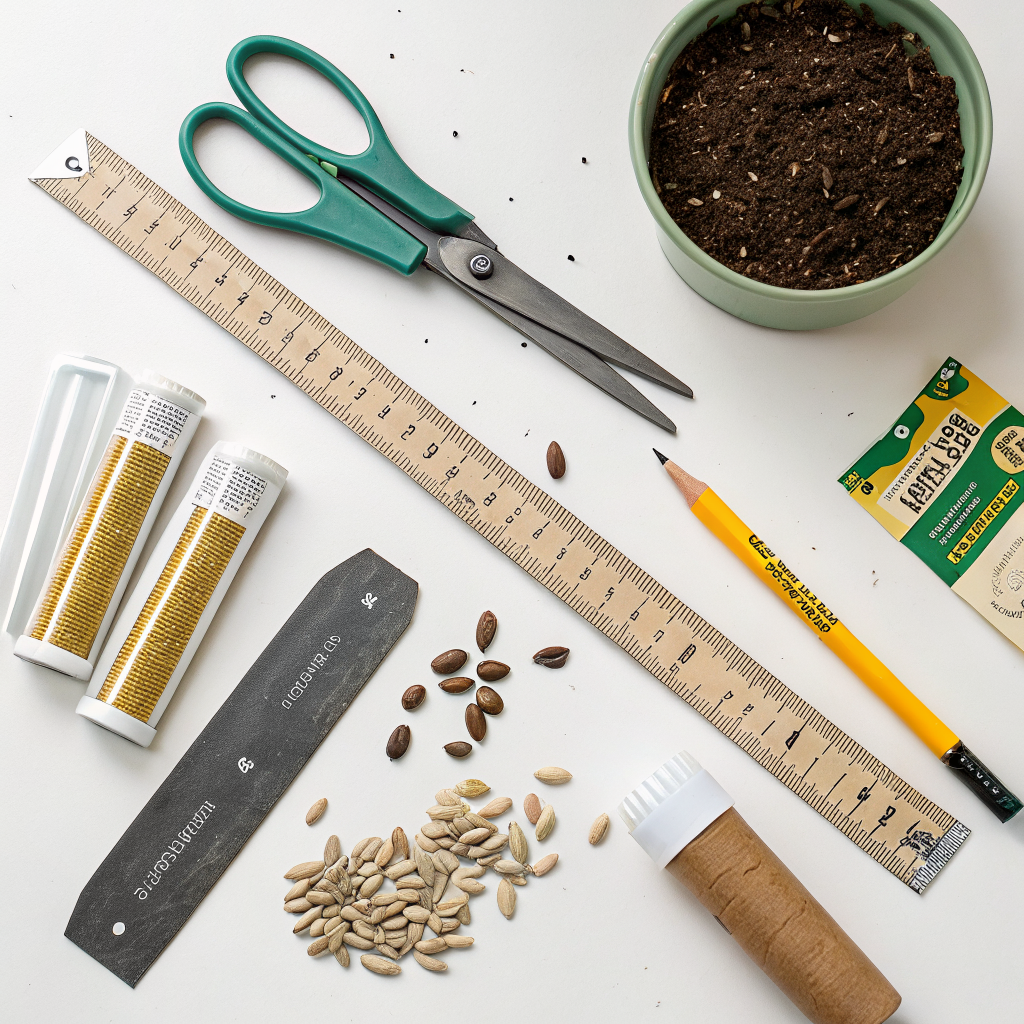
What You Need: Tools, Materials, and Your Chosen Seeds
One of the best aspects of this make seed tape DIY project is how accessible and inexpensive the materials are. You likely already have most of what you need around your home, making it a truly budget-friendly eco-friendly hack. Gathering your supplies beforehand will make the process smooth and enjoyable.
Essential Materials:
- Single-ply toilet paper: This is your primary material. Single-ply works best because it’s thin, breaks down quickly in the soil, and absorbs moisture well. Avoid patterned or heavily scented varieties, as these can contain chemicals that might inhibit germination. Paper towels can also work, but need to be cut into strips.
- Flour and water for paste: A simple, non-toxic paste is crucial for adhering the seeds. Use all-purpose flour and water. The ratio will vary slightly, but aim for a consistency similar to white school glue.
- Your chosen seeds: This is where the magic happens! Select seeds that benefit most from precise spacing, such as carrots, radishes, lettuce, spinach, beets, or small flower seeds. Check the seed packet for recommended spacing.
Tools You’ll Need:
- Small bowl or cup: For mixing your flour paste.
- Small paintbrush or cotton swab: Ideal for applying small dots of paste to the toilet paper. A toothpick can also work in a pinch.
- Marker or pen: For labeling your seed tape, which is essential for identifying your plants later.
- Ruler or measuring tape: To accurately measure the spacing between your seeds. Precision is key here.
- Scissors: To cut your toilet paper strips to length if you’re using paper towels or want specific strip sizes.
- Wax paper or newspaper: To protect your work surface and provide a non-stick drying area for your finished seed tapes.
- Optional – Tweezers: Handy for picking up and placing very tiny seeds accurately.
The 7-Step Guide to Making Your Seed Tape DIY
Creating your own seed tape is a wonderfully meditative and rewarding process. Follow these steps carefully, and you’ll soon have a collection of perfectly prepared seed tapes ready for planting. Remember, patience and precision are your allies here.
Step 1: Prepare Your Workspace and Materials
Find a clean, flat surface to work on. Cover it with wax paper or old newspaper to protect it from the flour paste and make cleanup easier. Unroll a length of single-ply toilet paper – think about the length of your garden rows. For beginners, starting with shorter sections (2-3 feet) can be more manageable. If using paper towels, cut them into strips of about 1-2 inches wide. Lay out your seeds, paste ingredients, ruler, and marking tools.
Step 2: Mix Your Biodegradable Paste
In your small bowl, combine about 2 tablespoons of all-purpose flour with a few teaspoons of water. Mix thoroughly until you achieve a smooth, somewhat thick paste, similar in consistency to white school glue or a thin pancake batter. It should be thick enough to hold the seeds but thin enough to spread easily. Add more flour or water as needed to reach the desired consistency. This simple flour paste is entirely biodegradable and harmless to your seeds.
Step 3: Mark Your Spacing on the Toilet Paper
Lay your chosen length of toilet paper flat on your protected work surface. Using your ruler and marker, make small marks along the center of the toilet paper strip to indicate where each seed should be placed. Refer to your seed packet for the recommended in-row spacing. For example, if carrots need 1 inch spacing, mark every inch. This pre-marking step is crucial for achieving accurate spacing and avoids last-minute adjustments. You can make light pencil marks that will not be visible once planted. For different ideas on seed starting, check out A Beginner’s Guide to Seed Starting.
Step 4: Apply the Paste Dots
Dip your small paintbrush or cotton swab into the flour paste. Apply a small dot of paste directly onto each mark you made on the toilet paper. The dots should be just large enough to hold one seed, but not so big that they spread excessively. Be consistent with the size of your dots to ensure each seed adheres properly. Work in manageable sections to prevent the paste from drying out too quickly.
Step 5: Place Your Seeds
Carefully pick up individual seeds (using tweezers for very tiny seeds can be helpful) and place one directly onto each paste dot. Gently press the seed into the paste to ensure good contact. This is the most delicate step, especially with fine seeds. Take your time and enjoy the precision. Once seeds are placed, you can lightly fold the toilet paper over the top of the seeds if using a wider strip, effectively “sandwiching” them in. For narrower strips, simply let them dry openly.
Step 6: Label and Dry Your Seed Tape
This step is vital for garden organization! Immediately after placing seeds, use your marker to label the beginning of each seed tape strip with the plant type (e.g., “Carrots ‘Nantes'”). You can also add the date you made the tape or specific variety information. Lay the finished seed tapes flat on your wax paper or newspaper in a warm, dry area away from direct sunlight. Allow them to dry completely, which can take several hours to overnight, depending on humidity. The paste should be firm and not sticky to the touch.
Step 7: Store Your Seed Tape for Later Planting
Once your seed tapes are completely dry, carefully roll them up, much like a scroll, or fold them neatly. Store them in airtight containers, zip-top bags, or envelopes to protect them from moisture and pests until planting time. Keep them in a cool, dark, and dry place – the same conditions you would use for storing regular seed packets. Proper storage ensures your homemade seed tape remains viable until you’re ready to plant. For year-round gardening inspiration, discover Innovative Indoor Gardening Setups.
Pro Tips and Common Mistakes to Avoid
Making seed tape is straightforward, but a few insider tips can elevate your success, and being aware of common pitfalls can save you frustration. Let’s ensure your make seed tape DIY project goes off without a hitch!
Pro Tips for Success:
- Test Your Paste Consistency: Before committing to an entire roll, try making a small test batch of paste with a few seeds. It should hold the seeds without being too globby or too watery.
- Use the Right Tools for Tiny Seeds: For very small seeds like carrots or lettuce, tweezers are invaluable for precise placement. A moistened toothpick can also help pick up and drop individual seeds.
- Consider Width: If you plan to fold the toilet paper over the seeds, ensure your strip is wide enough (e.g., 2-ply folded in half, or wider paper towel strips). This can add an extra layer of protection during planting and ensure the seeds stay in place.
- Planting Depth: When it comes to planting, always refer to your seed packet for the correct planting depth. You’ll simply lay your seed tape in a shallow trench and cover it with the recommended amount of soil. This ensures optimal germination.
- Watering After Planting: After laying your seed tape and covering it with soil, water gently and thoroughly. The moisture will dissolve the paper and paste, allowing the seeds to absorb water and begin germination.
- Make Bulk Batches: If you plan to plant a lot of one type of seed, consider dedicating an afternoon to making a large batch of that specific seed tape. It saves time in the long run!
Common Mistakes to Avoid:
- Too Much Paste: Excessive paste can create a thick barrier around the seed, potentially inhibiting germination or making it harder for the paper to break down. Use just enough to adhere the seed.
- Wet Seeds During Placement: Ensure your hands and tools are completely dry when handling seeds before placing them on the paste. Moisture can cause seeds to stick together or germinate prematurely.
- Insufficient Drying Time: If your seed tape isn’t completely dry before storage, moisture can lead to mold or premature germination, ruining your hard work. Always allow ample drying time.
- Forgetting to Label: This is a classic gardener’s blunder! Without clear labels, you’ll have no idea what you’re planting. Label each strip immediately after placing the seeds.
- Using Scented or Bleached Paper: Avoid toilet paper with dyes, perfumes, or heavy bleaching. These chemicals can leach into the soil and negatively affect seed germination and plant growth. Stick to plain, single-ply, unbleached options if possible.
- Incorrect Spacing: Double-check your seed packet for recommended spacing. Guessing can defeat the purpose of making seed tape in the first place!
Eco-Friendly Variations and Enhancements
The beauty of the make seed tape DIY project lies not only in its effectiveness but also in its potential for eco-conscious customization. There are several ways to make your seed tape even more environmentally friendly and enhance its performance.
- Newspaper Strips: Instead of toilet paper, consider using strips of plain newspaper (black ink only, avoid color sections as they contain heavy metals). Newspaper is readily available, breaks down quickly, and provides an excellent alternative.
- Homemade Vegetable Starch Paste: While flour paste is safe, you can also experiment with pastes made from cornstarch or even potato starch for a slightly different texture or if you have specific dietary restrictions for flour in your home. These are equally biodegradable and effective.
- Compostable Paper: Look for certified compostable paper alternatives if you want to go a step further than toilet paper or newspaper. While potentially more expensive, they guarantee complete breakdown. For more on sustainability, explore The Benefits of Composting.
- Seed Primer/Mycorrhizae: For an advanced twist, you can mix a tiny amount of seed primer or mycorrhizal fungi spores into your paste. These can boost germination rates and improve root health, giving your seedlings an extra advantage.
- Vertical Seed Tapes for Indoor Growing: For specific indoor setups, you could create longer, narrower tapes to fit into vertical growing systems or seed-starting trays with precise cell sizes.
Seasonal Considerations for Your Seed Tape Project
While making seed tape is an indoor activity that can be done anytime, understanding seasonal timing is key to maximizing its benefits in your garden. This make seed tape DIY hack can be planned around your planting schedule for ultimate efficiency.
Winter Preparation (Off-Season): This is the ideal time to make seed tape! When the garden is dormant and outdoor tasks are minimal, you can comfortably sit indoors and prepare your tapes. It’s a great way to satisfy your gardening itch during colder months and ensures you’re perfectly organized when spring arrives. Think of it as pre-planning for a bountiful harvest. You can make tapes for every type of seed you plan to grow in the upcoming season and have them neatly stored away.
Spring Planting (Peak Season): When the soil warms and planting season begins, your pre-made seed tapes will be a lifesaver. You won’t need to fuss with individual seeds, especially in cool, damp spring weather. Simply lay down your tapes, cover, and water. This significantly speeds up the planting process during a busy time. It’s particularly useful for those early crops like radishes, spinach, and lettuce that benefit from quick, efficient planting.
Summer Succession Planting: Don’t limit seed tape to just spring planting. Many crops benefit from succession planting throughout the summer (e.g., more lettuce, beans, or carrots). Having seed tapes ready allows you to quickly plant new rows every few weeks for a continuous harvest without having to restart the full process of spacing seeds each time. This makes summer gardening much more manageable and productive.
Fall Cover Crops: If you plant cover crops in the fall, making seed tape for them can also be a good idea, especially for smaller seeds. While often broadcast, precise rows can sometimes be preferred for certain cover crop types or small beds. It ensures even distribution. However, for most large-scale cover cropping, traditional broadcasting remains more practical.
Expert Resources for Further Learning
To deepen your gardening knowledge and build on the skills you’ve gained from this make seed tape DIY guide, exploring resources from trusted horticultural organizations is highly recommended. These provide science-backed advice and comprehensive guides.
- Gardening Know How: An excellent online resource offering a vast array of articles on virtually every gardening topic, from pest control to plant diseases and cultivation techniques. Their practical advice is easy to understand for all levels of gardeners. Visit gardeningknowhow.com for more gardening insights.
- Royal Horticultural Society (RHS): A world-renowned gardening charity based in the UK, the RHS provides unparalleled horticultural expertise. Their website is a treasure trove of plant profiles, gardening advice, and research. An invaluable resource for expanding your knowledge. Explore their extensive content at rhs.org.uk.
- University Extension Offices: Many universities across the US have agricultural extension offices that provide free, localized gardening advice, publications, and even workshops. These resources are tailored to your specific region’s climate and soil conditions, offering invaluable practical guidance. A great example is the University of Minnesota Extension: extension.umn.edu/garden. Search for your local university extension for personalized information.
Conclusion: Plant Smarter, Not Harder with DIY Seed Tape
Congratulations! You’ve just unlocked a powerful, eco-friendly gardening hack that will revolutionize your planting experience. By learning how to make seed tape DIY, you’re not just creating perfectly spaced rows; you’re investing in a more efficient, sustainable, and enjoyable gardening journey. Imagine the satisfaction of seeing perfectly aligned seedlings emerge, all thanks to your mindful preparation.
This simple project saves you time on thinning, reduces seed waste, and ensures every plant has the optimal chance to thrive. It’s a testament to how creative, sustainable solutions can make a big difference in our gardens and for the environment. So gather your supplies, pick your favorite seeds, and get ready to transform your garden beds into models of precision and productivity. Happy planting!
FAQ: Your Questions About Make Seed Tape DIY Answered
Q1: What kind of seeds are best for making seed tape?
A1: Seed tape is best for small to medium-sized seeds that require precise spacing, such as carrots, radishes, lettuce, spinach, beets, and many small flower seeds. Larger seeds like beans or peas are typically easy enough to space by hand and may require more paper to adhere effectively.
<p><strong>Q2: How long does homemade seed tape last?</strong></p>
<p>A2: When stored properly in a cool, dark, and dry place (like regular seed packets), homemade seed tape can last as long as the seeds themselves would normally remain viable – typically 1 to 3 years for most common vegetables. Ensure it is completely dry before storage to prevent mold or premature germination.</p>

<p><strong>Q3: Can I use different types of paper for seed tape?</strong></p>
<p>A3: Yes, single-ply toilet paper is ideal due to its thinness and quick decomposition. However, plain, non-glossy newspaper (avoiding colored inks due to potential heavy metals) cut into strips can also work well. Some gardeners also use specialized compostable paper rolls, if available, for an even more eco-conscious option.</p>

<p><strong>Q4: Will the flour paste harm my seeds or the soil?</strong></p>
<p>A4: No, a simple paste made from all-purpose flour and water is completely biodegradable and harmless to your seeds and the soil. It will break down quickly once planted and watered, providing a minor nutrient boost to soil microbes. Avoid using glues that are not food-grade or explicitly non-toxic for this purpose.</p>


