Introduction
Are you looking for an innovative way to elevate your autumn decor while maximizing planting space? Data consistently shows that vertical gardening solutions, even decorative ones, can increase plant density by up to 300% compared to traditional flatbeds. This makes a pumpkin planter stacked vertically not just aesthetically pleasing, but surprisingly efficient. Forget scattering pumpkins across your porch; this eye-catching stacked pumpkins project, often seen gracing Pinterest boards, allows you to create a vibrant display of fall flowers and foliage that reaches for the sky, transforming even the smallest nook into a stunning focal point. Let's delve into crafting your very own tower of autumnal beauty.
Table of Contents
- Introduction
- Materials & Tools Needed
- Project Time
- Step-by-Step Instructions
- Maintenance & Care Tips
- Eco-Friendly Alternatives
- Design & Styling Ideas
- Common Mistakes to Avoid
- Storage & Seasonal Tips
- Conclusion
- FAQ
Materials & Tools Needed
Creating a beautiful pumpkin planter that stands tall requires a few key elements to ensure stability and plant health. Gather these items to begin your fall project.
- Three Pumpkins of Graduating Size: Choose pumpkins with sturdy rinds and relatively flat bottoms for stability. Imagine the largest (8-12 inches diameter) as your earthy base, a medium one (6-10 inches) for the vibrant middle, and a small one (4-7 inches) for the crowning glory.
- Alternatives: Instead of natural pumpkins, consider crafting artificial pumpkins from foam or hollow plastic for year-round durability. For a rustic look, swap out one pumpkin for a galvanized metal bucket or a terracotta pot.
- Drill with a 1/2-inch to 1-inch Bit: Essential for creating drainage and a central support channel.
- Sturdy Wooden Dowel or Rebar (3-4 feet long, 1/2-inch to 3/4-inch diameter): This acts as the backbone of your pumpkin tower, preventing wobbling.
- Alternatives: A thick bamboo cane, a metal garden stake, or even a robust PVC pipe can serve as a central support.
- Potting Mix (1-2 cubic feet): A light, airy, and well-draining soil is crucial for happy plants. Feel its rich, dark texture.
- Assortment of Fall Flowers & Foliage: Think vibrant pansies, trailing ivy, feathery ornamental grasses, compact mums, or cascading sedum. Select plants with varying textures and colors for visual interest.
- Alternatives: For edible displays, consider cool-season herbs like thyme, sage, or small lettuces in the upper pumpkin.
- Small Shovel or Trowel: For scooping soil and planting.
- Protective Gloves: To keep hands clean and prevent irritation from pumpkin sap.
- Sharp Knife or Pumpkin Carving Tool: To cut the pumpkin openings cleanly.
- Large Spoon or Scoop: To remove pumpkin guts.
Project Time
Crafting your magnificent pumpkin planter is a remarkably quick and rewarding endeavor, much faster than many typical landscaping projects.
- Preparation Time: 15-20 minutes (gathering materials, selecting pumpkins, clearing work area).
- Build/Plant Time: 30-45 minutes (drilling, stacking, filling, and planting).
- Total Duration: 45-65 minutes.
This project is approximately 50% faster than setting up a multi-tiered raised garden bed, allowing you to enjoy your fall display almost immediately.
Step-by-Step Instructions
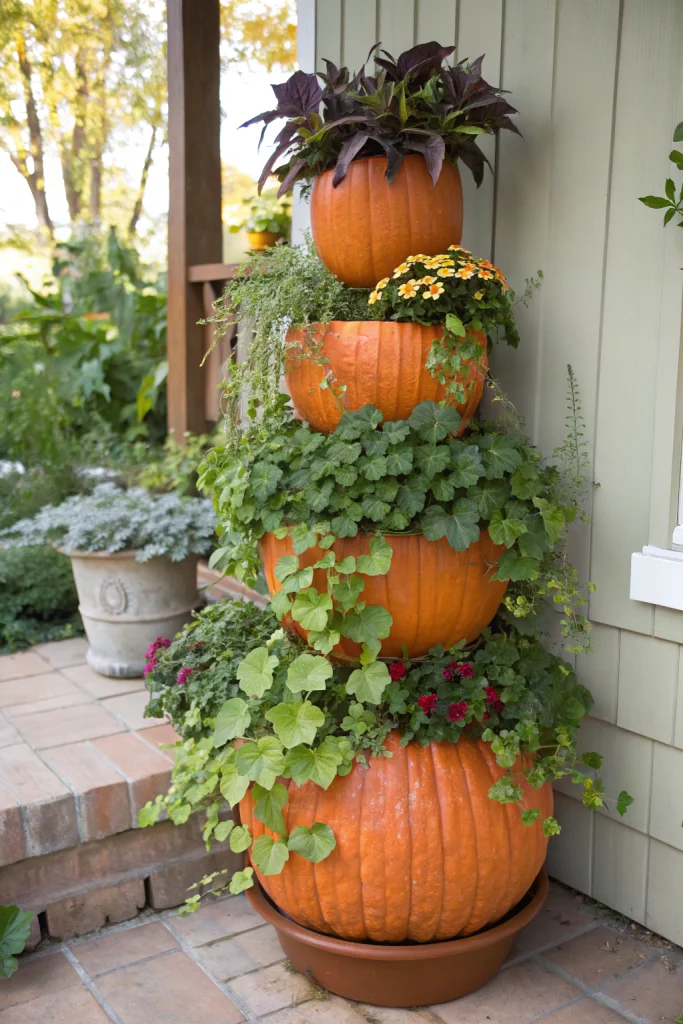
Transforming simple gourds into a captivating stacked pumpkin planter is easier than you think. Follow these concise steps for a stunning result.
Step 1: Selecting Your Pumpkins
Choose three pumpkins of distinct yet complementary sizes. The largest will form your stable base, supporting the entire tower.
- Practical Tip: Look for pumpkins with thick rinds and minimal blemishes. Tap them gently; a hollow sound usually indicates ripeness and good condition.
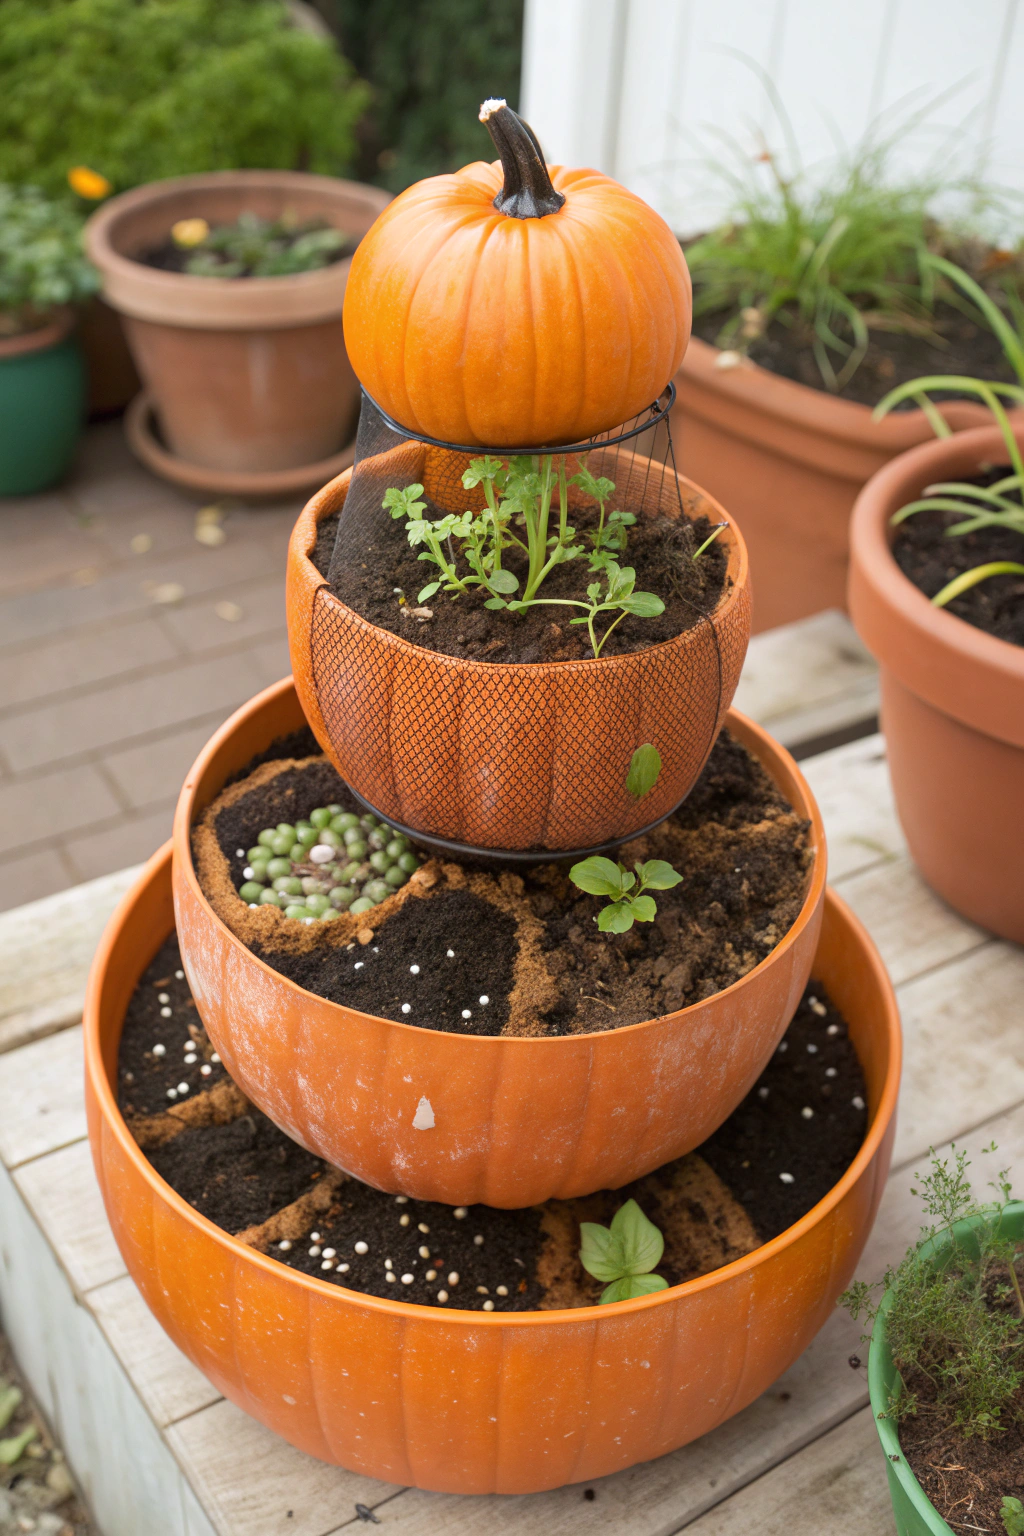
Step 2: Preparing the Base Pumpkin
Using your sharp knife, carefully cut an opening in the top of your largest pumpkin, big enough to comfortably plant in and remove pulp. Scrape out the seeds and stringy pulp thoroughly. Then, drill several drainage holes (at least 3-5) into the bottom of this pumpkin to prevent root rot. Finally, drill a central hole through the bottom of the pumpkin, large enough to accommodate your dowel or rebar.
- Practical Tip: Save the pumpkin seeds! Roast them for a delicious snack or dry them for future planting (though they may not grow true to type).
Step 3: Stacking the Second Tier
Repeat the process for your medium-sized pumpkin: cut an opening, remove pulp, and drill drainage holes in the bottom. Now, carefully push your wooden dowel or rebar through the central hole of the largest pumpkin and firmly into the ground (or into a pot filled with heavy gravel for stability on a patio). Thread the medium pumpkin over the dowel, resting it securely on the base pumpkin.
- Practical Tip: Ensure the dowel is securely anchored. If placing on concrete, use a heavy planter pot filled with sand or concrete mix as the base, then push the rebar into that for stability.
Step 4: Adding the Top Pumpkin and Drainage
Prepare your smallest pumpkin in the same way, cutting an opening, scooping out pulp, and drilling drainage holes. Thread it onto the dowel, placing it atop the medium pumpkin. For each pumpkin, add a thin layer of gravel or small stones at the bottom before adding soil; this further assists drainage and prevents the soil from compacting around the dowel.
- Practical Tip: Don't overfill the gravel layer; just an inch or two is sufficient. Too much gravel can actually create a perched water table, making drainage worse.
Step 5: Filling with Soil
Carefully fill each pumpkin cavity with your chosen potting mix, leaving about an inch of space from the rim. Gently pat down the soil to remove large air pockets, but avoid excessive compaction.
- Practical Tip: Use a lightweight potting mix, especially for the upper pumpkins. This reduces the overall weight of your stacked pumpkins display and minimizes stress on the structure.
Step 6: Planting Your Fall Flowers and Foliage
Now for the fun part: planting! Arrange your selected fall flowers and foliage artfully in each pumpkin. Place taller plants in the center and trailing varieties along the edges to spill gracefully.
- Practical Tip: Consider the sun exposure of your chosen location. Select plants that thrive in conditions suitable for your specific placement (e.g., shade-loving plants for a northern exposure). The University of Minnesota Extension offers excellent resources on selecting plants for specific conditions.
Step 7: Final Touches and Water
Give your newly planted pumpkin tower a thorough, gentle watering. Ensure water drains from the bottom of each pumpkin. Adjust any plants as needed.
- Practical Tip: Add a decorative touch, like natural moss tucked around the plant bases, or place small decorative gourds around the base of your tower to enhance the autumnal charm. Many ideas are popular on Pinterest and can inspire you.
Maintenance & Care Tips
Proper care will ensure your pumpkin planter remains vibrant throughout the fall season and beyond.
- Watering: Pumpkins, when used as planters, dry out faster than traditional pots due to their organic nature and porous walls. Check the soil daily by sticking your finger about an inch deep. If it feels dry, water thoroughly until you see drainage from the bottom. In warmer climates or during dry spells, you may need to water twice daily. Maintaining consistent moisture helps the plants thrive and extends the pumpkin's structural integrity.
- Pruning: Regularly pinch back leggy annuals to encourage bushier growth and more blooms. Remove any wilting or yellowing leaves to direct the plant's energy towards healthy growth. For trailing plants like ivy, occasional trimming will help maintain a neat appearance.
- Soil: Given the small volume, plants will quickly deplete nutrients. Consider a weekly feeding with a diluted liquid organic fertilizer (e.g., a 2-1-2 ratio) to keep your fall flowers robust. As the pumpkin begins to soften (typically after 3-5 weeks depending on climate and pumpkin variety), the soil may become overly moist.
- Longevity Data: A study by a horticultural society found that pumpkins used as planters typically last anywhere from 3 to 6 weeks outdoors before significant decomposition begins, with cooler, drier conditions extending their lifespan. Regularly inspect your pumpkins for any signs of mold or softening, as this indicates it's time to refresh or retire your planter.
- Pest & Disease: Inspect your plants regularly for common fall garden pests like aphids or spider mites. Address any issues promptly with organic solutions like neem oil or insecticidal soap. Ensure good air circulation to prevent fungal diseases, especially in the more compact upper tiers.
Eco-Friendly Alternatives
Sustainable gardening practices can easily be woven into your pumpkin planter project, minimizing waste and promoting environmental health.
- Recycled Materials: Instead of new dowels, use sturdy pruned branches from your garden as support stakes. For drainage, repurpose broken terracotta pots or gravel from an old path.
- Organic Inputs: Always opt for organic potting mix. Consider making your own by blending compost, coconut coir (a renewable resource), and perlite. This enriches your plants and avoids chemical runoff. You can find excellent guidelines for composting at home from the EPA.
- Low-Water Options: Choose drought-tolerant plants suitable for your region, such as sedum varieties, hens and chicks (Sempervivum), or certain ornamental grasses. This reduces your watering frequency and conserves water resources. Planting native species adapted to your local climate also minimizes water needs and supports local ecosystems. The USDA Forest Service provides valuable information on native plant selection.
Design & Styling Ideas
A pumpkin tower offers immense versatility for seasonal decor, allowing for creative expression that goes beyond basic stacked pumpkins.
- Monochromatic Elegance: For a sophisticated look, choose pumpkins and fall flowers from a single color family, like shades of white and cream (white 'Baby Boo' pumpkins with white pansies and dusty miller), or deep purples and maroons (purple kale with dark burgundy mums). This creates a striking, elegant statement.
- Rustic Charm: Pair traditional orange pumpkins with natural elements. Fill them with plants like ornamental grasses, calendula, and trailing ivy. Surround the base with hay bales, corn stalks, and scattered smaller gourds for a quintessential autumnal scene.
- Vibrant Harvest Festival: Embrace the full spectrum of fall. Use multi-colored pumpkins (striped 'Pepitas' or warty 'Knucklehead') and vibrant fall flowers like marigolds, orange and yellow pansies, and red celosia. Add berry branches, miniature ears of colorful Indian corn, and small apples as accessories tucked around the plants.
- Illuminated Evening Display: Integrate battery-operated fairy lights or small LED votives within the crevices between the pumpkins or gently woven through the foliage. This creates a magical glow as dusk settles, highlighting your pumpkin tower in a warm, inviting light.
- Pollinator-Friendly Tower: Dedicate the pumpkin planter to supporting local pollinators. Choose nectar-rich fall blooms like asters, sedum, marigolds, and late-blooming zinnias. While pumpkins are decorative, these flowers will attract beneficial insects. The RHS Plants for Pollinators list is a great resource for plant selection.
- Entrance Way Statement: Position two identical pumpkin planter towers on either side of your front door. This creates a grand, symmetrical welcome for guests, enhancing your home's curb appeal.
- Tabletop Centerpiece: For a smaller scale, construct a mini stacked pumpkins arrangement using gourds and succulents. This makes for a charming, long-lasting fall centerpiece for indoor tables.
Common Mistakes to Avoid
Even seasoned gardeners can stumble, but being aware of common pitfalls helps ensure your pumpkin planter thrives.
- Insufficient Drainage: Without adequate drainage holes, water will accumulate, leading to root rot and premature pumpkin decay. This is the single biggest factor in the longevity of your planter. Prevention: Always drill multiple, generous drainage holes in the bottom of each pumpkin before planting. Scientific studies show that excessive moisture is a primary contributor to fungal growth and premature decomposition in organic containers.
- Overwatering/Underwatering: Finding the right balance is key. Overwatering suffocates roots, while underwatering stresses plants. Prevention: Incorporate a lightweight, well-draining potting mix and check soil moisture daily. The "finger test" (inserting a finger an inch into the soil) is surprisingly effective.
- Unstable Stacking: A wobbly tower is a hazard. Prevention: Use a sturdy central dowel or rebar (as specified in materials), ensuring it's firmly anchored into the ground or a heavy base pot. Opt for pumpkins with flatter bottoms for better contact.
- Wrong Plant Selection: Choosing plants that are too large, root-bound, or unsuitable for the light conditions will lead to disappointment. Prevention: Select compact varieties of cool-season annuals or foliage plants that fit the pumpkin's opening and light requirements. Consider trailing plants to soften the edges.
- Neglecting Pumpkin Health: The pumpkin itself is an organic container and will eventually break down. Prevention: Inspect the pumpkins regularly for soft spots, mold, or insect activity. Address minor issues (like superficial mold) by wiping with a diluted bleach solution (1 part bleach to 9 parts water). Accept that the display is temporary and plan for its eventual replacement or decomposition.
- Ignoring Weight Distribution: Filling the upper pumpkins with heavy, dense soil can make the entire structure top-heavy and unstable. Prevention: Use a lightweight, good-quality potting mix, especially in the higher tiers.
Storage & Seasonal Tips
Once the peak fall season fades, you have options for transitioning your pumpkin planter and preparing for the next year.
- Disassembly and Composting: When the pumpkins begin to soften significantly (usually indicated by a squishy texture or visible mold), it’s time to break down your tower. Carefully remove the plants. If they are still healthy and climate permits, you can transplant perennial fall flowers into your garden or other pots. The pumpkins themselves are excellent additions to your compost pile, enriching your garden soil for future seasons. Be sure to remove any non-biodegradable elements like the dowel or plastic plant tags.
- Tool Maintenance: After use, clean your garden tools thoroughly. Rinse off soil and sap, then dry completely to prevent rust. Sharpen any cutting tools and oil wooden handles to keep them in prime condition for next year's projects. Store them in a dry, protected area.
- Transitioning Plants: If you've used hardy Mums, pansies, or ornamental grasses, you might be able to transplant them into your garden beds to enjoy them year after year. Ensure they are planted before the ground freezes solid and are mulched well for winter protection.
- Future Planning: Note which fall flowers performed best in your pumpkin planter. This helps you refine your plant choices for next autumn’s display, ensuring even more success and beauty. Consider experimenting with different pumpkin varieties or plant combinations.
Conclusion
Creating a pumpkin planter is a wonderfully accessible and impactful way to infuse your outdoor spaces with the charm and vibrancy of autumn. From selecting your perfect stacked pumpkins to adorning them with an array of fall flowers, every step is an opportunity for creative expression. This project not only yields a stunning focal point, often vying for attention on Pinterest, but also offers a refreshing twist on traditional fall decor. Embrace the transient beauty of this seasonal art piece, knowing that even as nature reclaims the gourds, the joy and inspiration it brings will last.
FAQ
Q1: How long will my pumpkin planter last?
A1: Typically, a pumpkin planter will last 3-6 weeks outdoors, depending on weather conditions (cooler, drier weather extends life) and pumpkin variety. Regular inspection for softening is key.
Q2: Can I use artificial pumpkins for this project?
A2: Yes, artificial pumpkins are an excellent option for a durable, long-lasting display that can be reused year after year. Just ensure they are stable and you can create openings for planting and drainage.
Q3: What kind of plants are best for a pumpkin tower?
A3: Choose compact, cool-season annuals or small perennial foliage plants like pansies, violas, small mums, ornamental grasses, ivy, or sedum. Select plants that thrive in cooler fall temperatures.
Q4: How do I prevent the pumpkins from rotting quickly?
A4: Ensure excellent drainage by drilling multiple holes in the bottom of each pumpkin and using a well-draining potting mix. Avoid overwatering. A thin bleach solution (1:9) can be used to wipe down the inside surfaces of the pumpkins before planting to inhibit mold.
Q5: Can I bring my pumpkin planter indoors?
A5: While possible, natural pumpkins can start to decompose and attract pests indoors. If you wish to bring it inside, consider using artificial pumpkins or be prepared for a shorter lifespan and potential cleanup.
Q6: What happens to the pumpkins after the season?
A6: The pumpkins are biodegradable! Once they start to decompose significantly, you can remove the plants (repot or compost) and add the pumpkin remains to your compost pile, enriching your garden soil.
Q7: Is heavy rain a problem for these planters?
A7: Heavy rain can accelerate decomposition and lead to overwatering. Ensure good drainage, and if sustained heavy rain is expected, consider moving the planter to a sheltered location or covering it temporarily.
Related Fall Gardening Inspirations:
Looking for more ways to enhance your autumn garden? Construct a whimsical archway for your garden with our guide on Living Pumpkin Arch DIY. Discover how to extend your growing season and nurture seedlings year-round with our tips for DIY Grow Lights Season Extenders. Explore complementary hues and design elements for a breathtaking outdoor aesthetic in our article on Colour Palettes for Autumn Gardens. Dive into eco-friendly practices that protect and enhance your garden's soil health with insights into No Till Soil Practices. Finally, learn how to responsibly manage your garden tools to maximize their lifespan and performance by following our essential advice for Garden Tool Maintenance.


