The Ultimate Guide: 7 Steps to Smart Irrigation Timer Setup for Apartment Balconies
Living in an apartment shouldn’t mean sacrificing a lush, thriving garden. In fact, urban dwellers are increasingly embracing the green revolution, transforming their balconies into vibrant oases. The biggest challenge for many, however, is consistent and efficient watering, especially with busy schedules or travel plans. This is where a smart irrigation timer balcony setup becomes a game-changer. It automates the watering process, ensuring your precious plants receive precisely what they need, exactly when they need it, conserving water and saving you time. Imagine waking up to perfectly hydrated plants, or coming home after a weekend away to find your leafy companions flourishing without a worry.
[lwptoc]
This comprehensive guide will walk you through everything you need to know to design, install, and optimize a smart irrigation system for your balcony. We’ll delve into the ‘why,’ the ‘what,’ and the ‘how,’ ensuring you gain the confidence and knowledge to transform your urban gardening experience. From choosing the right components to advanced tips for water conservation and plant health, prepare to unlock the full potential of your balcony garden.

Why Smart Irrigation Matters for Your Urban Oasis
For apartment dwellers, water efficiency and convenience are paramount. A smart irrigation timer balcony system addresses both these concerns head-on. Traditional watering methods, such as hand-watering, are often inconsistent and can lead to either overwatering (root rot, nutrient leaching) or underwatering (wilting, stunted growth). Both scenarios are detrimental to plant health and can waste significant amounts of water.
Automating your watering schedule with a smart timer brings numerous benefits. Firstly, it ensures consistency, providing your plants with the exact amount of water they require at optimal times, often during cooler parts of the day to minimize evaporation. Secondly, it offers unparalleled convenience, freeing up your time and removing the chore of daily watering. This is particularly valuable for those with busy lifestyles, frequent travelers, or anyone who simply wants to streamline their gardening routine.
Furthermore, and critically, smart irrigation promotes water conservation. Many smart timers can be programmed with sophisticated features like rain delay functions, adjusting schedules based on local weather forecasts, or even integrating with soil moisture sensors. This intelligent approach prevents unnecessary watering, significantly reducing your water footprint and contributing to a more sustainable urban lifestyle, a core tenet of urban permaculture. By adopting a “less is more” approach with precision watering, you not only benefit your plants but also the planet.
What You Need: Tools, Materials, and Plant Considerations
Before diving into the installation, gathering the right components is crucial. A well-prepared gardener is a successful gardener! Here’s a breakdown of what you’ll typically need:
Essential Tools:
- Utility Knife or Scissors: For cutting drip tubing.
- Hole Punch Tool: Specifically designed for making holes in dripper lines if using separate emitters.
- Measuring Tape: To accurately measure tubing lengths.
- Pliers (Optional): Can be helpful for tightening connections or removing stubborn pieces.
- Small Bucket or Bowl: To soak tubing and make it more pliable.
- Screwdriver (if needed): For mounting timer or securing components.
Key Materials:
- Smart Irrigation Timer: This is the brain of your system. Look for models with Wi-Fi connectivity for smartphone control, multiple programming options, and ideally, compatibility with weather data or soil sensors. Some excellent options are available for apartment balconies that connect directly to a tap.
- Water Source Connection: Typically a tap adapter (e.g., standard garden hose adapter) that screws onto your balcony tap.
- Pressure Regulator: Essential for drip systems. Balcony taps often have higher pressure than drip systems require, and a regulator will prevent blowouts and ensure even water distribution. Look for one that reduces pressure to around 15-30 PSI.
- Main Drip Tubing (1/2″ or 1/4″): This is the primary line that carries water from your timer to your plants. Choose UV-resistant tubing for longevity. For most balconies, 1/4″ tubing is sufficient and less obtrusive.
- Emitter Tubing (1/4″ or Microtubing): Smaller tubing that branches off the main line to individual plants.
- Drip Emitters/Sprayers: These are the devices that deliver water to your plants.
- Drip Emitters: Deliver water slowly and precisely to the plant’s root zone. Available in various flow rates (e.g., 0.5 GPH, 1 GPH). Pressure-compensating emitters are great for ensuring even water delivery across different plants.
- Micro-Sprayers/Mini-Sprinklers: Offer a wider spray pattern, suitable for groups of plants or larger pots. Less water-efficient than drip emitters.
- Soaker Hose (Micro-Porous Tubing): Can be an option for densely planted window boxes or raised beds, but less precise for individual pots.
- Fittings and Connectors:
- T-connectors and Elbows: For branching off the main line and navigating corners.
- End Caps: To seal the end of your tubing runs.
- Goof Plugs: For sealing accidental holes or unused emitter sites.
- Stakes/Holders: To secure drip tubing and emitters in place in pots or planter boxes.
- Hose Clamps (Optional but Recommended): For securing connections, especially where pressure might be higher.
- Filter (Optional but Recommended): A small inline filter can prevent sediment from clogging your emitters, extending the life of your system.
Plant Considerations:
Understanding your plants’ watering needs is paramount. Group plants with similar water requirements together. Mediterranean herbs like rosemary and lavender thrive on less water than moisture-loving ferns or leafy greens. This knowledge will guide your choice of emitters and zone setup.
Step-by-Step Guide: Setting Up Your Smart Irrigation Timer Balcony System
Follow these steps carefully to ensure a robust and efficient smart irrigation timer balcony setup. Always refer to the specific instructions provided with your chosen smart timer and drip components.
Step 1: Planning and Design Your Layout
Before cutting any tubing, sketch out your balcony layout. Note the location of your water source, each plant pot, and any planter boxes. Consider:
- Water Source: Identify the tap on your balcony.
- Main Line Path: Plan the most direct and inconspicuous route for your main drip tubing.
- Zones (Optional but Recommended): If you have plants with vastly different water needs (e.g., succulents vs. vegetables), consider dividing your system into multiple zones, each controlled by a separate valve on some advanced smart timers, or by setting different emitter types and run times. For most small balconies, a single zone with varied emitters is sufficient.
- Emitter Placement: Decide where each emitter will be placed – typically near the base of each plant’s root zone.
Measure the distances between your water source and each plant to estimate the amount of tubing and number of fittings you’ll need. It’s always better to overbuy a little tubing than to run short.
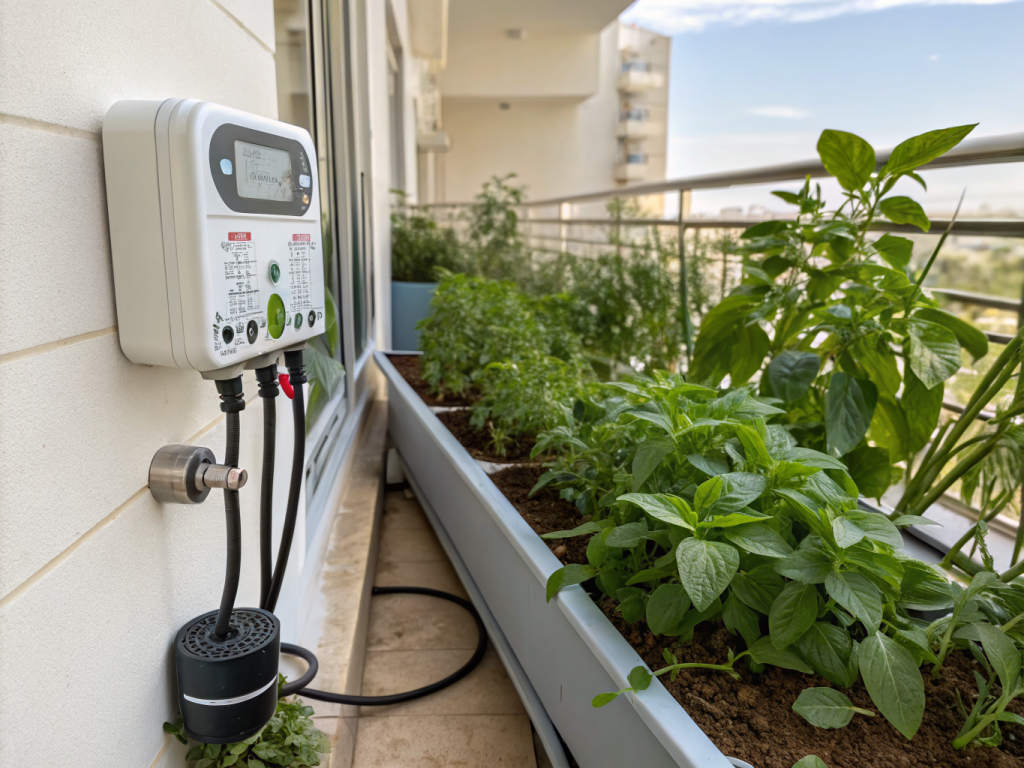
Step 2: Connect the Smart Timer and Pressure Regulator to Your Tap
First, ensure your balcony tap is clean. Screw on the smart irrigation timer to the tap. Most timers have a standard hose thread. Hand-tighten firmly, but don’t overtighten. Next, attach the pressure regulator to the output side of your smart timer. If you’re using an inline filter, attach it after the pressure regulator. This sequence protects the filter from high pressure and ensures it receives regulated flow.
Test the connection by slowly turning on the tap. Check for leaks. If there are drips, tighten the connections a bit more or use thread seal tape if necessary, though good quality connections usually seal well on their own. Setting up smart home devices often involves careful connection, and this is no exception.
Step 3: Laying the Main Drip Tubing
Unroll your main drip tubing. If the tubing is stiff, let it sit in the sun for an hour or soak it in warm water for a few minutes; this will make it much more flexible and easier to work with. Connect one end of the main tubing to the pressure regulator (or filter/water source if not using a regulator/filter). Run the tubing along your planned path, securing it with stakes or clips as needed to keep it tidy and prevent tripping hazards. Avoid kinking the tubing, as this will restrict water flow.
Extend the main line to cover the general area where your plants are located. You can run it along the edge of the balcony, under pots, or behind planter boxes, aiming for discretion.
Step 4: Installing Emitter Lines and Emitters
This is where your plants get their water!
- For Micro-Tubing with Individual Emitters: Use a hole punch tool to create small holes in the main drip tubing where you want to branch off to individual plants. Insert a barb connector into each hole, then attach a length of 1/4″ micro-tubing to the barb. Run this micro-tubing to the plant, and at its end, insert your chosen drip emitter. Secure the emitter near the base of the plant with a stake.
- For Pre-Assembled Drip Lines: Some systems come with pre-punched drip tubing with integrated emitters. In this case, you simply cut the tubing to length and run it through your pots, ensuring emitters are positioned correctly.
Once all emitters are in place, cap off the end of your main drip tubing with an end cap. This creates pressure in the system, forcing water out through the emitters. For a hydroponic vertical garden, the precision of these emitters is even more critical.
Step 5: Test the System and Adjust Emitters
With everything connected, turn on your balcony tap and activate your smart timer for a brief manual run. Observe the water flow from each emitter.
- Check for Leaks: Look for any drips or sprays from fittings or tubing. Tighten connections as needed.
- Verify Emitter Function: Ensure water is flowing steadily from each emitter. If an emitter isn’t working, it might be clogged (check for debris) or not properly seated.
- Adjust Flow and Coverage: If you’re using adjustable emitters or micro-sprayers, fine-tune them for optimal coverage for each plant. For fixed-rate emitters, note which plants are receiving how much water.
This testing phase is crucial for identifying and fixing any issues before relying on the automated system. It’s often necessary to run the system for 15-30 minutes to properly assess the flow rate and ensure all connections hold under pressure.
Step 6: Programming Your Smart Irrigation Timer
This is where the “smart” truly comes in! Connect your smart timer to your home Wi-Fi network (if applicable) and download the manufacturer’s app. Follow the app’s instructions to set up your watering schedule.
- Basic Scheduling: Set start times, run duration, and frequency (e.g., daily, every other day, specific days of the week).
- Advanced Features: Explore options like:
- Rain Delay: Automatically pauses watering if rain is forecast or detected.
- Seasonal Adjust: Automatically changes watering duration based on seasonal needs.
- Soil Moisture Sensor Integration: If you’ve purchased a compatible sensor, connect it to your timer. This allows the system to water only when the soil moisture drops below a certain threshold.
- Cycle and Soak: For heavy soils or sloped areas, this breaks watering into shorter cycles with soak times in between, reducing runoff and promoting deeper water penetration.
Start with a conservative watering schedule and adjust based on your plants’ response and environmental conditions. Monitor your plants closely for the first week or two after setup.
Step 7: Ongoing Maintenance and Monitoring
A smart system isn’t entirely hands-off. Regular checks ensure its longevity and efficiency.
- Regular Checks: Periodically inspect your system for leaks, clogged emitters, or damage to tubing. Leaves, dirt, or even small insects can clog emitters over time.
- Emitter Cleaning: If emitters become clogged, try to clean them by flushing the system (running it without emitters for a short period) or by removing and cleaning individual emitters.
- Seasonal Adjustments: Even with smart features, manual adjustments may be needed during extreme heatwaves, prolonged wet periods, or as plants grow and their water needs change.
- Winterization (if applicable): In colder climates, drip systems need to be drained and stored indoors to prevent freezing and damage. Disconnect the timer, drain all tubing, and bring sensitive components inside.
By staying on top of maintenance, your smart irrigation timer balcony system will serve your urban permaculture efforts for seasons to come.
Pro Tips for a Flourishing Balcony Garden & Common Mistakes to Avoid
Elevate your smart irrigation setup with these expert tips and learn from common pitfalls.
Pro Tips:
- Consider Container Type: Terra cotta pots dry out much faster than plastic or glazed ceramic. Adjust emitter flow or run times accordingly.
- Mulch, Mulch, Mulch: A layer of organic mulch (shredded bark, straw, coco coir) on top of your potting mix significantly reduces evaporation, keeps soil temperatures more stable, and suppresses weeds. This allows your smart system to be even more efficient.
- Group Plants by Water Needs: Although you can customize emitters, it’s generally easier if you naturally cluster plants that like similar amounts of water.
- Elevate Pots for Drainage: Ensure all your pots have drainage holes and are slightly elevated to prevent waterlogging, even with precise drip irrigation. Good drainage is crucial for root health.
- Monitor Weather Data: Even without direct integration, manually adjusting your smart timer schedules based on local weather forecasts (e.g., predicted heavy rainfall or heatwaves) can further optimize water usage. Many smart apps do this automatically if connected to a weather station.
- Battery Life: If your smart timer is battery-powered, keep an eye on the battery indicator in the app and replace batteries proactively before they die.
- Invest in Quality Components: While cheaper options exist, investing in UV-resistant tubing and reliable emitters will save you headaches and replacements in the long run. A well-designed balcony garden deserves quality components.
Common Mistakes to Avoid:
- No Pressure Regulator: This is a cardinal sin for drip systems. High water pressure will blow out your emitters and connections, leading to constant leaks and frustration.
- Incorrect Emitter Placement: Placing emitters too far from the plant’s root zone or directly on the stem can be inefficient or harmful. Aim for near the drip line of the plant.
- Ignoring Plant Needs: One size does not fit all. Research the specific water requirements of each plant. Overwatering is just as detrimental as underwatering.
- Forgetting to Test: Skipping the initial system test can lead to unnoticed leaks or dry spots, damaging your plants before you even realize there’s a problem.
- Insufficient Tubing Securing: Loose tubing is a tripping hazard, looks messy, and can be easily dislodged, causing leaks or misdirected water.
- Neglecting Maintenance: Clogged emitters are the bane of drip systems. Regular checks and cleaning are essential.
- Over-reliance on “Smartness”: While smart features are amazing, they are not infallible. Always keep an eye on your plants and the system, especially during setup and extreme weather conditions.
Eco-Friendly Variations and Enhancements
Embrace the urban permaculture ethos by making your smart irrigation system even more sustainable.
- Rainwater Harvesting: For an ultimate eco-friendly setup, consider integrating a small rain barrel into your balcony system. Rainwater is excellent for plants, naturally free of chlorine and other chemicals found in tap water. Connect your smart timer to the output of your rain barrel (you might need a small pump if pressure is insufficient).
- Solar-Powered Timers: Some smart timers offer solar charging capabilities, further reducing your energy footprint and eliminating the need to replace batteries.
- Soil Moisture Sensors: These are arguably the most impactful eco-friendly enhancement. By ensuring your system only waters when the soil truly needs it, you drastically reduce water waste. Look for smart timers that directly integrate with wireless soil moisture sensors placed in representative pots.
- Recycled Materials: While not for the core irrigation components, consider using recycled materials for pot bases, decorative elements, or even creating DIY wicking beds from repurposed containers to further reduce water consumption.
Seasonal Considerations for Balcony Plants
Your smart irrigation system will need seasonal adjustments to perform optimally.
- Spring: As temperatures rise and plants emerge from dormancy or are newly planted, gradually increase watering frequency and duration. Pay close attention to new seedlings, which often require consistent moisture.
- Summer: This is typically when water demands are highest. Increase watering frequency and duration. Consider watering in the early morning to minimize evaporation and ensure plants are hydrated before the heat of the day. Utilize your smart timer’s “cycle and soak” feature during hot spells to allow water to penetrate deeply without runoff.
- Autumn: As temperatures cool and daylight hours shorten, gradually decrease watering. Overwatering in cooler, wetter conditions can lead to fungal issues and root rot, especially for perennials preparing for winter. Your smart timer’s seasonal adjust function or rain delay will be very useful here.
- Winter: For hardy plants that remain outdoors, watering requirements will be minimal, often only during dry spells. For tender plants brought indoors, revert to manual watering or a separate indoor smart watering system. In cold climates, completely drain and store your outdoor system to prevent freezing damage.
Expert Resources for Deeper Knowledge
To further enhance your understanding and tackle advanced gardening challenges, consult these reliable sources:
- Gardening Know How: A vast resource covering a wide array of gardening topics, plant care, and problem-solving, suitable for beginners and experienced gardeners alike.
- Royal Horticultural Society (RHS): The UK’s leading gardening charity, offering authoritative advice on plant cultivation, garden design, and sustainable gardening practices.
- University of Minnesota Extension: Provides research-based information on horticulture, pest management, and sustainable living, often with practical guides for home gardeners.
Conclusion: Cultivate Smarter, Not Harder
A smart irrigation timer balcony setup is more than just a convenience; it’s an investment in the health of your plants, the efficiency of your resources, and the enjoyment of your urban garden. By automating the most repetitive task in gardening, you free up time to truly appreciate your green space, experiment with new plants, and observe the nuanced beauty of nature right outside your apartment door. You’ll save water, prevent plant stress from inconsistent watering, and gain peace of mind whether you’re at home or away.
Embracing this technology aligns perfectly with the principles of urban permaculture – working with nature, conserving resources, and creating productive, resilient ecosystems in small spaces. So, take the leap, transform your balcony, and let smart technology do the heavy lifting, allowing you to cultivate smarter, not harder, and watch your urban oasis truly flourish.
FAQ: Smart Irrigation for Your Apartment Balcony
<h4>Q1: Can a smart irrigation timer handle different plant water needs on one balcony?</h4>
<p>Yes, absolutely. While some advanced smart timers can control multiple zones, for a single-zone system, you can achieve this by using different types of emitters with varying flow rates. For example, use a 0.5 GPH (Gallons Per Hour) emitter for a drought-tolerant succulent and a 1 GPH emitter for a thirsty tomato plant. You can also manually adjust the duration the system runs if certain plants need more or less moisture over time, or by varying the number of emitters per pot.</p>

<h4>Q2: What if my balcony doesn't have a tap?</h4>
<p>This is a common challenge. Options include connecting to an indoor tap (like a kitchen or bathroom sink) using an adapter and running a hose to the balcony, though this can be cumbersome. Another solution is a gravity-fed system with a large water reservoir and a low-pressure drip kit, coupled with a battery-operated smart timer designed for gravity feed. Some advanced battery-operated smart watering systems even siphon water directly from a container. Consider battery-operated pump systems for small number of plants if no tap is available.</p>

<h4>Q3: How do I prevent my drip emitters from clogging with sediment or algae?</h4>
<p>To prevent clogging, install an inline filter between your water source/pressure regulator and the main drip tubing. This will catch most sediment. Regularly flush your system by temporarily removing the end cap and letting water run through at full pressure, which can clear out debris. If using rainwater, filter it before it enters your system. For recurring algae issues, ensure your system components are not exposed to direct sunlight for prolonged periods without water flowing, and consider cleaning emitters periodically with a dilute vinegar solution if they permit disassembly.</p>

<h4>Q4: Is a smart irrigation system truly water-efficient, or is it just a convenience?</h4>
<p>It is definitely both. A well-programmed smart irrigation system, especially one integrated with weather data or soil moisture sensors, is significantly more water-efficient than manual watering. It delivers water precisely where and when needed, avoiding runoff, evaporation from over-spraying, and unnecessary watering after rainfall. This precision dramatically reduces water waste, conserves resources, and ensures your plants receive optimal hydration, making it a cornerstone of sustainable urban gardening and urban permaculture.</p>