Essential Guide to 7 Steps for Smart Irrigation Timer Setup on Your Apartment Balcony
Living in an apartment doesn’t mean you have to sacrifice the joy of gardening, even if you’re short on time or regularly away. Balcony gardening offers a fantastic opportunity to cultivate herbs, vegetables, and flowers, bringing a touch of nature to urban living. However, keeping these plants consistently hydrated, especially during hot summer months or when you’re on vacation, can be a significant challenge. This is where a smart irrigation timer balcony system becomes an absolute game-changer, transforming your watering routine from a chore into an effortless, efficient process.
This comprehensive guide will walk you through everything you need to know about setting up an automated watering solution for your balcony garden. From understanding the benefits of smart irrigation to a step-by-step installation process and expert tips for success, we’ll ensure your plants thrive with minimal effort from your side. Embrace urban permaculture principles by optimizing water usage and creating a resilient, beautiful green space right outside your door.
[lwptoc]

Why This Matters for Your Balcony Garden
The concept of a smart garden on a balcony might seem advanced, but its benefits are profoundly practical and impactful. Firstly, it ensures consistent watering, which is crucial for plant health. Fluctuations in moisture can stress plants, leading to stunted growth, reduced yields, and increased susceptibility to pests and diseases. A smart irrigation timer provides precise, scheduled watering, eliminating guesswork and human error.
Secondly, it saves water. Traditional hand watering often leads to over-watering or runoff, wasting precious resources. A well-designed drip irrigation system, coupled with a smart timer, delivers water directly to the plant’s root zone, minimizing evaporation and maximizing absorption. This efficiency is particularly important in urban environments where water conservation is a growing concern and can significantly reduce your utility bills.
Thirdly, it offers unparalleled convenience. Imagine going on holiday without worrying if your plants are wilting. With a smart irrigation system, you can set it and forget it, or even adjust schedules remotely via a smartphone app. This frees up your time and mental energy, allowing you to enjoy your garden rather than being burdened by its maintenance. For apartment dwellers with busy schedules, this convenience is invaluable.
Finally, adopting smart irrigation aligns perfectly with urban permaculture principles. Permaculture emphasizes creating self-sustaining systems that mimic nature, conserve resources, and reduce waste. By optimizing water usage and promoting healthy plant growth through automation, you’re building a more resilient and eco-friendly balcony ecosystem. It’s an investment in the longevity and vibrancy of your urban green space.
What You Need: Tools and Materials for Your Balcony oasis
Before diving into the setup, gathering all the necessary components will make the process smooth and efficient. While specific brands and models may vary, the core items remain consistent. Investing in quality components will ensure durability and reliability for your smart irrigation timer balcony system.
Essential Materials:
- Smart Irrigation Timer: This is the brain of your system. Look for models designed for outdoor use, ideally with Wi-Fi connectivity for remote control and weather-based adjustments. Some models might be battery-operated, others require an AC outlet.
- Drip Tubing (Mainline): Typically 1/2-inch or 1/4-inch diameter, this will carry water from the timer to your plants. Measure your balcony and plant layout to estimate the length needed.
- Drip Emitters or Emitter Tubing: These deliver water directly to individual plants. Emitters come in various flow rates (e.g., 0.5 GPH, 1 GPH) or you can use emitter tubing with built-in emitters spaced at regular intervals.
- Tubing Connectors and Fittings: These include T-connectors, elbows, end caps, and reducers to customize your layout. Purchase a variety pack or specific fittings based on your design.
- Hose Bib (Spigot) Adapter: If your timer connects directly to a standard garden hose spigot, ensure you have the correct thread size. Most are standard ¾-inch GHT (Garden Hose Thread).
- Pressure Regulator: Balcony water pressure can sometimes be too high for drip systems, potentially causing blowouts. A pressure regulator (typically 25-30 PSI) ensures optimal operation.
- Filter: Prevents clogging of emitters from sediment in the water. A small in-line filter is usually sufficient.
- Stakes or Clips: To secure drip tubing in place, preventing tripping hazards and ensuring water delivery to the correct spots.
- Hole Punch Tool: For inserting emitters into mainline tubing (if not using emitter tubing).
- Container Plants: The stars of your balcony show! Choose plants suitable for containers and your balcony’s sunlight conditions.
- Water Source: A readily accessible outdoor spigot on your balcony or a nearby faucet that can be converted.
Recommended Tools:
- Scissors or Tubing Cutter: For clean cuts on drip tubing.
- Measuring Tape: To plan your layout and cut tubing accurately.
- Timer/Smartphone: For programming and monitoring.
- Small Bucket or Bowl: For testing components and catching water during setup.
Step-by-Step Guide: Building Your Smart Balcony Oasis
Setting up your smart irrigation timer balcony system is a rewarding DIY project that empowers you to become a more sustainable urban gardener. Follow these steps carefully for a successful installation.
Step 1: Plan Your Layout and Water Source
Before cutting any tubing, visualize your entire system. Sketch out the layout of your plants, containers, and the location of your water source. This initial planning helps determine the length of tubing needed, the number of emitters, and the types of connectors required. Identify the best location for your smart irrigation timer – it should be easily accessible, protected from direct heavy rain (if not rated for extreme exposure), and ideally near your electrical outlet if it’s an AC-powered model. Ensure your water source (spigot) is clean and fully operational.
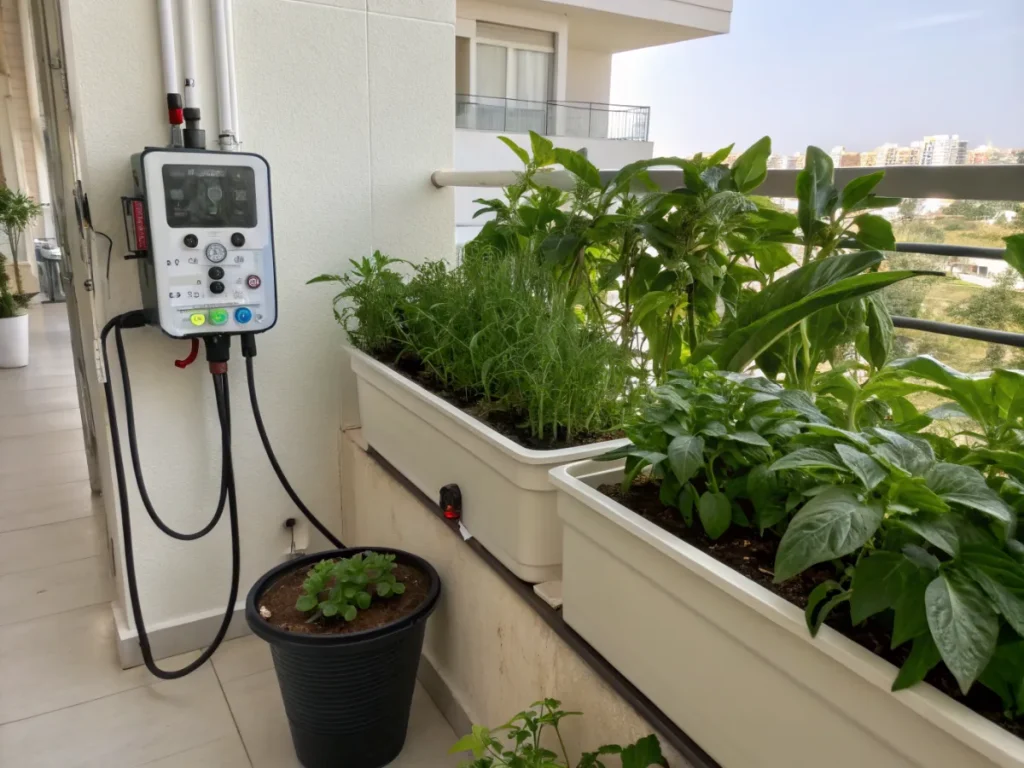
Step 2: Connect the Timer to the Water Source
Attach the smart irrigation timer directly to your outdoor spigot. Ensure a tight, leak-free connection. If your timer requires power, plug it into a weather-protected outdoor outlet. Next, attach a pressure regulator and then a filter directly to the timer’s output port. This sequence (timer, regulator, filter) is crucial for protecting your system and ensuring proper operation. Test the connection briefly by turning on the water to check for leaks.
Step 3: Lay Out the Main Drip Tubing
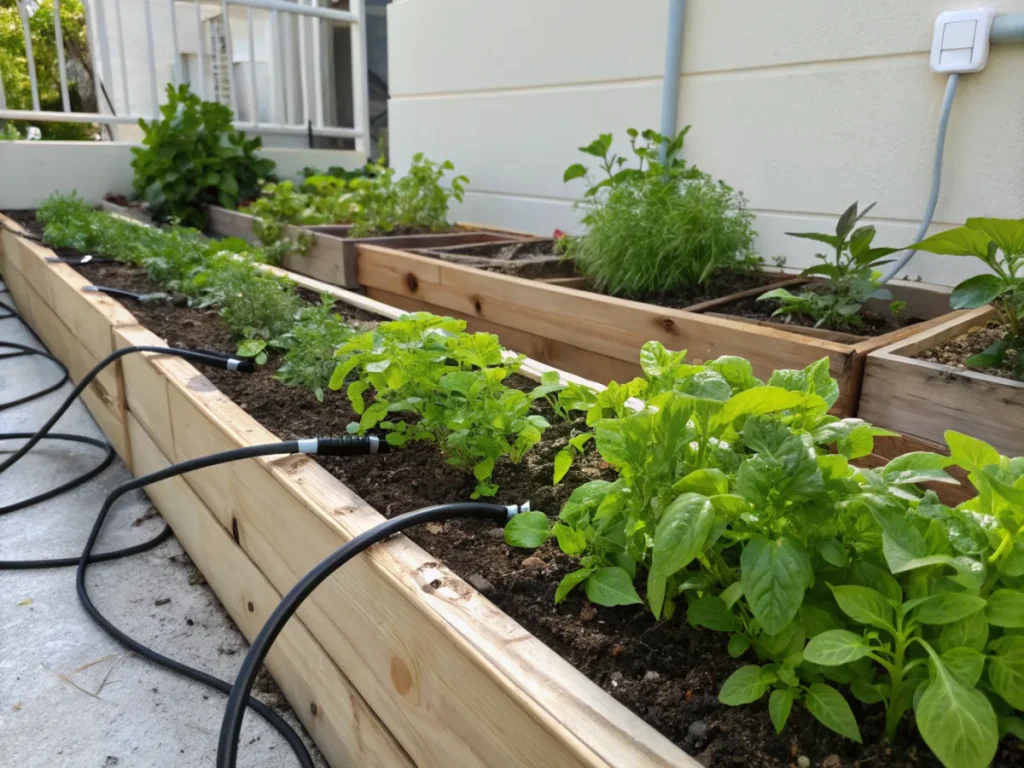
Run your main drip tubing from the filter along the edge of your balcony or strategically near your plant containers. Use stakes or clips to secure the tubing in place, preventing kinks and ensuring it stays discreet. Avoid sharp bends that can restrict water flow. If you have a large balcony, you might need to use T-connectors to branch off the mainline to reach all your plants effectively. For a clean look, try to run the tubing along the railings or behind planters.
Step 4: Install Emitters or Emitter Tubing
Once the mainline is in place, it’s time to deliver water to your plants. If using individual drip emitters, use a hole punch tool to create small holes in the mainline tubing directly adjacent to each plant. Carefully insert the emitters into these holes. Ensure the emitters are positioned so they will drip directly onto the soil near the base of the plant, not on the foliage. If using emitter tubing, simply cut sections of this tubing to connect to the mainline (using suitable connectors) and run them into your plant pots. For larger containers, you might need two emitters per pot to ensure even saturation. Secure the emitter tubing or individual emitters with small stakes if necessary.
Step 5: Cap the Ends and Test the System
Once all emitters are in place, cap off the open ends of your mainline tubing using end caps. This creates pressure within the system, forcing water out through the emitters. Before programming, do a manual test run. Turn on the water fully and observe the emitters. Check for any leaks, blockages, or inconsistent water flow. Adjust any connections as needed. This test also helps you visually confirm that water is reaching each plant effectively. You may need to flush the system initially by briefly removing the end caps to clear any debris.
Step 6: Program Your Smart Irrigation Timer
This is where the “smart” aspect comes in. Most smart irrigation timers connect to a smartphone app via Wi-Fi or Bluetooth. Follow the manufacturer’s instructions to pair your device. Input details about your plants (type, sun exposure, container size), soil type, and local weather conditions. The app will then help you create an optimized watering schedule. Start with a conservative schedule (e.g., daily for 1-2 minutes) and monitor your plants’ moisture levels. You can always adjust the frequency and duration based on observation and plant needs. Many smart timers can integrate with local weather forecasts to automatically adjust watering based on rain or extreme heat, saving even more water.
Step 7: Ongoing Monitoring and Maintenance
Your smart irrigation system isn’t entirely “set it and forget it” indefinitely. Regularly check your plants for signs of under or over-watering. Periodically inspect the drip lines and emitters for clogs (especially if you have hard water), kinks, or damage. Clean the filter every few weeks or months, depending on water quality. In colder climates, remember to winterize your system by draining it and storing the timer indoors to prevent freezing damage. Consistent monitoring ensures your smart irrigation timer balcony system remains efficient and your plants stay healthy.
Pro Tips and Common Mistakes
Maximizing the efficiency and longevity of your smart irrigation timer balcony setup involves learning from common pitfalls and incorporating best practices. A little extra attention during installation and ongoing maintenance can make a huge difference.
Pro Tips:
- Zone Your Watering: If you have plants with vastly different water needs (e.g., succulents and ferns), consider separate irrigation zones if your timer supports it. This allows for customized watering schedules for each plant group. However, for most balcony setups with similar plants, a single zone is usually sufficient.
- Use Good Quality Components: Cheap tubing and connectors can degrade quickly under UV light or pressure, leading to leaks and failures. Invest a bit more for UV-resistant, durable materials. This is especially important for the connections near your best flexible garden hose.
- Elevate Your Drip System: If possible, slightly elevate your mainline tubing to prevent siphoning effects where water might inadvertently drain out. Secure it firmly along railings or under planters.
- Consider Soil Type: Different soil mixes retain water differently. Sandy soils drain quickly, requiring more frequent, shorter waterings, while loamy soils retain moisture longer. Adjust your timer settings accordingly.
- Mulch, Mulch, Mulch: Applying a layer of organic mulch (like coco coir, wood chips, or straw) to your containers significantly reduces evaporation, keeps soil temperatures stable, and suppresses weeds. This is a cornerstone of urban permaculture.
- Rain Sensors: Some advanced smart timers offer rain sensor compatibility. This adds another layer of intelligence, automatically pausing watering if it detects rainfall, further optimizing water conservation.
- Strategic Plant Grouping: Group plants with similar water requirements together. This simplifies your drip system design and reduces the need for complex zoning, making your balcony garden design more efficient.
Common Mistakes to Avoid:
- Forgetting the Pressure Regulator and Filter: This is a frequent oversight that can lead to blown tubing, broken emitters, and clogged lines, resulting in a frustrating and inefficient system.
- Incorrect Tubing Sizing: Using tubing that’s too small for the length or number of emitters can lead to uneven water distribution, with plants at the end of the line receiving less water.
- Over-Complicating the Design: For a balcony, simplicity is often key. Start with a straightforward layout and expand only if necessary.
- Ignoring Plant Symptoms: Even with a smart timer, plants can still get sick. Always observe your plants for signs of stress, and adjust your watering schedule or system components as needed.
- Not Checking for Leaks Regularly: Small leaks can waste significant amounts of water over time and reduce system pressure, impacting other emitters.
- Placing Emitters Incorrectly: Emitters should be positioned to deliver water directly to the plant’s root zone, not splashing on leaves or running off the container.
- Lack of Winterization: In climates with freezing temperatures, failing to drain and store your system properly will almost certainly result in burst pipes and damaged components, requiring costly replacements.
Eco-Friendly Variations for a Greener Balcony
Integrating eco-friendly practices into your smart irrigation timer balcony setup not only benefits the environment but also enhances the resilience and sustainability of your urban garden. These variations align perfectly with the principles of urban permaculture.
- Rainwater Harvesting: If space and building regulations permit, consider a small rainwater harvesting system. A rain barrel connected to your downspout can collect rainwater, which can then be fed into your smart irrigation system. This reduces reliance on municipal water and utilizes a natural resource. Even a small barrel can collect a surprising amount of water from your balcony’s roof runoff or a nearby gutter.
- Greywater Reuse (Check Local Regulations): In some municipalities, treated greywater (from showers or laundry) can be repurposed for landscape irrigation. This is a more advanced option and requires careful planning and adherence to local codes. While typically not for direct potable use, it’s a powerful water conservation strategy.
- Compost Tea and Liquid Fertilizers: Instead of chemical synthetic fertilizers, use your drip system to deliver nutrient-rich compost tea or organic liquid fertilizers. This nourishes your plants naturally and improves soil health, fostering a vibrant microbial ecosystem within your containers. Ensure your system’s filter can handle any particulate matter if you’re using this method.
- Soil Moisture Sensors: Some advanced smart irrigation timers can integrate with wireless soil moisture sensors. These sensors provide real-time data on soil moisture levels, allowing the timer to adjust its schedule based on actual plant needs rather than just a pre-set program or weather forecast. This is the ultimate in precision watering.
- Companion Planting: While not directly related to the irrigation system, practicing companion planting on your balcony enhances biodiversity, deters pests naturally, and can even improve soil health, reducing the need for chemical interventions. Healthy plants are often more resilient to watering fluctuations.
- Recycled Material Planters: Utilize recycled materials for your plant containers. Upcycled plastic bottles, old tires (if aesthetically pleasing and safe), or wooden pallets can reduce waste and add character to your balcony garden. Ensure adequate drainage for whatever container you choose.
Seasonal Considerations for Balcony Irrigation
Your balcony garden experiences seasonal changes just like any outdoor garden, and your smart irrigation timer balcony setup needs to adapt accordingly. Understanding these dynamics ensures your plants thrive year-round.
- Spring: As temperatures rise and plants emerge from dormancy, start with more conservative watering. Newly planted seedlings or established plants beginning new growth will need consistent but not excessive moisture. Gradually increase watering frequency and duration as plants grow and temperatures warm up. Program your smart timer to reflect this gradual increase.
- Summer: This is typically when your irrigation system works hardest. High temperatures and increased evaporation will demand more frequent and longer watering cycles. Ensure your smart timer is set to account for heat waves and increased sun exposure. Monitor plants closely for signs of stress, and adjust schedules as needed. Consider setting your timer to water in the early morning or late evening to minimize water loss due to evaporation.
- Autumn: As temperatures begin to cool and daylight hours shorten, plant growth slows down. You’ll need to gradually reduce both the frequency and duration of watering. Overwatering in cooler, wetter weather can lead to root rot. Your smart timer’s weather integration feature will be particularly useful here, automatically scaling back watering during rainy periods.
- Winter: In colder climates, drip irrigation systems must be winterized to prevent damage from freezing water. This involves disconnecting the timer, draining all water from the lines and emitters, and storing the timer indoors. For evergreen plants or cool-season crops, hand watering might be necessary on warmer days during dry spells. In frost-free climates, watering will be significantly reduced but may still be necessary during dry winter periods.
Expert Resources for Further Learning
To deepen your knowledge of gardening and irrigation, consult these trusted resources:
- Gardening Know How: An extensive online resource offering articles and advice on a vast array of gardening topics, from plant care to pest control. Their guides on drip irrigation are particularly helpful. Visit Gardening Know How
- Royal Horticultural Society (RHS): A world-leading gardening charity providing authoritative information on horticulture, plant care, and sustainable gardening practices. Their advice is invaluable for any gardener. Explore the RHS Website
- University of Minnesota Extension: Offers science-based information on home gardening, pest management, and environmental horticulture, often with practical, research-backed advice. Search for their publications on container gardening and irrigation. Check out UMN Extension
Conclusion: Cultivating a Smarter, Greener Balcony
Setting up a smart irrigation timer balcony system is a powerful step towards creating a resilient, low-maintenance, and eco-conscious urban garden. It liberates you from the daily chore of watering, ensuring your plants receive optimal hydration even when you’re away. By embracing smart technology, you’re not just automating a task; you’re adopting a more sustainable approach to gardening, conserving water, and fostering healthier plant growth.
Remember that the journey of urban permaculture is about continuous learning and adaptation. Start with the basics, observe your plants, and fine-tune your system as you gain experience. Your smart irrigation timer is a tool that empowers you to nurture a thriving green space, bringing beauty, fresh produce, and a deeper connection to nature right to your apartment balcony. Enjoy the verdant transformation!
FAQ: Smart Irrigation Timer Setup for Apartment Balconies
A: If you don’t have an outdoor spigot, you’ll need to get creative. Options include using an adapter for an indoor faucet that can temporarily connect to a garden hose, or a gravity-fed system from a large water reservoir (like a rain barrel) with a low-pressure drip kit. Some specialized timers can work with pumps to draw water from containers, but this adds complexity and cost.
<strong>Q: How do I know how much water my plants need?</strong>
<p>A: Plant water needs vary by species, container size, soil type, and weather. A good starting point for drip emitters is 0.5 to 1 gallon per hour (GPH). Run the system for 1-2 minutes daily initially, then check the soil moisture. Stick your finger 1-2 inches into the soil; if it feels dry, increase watering time. If it's soggy, decrease. Your smart timer's app may offer plant-specific recommendations as well.</p>

<strong>Q: Can I use a smart irrigation timer with hydroponic or aquaponic systems on my balcony?</strong>
<p>A: While a smart irrigation timer can control pump schedules for recirculating hydroponic or aquaponic systems, the setup is more specialized than a typical drip irrigation system for soil-based plants. You would need different emitters, tubing, and potentially a reservoir and pump. The principles of automated timing are similar, but the hardware specifics differ.</p>

<strong>Q: Is battery-powered or AC-powered better for a smart irrigation timer on a balcony?</strong>
<p>A: The choice depends on your balcony's access to power. Battery-powered timers offer flexibility for placement but require periodic battery changes. AC-powered timers provide consistent power, often allow for more advanced features (like Wi-Fi), but necessitate a weather-protected outdoor outlet. Consider convenience versus feature set when making your decision.</p>