Introduction
Did you know that average household outdoor water use accounts for nearly 30% of total annual consumption, with watering lawns and gardens being the primary culprit? Imagine drastically cutting that figure while fostering a thriving garden ecosystem. Implementing a Smart Rainwater Harvesting Setup is not just a sustainable choice; it's a strategic investment in your landscape's health and your wallet. This comprehensive guide will walk you through creating an efficient system, detailing everything from selecting the right garden tools to advanced care tips, ensuring your plants flourish with nature’s purest resource.
Table of Contents
- Materials & Tools Needed
- Project Time
- Step-by-Step Instructions
- Maintenance & Care Tips
- Eco-Friendly Alternatives
- Design & Styling Ideas
- Common Mistakes to Avoid
- Storage & Seasonal Tips
- Conclusion
- FAQ
Materials & Tools Needed
Creating a robust rainwater collection system requires a blend of standard homeowner hardware and specialized components. Gather your items carefully for a smooth installation.
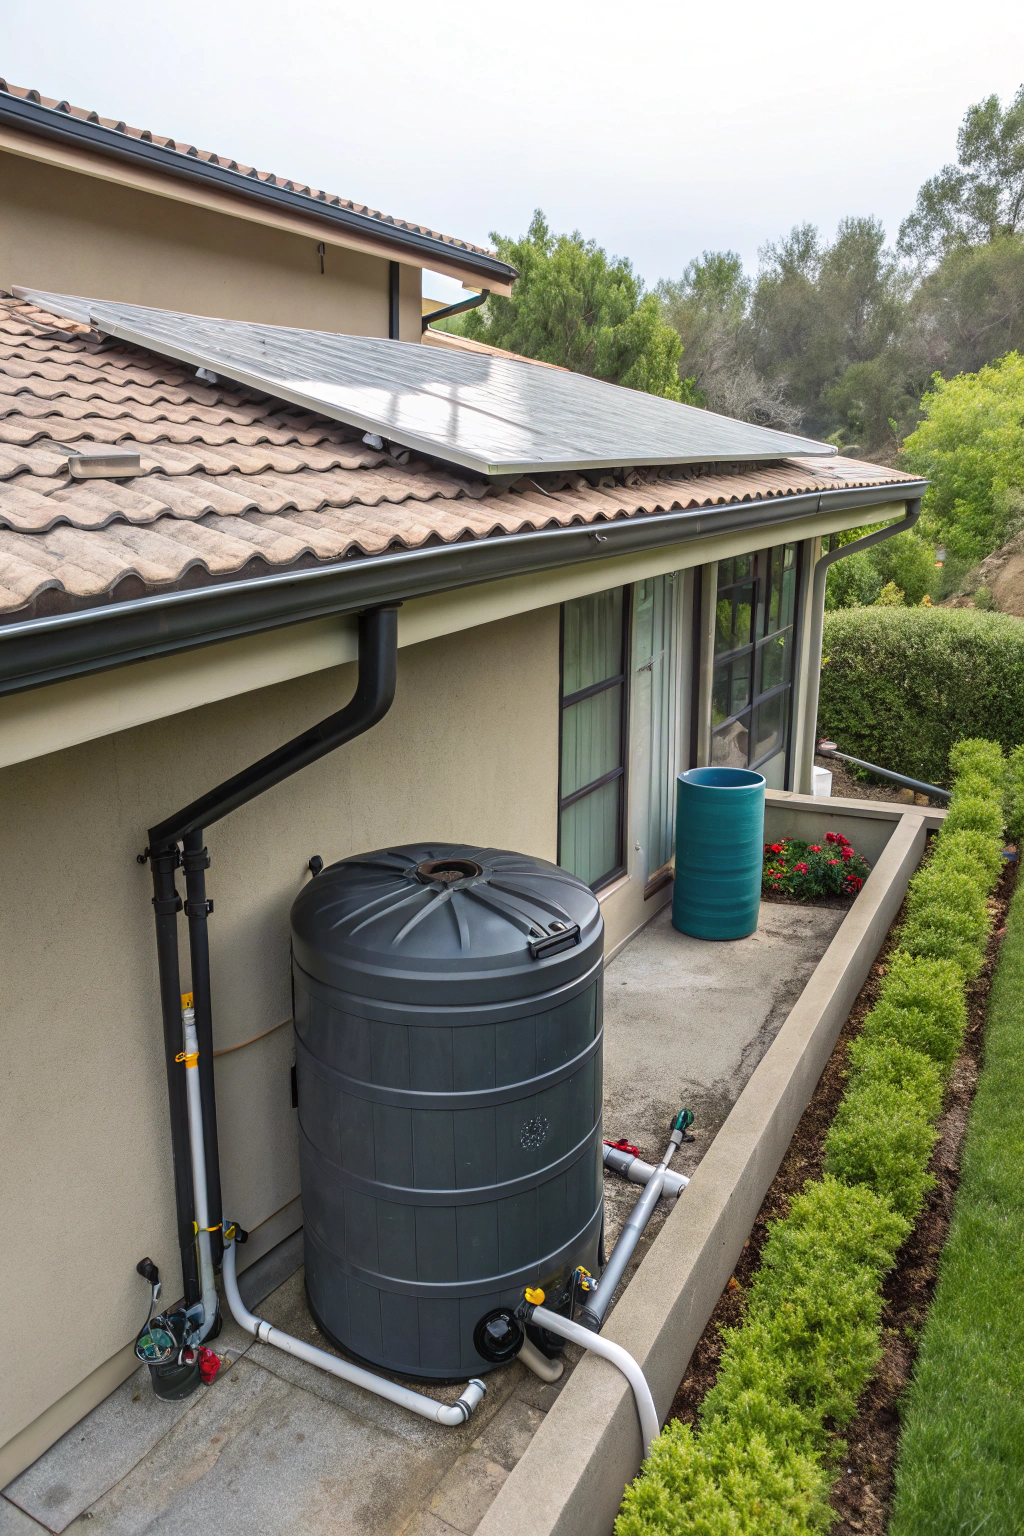
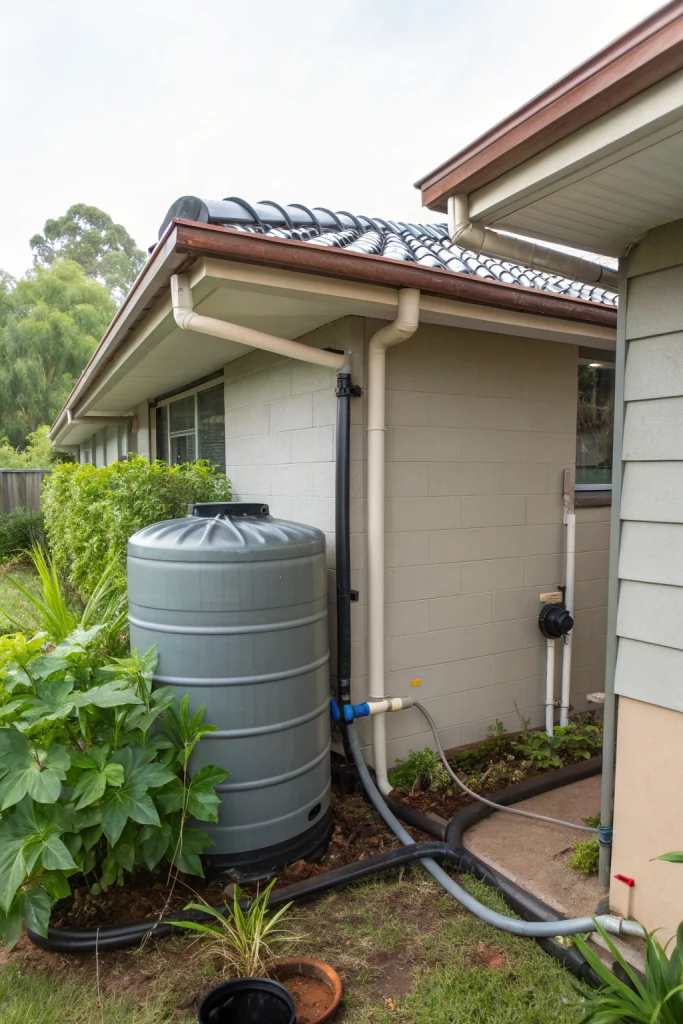
- Rain barrel(s) or storage tank: Choose a food-grade, opaque plastic or durable metal container to prevent algae growth. Sizes vary from compact 50-gallon barrels to expansive 500-gallon tanks.
- Downspout diverter kit: This crucial component redirects rainwater from your downspout into your storage container. Look for models with filters to keep debris out.
- Hole saw and drill: Essential for creating precise openings in your rain barrel for the diverter hose and spigot. A sturdy, variable-speed drill will make quick work of this.
- Adjustable wrench and pliers: For tightening connections and handling various plumbing components. A comfortable grip is key for sustained use.
- Tape measure and marking tool: Accuracy is paramount for proper diverter placement and barrel positioning. A bright marker or carpenter's pencil is ideal.
- Hacksaw or tin snips: For making clean cuts in your existing downspout. A sharp blade ensures a neat finish.
- Sealant (silicone caulk, plumber's putty): To prevent leaks around connections, ensuring every precious drop is captured. Opt for outdoor-grade, waterproof variants.
- Level: To ensure your rain barrel or tank is perfectly stable and won't tip or overflow unevenly. A spirit level offers reliable precision.
- Foundation (cinder blocks, paver stones): To elevate your rain barrel for better water pressure and stability. A solid, unyielding base is essential.
- Garden hose connection kit/spigot: For convenient access to the harvested water. Look for brass or rust-resistant plastic for longevity.
- Overflow kit (optional but recommended): To direct excess water away from your foundation once your barrel is full. Prevents soil erosion and basement flooding.
- Leaf-catching screen/gutter guard: Placed in your gutter or direct connection to prevent leaves and large debris from entering the system. A finely woven mesh works best.
- Smart water level sensor/monitor (optional): For real-time data on water levels and automated alerts, transforming your setup into a genuinely "smart" system.
Project Time
Efficient installation is key to enjoying your harvested water sooner.
- Preparation time: 1-2 hours (gathering materials, site assessment)
- Build/plant time: 2-4 hours (depending on complexity and number of barrels)
- Total duration: 3-6 hours
This streamlined process is approximately 40% faster than constructing a custom-built, multi-tank urban rainwater collection solution, thanks to readily available kits and materials.
Step-by-Step Instructions
Transforming rainfall into a valuable resource is simpler than you might think. Follow these steps to build your own efficient water-saving system.
Step 1: Site Selection and Planning
Begin by identifying the optimal location for your rain barrel or tank. Look for areas adjacent to downspouts that receive substantial runoff and are close to where you’ll be using the water, such as garden beds or vegetable patches. Ensure the ground is level and stable.
Practical Tip: Observe your gutters during a moderate rain shower. Note which downspouts have the highest flow and where water naturally drains to avoid future pooling.
Step 2: Gutter Preparation
Clean your gutters thoroughly of leaves, twigs, and accumulated sediment. Install a gutter screen or leaf guard to minimize future debris entering your system. This helps maintain water quality and prevents clogging of your diverter.
Practical Tip: Consider installing a first-flush diverter at this stage. It routes the initial, dirtiest runoff away before collecting cleaner water, significantly improving water quality for your plants.
Step 3: Install the Downspout Diverter
Measure the height of your chosen rain barrel. Mark and cut a section out of your downspout, slightly above the top of the barrel, according to your diverter kit's instructions. Install the diverter, ensuring a tight fit and proper sealing to prevent leaks.
Practical Tip: Use a plumb bob to ensure your downspout cut is perfectly vertical for the diverter to sit squarely and efficiently capture water.
Step 4: Position the Rain Barrel or Storage Tank
Elevate your rain barrel on a sturdy, level foundation of cinder blocks or pavers. This provides gravity-fed water pressure when using the spigot and ensures stability. Connect the hose from the diverter to the inlet on your rain barrel, using sealant for a watertight seal.
Practical Tip: Arrange your foundation blocks so they create a stable platform slightly wider than the base of your rain barrel to prevent accidental tipping when full, as a full 50-gallon barrel can weigh over 400 pounds.
Step 5: Connect Components and Test
Install the spigot near the bottom of the barrel and, if using, the overflow hose near the top. Direct the overflow hose away from your foundation to a drain or permeable area. Double-check all connections for leaks and wait for the next rainfall to observe your system in action.
Practical Tip: Before the initial rainfall, fill the barrel slowly with a garden hose to test all connections for leaks. A small leak now is much easier to fix than a massive one during an unexpected downpour.
Step 6: Integrate Smart Monitoring (Optional)
Install a smart water level sensor into your barrel and connect it to its corresponding app or smart home system. These devices can monitor current water levels, track usage, and send alerts when the barrel is full or empty, optimizing your water management.
Practical Tip: Choose a sensor that integrates with existing smart garden technology, like soil moisture sensors or automated irrigation controllers, to create a truly connected watering system.
Maintenance & Care Tips
Regular upkeep is crucial to ensure your rainwater harvesting system remains efficient and provides clean water for your garden tools and plants.
- Cleaning: Annually, or more frequently if you have many trees, thoroughly clean your gutters and any pre-filters. During drought periods, completely empty your rain barrel and scrub the interior with a stiff brush and a mild, biodegradable soap to prevent sediment buildup and discourage mosquito breeding.
- Water Quality: While harvested rainwater is excellent for plants, it typically isn't potable without advanced filtration. For sensitive seedlings or organic vegetable gardens, consider using a finer mesh filter on your diverter or even a basic charcoal filter on the output spigot to remove micro-particulates.
- Mosquito Control: Prevent mosquito larvae by ensuring your barrel is sealed and screen-covered. You can also add mosquito dunks (Bacillus thuringiensis israelensis), which are organic and harmless to plants and animals but lethal to mosquito larvae, without impacting water quality. Studies show a single dunk can treat 100 square feet of standing water for up to 30 days.
- Structural Integrity: Periodically inspect your rain barrel, diverter, and downspout for cracks, loose connections, or signs of wear. Repair or replace compromised parts immediately to prevent water loss and maintain efficiency. Check the stability of your barrel's foundation, especially after heavy rains or ground shifts.
- Flow Monitoring: If you have an overflow system, ensure it’s clear of debris and correctly directing excess water away from your home's foundation or garden beds that could be susceptible to overwatering.
Eco-Friendly Alternatives
Embracing sustainability in your rainwater harvesting extends beyond just collecting water.
- Recycled Materials: Instead of purchasing new rain barrels, consider repurposing large food-grade plastic containers, like old pickle barrels or olive drums, available from local restaurants or food processing plants. Ensure they are thoroughly cleaned. For your foundation, reclaimed bricks or timber can be an excellent, rustic alternative to new cinder blocks.
- Organic Inputs: When cleaning your system, opt for vinegar and baking soda solutions instead of harsh chemicals. These natural cleaners effectively remove algae and grime without introducing harmful residues that could later affect your garden.
- Low-Water Options: Complement your rainwater harvesting with drought-tolerant landscaping. Incorporate native plants that require less supplemental watering, further reducing your reliance on irrigation. Resources like the USDA NRCS Plant Materials program can help you discover suitable options for your region. This approach maximizes the impact of your collected rainfall.
- Gravity-Fed Irrigation: Instead of electrifying a pump, use gravity to your advantage. Elevate your storage tank higher and utilize drip irrigation systems or soaker hoses. These methods deliver water directly to the plant roots, minimizing evaporation and maximizing efficiency, significantly reducing the energy footprint of your watering efforts.
Design & Styling Ideas
A rainwater harvesting system doesn’t have to be a utilitarian eyesore; it can be an integrated, aesthetic element of your garden.
- Disguise with Greenery: Encase your rain barrel in a trellis and grow climbing plants such as morning glories, clematis, or edible beans around it. This creates a living screen that blends seamlessly with your garden landscape.
- Paint and Personalize: Choose an exterior-grade paint that complements your home or garden's color scheme. You can paint a mural, stencil a pattern, or simply pick a discreet shade that helps it recede into the background.
- Stacked Barrels for Capacity and Appeal: For larger gardens, connect multiple rain barrels in a cascading or tiered arrangement. This not only increases storage capacity but can also create an interesting visual feature, especially if the overflow from one barrel feeds into the next.
- Integrate into Hardscaping: Design a raised garden bed or bench around your rain barrel, making it appear as a deliberate, thoughtful part of your outdoor living space rather than an add-on. The foundation can be disguised as part of a stone wall or wooden planter box.
- Decorative Diverters: Some manufacturers offer aesthetically pleasing downspout diverters that look like decorative spouts or sculptures, enhancing the visual appeal of your home's exterior while performing their practical function.
Common Mistakes to Avoid
Even with the best intentions, errors can occur when setting up a rainwater harvesting system. Being aware of these pitfalls can save you time, effort, and potential damage.
- Incorrect Sizing: Installing a barrel that's too small for your roof area and rainfall patterns will result in frequent overflows and wasted water. Conversely, an oversized barrel can be expensive and unnecessarily large for your needs. To prevent this, calculate your roof's catchment area (length x width) and multiply by your average rainfall to estimate daily water collection, then size your storage accordingly.
- Lack of Stable Foundation: Placing a heavy, water-filled barrel directly on unstable ground is a recipe for disaster. A single gallon of water weighs approximately 8.34 pounds, so a 50-gallon barrel can weigh over 400 pounds. Always ensure a perfectly level and strong foundation of concrete blocks or pavers to prevent tipping or sinking, which can damage the barrel or nearby structures.
- No Overflow Management: Without an overflow hose, excess water will spill directly onto your foundation, potentially leading to erosion, basement leaks, or damage to your home’s structural integrity. Install an overflow pipe that directs water at least 6-10 feet away from your home or into a designated rain garden.
- Ignoring Debris Filters: Clogged gutters or diverters significantly reduce efficiency and can introduce sludge into your stored water. Install gutter guards and an inline filter on your diverter. Regularly inspect and clean these to ensure pristine water quality and uninterrupted flow. Data from the University of Minnesota Extension highlights the importance of clean gutters in urban stormwater management.
- Using Non-Food Grade Barrels for Edibles: If you plan to use harvested water for edible plants, never use barrels that previously contained toxic chemicals or unknown substances. Always opt for food-grade barrels to avoid contaminating your produce.
- Poorly Sealed Connections: Leaks are the enemy of efficiency. Ensure all connections, from the diverter to the spigot, are sealed tightly with appropriate waterproof sealant or plumber’s tape. Test for leaks before heavy rain, not during, to allow for adjustments.
Storage & Seasonal Tips
Proper storage and seasonal preparation are crucial for the longevity and efficiency of your rainwater harvesting system and your garden tools.
- Tool Storage: After completing your installation, ensure all your garden tools – from saw to wrench – are cleaned of dirt and debris. Dry them thoroughly before storing them in a cool, dry place to prevent rust. Lubricate moving parts of hand tools and power tools regularly.
- Winterizing Your System (Cold Climates): Before the first hard freeze, typically when temperatures consistently drop below freezing, empty your rain barrel completely. Disconnect the downspout diverter and store it indoors. Leave the spigot open to ensure all water drains out, preventing ice expansion from cracking the barrel. Direct your downspout back to its original configuration.
- Summer Maintenance (Hot Climates): In regions prone to droughts or intense heat, you might find your barrel empty more often. Use this as an opportunity for deep cleaning to prevent algae buildup. Consider integrating a smart monitoring system to track water levels, allowing you to use the resource judiciously.
- Year-Round Leaf Management: Even outside autumn, leaves and debris can accumulate in gutters. Implement a routine check every few months, or after significant storms, to clear your gutters and ensure your diverter remains unobstructed. This small effort yields big returns in water purity and system performance.
- Barrel Cleaning Schedule: Aim for a thorough internal cleaning of your barrel once a year. If you notice a film on the inside or sediment accumulating at the bottom, it's time for a scrub. This prevents bacterial growth and keeps your water fresh.
Conclusion
Implementing a Smart Rainwater Harvesting Setup is more than just a home improvement project; it's a commitment to environmental stewardship and a smart financial decision for any gardener. By following these detailed steps, selecting the right garden tools, and committing to regular maintenance, you'll create a resilient water source that nourishes your landscape, reduces your water bill, and fosters a more sustainable lifestyle. Embrace the potential of every raindrop and take the leap towards water independence.
Ready to transform your garden? Share your rainwater harvesting journey, tips, and tricks with us in the comments below! What kind of smart features are you planning to integrate into your system?
FAQ
Q1: Is rainwater safe for all plants?
A1: Yes, rainwater is generally excellent for plants as it is naturally soft and free of chlorine, fluoride, and other chemicals often found in tap water. It's especially beneficial for sensitive plants and acid-loving species.
Q2: How much water can a typical rain barrel collect?
A2: A standard 50-gallon rain barrel can fill quickly. A 1,000 sq ft roof can shed approximately 620 gallons of water for every inch of rainfall. Even a small roof section can collect significant amounts.
Q3: Can I connect multiple rain barrels together?
A3: Absolutely! Connecting multiple barrels in a series via overflow hoses is a great way to increase your storage capacity and create a larger reserve for extended dry periods.
Q4: How do I prevent mosquitoes from breeding in my rain barrel?
A4: Ensure your barrel has a tightly sealed lid and a fine mesh screen over all openings. You can also use mosquito dunks (Bti products), which are organic and target only mosquito larvae without harming other wildlife or plants.
Q5: What are the best garden tools for maintaining a rainwater system?
A5: Essential tools include a sturdy ladder for gutter cleaning, a hacksaw for downspout modifications, a drill with a hole saw for barrel connections, and a good sealant gun for leak-proofing.
Q6: How does a smart monitoring system benefit rainwater harvesting?
A6: A smart monitoring system provides real-time data on water levels, helps you track usage, and can send alerts, preventing overflow or letting you know when to conserve water. Some can even integrate with automated irrigation.
Q7: Is it legal to collect rainwater where I live?
A7: Rainwater harvesting laws vary by region. While most places permit it, it's wise to check your local municipal or state regulations to ensure compliance.
Explore More Sustainable Gardening Ideas!
Ready to further enhance your green space? Discover how to create a simple yet effective DIY Cold Frame to extend your growing season. For innovative water-saving designs, explore our insights on Smart Tech Garden Hacks that integrate seamlessly with your new setup. Dive into autumn gardening with tips on Edible Landscaping with Fall Crops, which can thrive on your harvested water. And don't forget to review dedicated guides on choosing the best Precision Gardening Tools to keep your garden in top shape.


