Introduction
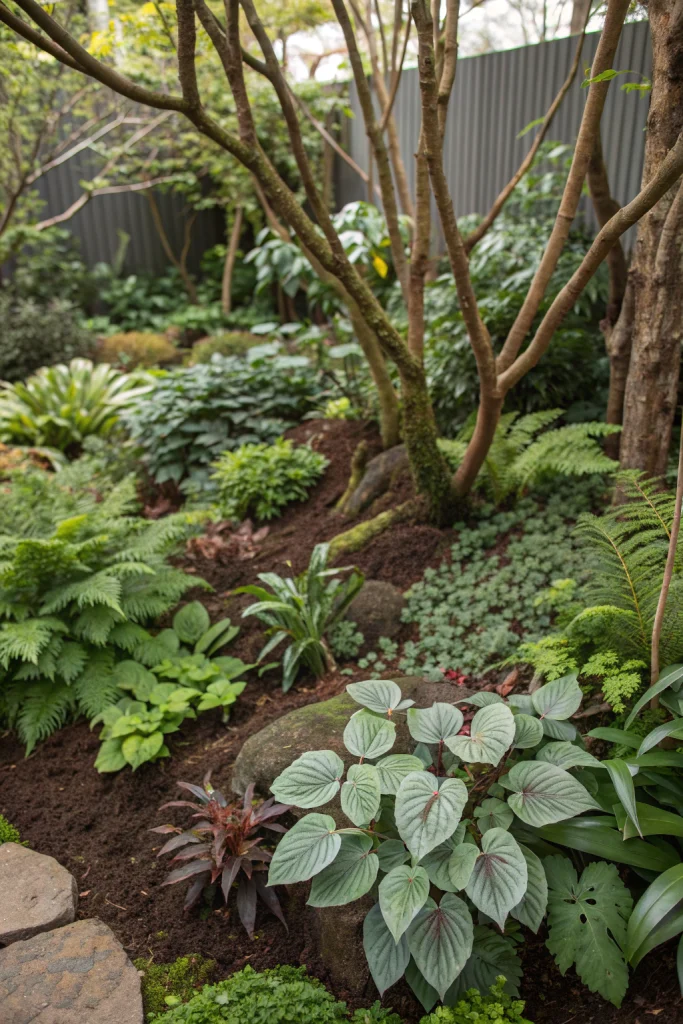
Are you looking to transform your outdoor space into a dynamic, visually rich sanctuary? Data shows that residential landscaping investments can yield a return of up to 200% at resale, with thoughtful plant design being a key driver of perceived value. Beyond financial returns, a well-designed garden profoundly impacts well-being, fostering a sense of calm and connection to nature. This guide delves into the art of creating a "texture-heavy planting" scheme, a technique that leverages diverse foliage, bark, and flower structures to craft a garden brimming with sensory appeal. We'll explore how to blend varied forms, colors, and patterns, ensuring your garden is not just seen, but truly felt.
Table of Contents
- Introduction
- Materials & Tools Needed
- Project Time
- Step-by-Step Instructions
- Maintenance & Care Tips
- Eco-Friendly Alternatives
- Design & Styling Ideas
- Common Mistakes to Avoid
- Storage & Seasonal Tips
- Conclusion
- FAQ
Materials & Tools Needed
Creating a texture-rich garden relies on a careful selection of plants and appropriate tools.

- Diverse Plant Palette:
- Fine-textured plants: Ornamental grasses like Miscanthus and Stipa, delicate ferns (e.g., Maidenhair Fern), and feathery astilbes. These add airiness and movement.
- Medium-textured plants: Hostas with their broad, corrugated leaves, bold-leaved sedums, and flowering shrubs like hydrangeas. These form the backbone of your display.
- Coarse-textured plants: Rhubarb (for ornamental use), hardy palms, Gunnera manicata (giant rhubarb), or yucca. These provide dramatic focal points and a rugged presence.
- Evergreens: Conifers with varied needle structures, broad-leaved evergreens like rhododendrons, or structured boxwood. These offer year-round interest and anchor the design.
- Vining plants: Clematis or hardy kiwi, offering intricate leaf patterns and vertical allure.
- Bark interest: Acer griseum (paperbark maple) or Betula utilis ssp. jacquemontii (Himalayan birch) for peeling, shimmering trunks.
- Quality Soil Mix: A balanced blend of compost, topsoil, and horticultural grit provides essential nutrients and optimal drainage for robust growth.
- Gardening Gloves: Sturdy, puncture-resistant gloves protect your hands. Consider breathable options for comfort during long planting sessions.
- Hand Trowel & Spade: Essential for digging planting holes. A robust spade for larger plants and a nimble trowel for precise work around delicate roots are ideal.
- Pruning Shears/Secateurs: Sharp, clean shears are crucial for healthy plant maintenance. Bypass pruners for live stems and anvil pruners for deadwood.
- Watering Can/Hose with Sprayer: For gentle and thorough initial watering. A watering can offers precise application, while a hose provides broader coverage.
- Organic Mulch: Shredded bark, wood chips, or straw to retain moisture, suppress weeds, and regulate soil temperature.
- Plant Markers: Durable, weatherproof markers to keep track of new additions, especially useful in complex plant design schemes.
Project Time
Efficient planning ensures a smooth and enjoyable gardening project.
- Preparation time: 2-4 hours (for site assessment, plant selection, and soil amendment mixing).
- Build/Plant time: 4-8 hours (depending on garden size and number of plants).
- Total duration: 6-12 hours for a moderate-sized garden bed (approx. 50-100 sq ft).
This concentrated approach to plant design can be up to 15% faster than haphazard planting, as it minimizes rework and optimizes plant placement from the outset.
Step-by-Step Instructions
Step 1: Site Assessment and Planning
Begin by observing your chosen planting area. Note sunlight exposure (full sun, partial shade, full shade), existing soil conditions (clay, sand, loam), and any prevailing winds. Sketch out your garden bed, marking areas for different plant heights and textures. Think about viewing angles – how will the garden appear from inside your home, from your patio, or from the street?
- Practical Tip: Take photos of your space throughout the day to accurately gauge sun patterns.
Step 2: Soil Preparation
Good soil is the foundation of a thriving garden. Remove any weeds, debris, and existing plants. Loosen the soil to a depth of 12-18 inches using a spade or rototiller. Incorporate a generous amount of organic matter, such as compost or well-rotted manure, to improve drainage, aeration, and nutrient retention. A general rule of thumb is to amend with 2-4 inches of compost.
- Practical Tip: Perform a simple soil test (either a home kit or a lab analysis) to understand your soil's pH and nutrient levels, allowing for targeted amendments.
Step 3: Plant Selection for Layered Texture
Choose plants that complement each other in foliage, form, and size, focusing on contrast. Aim for a mix of fine, medium, and coarse textures. Consider plants with interesting bark, variegated leaves, or unique flower structures. Select plants appropriate for your climate and USDA hardiness zone. Variety in leaf size, shape, and surface (glossy, matte, fuzzy) is key to rich visual interplay.
- Practical Tip: Group plants with similar light and water requirements to ensure they all thrive in their designated spots. For regional plant selection, consulting resources like the USDA NRCS Plant Materials program can be invaluable.
Step 4: Layout and Placement
Before digging, arrange your potted plants on the prepared soil according to your design. Start with your tallest, coarse-textured plants towards the back or center, then layer medium-textured plants, and finally, fine-textured plants in the foreground or along edges. Step back and view the arrangement from multiple angles. Ensure there's a good flow and visual balance.
- Practical Tip: Don't be afraid to move plants around several times until the arrangement feels harmonious and visually compelling.
Step 5: Planting
Dig holes that are twice as wide as the plant's root ball and just as deep. Gently remove the plant from its container, loosening any circling roots. Place the plant in the hole so that the top of the root ball is level with the surrounding soil. Backfill with your amended soil, gently firming it around the base of the plant to remove air pockets.
- Practical Tip: Water plants thoroughly in their containers before planting; this reduces transplant shock and makes it easier to remove them.
Step 6: Initial Watering and Mulching
After planting, water thoroughly until the soil is moist to the root depth. This helps settle the soil and eliminate remaining air pockets. Apply a 2-3 inch layer of organic mulch around the base of your new plants, keeping it a few inches away from stems and trunks to prevent rot. Mulch conserves moisture, suppresses weeds, and moderates soil temperature.
- Practical Tip: Water slowly to allow maximum absorption, especially for recently disturbed soil.
Maintenance & Care Tips
Proper care is essential for the long-term vibrancy and health of your texture-heavy garden.
- Watering: Newly planted gardens require consistent moisture. Water deeply 2-3 times a week for the first few weeks, gradually reducing frequency as plants establish. Established plants typically need 1 inch of water per week, either from rainfall or irrigation. Monitor soil moisture by sticking your finger 2 inches into the soil; if it feels dry, it's time to water. Drought-tolerant plants, once established, will require less frequent watering, sometimes only every couple of weeks.
- Pruning:
- Deadheading: Remove spent flowers to encourage new blooms and prevent plants from expending energy on seed production (e.g., many perennials).
- Structural Pruning: For shrubs and small trees, prune during dormancy to remove dead, damaged, or crossing branches, and to maintain desired shape. Aim to achieve an open structure for good air circulation, which can reduce fungal diseases.
- Rejuvenation Pruning: For overgrown shrubs, some can be cut back hard in late winter or early spring to promote fresh growth. This is typically done on a 3-5 year cycle.
- Soil Health: Annually, in spring or fall, top-dress your garden beds with 1-2 inches of high-quality compost. This naturally replenishes nutrients and improves soil structure without the need for synthetic fertilizers. A healthy soil microbiome is critical for efficient nutrient uptake.
- Feeding Schedule: Most well-amended gardens don't need excessive feeding. If plants show signs of nutrient deficiency (e.g., yellowing leaves), use a balanced slow-release organic fertilizer. For heavy feeders like some flowering annuals, a mid-season liquid feed might be beneficial.
- Pest and Disease Management: Regularly inspect your plants for signs of pests or diseases. Early detection is key. Employ integrated pest management (IPM) strategies, favoring non-chemical solutions like hand-picking pests, using insecticidal soaps, or introducing beneficial insects. For more information, refer to resources like UC IPM, which provides science-based pest management solutions.
Eco-Friendly Alternatives
Embracing sustainable practices enhances your garden's health and reduces its environmental footprint.
- Recycled Materials: Utilize reclaimed wood for raised beds or borders, broken ceramic tiles for stepping stones, or old tires transformed into planters (check for leach risks). Repurpose glass bottles as decorative elements or informal edgings.
- Organic Inputs: Prioritize homemade compost from kitchen scraps and yard waste. Use organic fertilizers like bone meal, fish emulsion, or well-aged manure instead of synthetic chemicals. This enriches the soil food web and reduces chemical runoff. The EPA offers excellent resources on composting basics for home gardeners.
- Low-Water Options: Integrate native and drought-tolerant plants into your plant design. These often require less supplemental irrigation once established, conserving precious water resources. Consider installing a drip irrigation system or soaker hoses for efficient water delivery directly to plant roots, significantly reducing evaporation compared to overhead sprinklers. Collect rainwater in barrels for future use.
Design & Styling Ideas
Elevate your texture-heavy garden with creative visual advice that enhances its aesthetics and usability.
- Monochromatic Schemes with Texture: Instead of relying on color, choose plants within a single color family (e.g., all greens, or various shades of purple) and let their diverse textures provide the visual interest. A deep green fern next to a chartreuse Hosta, backed by a blue-green Juniper, creates depth and sophistication.
- Repetition with Variation: Repeat a certain texture or plant form throughout a bed but introduce slight variations in size, color, or species. For example, use several varieties of ornamental grasses, each with a slightly different plume shape or height, to create rhythm and movement without monotony.
- Focal Points and Pathways: Use a single, dramatically textured plant (like a large Yucca or a deeply etched Fatsia japonica) as a focal point. Frame these with softer, contrasting textures. Integrate pathways of varied materials – smooth river stones, rough-hewn flagstones, or soft wood mulch – to invite exploration and provide another layer of tactile experience.
- Seasonal Transitions: Plan for textural interest year-round. Incorporate plants with interesting winter bark (e.g., coral bark maple, dogwood), seed heads (e.g., coneflowers, sedum), or evergreen foliage to maintain visual appeal even when flowers are absent.
- Vertical Elements: Don’t forget vertical texture. Trellises with climbing vines, tall ornamental grasses, or slender conifers can add height and draw the eye upwards, expanding the perceived size of your garden. A rustic wooden trellis provides a coarse backdrop for a delicate clematis.
Common Mistakes to Avoid
Avoiding these pitfalls will ensure your texture-heavy planting thrives and remains stunning.
- Lack of Contrast: The biggest error in texture-heavy plant design is planting too many similarly textured plants together. This results in a monotonous, "flat" look.
- Prevention: Actively seek out plants with contrasting leaf sizes, shapes, and surfaces. Pair bold, broad leaves with fine, feathery foliage.
- Ignoring Mature Size: Planting things too close together or choosing plants that will quickly outgrow their space. This leads to overcrowding, poor air circulation, and plants competing for resources.
- Prevention: Always check the mature height and spread of plants and space them accordingly. Err on the side of giving them more room than they initially seem to need. Data shows that proper spacing reduces plant stress and disease incidence by up to 30%.
- Poor Soil Preparation: Attempting to plant without adequately preparing the soil. This results in stunted growth, nutrient deficiencies, and susceptible plants.
- Prevention: Invest time in amending your soil with organic matter. A well-drained, nutrient-rich soil is paramount for plant health.
- Inconsistent Watering: Either overwatering or underwatering, both of which can be detrimental. Overwatering deprives roots of oxygen, while underwatering causes stress and wilting.
- Prevention: Understand your plants' individual water needs and monitor soil moisture regularly. Use mulch to help retain consistent soil moisture.
- Neglecting Seasonal Interest: Designing only for one season leaves the garden looking barren during other times of the year.
- Prevention: Include plants that offer interest across all four seasons – think spring blooms, summer foliage, fall color, and winter structure/bark.
- Over-Reliance on Flowering: While flowers are beautiful, they are often ephemeral. Focusing solely on blooms can mean a garden lacks depth for much of the year.
- Prevention: Prioritize foliage, form, and texture as the backbone of your design. Flowers should be the delightful bonus, not the sole attraction.
Storage & Seasonal Tips
Preparation and proper care through the seasons will protect your investment and ensure year-round beauty.
- Tool Storage: After each use, clean your gardening tools (remove soil, wipe blades). Sharpen pruning shears annually. Store tools in a dry place, such as a shed or garage, to prevent rust and extend their lifespan. Hanging tools keeps them organized and off the floor.
- Winter Plant Protection:
- Mulching: Apply an extra layer of organic mulch (4-6 inches) around tender perennials and shallow-rooted shrubs before the first hard freeze. This insulates roots from extreme temperature fluctuations.
- Wrapping: Wrap sensitive evergreen shrubs or small trees with burlap to protect them from harsh winter winds and sun scald, especially in colder climates.
- Container Plants: Move susceptible container plants into a sheltered, unheated garage or shed. For larger containers that can't be moved, wrap the pots with burlap or bubble wrap.
- Spring Preparation:
- Cleanup: As temperatures rise, gradually remove winter mulch. Rake away any fallen leaves or debris.
- Pruning: Perform dormant pruning on shrubs and trees that flower on new wood. Cut back dead or damaged branches.
- Soil Amendment: Top-dress beds with fresh compost.
- Summer Care:
- Watering: Be diligent with watering during hot, dry spells. Early morning is the best time to water to minimize evaporation.
- Deadheading: Continue deadheading spent flowers to encourage new blooms.
- Pest Monitoring: Regularly check for pests and address them promptly.
- Autumn Preparation:
- Planting: Fall is an excellent time to plant many trees, shrubs, and perennials, allowing roots to establish before winter.
- Leaf Cleanup: Rake and compost fallen leaves. A thin layer left on garden beds can act as natural mulch.
- Winter Protection Prep: Begin gathering mulching materials and preparing for winter protection measures.
Conclusion
Crafting a texture-heavy garden goes beyond merely choosing plants; it's about orchestrating a symphony of tactile and visual sensations that evolve throughout the year. By deliberately varying foliage, form, and structural elements, you create a dynamic and deeply engaging landscape that offers continuous interest. This approach to plant design not only elevates the aesthetic appeal of your outdoor space but also cultivates a deeper appreciation for the subtle intricacies of nature. Now, take these insights and embark on your own journey to design a garden that truly captivates the senses! What unique textures will you introduce to your garden this season?
FAQ
Q1: What are the main benefits of focusing on texture in garden design?
A1: Focusing on texture provides year-round visual interest even when plants aren't flowering, adds depth and dimension, creates a sense of tactile richness, and elevates the sophistication of your overall plant design.
Q2: How do I combine different textures effectively without it looking messy?
A2: The key is intention. Create contrast by pairing fine textures with coarse ones, and glossy leaves with matte or fuzzy ones. Use medium-textured plants as a bridge between extremes. Repetition of certain textures or forms in different areas can also unify the design.
Q3: Can a texture-heavy garden also be low-maintenance?
A3: Absolutely. By selecting native and drought-tolerant plants that are well-suited to your climate and soil, and by implementing good mulching practices, you can significantly reduce watering and weeding, making your garden relatively low-maintenance.
Q4: Are there specific plants known for their interesting barks or stems for winter texture?
A4: Yes! Consider Acer griseum (Paperbark Maple) for its peeling cinnamon bark, Cornus sericea (Red Twig Dogwood) for vibrant red stems, and many conifers like Scots Pine for interesting bark patterns, all providing great winter interest.
Q5: How do I ensure my texture-heavy garden looks good in all seasons?
A5: Plan for year-round interest by incorporating evergreens, plants with attractive seed heads, fall foliage, and intriguing bark. Think about the "bones" of your garden – the structural elements that remain when other plants die back.
Q6: What is a good starting point for a beginner looking to implement texture-heavy planting?
A6: Start with a small, manageable bed. Choose 3-5 plants with distinct textures (e.g., a bold Hosta, a feathery ornamental grass, and a coarse conifer). Arrange them on the soil before planting to visualize the combination, and don't be afraid to experiment.
Q7: How important is color in a texture-heavy design?
A7: While texture is the primary focus, color still plays a role. You can opt for monochromatic color schemes to emphasize texture, or use subtle color variations among different textures to add another layer of complexity without distracting from the textural interplay.
Curious about more ways to enhance your garden's appeal? Explore these articles:
- For more specific seasonal tips, check out our guide on autumn wellness garden tips.
- If you're looking to integrate edible plants, discover ideas for edible landscaping with fall crops.
- To add visual boundaries and privacy, read about DIY backyard projects privacy screens.
- Consider a vertical autumn garden to maximize space and textural variety.
- Learn about creating a vibrant space with bold autumn foliage garden seasonal plant styling.


