
The Ultimate Guide to Understanding the Best Time to Plant Bulbs for Maximum Blooms
The promise of vibrant spring flowers – daffodils dancing in the breeze, tulips unfurling their silken petals, and hyacinths filling the air with their intoxicating fragrance – is often the driving force behind many gardening endeavors. Yet, achieving this spectacular display isn’t just about selecting beautiful varieties; it’s fundamentally about timing. Knowing the best time to plant bulbs is the secret ingredient that transforms a hopeful endeavor into a breathtaking reality. This comprehensive guide will demystify the art and science of bulb planting, ensuring your garden bursts into life with an abundance of color and charm each spring.
[lwptoc]
Why Timing Matters: The Circadian Rhythm of Your Garden
Bulbs are nature’s meticulously packaged powerhouses, each containing a complete plant embryo, food reserves, and the genetic blueprint for future blooms. Unlike seeds, which germinate from scratch, bulbs require specific environmental cues to initiate their growth cycle. This includes a crucial period of dormancy and chilling, imitating winter conditions, which is essential for developing flower buds. Planting at the optimal moment allows bulbs to establish a strong root system before the ground freezes solid, and ensures they receive the necessary cold stratification to trigger flowering.
Incorrect timing can lead to a host of problems, from premature sprouting and frost damage to a complete lack of blooms. Planting too early can expose emerging shoots to harsh freezes, while planting too late might not allow enough time for root development before the ground hardens. Understanding the specific needs of different bulb types and aligning your planting schedule with your local climate zone is paramount for success.
Beyond aesthetics, proper timing contributes to the overall health and longevity of your bulb patch. Well-established bulbs are more resilient to pests and diseases and are more likely to naturalize and multiply over the years, providing continuous beauty with minimal effort. It’s an investment in your garden’s future.
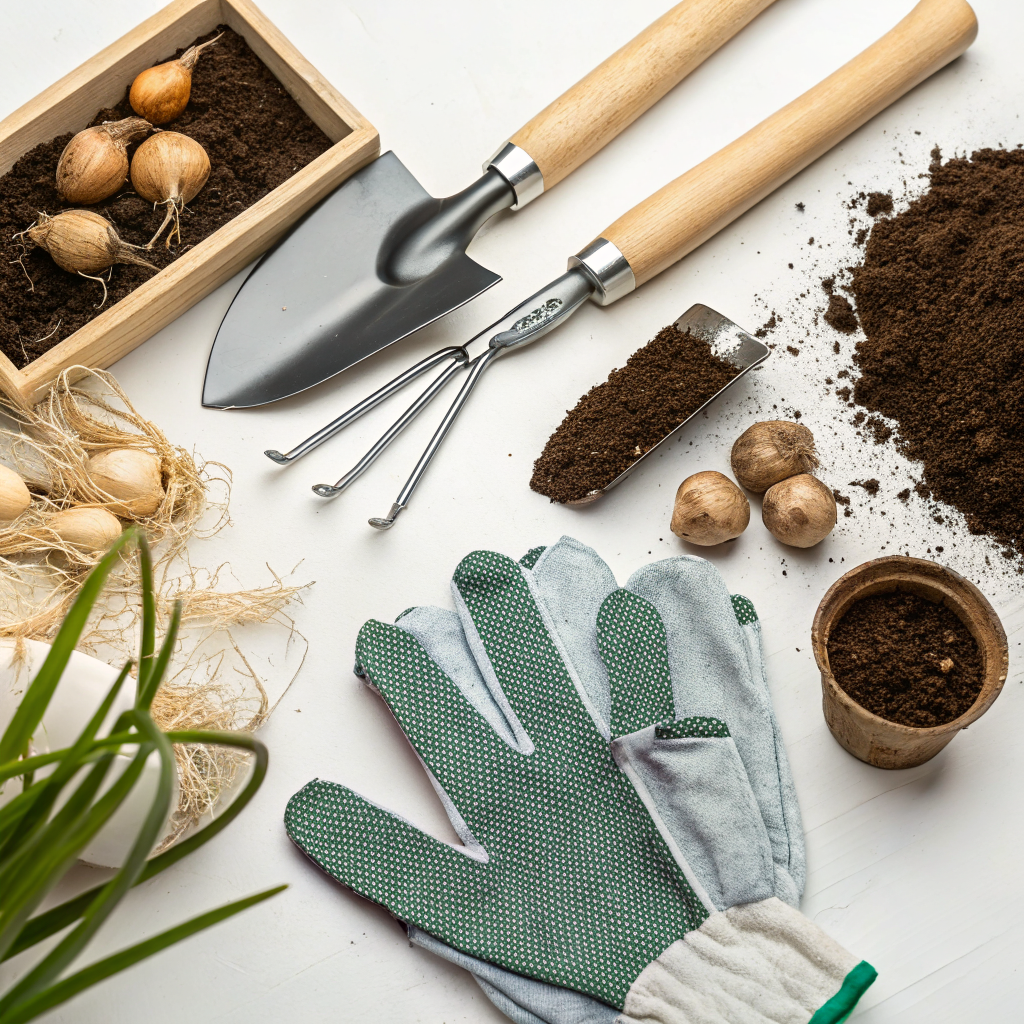
What You Need for a Bountiful Bulb Display
Before you get your hands dirty, gathering the right tools and materials will make the planting process efficient and enjoyable. A well-prepared gardener is a successful gardener.
Essential Tools:
- Gardening Gloves: Protect your hands from dirt, thorns, and potential skin irritations.
- Trowel or Bulb Planter: These tools make digging individual holes quick and easy. A bulb planter often extracts a core of soil perfectly sized for a bulb.
- Spade or Shovel: Necessary if you’re planting a larger area or creating a mass planting design.
- Soil Knife/Horit Horit: A versatile tool for digging, cutting, and weeding.
- Garden Fork or Cultivator: For loosening compacted soil, especially beneficial in beds that haven’t been worked recently.
- Measuring Tape or Ruler: To ensure proper planting depth and spacing for optimal growth.
Materials and Plants:
- High-Quality Flower Bulbs: Source your bulbs from reputable nurseries or garden centers. Look for firm, healthy bulbs free from mold, soft spots, or significant damage. Avoid shriveled or lightweight bulbs.
- Compost or Well-Rotted Manure: Amending the soil with organic matter improves drainage, aeration, and nutrient content, creating an ideal environment for root development.
- Bone Meal or Bulb Fertilizer: A slow-release phosphorus-rich fertilizer encourages strong root growth. Apply according to package directions.
- Mulch (e.g., straw, shredded leaves, wood chips): To insulate the soil, retain moisture, and suppress weeds after planting.
- Grit or Sand (optional): If your soil is heavy clay, incorporating grit can significantly improve drainage.
- Plant Markers (optional but recommended): Helps you remember what you planted where, especially useful for diverse layouts or future planning.
Step-by-Step Guide to Perfectly Timed Bulb Planting
Follow these steps to ensure your bulbs are planted correctly, maximizing their chances of producing stunning blooms.
Step 1: Choose the Right Bulbs for Your Climate Zone
Not all bulbs are created equal, and their chilling requirements vary. Determine your USDA Hardiness Zone to select bulbs that thrive in your region. Most spring-flowering bulbs require a significant period of cold. For gardeners in warmer climates (Zones 8 and above), some bulbs like tulips and hyacinths may need to be “pre-chilled” in the refrigerator for 6-10 weeks before planting. Check the bulb packaging or consult resources like the Gardening Know How website for specific chilling requirements.
Consider the mature height, bloom time, and sun requirements of your chosen varieties. Plan for a succession of blooms by selecting early, mid, and late-spring flowering bulbs. This ensures continuous color in your garden.
Step 2: Identify the Best Planting Window (Crucial for the Best Time Plant Bulbs)
The golden rule for planting spring-flowering bulbs is to plant them when soil temperatures have cooled but before a hard frost. Typically, this means planting from early September through November in most temperate regions, extending into December in milder climates. The ideal soil temperature is generally below 60°F (15°C) but above 40°F (4°C).
A good indicator is when nighttime temperatures consistently hover around 40-50°F (4-10°C). This timing allows the bulbs to establish a robust root system before the ground freezes solid, which is vital for nutrient uptake and anchoring the plant. Conversely, planting too early can encourage premature top growth, making the emerging shoots vulnerable to early frosts. Planting too late might not allow enough time for root development before the ground becomes impenetrable.
Step 3: Prepare Your Planting Site and Soil
Select a location that receives at least 6 hours of direct sunlight daily for most spring-flowering bulbs. Ensure the site has excellent drainage; bulbs rot quickly in waterlogged soil. If your soil is heavy clay, amend it generously with organic matter like compost, well-rotted leaf mold, or even grit or sand to improve porosity.
Loosen the soil to a depth of at least 12-15 inches. Incorporate a slow-release bulb fertilizer or bone meal into the planting area as per package directions. This provides essential nutrients for strong root development and future blooms. A soil test can help you determine any nutrient deficiencies specific to your garden.
Step 4: Digging and Positioning the Bulbs
The general rule of thumb for planting depth is to plant bulbs two to three times their height deep. So, a 2-inch tall bulb should be planted 4-6 inches deep. Larger bulbs, like tulips and daffodils, typically go deeper than smaller ones, like crocuses. Plant bulbs with the pointy side facing up, as this is where the shoots will emerge. If you can’t discern an “up” side, plant them on their side; they’ll still find their way, but it expends more energy.
Spacing is also important. For a naturalized look, scatter bulbs and plant them where they fall. For a more formal design, measure and space them according to bulb type (usually 3-6 inches apart for most medium-sized bulbs). Planting in clusters of 5-7 bulbs creates a more impactful display than scattering single bulbs.
Step 5: Cover, Water, and Mulch
Gently backfill the holes with the amended soil, lightly patting it down to remove large air pockets. Water the newly planted bulbs thoroughly. This settles the soil around the bulbs and helps initiate root growth. If rain is scarce, continue to water occasionally until the first hard frost.
Apply a 2-4 inch layer of mulch over the planted area. This could be straw, shredded leaves, or wood chips. Mulch helps insulate the soil, preventing extreme temperature fluctuations, retaining moisture, and suppressing weeds. It also provides an extra layer of protection during harsh winters, especially important for ensuring the best time to plant bulbs yields maximum results.
Remember that while the planting depth is crucial, consistency across your planting is equally important for a uniform emergence in spring. Deeper planting can delay emergence slightly, while shallower planting might expose bulbs to winter heave.
Measure the bulb from base to tip. Multiply this measurement by 2 or 3 to get the optimal planting depth. For example, a 2-inch daffodil bulb should be planted 4-6 inches deep.
Pro Tips for a Flourishing Flower Garden & Common Mistakes to Avoid
Even with careful planning, some nuances can elevate your bulb planting or lead to common pitfalls.
Pro Tips:
- Plant in Layers (Lasagna Planting): For a continuous bloom show in containers or small beds, plant bulbs in layers like lasagna. Start with late-blooming, deepest bulbs (e.g., tulips), then mid-season bulbs (e.g., daffodils), and finally early-blooming, shallowest bulbs (e.g., crocus).
- Consider Critter Protection: Squirrels and voles can be fond of certain bulbs (especially tulips and crocus). Consider placing chicken wire over the planting area before backfilling, or use a deterrent like a sprinkle of red pepper flakes or specialized granular repellents.
- “Naturalize” Your Bulbs: Toss bulbs onto the planting area and plant them where they land for a natural, informal look. This works wonderfully for daffodils, crocus, and glory-of-the-snow.
- Group for Impact: Plant bulbs in drifts or clusters of at least 5-7 of the same variety for a more dramatic visual impact. Scattered single bulbs often get lost in larger garden settings.
- Fertilize After Blooming: Once bulbs have finished flowering, allow the foliage to mature and yellow naturally. This allows the plant to photosynthesize and store energy in the bulb for the following year. You can apply a balanced liquid fertilizer at this stage.
Common Mistakes to Avoid:
- Planting Too Early: As mentioned, planting when the weather is still too warm can cause bulbs to sprout prematurely, making them vulnerable to frost damage.
- Planting Too Late: If the ground is already frozen, it’s too late for proper root establishment. Bulbs planted too late might not have enough time to develop roots before the deepest cold sets in.
- Poor Drainage: The single biggest killer of bulbs is wet feet. Ensure your planting site has excellent drainage to prevent rot.
- Cutting Foliage After Blooming: Resist the urge to cut off the green leaves immediately after the flowers fade. The foliage is crucial for recharging the bulb for next year’s bloom. Wait until it has completely yellowed and withered.
- Under-watering After Planting: While over-watering is bad, under-watering immediately after planting can prevent proper root initiation. Give them a good drink.
- Ignoring Sun Requirements: While some spring bulbs tolerate partial shade, most prefer full sun (at least 6 hours) for the strongest blooms.
Eco-Friendly Variations for Sustainable Bulb Planting
Embracing sustainable practices in your bulb planting can benefit your garden and the broader ecosystem.
- Choose Native or Naturalized Bulbs: Opt for species that are well-suited to your local climate and can naturalize easily. This reduces the need for constant replanting and supports local pollinators. Daffodils, for example, are excellent naturalizers and deer-resistant.
- Compost Power: Instead of synthetic fertilizers, rely heavily on organic compost and well-rotted leaf mold to enrich your soil. This improves soil structure, encourages beneficial microorganisms, and slowly releases nutrients. Learn more about composting techniques on our garden soil amendments guide.
- Water Conservation: After initial watering, use mulch to retain soil moisture, reducing the need for frequent irrigation. Consider incorporating rainwater harvesting for garden use.
- Pest Control with Nature: Instead of chemical pesticides, encourage natural predators by planting a diverse range of flowers and creating insect habitats. Many spring bulbs are inherently pest-resistant.
- Sustainable Sourcing: Purchase bulbs from local nurseries or reputable online vendors who practice sustainable growing methods. Inquire about how their bulbs are grown and harvested. Look for organic or untreated bulbs when possible.
- Reduce, Reuse, Recycle: Use reusable gloves and tools. Repurpose old containers for chilling bulbs, and compost any spent foliage.
By integrating these eco-friendly approaches, your bulb planting efforts won’t just result in beautiful flowers, but also contribute to a healthier, more resilient garden environment. This holistic approach aligns with the core principle of finding the best time to plant bulbs – working with nature, not against it.
Seasonal Considerations: Beyond Just Autumn Planting
While autumn is the primary season for planting spring-flowering bulbs, it’s important to differentiate between bulb types and their seasonal requirements.
Spring-Flowering Bulbs (Autumn Planting):
These are the stars of our guide: tulips, daffodils, hyacinths, crocus, alliums, and snowdrops. They require a period of cold stratification (winter chill) to initiate flowering. Their ideal planting window is generally from September to November/December, depending on your climate zone, when soil temperatures are cooling but before a hard freeze.
Summer-Flowering Bulbs (Spring Planting):
These bulbs, often called tender bulbs or corms, include dahlias, gladiolus, cannas, and calla lilies. They are planted in spring after all danger of frost has passed, usually from April to early June, when the soil has warmed up. They bloom in summer and often need to be lifted and stored indoors over winter in colder climates. Learn more about summer bulbs on the University of Minnesota Extension website.
Fall-Flowering Bulbs (Summer/Early Autumn Planting):
These include colchicum (autumn crocus) and some specific types of cyclamen. They are usually planted in late summer or very early autumn to provide blooms in fall. Their growing cycle often mirrors spring-flowering bulbs, but their bloom time is delayed.
Understanding these distinctions is key to maximizing your garden’s floral output throughout the year. For a continuous display, consider incorporating all three categories into your garden plan, always adhering to each type’s specific planting window to secure the best time to plant bulbs for every season.
Always check with your local garden center or agricultural extension office for the most precise planting times for your specific microclimate. Local conditions can vary greatly even within the same hardiness zone.
Expert Resources for Deeper Dive
To further enhance your knowledge and troubleshoot specific challenges, consider these reputable resources:
- Royal Horticultural Society (RHS): The RHS website provides comprehensive information on bulb care, specific varieties, and planting techniques, based on extensive horticultural research.
- Gardening Know How: An excellent resource for practical gardening advice, including specific guides on various bulb types and problem-solving tips. Explore their extensive library at Gardening Know How.
- Local University Extension Offices: These offices offer region-specific advice, soil testing services, and workshops tailored to your local climate and planting conditions. A quick search for “[Your State] Extension Office Gardening” will point you in the right direction. For example, the University of Minnesota Extension offers detailed guides.
- Specialized Bulb Catalogs and Online Retailers: Companies like Brent and Becky’s Bulbs or Colorblends often provide detailed cultural information for each variety they sell, alongside stunning imagery. These often contain advice on finding the best time to plant bulbs for their specific offerings.
- Our Own Garden Tips: Don’t forget to explore other articles on Nouvelles-Technologie.com for more garden tips, including pest and disease prevention, to keep your entire garden healthy. We also have articles on vegetable garden layout ideas to complement your beautiful bulb displays.
Conclusion: Your Path to a Blossoming Spring
Mastering the best time to plant bulbs is not merely a technical skill; it’s an act of faith and patience. It’s about working in harmony with nature’s cycles, understanding the hidden life within each dormant bulb, and providing the optimal conditions for it to flourish. When done correctly, your efforts in autumn will be richly rewarded with a dazzling display of color, fragrance, and life when spring awakens.
Remember, gardening is a journey, not a destination. Each year brings new lessons, new delights, and occasional challenges. By applying the principles outlined in this guide – choosing the right bulbs, preparing your soil meticulously, and above all, timing your planting perfectly – you are setting the stage for a spectacular show. So, grab your trowel, embrace the cooling autumn air, and plant the promise of spring. Your future self, and every passerby, will thank you for the vibrant beauty you’ve created.
Frequently Asked Questions About Bulb Planting
<p><strong>Q1: What happens if I plant bulbs too early?</strong></p>
<p>A1: Planting bulbs too early, when soil temperatures are still warm, can cause them to sprout prematurely. These tender young shoots are highly vulnerable to subsequent hard frosts, leading to damage or even death of the plant, and significantly reducing or eliminating spring blooms.</p>

<p><strong>Q2: Can I still plant bulbs if it's already November or December?</strong></p>
<p>A2: In many regions, yes, you can still plant bulbs in November or even early December, especially if the ground hasn't frozen solid. The key is to plant them before the ground becomes impenetrable. Late-planted bulbs might have slightly delayed blooms or a less vigorous display the first year, but they often recover and perform well in subsequent seasons. Look for "last chance" bulbs at garden centers, often at a discount.</p>

<p><strong>Q3: How do I know if my soil has good drainage?</strong></p>
<p>A3: To test your soil drainage, dig a hole about 12 inches deep and 12 inches wide. Fill it with water and let it drain. Once it's empty, fill it again. If the second filling drains within 1-2 hours, you have good drainage. If it takes much longer, your soil is likely heavy clay and will benefit from significant amendments like compost and grit to improve drainage.</p>

<p><strong>Q4: Do all bulbs require a chilling period?</strong></p>
<p>A4: No, not all bulbs require a chilling period. Spring-flowering bulbs (like tulips, daffodils, hyacinths) require a cold period to develop flower buds. Summer-flowering bulbs (like dahlias, gladiolus) are planted in spring and do not need a chilling period; they are often sensitive to frost. Always check the specific requirements for the bulb type you are planting.</p>


