10 Ultimate Zero-Waste Seed Starting Hacks You Need Now
Ditch the plastic cell trays and expensive peat pots! Embark on a rewarding journey of zero-waste seed starting, transforming everyday household “waste” into thriving nurseries for your beloved plants. Not only will you save money, but you’ll also reduce your environmental footprint, nurturing a more sustainable garden from the very first sprout. This comprehensive guide will equip you with the knowledge and inspiration to cultivate a bountiful harvest using what you already have.
[lwptoc]
Why Zero-Waste Seed Starting Matters for Your Garden (and the Planet)
The allure of glossy seed catalogs and neatly packaged seed-starting kits is undeniable, but their environmental cost is often overlooked. Plastic cell trays, while convenient, contribute to landfills and microplastic pollution, taking hundreds of years to decompose. Peat, a common ingredient in many seed-starting mixes and pots, is harvested from delicate peatlands, vital ecosystems that store vast amounts of carbon and support unique biodiversity, leading to significant environmental degradation.
Embracing zero-waste seed starting is a powerful statement of environmental stewardship. By repurposing items that would otherwise be discarded, you directly divert waste from landfills, reducing your household’s ecological impact. This approach fosters a deeper connection with your garden, as you witness the magic of life emerging from humble, repurposed vessels.
Beyond the environmental benefits, zero-waste seed starting offers significant financial advantages. Think about the cumulative cost of buying new seed-starting supplies year after year. By utilizing materials readily available in your home, you eliminate these recurring expenses, freeing up your gardening budget for other essentials, like quality seeds or organic soil amendments. It truly makes gardening more accessible and affordable for everyone.
Furthermore, this method encourages resourcefulness and creativity. You’ll develop a keen eye for potential seed-starting containers in your everyday life, transforming mundane items into invaluable tools for your gardening passion. This ingenuity can spill over into other areas of your life, promoting a more mindful and sustainable lifestyle overall.
What You Need: Essential Tools, Materials, and Plant Choices
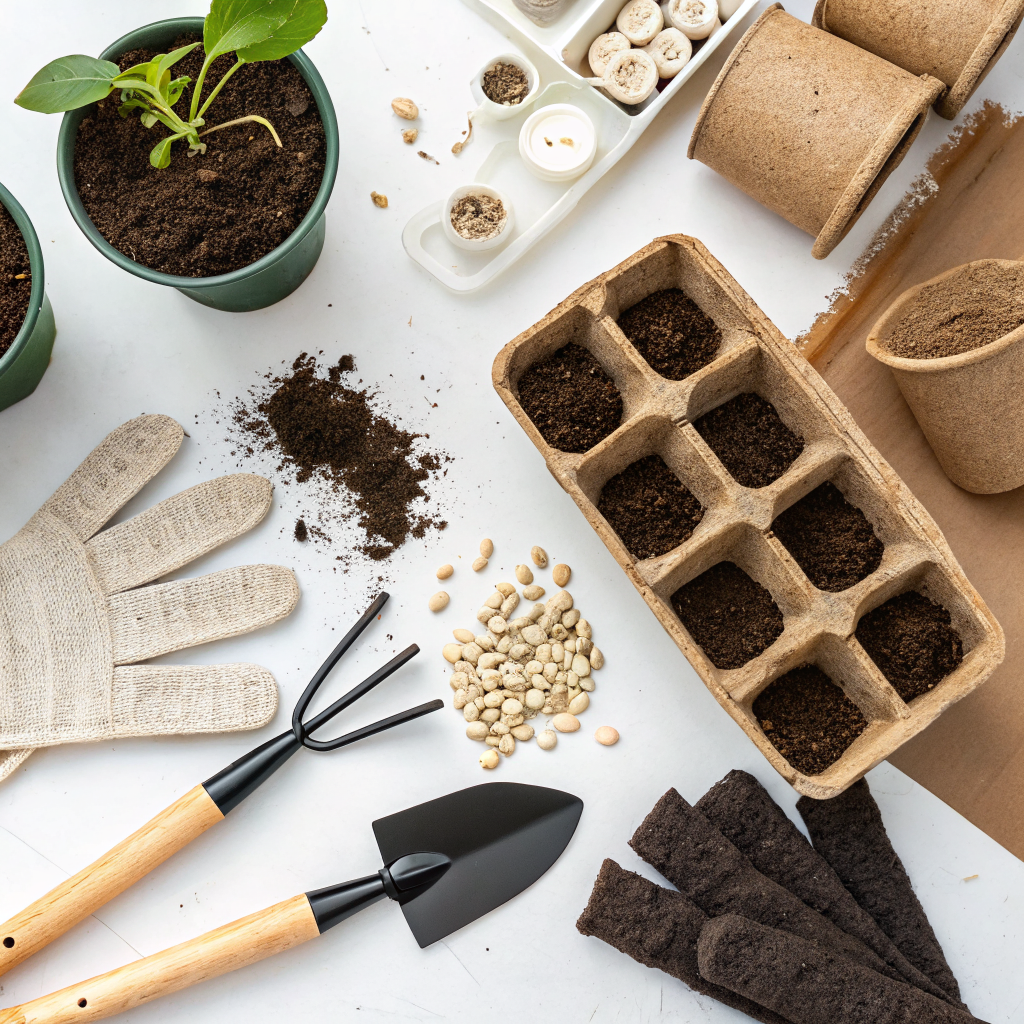
One of the beauties of zero-waste seed starting is the minimal need for specialized tools. Most of what you require can be found around your home. The key is to think creatively and view everyday items with a gardener’s eye.
Essential Tools:
- Scissors or Craft Knife: For cutting and shaping your repurposed containers.
- Spoon or Small Trowel: For filling containers with soil and germinating seeds.
- Watering Can with Fine Rose Sprinkler or Spray Bottle: Gentle watering is crucial for delicate seedlings.
- Labels (repurposed or homemade): Essential for remembering what you planted where. Craft sticks, cut-up plastic containers, or even stone pieces can serve as excellent labels.
- Trays or Waterproof Surfaces: To catch excess water and keep your seed-starting area tidy. Old baking trays, plastic take-out containers, or even an old towel can work.
Zero-Waste Materials (Your Upcycled Treasures):
- Toilet Paper Rolls and Paper Towel Rolls: Excellent for deeper tap-rooted plants like peas and beans, as they can be planted directly into the ground.
- Newspaper: Easily folded into biodegradable pots. Look for black and white print to avoid potential ink toxins, though most modern soy-based inks are considered safe.
- Egg Cartons (Cardboard): Individual cells are perfect for smaller seeds. Punch drainage holes in the bottom.
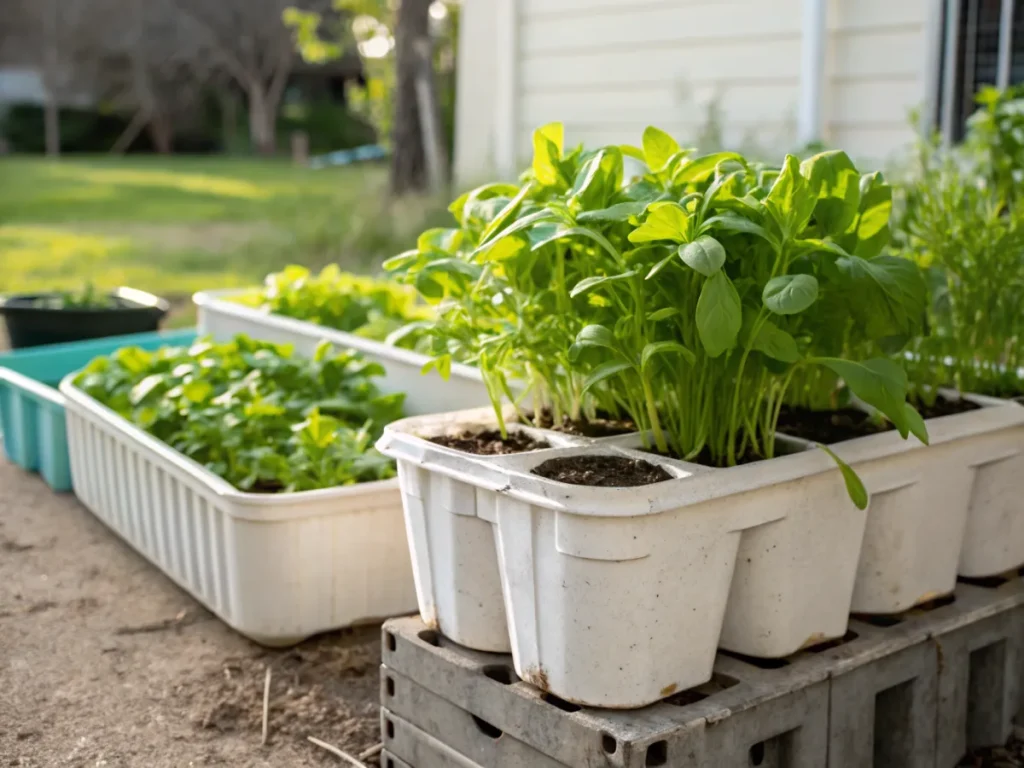
- Plastic Clamshell Containers (from berries, salads): Wash them thoroughly. The clear lids create a mini-greenhouse effect, perfect for retaining moisture and warmth. Just remember to vent them once seedlings emerge.
- Yogurt Cups, Cottage Cheese Containers, Plastic Drink Bottles (cut appropriately): Wash well and ensure adequate drainage holes are poked in the bottom.
- Tin Cans (from soup, vegetables): Clean thoroughly and ideally, sand down any sharp edges. Punch drainage holes. These are more durable, but remember they don’t break down so the seedling will need to be transplanted carefully.
- Old Food Packaging (cereal boxes, milk cartons – plastic or paper): Cut and shaped, these can serve as larger seed trays or individual pots. Always ensure drainage.
- Homemade Potting Mix: While not “waste,” creating your own potting mix from compost, coir (a sustainable alternative to peat), and perlite (or sand/grit for drainage) further reduces your footprint.
Good Candidates for Zero-Waste Seed Starting:
Practically any seed can be started this way, but some thrive particularly well. Consider plants that benefit from an early start or those you intend to transplant directly with the biodegradable container.
- Tomatoes and Peppers: Classic choices that love an early start indoors.
- Herbs: Basil, parsley, dill, cilantro – all do well indoors before hardening off.
- Lettuce and Spinach: Can be started in successive batches for a continuous harvest.
- Cucumbers and Squash: These fast-growing plants appreciate bottomless toilet roll pots for easy transplanting.
- Flowers: Marigolds, zinnias, cosmos, sweet peas – many annuals benefit from an indoor head start.
- Beans and Peas: Their deeper root systems are well-accommodated by toilet paper roll pots.
Step-by-Step Guide: Crafting Your Zero-Waste Seed Starting System
Let’s dive into the practical steps of transforming your household discards into productive seedling homes. Remember, patience and proper care are your best allies.
Step 1: Gather and Prepare Your Repurposed Containers
The first and most crucial step is collecting your preferred containers. Wash all plastic or metal items thoroughly to remove any food residue and prevent mold growth. For cardboard and paper items, inspecting for any signs of mold or contamination is important. Once clean, ensure every single container, regardless of material, has adequate drainage holes at the bottom. This prevents waterlogging, which is a common killer of young seedlings. Use scissors, a craft knife, or even a sturdy pen to poke several holes.
Step 2: Crafting Specific Containers (Detailed Examples)
- Toilet Paper Roll Pots: Cut four 1-inch long slits evenly spaced around one end of the roll. Fold these flaps inward to create a bottom. Alternatively, for tap-rooted plants, you can leave the bottom open for direct planting. Stand them upright in a waterproof tray for stability.
- Newspaper Pots: Various methods exist. One popular way involves wrapping newspaper around a cylindrical object (like a can or small bottle), folding the bottom to create a base, and securing it. The finished pot should be approximately 3-4 inches tall. There are also specific newspaper pot makers you can purchase, but a DIY approach works just as well. Secure with masking tape if needed, though they often hold their shape with just folding.
- Egg Cartons (Cardboard): Simply poke a good-sized hole in the bottom of each cell. The lid can serve as a humidity dome if you punch a few air holes.
- Plastic Clamshells: These are amazing. Just poke drainage holes in the bottom of the container. The clear lid naturally creates a miniature greenhouse, trapping warmth and moisture. Remember to prop the lid open or remove it once seeds sprout to prevent damping off.
Step 3: Fill with Quality Seed-Starting Mix
Once your containers are ready, fill them with a high-quality, sterile seed-starting mix. Avoid using garden soil, as it can be too heavy, contain weed seeds, and introduce diseases. A good seed-starting mix is light, airy, and drains well, providing the perfect environment for tiny roots to establish. Fill containers to about 1/2 inch from the top, gently tamping down the soil to remove large air pockets. A sterile mix is crucial to prevent “damping off,” a fungal disease that can quickly kill young seedlings.
Step 4: Sow Your Seeds with Care
Refer to your seed packets for specific planting depth and spacing instructions. As a general rule, plant seeds at a depth roughly two to three times their diameter. Smaller seeds can be scattered thinly on the surface and lightly covered with a fine layer of soil. For larger seeds, create a small indentation with your finger or a pencil, place the seed, and cover gently. Don’t overcrowd your containers; it’s better to plant fewer seeds per pot to ensure ample space for development.
Step 5: Water, Label, and Provide Optimal Conditions
After sowing, water your seeds gently. A spray bottle or a watering can with a fine rose attachment is ideal to avoid dislodging small seeds. Ensure the soil is consistently moist but not waterlogged. Label each container immediately with the plant type and sowing date – you’ll be surprised how quickly you forget! Place your containers in a warm location, ideally between 65-75°F (18-24°C), and ensure they receive sufficient light. A south-facing window can work, but supplemental grow lights will give you much stronger, healthier seedlings. Consider covering your containers with plastic wrap or the lid of a clamshell to maintain humidity, removing it once germination occurs.
Pro Tips and Common Mistakes to Avoid
Success with zero-waste seed starting, like any gardening endeavor, benefits from a few seasoned tips and an awareness of potential pitfalls.
Pro Tips for Thriving Seedlings:
- Bottom Watering: To encourage strong root development and prevent damping off, place your seed trays in a larger tray filled with about an inch of water. The soil will absorb water from the bottom up. Remove the tray of water once the soil surface is moist.
- Air Circulation: Once seedlings emerge, good air circulation is vital. A small fan set on a low setting helps strengthen stems and prevents fungal diseases like damping off.
- “Hardening Off”: Before transplanting your seedlings outdoors, they need to gradually acclimate to the harsher outdoor conditions (wind, direct sun, temperature fluctuations). This process, called hardening off, involves taking them outside for increasingly longer periods over 7-10 days. Learn more about hardening off seedlings here.
- Fertilize Sparingly: Most seed-starting mixes contain enough nutrients for the first few weeks. If your seedlings look pale, a very dilute solution (1/4 strength) of liquid organic fertilizer can be applied after they develop their first true leaves.
- Thinning: If you’ve sown multiple seeds per pot, thin them to the strongest seedling once they have their first set of true leaves. Snip the weaker seedlings at the soil line with scissors to avoid disturbing the roots of the keepers.
- Consider Coir: For a sustainable seed starting medium, consider using coir (coconut fiber) instead of peat. It’s a renewable resource, holds water well, and is naturally pH neutral. You can find more information on sustainable gardening practices from The Royal Horticultural Society.
Common Mistakes to Avoid:
- Overwatering: This is the number one killer of seedlings. Root rot and damping off thrive in waterlogged conditions. Always check the soil moisture before watering – it should feel slightly damp, not soggy.
- Insufficient Light: Seedlings will become “leggy” (tall, thin, and weak) if they don’t receive enough light. They stretch towards the light source, expending energy not on developing strong stems. If using natural light, rotate your trays regularly.
- Planting Too Deep/Shallow: Follow seed packet instructions. Too deep, and they might not emerge; too shallow, and they might dry out or be dislodged.
- Neglecting Drainage: As mentioned, without proper drainage, your seedlings are doomed. Double-check all improvised containers.
- Patience, or Lack Thereof: Germination takes time, sometimes weeks. Don’t give up too soon! Provide consistent conditions and be patient.
Eco-Friendly Variations and Enhancements
Taking your zero-waste seed starting to the next level involves incorporating other sustainable practices into your gardening routine. These variations not only benefit the environment but can also lead to healthier, more resilient plants.
- Compost Tea as Fertilizer: Instead of buying bottled fertilizers, brew your own nutrient-rich compost tea. It’s a natural, gentle way to feed your seedlings and support beneficial soil microbes. Simply steep finished compost in water for a day or two, then dilute before using. For a deeper dive into composting, check out our guide on sustainable composting methods.
- Seed Saving: The ultimate zero-waste practice! Learn to save seeds from your own healthy plants at the end of the season. This closes the loop, saves money, and allows you to preserve varieties perfectly suited to your local climate.
- Leaf Mold for Seed Starting Mix: Gather fallen leaves in autumn, let them decompose over a year or two, and you’ll have beautiful, rich leaf mold. This acts as a superb soil conditioner and can be incorporated into your homemade seed-starting mix. It improves drainage, aeration, and water retention.
- Worm Castings: Integrate worm castings (vermicompost) into your seed-starting mix. They are packed with beneficial microbes and nutrients, giving your seedlings a powerful, organic boost. If you’re interested in setting up your own vermicompost system, we have a helpful article on DIY worm farms for beginners.
- Rainwater Harvesting: Collect rainwater to water your seedlings. It’s free, pH-neutral, and free of the chlorine and other chemicals often found in tap water. A simple rain barrel connected to a downspout is a great start.
- Biodegradable Labels: Instead of plastic labels, use painted stones, popsicle sticks, cut-up yogurt lids (using a permanent marker), or even slivers of wood as plant markers.
- Upcycled Grow Lights: If you’re handy, repurpose old fluorescent lighting fixtures. You can easily replace the bulbs with efficient grow light tubes, saving money and diverting waste. For optimal plant growth with these or other lighting solutions, understanding how to optimize plant growth with LED technology can be incredibly beneficial.
Seasonal Considerations for Zero-Waste Seed Starting
Timing is everything in gardening, and zero-waste seed starting is no exception. Understanding your region’s climate and the specific needs of your chosen plants will greatly enhance your success.
- Winter Sowing (Zone Dependent): For colder climates (Zones 3-7), winter sowing is an incredible zero-waste technique. You sow seeds in repurposed translucent containers (milk jugs, clear plastic bins) and leave them outdoors to stratify naturally. The snow and cold break dormancy, and seeds germinate when conditions are just right. This mimics nature’s process and produces incredibly hardy seedlings.
- Spring Ahead: For most annuals and vegetables, aim to start seeds indoors 6-8 weeks before your last anticipated frost date. This gives them enough time to develop into sturdy plants ready for transplanting. Use your zero-waste containers to get a head start.
- Succession Planting: Don’t sow all your seeds at once! For crops like lettuce, radishes, and bush beans, sow small batches every 2-3 weeks. This provides a continuous harvest throughout the growing season, preventing gluts and ensuring you always have fresh produce. Your repurposed containers are perfect for these smaller batches.
- Summer Sowing: Many cool-season crops can be sown in late summer for a fall harvest. Think spinach, kale, and certain varieties of lettuce. Utilize your zero-waste methods to protect these young seedlings from intense summer sun during their initial growth stages.
- Seed Storage: Protect your valuable seeds! Store them in cool, dry, dark conditions. Repurpose small glass jars, airtight tins, or even old film canisters for long-term seed storage. Always label them clearly with the plant type and the year collected or purchased.
Expert Resources for Your Gardening Journey
Even with the best intentions and clever hacks, gardening often involves continuous learning. Here are some trusted external resources to deepen your knowledge and troubleshoot any issues that arise as you embrace your zero-waste gardening lifestyle:
- Gardening Know How: A fantastic resource for a wide variety of gardening questions, from beginner tips to advanced troubleshooting. Many articles cover organic gardening and sustainable practices. Their website is invaluable.
- The Royal Horticultural Society (RHS): For those in the UK and beyond, the RHS offers a wealth of research-backed horticultural advice. Their plant profiles and guides on eco-friendly gardening are exceptional. Visit the RHS website for expert guidance.
- University Extension Offices: Many universities across the US have brilliant agricultural extension programs that provide region-specific gardening advice, often free of charge. These resources are tailored to your local climate and soil conditions. For instance, the University of Minnesota Extension offers extensive gardening information. Search for your local university’s extension program online.
Conclusion: Cultivating a Greener Garden, One Sprout at a Time
Embracing zero-waste seed starting is more than just a clever gardening hack; it’s a mindful approach to nurturing life and respecting our planet. By repurposing common household items, you not only save money and reduce waste but also foster a deeper connection with your garden. Each toilet paper roll pot, newspaper seedling, and egg carton nursery contributes to a more sustainable and resilient food system.
The satisfaction of seeing robust seedlings emerge from something you would have otherwise discarded is incredibly rewarding. It’s a testament to ingenuity, resourcefulness, and the power of simple, eco-conscious choices. As you continue your gardening journey, remember that every small step towards sustainability makes a significant difference.
So, gather your “waste,” get your hands dirty, and watch as your zero-waste seedlings flourish, bringing beauty and bounty to your garden for seasons to come. Happy planting!
FAQ: Zero-Waste Seed Starting
Q1: Are the inks on newspaper safe for seedlings?
Most modern newspapers use soy-based inks, which are generally considered safe for gardening. However, it’s best to stick to black and white print and avoid glossy inserts or colored pages, as these often contain heavier metallic inks that could be harmful to young plants.
Q2: How long do toilet paper roll pots last before breaking down?
Toilet paper roll pots typically hold their shape well enough for the 6-8 weeks most seedlings need before transplanting. Once planted in the ground, they begin to decompose relatively quickly, usually within a few weeks, allowing the roots to grow freely into the surrounding soil.
Q3: Can I use soil from my garden instead of seed-starting mix?
It’s generally not recommended to use garden soil directly for seed starting. Garden soil can be too heavy, lack proper drainage and aeration, and may contain weed seeds, pests, or disease pathogens that can harm delicate seedlings. A sterile, light seed-starting mix provides the best environment for germination and early growth.
Q4: How do I store leftover seeds from my packets?
To maximize seed viability, store leftover seeds in a cool, dark, and dry place. An airtight container or sealed plastic bag placed in the refrigerator or freezer is ideal for many types of seeds. Always label packets with the plant type and the date collected or purchased to keep track of their age.


