The Ultimate 7-Step Guide to Keyhole Permaculture Garden Design
Are you an urban dweller yearning for a productive garden but limited by space? Do you dream of growing your own food in a sustainable, low-maintenance way? Look no further! The keyhole permaculture garden is a revolutionary design that maximizes yield in a minimal footprint, making it the most space-efficient garden solution for productive urban food growing. This comprehensive guide will walk you through every aspect of keyhole permaculture garden design, transforming your small patch into a thriving oasis.
[lwptoc]
Why This Matters for Your Garden: Unlocking Urban Abundance
The concept of keyhole gardens originated in Africa as a resilient response to challenging growing conditions, offering a practical solution for year-round food production with minimal water. Translating this ingenious design to urban environments provides a powerful tool for food security and sustainable living. Imagine fresh herbs, crisp greens, and vibrant vegetables harvested just steps from your back door, even in the smallest of spaces.
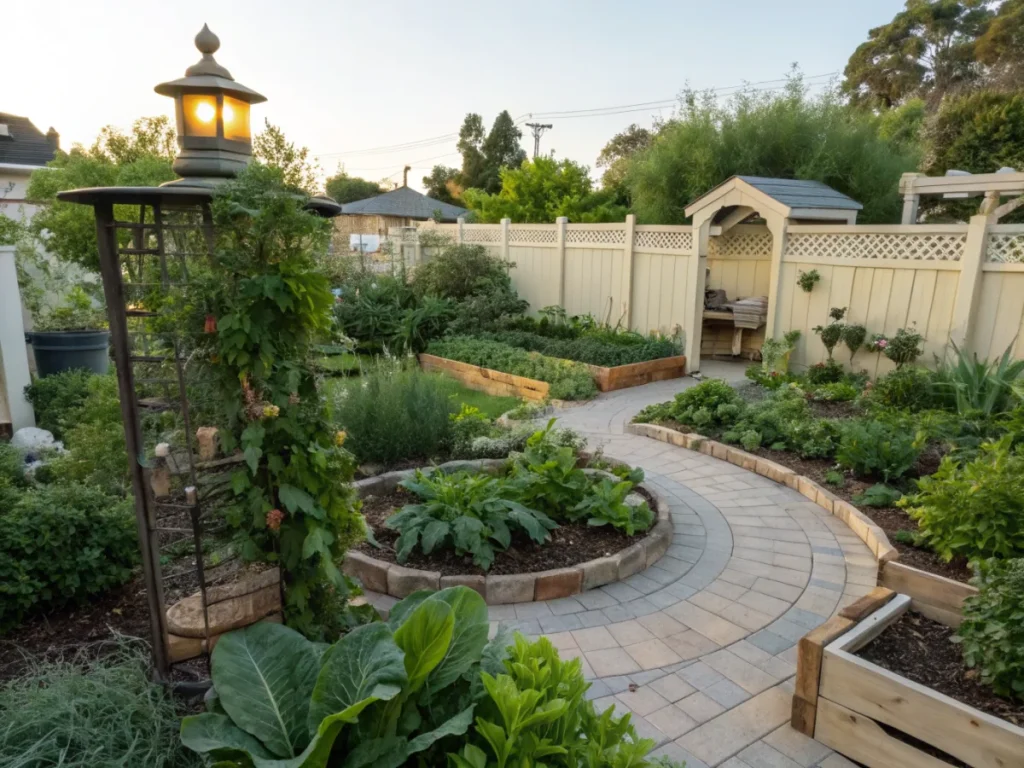
A keyhole permaculture garden is not just a garden; it’s a micro-ecosystem designed for efficiency. Its circular shape, central compost basket, and elevated beds foster an incredible synergy that promotes soil health, conserves water, and reduces the need for constant intervention. This design truly embodies permaculture principles by working with nature, rather than against it.
Beyond its practical benefits, a keyhole garden offers a profound connection to the food you eat and the earth that sustains it. It’s a living classroom, inspiring curiosity about ecological processes and fostering a sense of accomplishment. For urban gardeners facing concrete jungles and limited plots, the keyhole design is a beacon of hope, proving that abundant, nutritious food can be grown anywhere.
What You Need: Tools, Materials, and Plant Power
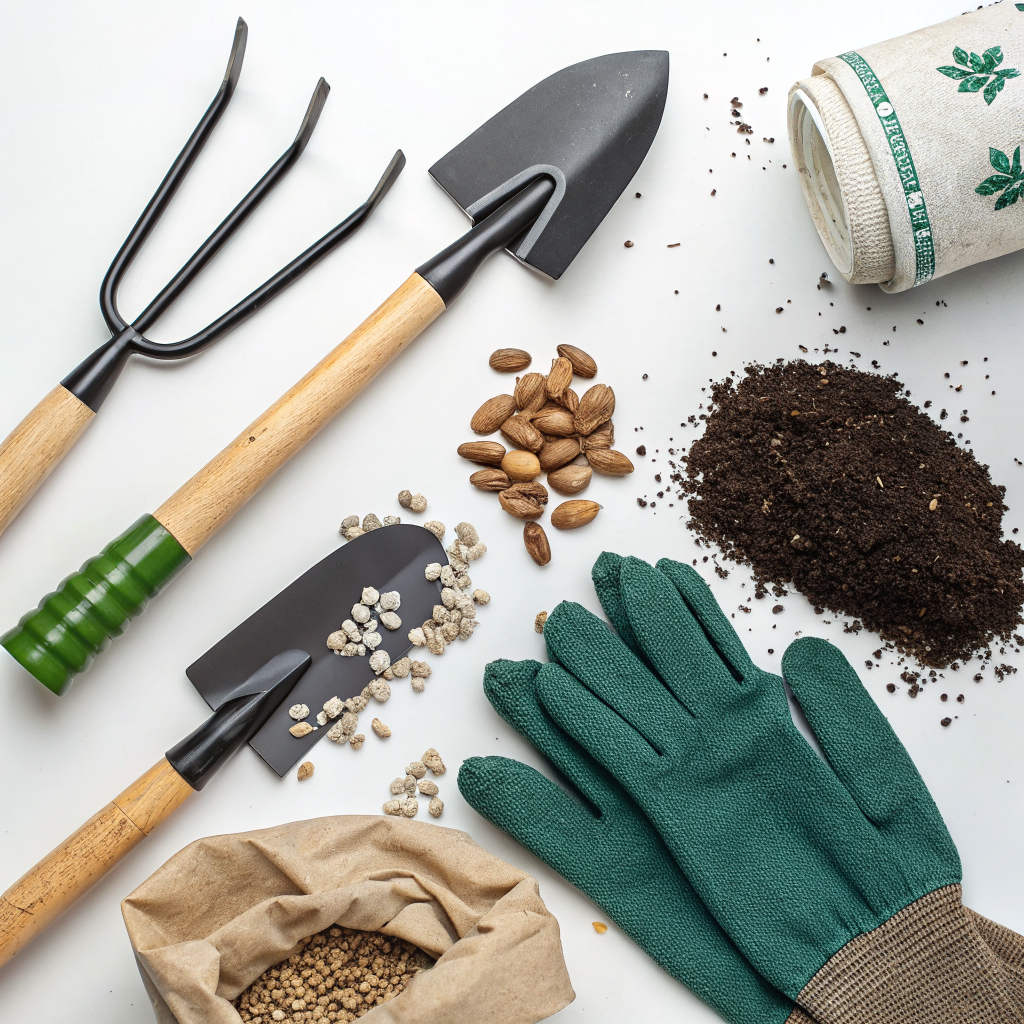
Before you begin digging, it’s essential to gather your resources. A well-planned approach will save you time, effort, and potential frustration. The beauty of a keyhole garden is its adaptability, meaning you can often utilize repurposed and readily available materials.
Essential Tools:
- Shovel and Trowel: For digging, moving soil, and planting.
- Measuring Tape and Stakes: For accurate layout of your garden’s footprint.
- Wheelbarrow or Buckets: For transporting soil, compost, and other materials.
- Wire Cutters and Pliers: If constructing a wire compost basket.
- Level: To ensure your garden walls are even.
- Gloves: To protect your hands during construction and planting.
Key Materials:
- Edging Material: This forms the walls of your keyhole garden. Options include:
- Stone or Bricks: Durable, aesthetically pleasing, and excellent for thermal mass.
- Logs or Wood Planks: Natural look, but ensure they are untreated to avoid chemical leaching.
- Recycled Plastic/Rubber Edging: Long-lasting and eco-conscious.
- Galvanized Metal Sheeting: Modern and durable, but can get hot in direct sun.
- Compost Basket Material: This is a crucial element.
- Woven Willow or Branches: Traditional and natural.
- Hardware Cloth or Chicken Wire: Durable and provides good aeration.
- Perforated Plastic Pipe: Simple and effective for smaller keyholes.
- Cardboard or Newspaper: For the base layer to suppress weeds.
- Organic Matter Layers:
- Twigs, Small Branches, Wood Chips (Hugelkultur style): Base layer for drainage and long-term nutrient release.
- Straw, Hay, Dried Leaves: Nitrogen-rich components for initial decomposition.
- Compost (finished or unfinished): Critical for nutrient content and microbial activity.
- Topsoil: High-quality, loamy soil for planting.
- Mulch: Straw, wood chips, shredded leaves to conserve moisture and regulate soil temperature.
- Water Source: Proximity to a hose or rain barrel is ideal.
Plant Power: What to Grow
The beauty of a keyhole design is its versatility. Focus on plants that thrive in nutrient-rich soil and benefit from consistent moisture. Consider companion planting to further enhance your garden’s productivity and resilience.
- Leafy Greens: Lettuce, spinach, kale, Swiss chard, arugula – thrive in the consistent moisture.
- Herbs: Basil, mint (in a contained pot!), parsley, cilantro, thyme, oregano – love the rich soil.
- Root Vegetables: Carrots, radishes, beets (ensure your soil depth accommodates them).
- Bush Beans and Peas: Can be trained to grow up the sides.
- Strawberries: Excellent ground cover and perimeter plant.
- Small Fruiting Plants: Some dwarf tomato varieties or peppers can work well.
- Edible Flowers: Nasturtiums, marigolds (also pest deterrents).
For more plant ideas, browse our permaculture plant resources on this site.
Step-by-Step Guide: Building Your Keyhole Garden Oasis
Creating a keyhole permaculture garden is a rewarding DIY project that doesn’t require advanced skills. Follow these steps carefully, and you’ll soon have a flourishing, productive garden.
Step 1: Choose Your Site and Mark the Layout (2-3 hours)
Location, Location, Location: Select a sunny spot that receives at least 6-8 hours of direct sunlight per day. Consider proximity to your kitchen for convenience and to a water source. Ensure good drainage; avoid areas prone to waterlogging.
Size Matters: A typical keyhole garden ranges from 6 to 10 feet in diameter. For a beginner, a 6-foot diameter is manageable. Use a rope and stake to draw a perfect circle. Mark the “keyhole” entrance, which should be about 1.5 to 2 feet wide, leading to the center. Mark the center point for your compost basket, approximately 1 foot in diameter.
Level the Ground: While perfect leveling isn’t critical, try to make the base reasonably even. This will make building the walls much easier and more stable. Remove any large rocks or debris.
Step 2: Construct the Walls of Your Garden (4-8 hours)
Building Up: Begin constructing the circular walls of your keyhole garden using your chosen material (stones, bricks, wood). The walls should ideally be 2.5 to 3 feet high on the outside edge, gradually sloping down to about 1 foot high at the keyhole entrance. This height allows for comfortable working and keeps critters out.
Stability is Key: Dry stacking stones or bricks works well, but for added stability, especially with heavier materials, consider using a mortar. If using wood, secure planks with screws or stakes. Leave a gap for the keyhole entrance.
Central Compost Basket: Construct your compost basket in the center, ensuring it’s robust and well-ventilated. If using hardware cloth, form it into a cylinder and secure the edges. This cylinder should stand about 2-3 feet tall.
Step 3: Lay the Foundation and “Lasagna” Layers (4-6 hours)
Weed Barrier: Line the entire base of your garden (inside the walls, around the compost basket) with cardboard or several layers of newspaper. This smothers existing weeds and will eventually break down, adding organic matter.
Hugelkultur Base (Optional but Recommended): For the lowest layers, consider logs, twigs, and wood chips. This “hugelkultur” approach creates a long-lasting sponge that holds moisture and slowly releases nutrients as it decomposes. Place larger woody material at the bottom, graduating to smaller pieces.
Layering for Fertility: This is where the magic happens! Follow a “green” (nitrogen-rich) and “brown” (carbon-rich) layering approach, similar to composting.
- Brown Layer: Straw, dried leaves, uncomposted wood chips (if not using hugelkultur base).
- Green Layer: Green garden waste, grass clippings (avoiding treated lawns), food scraps (avoid meat/dairy).
- Thin Layer of Soil or Compost: To introduce microbial activity.
Repeat these layers, gradually building up the volume. Moisten each layer as you go to encourage decomposition.
Step 4: Incorporate the Compost Basket and Fill (6-10 hours)
Integrating the Compost: Continue layering your organic materials, building them up around the central compost basket. The basket itself should be filled with kitchen scraps (fruits, vegetables, coffee grounds, tea bags), grass clippings, and other readily decomposable organic waste. This active compost system will continuously feed nutrients and moisture to your garden beds.
Top Layers for Planting: As you near the top of your walls, transition to finer materials. Add layers of finished compost mixed with high-quality topsoil. The final 6-12 inches should be a rich, loose growing medium, ready for planting. The beds should slope gently downwards from the compost basket to the outer edge, allowing nutrients and water to seep outwards.
Watering In: Thoroughly water the entire garden bed after filling. This helps settle the layers and kickstarts the decomposition process. You may notice the bed settling over the next few days, so have some extra compost or soil on hand for topping up.
Step 5: Planting Your Keyhole Garden (2-4 hours)
Strategic Placement: Place plants that require more moisture closer to the compost basket. Plants that prefer slightly drier conditions can be placed towards the outer edges. Consider sun exposure for each section of the circle. Taller plants can go towards the back, shorter ones at the front (near the keyhole entrance).
Diversity is Key: Plant a variety of crops to mimic natural ecosystems and promote pest resistance. Think about companion planting principles – for example, marigolds deter nematodes, and basil can improve tomato flavor.
Initial Watering: Water your newly planted seedlings or seeds gently but thoroughly. Maintain consistent moisture, especially during establishment. Explore efficient garden irrigation options on our site for long-term solutions.
Step 6: Mulching and Ongoing Maintenance (Ongoing)
The Power of Mulch: Apply a generous layer of organic mulch (straw, wood chips, shredded leaves) over the entire surface of your garden beds, leaving a small space around plant stems. Mulch conserves moisture, suppresses weeds, regulates soil temperature, and slowly adds organic matter as it breaks down.
Feeding the Basket: Regularly add kitchen scraps and garden waste to your central compost basket. This is the heart of your keyhole garden’s fertility. Keep the basket contents moist to encourage decomposition.
Observing and Adjusting: Regularly observe your plants for signs of pests or diseases. Top up your garden beds with fresh compost as needed, especially if you notice significant settling. Rotate crops seasonally to maintain soil health.
Step 7: Harvest and Enjoy (Ongoing)
Continuous Harvest: Many of the plants suitable for keyhole gardens are “cut and come again” varieties, allowing for continuous harvesting. Enjoy your fresh produce, knowing you grew it yourself in a sustainable way!
Replenishment: As you harvest, consider what new plants can fill those spaces. The keyhole design encourages a continuous cycle of planting, growing, and harvesting.
Pro Tips and Common Mistakes
Even with a detailed guide, a few extra insights can make a big difference. Learn from common pitfalls and embrace best practices for a truly successful keyhole garden.
Pro Tips:
- Start Small: Don’t try to build the largest keyhole garden right away. A smaller, well-managed one will be more successful and less overwhelming. You can always build more later!
- Incorporate Worms: Introduce red wiggler composting worms into your central compost basket. They will dramatically speed up decomposition and enrich the compost with their castings.
- Utilize Rainwater: Position your keyhole garden to catch rainwater runoff or integrate it with a rain barrel system. Its design is perfect for water conservation.
- Consider Vertical Elements: For even more space savings, add trellises or small supports for climbing plants like beans, peas, or even miniature cucumbers around the outer edges.
- “Chop and Drop”: For any trimmings or spent plants, chop them up and drop them directly onto the garden bed as mulch or into the compost basket. This keeps nutrients in the system.
Common Mistakes to Avoid:
- Insufficient Sun: The biggest mistake! Most edible plants need ample sunlight. Don’t compromise on location.
- Not Enough Organic Matter: A keyhole garden thrives on decomposition. Skimping on layers of brown and green materials will result in less fertile soil.
- Over-Filling the Compost Basket with Inappropriate Materials: Avoid meat, dairy, oily foods, and diseased plants. Stick to fruit and veggie scraps, coffee grounds, and garden waste to prevent pests and foul odors.
- Neglecting Mulch: Skipping mulch leads to increased water evaporation, more weeds, and less stable soil temperatures. It’s a crucial component of success.
- Lack of Drainage: While the layers help, ensuring your initial site has reasonable drainage prevents waterlogging, which can drown roots and create anaerobic conditions.
- Ignoring Soil pH: While the composting action helps balance pH, it’s good practice to occasionally test your soil. Most vegetables prefer a slightly acidic to neutral pH (6.0-7.0).
Note: Don’t be afraid to experiment! Permaculture is about observation and adaptation. What works best in one garden might be slightly different in another. Keep a gardening journal to track your progress and learn from your experiences.
Eco-Friendly Variations: Beyond the Standard Keyhole
The keyhole design is inherently eco-friendly, but you can enhance its sustainability even further with a few thoughtful adaptations.
- Recycled Material Focus: Go beyond just the walls. Use old tires (check for leaching concerns specific to food crops), broken concrete pieces (upcycled from construction sites), or even woven branches for the compost basket.
- Worm Tower Integration: Instead of a simple wire basket for compost, build or buy a dedicated worm tower that sits in the center. This maximizes vermicomposting directly within your garden.
- Rainwater Harvesting Integration: Design your keyhole garden to be directly adjacent to a downspout from your house, directing rainwater into the center, or elevate a rain barrel nearby for gravity-fed watering.
- Biochar Inclusion: Add biochar to your soil layers. This highly porous carbon material enhances soil structure, water retention, and microbial life, offering long-term fertility.
- “Food Forest” Mimicry: While not a full food forest, you can mimic its layers within a keyhole. Plant a small dwarf fruit tree (if space allows) in the center, surrounded by taller vegetables, then ground covers/herbs.
- Native Plant Integration: Dedicate a small section of your outer keyhole edge to suitable native pollinator plants. This attracts beneficial insects, supporting your edible crops naturally.
Seasonal Considerations for Year-Round Production
Maximizing a keyhole garden’s potential means understanding and adapting to the seasons. The consistent moisture and nutrient supply make it an ideal environment for extended growing.
- Spring: The time for planting cool-season crops like lettuce, spinach, radishes, peas, and early carrots. As the weather warms, transition to transplants of tomatoes, peppers, and beans. Keep the compost basket well-fed to provide a boost.
- Summer: Focus on heat-loving plants like tomatoes, peppers, eggplant, squash, and corn (if your keyhole is large enough). Ensure the mulch layer is thick to combat evaporation. Water diligently, especially around the compost basket to keep it active. Consider partial shade for some plants in very hot climates.
- Fall: As temperatures drop, plant another round of cool-season crops for a late harvest. Kale, Swiss chard, broccoli, and later varieties of lettuce thrive. Start thinking about cover crops for any empty sections to protect and enrich the soil over winter. Continue adding to your compost basket.
- Winter: In milder climates, you can continue growing hardy greens like spinach, kale, and winter lettuce. Use row covers or mini hoop tunnels directly over your keyhole to extend the season. In colder climates, the garden may go dormant. Use this time to replenish the compost basket with all available organic matter, prepare soil for spring, and conduct any necessary repairs to your garden walls. The decomposition in the central basket will continue, albeit slowly, enriching the soil for the next season.
Expert Resources for Advanced Learning
To dive deeper into the world of keyhole gardens and permaculture, consult these authoritative resources:
- Gardening Know How: Keyhole Gardening Information – Provides an excellent overview and practical advice on establishing and maintaining keyhole gardens.
- Royal Horticultural Society (RHS): Composting Advice – Essential reading for understanding the principles of composting, which is the heart of a keyhole garden’s fertility.
- University of Minnesota Extension: Starting a Vegetable Garden – Offers comprehensive guides on various aspects of vegetable gardening, including soil health and plant selection, applicable to keyhole designs.
Conclusion: Your Key to Productive Urban Gardening
Designing a keyhole permaculture garden is an empowering step towards self-sufficiency and sustainable living. It’s an intelligent solution for urban spaces, offering high yields, water efficiency, and continuous fertility through its integrated composting system. By following these steps and embracing the principles of observation and adaptation, you can create a vibrant, productive garden that provides fresh, organic food for years to come.
Embrace the challenge, enjoy the process, and soon you’ll be harvesting the delicious fruits (and vegetables!) of your labor. Happy gardening!
Frequently Asked Questions About Keyhole Permaculture Gardens
<div class="faq-item">
    <h4>Q: How often do I need to add material to the central compost basket?</h4>
    <p>A: Ideally, you should add kitchen scraps and other suitable organic matter to the compost basket regularly, at least a few times a week. The more consistently you feed it, the more active and nutrient-rich the compost will be, continuously enriching your garden soil.</p>
</div>

<div class="faq-item">
    <h4>Q: Can I grow small trees or large bushes in a keyhole garden?</h4>
    <p>A: Generally, no. Keyhole gardens are best suited for annual vegetables, herbs, and smaller perennial edibles. The depth and width might not be sufficient for the root systems of larger trees or bushes, and they could overshadow other plants, impacting sunlight. Dwarf varieties of some fruiting plants might be an exception, positioned carefully.</p>
</div>

<div class="faq-item">
    <h4>Q: What's the best way to prevent pests in a keyhole permaculture garden?</h4>
    <p>A: The keyhole design itself promotes biodiversity, which is a natural pest deterrent. Focus on companion planting (e.g., marigolds, nasturtiums), attracting beneficial insects (e.g., with dill, cilantro flowers), and maintaining healthy soil to grow robust plants naturally resistant to pests. Regular observation helps catch issues early.</p>
</div>

<div class="faq-item">
    <h4>Q: How long does it take for a keyhole garden to become fully productive?</h4>
    <p>A: You can start planting immediately after construction. The initial layers will begin to break down, and you'll see productivity in weeks for fast-growing crops like lettuce and radishes. However, the garden's fertility and overall health will improve significantly over the first 6-12 months as the organic layers fully decompose and the soil food web establishes, leading to even more vigorous growth in subsequent seasons.</p>
</div>