
Introduction
Successfully applying leaf compost to prepare your garden for winter can increase soil organic matter by 1-2% in a single season, potentially boosting yields by up to 15% next spring without additional chemical fertilizers. Think of it as investing in your garden’s future, rather than just covering it up.
[lwptoc]
This guide will walk you through the practical, environmentally friendly, and cost-effective process of using leaf compost to ensure your garden thrives through the colder months and rebounds stronger than ever come spring. You'll learn how this simple act of recycling fallen leaves delivers measurable results, saving you money and effort while enriching your soil's vitality.
By following these steps, you’ll unlock the secret to healthier plants, improved soil structure, and a vibrant garden that stands the test of winter. Prepare to transform your autumn chores into a powerful act of garden renewal.
Quick Summary
- Benefits: Enriches soil, boosts plant vigor, suppresses weeds, conserves moisture.
- Time: Approximately 1-3 hours per 1,000 sq ft (93 m²) for application, plus composting time (2-6 months).
- Cost: Nearly free if using homemade compost; commercial leaf compost ranges from $25-$50 per cubic yard (0.76 m³).
Context & Ideal Conditions
The opportune moment for applying leaf compost to prepare your garden for winter is typically late fall, after your final harvest but before the ground freezes solid, usually from late October through November in Hardiness Zones 5-7. Aim for ambient temperatures between 40-55°F (4-13°C) for easiest spreading and to allow decomposition to begin subtly. Your garden beds can be in full sun or partial shade, as the primary benefit is soil amendment, not plant growth at this stage.
Leaf compost thrives in a slightly acidic to neutral soil pH, ideally between 6.0 and 7.0, which most garden soils fall into. It’s particularly beneficial for improving dense clay soils by adding structure and aeration, and for enhancing sandy soils by increasing water and nutrient retention. A minimum of 2-4 in (5-10 cm) depth across garden beds will offer substantial winter protection and spring benefits. Ensure the weather forecast is clear of heavy rain for at least 24 hours post-application to prevent runoff and allow the compost to settle into the soil.
applying, leaf, compost, prepare, garden: Tools & Materials
To effectively apply leaf compost and prepare your garden, you’ll need a few essential tools and materials. Collecting fallen leaves from deciduous trees provides the raw material. If you don’t have enough, local municipal services or neighbors often offer free shredded leaves.
- Leaf Compost: Approximately 1 cubic yard (0.76 m³) per 100 sq ft (9.3 m²) of garden bed for a 3-inch (7.6 cm) layer. Ensure it’s fully decomposed, dark brown, and crumbly with an earthy smell.
- Garden Fork or Shovel: A sturdy garden fork, preferably one with strong, slightly curved tines for turning compost, or a broad-head shovel for scooping and spreading.
- Wheelbarrow or Garden Cart: A heavy-duty wheelbarrow with a 6 cubic ft (170 L) capacity or greater, or a similarly sized garden cart, to transport the compost to your beds.
- Garden Rake: A bow rake or a leaf rake with strong tines, 24 in (61 cm) wide, for evenly spreading and leveling the compost.
- Tarp or Drop Cloth: A durable tarp, at least 8 ft x 10 ft (2.4 m x 3 m), to stage compost piles or gather leaves.
- Work Gloves: Heavy-duty gardening gloves made from leather or nitrile-coated fabric, meeting ANSI/ISEA 105-2016 Cut Level A1 for protection.
- Dust Mask (Optional): An N95 particulate respirator mask if working with very dry or dusty compost.
- Soil Testing Kit (Optional but Recommended): A basic soil pH testing kit, ranging from simple litmus paper to digital meters, to accurately assess your garden’s current pH and nutrient levels.
applying, leaf, compost, prepare, garden: Time, Difficulty & Budget
| Prep | 30–60 min (clearing beds, gathering tools) |
| Build/Plant | 60–180 min (spreading compost for a 500 sq ft garden) |
| Total | 90–240 min |
| Skill Level | Beginner |
| Budget | ≈ $0–$100 (materials/tools, assuming homemade compost or free leaves) |
Using homemade or freely sourced leaf compost makes this project virtually free, offering substantial savings. This method is approximately 75-100% cheaper than purchasing equivalent quantities of commercial topsoil and synthetic fertilizers, which can cost $200-$400 for a similar garden area.
Step-by-Step Tutorial
Step 1 — Layout & Prep
Begin by clearing your garden beds of any lingering summer annuals, weeds, and significant debris. If you have any perennial plants, cut back their spent foliage to roughly 4-6 inches (10-15 cm) above the ground. Use a garden fork to gently loosen the top 2-3 inches (5-8 cm) of soil; this improves aeration and helps integrate the compost. For larger beds, mark out sections roughly 10 ft x 10 ft (3 m x 3 m) to help manage compost distribution evenly. Take note of any existing low spots, as these areas will especially benefit from compost to improve drainage and nutrient levels.
Step 2 — Gathering and Preparing Leaf Compost
If you’re using your own homemade leaf compost, check its readiness. It should be dark, crumbly, and have an earthy smell, indicating full decomposition. Avoid using leaves that are still primarily whole and crunchy, as these are better suited for fresh composting or as a coarser mulch layer rather than a soil amendment. For those collecting leaves, shredding them with a leaf shredder or a lawnmower attachment significantly speeds up decomposition and allows for easier spreading. A well-shredded leaf compost layer, ideally with pieces no larger than 0.5 inches (1.3 cm), will break down faster and integrate better into the soil.
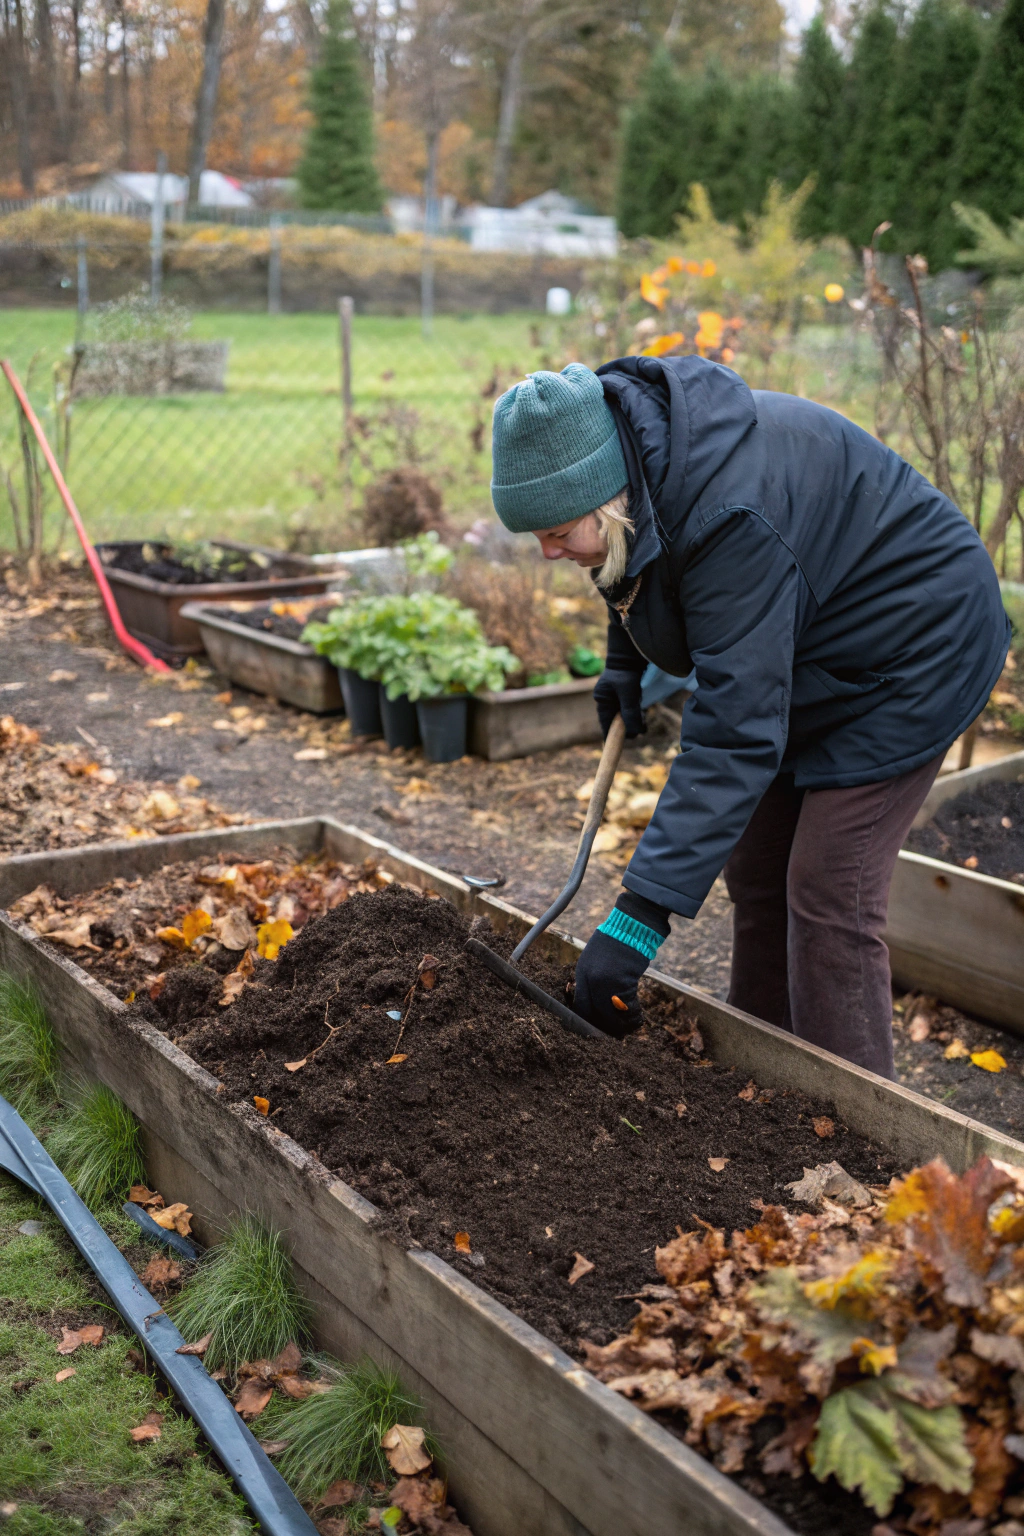
Step 3 — Installation/Planting (Applying the Compost)
Begin applying the leaf compost evenly across your prepared garden beds. Aim for a layer that is 2-4 inches (5-10 cm) deep. Use your wheelbarrow or garden cart to transport the compost and deposit small piles throughout the bed. Then, with your garden rake, spread these piles smoothly, ensuring consistent coverage. For example, a 10 ft (3 m) x 10 ft (3 m) bed would require roughly 10 cubic ft (280 L) of compost for a 1 foot deep layer or about 1 cubic yard (760 L) for the 3-inch (7.6 cm) recommended depth. Gently work the top inch (2.5 cm) of applied compost into the uppermost layer of your existing soil using the rake or a hand cultivator. This mixing initiates the integration process and prevents the compost from blowing away.
Step 4 — Finishing & Quality Assurance
After applying the leaf compost, rake the surface one final time to create a uniform, aesthetically pleasing layer. Ensure no large clumps or uneven patches remain. Walk gently across the garden beds to lightly compact the compost, helping it settle and making contact with the underlying soil. This also helps with moisture retention and suppresses overwintering weeds. Inspect for any areas where the compost might be too thin or uneven, adding more as needed to maintain the desired 2-4 inch (5-10 cm) depth. This finishing step not only prepares your garden visually but also maximizes the effectiveness of your winterizing effort.
Care & Schedule
Once applying leaf compost to prepare your garden for winter is complete, ongoing care during the cold months is minimal but important.
- Watering: In most climates, winter precipitation (rain or snow) will provide sufficient moisture. However, if you experience unusually dry periods without snow cover for more than two weeks, lightly water the composted beds with approximately 1-2 gallons (3.8-7.6 L) per 10 sq ft (0.9 m²), especially if your region is prone to winter drought.
- Fertilization: No additional fertilization is needed during winter. The leaf compost itself slowly releases nutrients as it continues to decompose, providing a steady, natural food source for soil microorganisms and future plant growth.
- Mulch Top-ups: If severe winds cause some compost to blow away, or if you notice significant compaction, you can add a light top-up of 0.5-1 inch (1.3-2.5 cm) in late winter/early spring.
- Weed Checks: While compost helps suppress weeds, occasionally an ambitious winter annual might sprout. Pull these by hand if they appear.
Monthly Winter Garden Care Schedule (Hardiness Zone 6)

| Month    | Task                                                                | Notes                                                            |
|----------|---------------------------------------------------------------------|------------------------------------------------------------------|
| November | Apply leaf compost, clear debris, cut back perennials.              | Ensure 2-4 inch (5-10 cm) layer.                                 |
| December | Monitor snow cover; light watering if prolonged dry spell.          | Avoid disturbing settled compost.                                |
| January  | Check for wind erosion; reapply compost to sparse areas if needed.  | Minimal activity.                                                |
| February | Plan spring plantings; assess compost layer for spring integration. | Prepare for warmer weather.                                      |
Variations & Adaptations
Applying leaf compost can be adapted for nearly any garden size or climate. For gardeners with small spaces or balconies, container gardening benefits immensely from a top-dressing of leaf compost. Use 1-2 inches (2.5-5 cm) of compost on top of potting mix in containers during late fall; this insulates roots and adds slow-release nutrients.
In hot climates (USDA Zone 9+), winter often presents a less dormant period. Here, leaf compost can be applied in early fall to help retain soil moisture and keep soil temperatures cooler during warm spells, in addition to its nutrient benefits. In very cold climates (USDA Zone 4 or colder), a thicker layer of 4-6 inches (10-15 cm) might be beneficial for added insulation for borderline hardy perennials.
If you don't have enough leaves for traditional compost, consider buying bagged leaf mold from a gardening center or a local soil supplier. For aesthetic reasons, if the dark compost isn't visually appealing over winter, a thin layer of decorative mulch (pine needles, wood chips) can be placed on top of the compost layer. A knock-down version of this approach involves simply raking fallen leaves directly onto garden beds without composting them first, allowing them to break down naturally over winter (though this can invite pests if not managed).
Common Mistakes to Avoid
Avoiding these common pitfalls when applying leaf compost will ensure maximum benefit for your garden.
- Applying Undecomposed Leaves: Using fresh, unshredded leaves directly as a top-dressing can create a matted layer that blocks air and water, and can also tie up nitrogen in the soil as they decompose, starving plants. Always use fully decomposed leaf compost or finely shredded leaves.
- Applying Too Thin a Layer: A layer less than 2 inches (5 cm) might not provide sufficient insulation or nutrient benefit to significantly impact soil health over winter. Aim for 2-4 inches (5-10 cm) for optimal results.
- Uneven Spreading: Inconsistent application leads to patchy benefits—some areas might be well-nourished and insulated, while others remain exposed or underserved. Ensure uniform coverage with a rake.
- Applying on Already Frozen Ground: Once the ground is frozen solid, the compost won’t be able to integrate with the soil and its insulating properties will be less effective for root zones. Apply before hard freezes.
- Over-Composting/Excessive Depth: While beneficial, an extremely thick layer (e.g., 6+ inches / 15+ cm) can suppress beneficial soil activity, especially in poorly drained areas, potentially leading to anaerobic conditions, root rot, or creating habitat for unwanted pests.
- Not Clearing Weeds First: Applying compost over existing weeds can inadvertently “plant” weed seeds or provide a perfect, fertile bed for their resurgence in spring. Always clear weeds thoroughly before applying your compost layer.
- Neglecting Soil Moisture: Applying compost to bone-dry soil can hinder microbial activity. Ensure your garden beds have adequate moisture before application, or gently water after spreading.
Sustainability, Safety & Regulations
Applying leaf compost is inherently sustainable, recycling organic waste and reducing landfill use. To enhance sustainability, always prioritize collecting leaves from your own yard or local sources to minimize transportation emissions. Consider using untreated, chemical-free leaves to protect soil biodiversity. You can also incorporate rainwater harvesting to moisten your compost piles or newly applied layers, conserving municipal water. When working with tools like shovels, forks, and rakes, wear appropriate PPE, including sturdy gardening gloves (like those meeting EN 388 mechanical hazards standard) and closed-toe shoes to prevent injuries.
For any shredding activities, eye protection (ANSI Z87.1 rated safety glasses) and hearing protection (NRR 25+ earplugs or earmuffs) are recommended. Children and pets should be kept away from tools and compost piles during application to prevent accidental ingestion or injury. When disposing of any excess green waste that is not compostable, ensure it aligns with local municipal green waste collection guidelines. There are no specific height or setback regulations for applying compost in garden beds, but be mindful of your neighbors if your composting efforts attract excessive wildlife.
Measure the Outcome
Tracking the impact of applying leaf compost provides valuable insights for future gardening. One common metric is the survival rate of tender perennials or biennials across winter. A well-composted bed should show a higher percentage of thriving plants in spring compared to uncomposted areas. Observe growth rates: do plants in compost-enriched beds show faster initial growth (e.g., 1-2 inches / 2.5-5 cm more stem growth per month) or more vigorous foliage compared to previous seasons?
Consider a simple before-and-after soil test to measure improvements in organic matter content. Even without a lab, you can perform a "hand-feel" test – composted soil should feel richer, darker, and more friable. While difficult to quantify precisely, reduced watering needs in spring and summer (e.g., a 10-15% decrease in watering frequency or volume per week), thanks to improved moisture retention, indicates success. Longer-term, you might see a 5-15% increase in vegetable yields or flower production per square foot (or m²), and a noticeable reduction in weed germination, symbolizing overall satisfaction and a thriving garden ecosystem.
Conclusion
Applying leaf compost is a simple yet profoundly impactful practice for preparing your garden for winter. It’s an eco-friendly method that recycles nature’s bounty, enriching your soil and providing vital insulation for plants. Not only does it improve soil structure and fertility, but it also minimizes waste and saves you money on purchased amendments. So, embrace the fall cleanup as an opportunity to transform your garden into a robust, vibrant ecosystem ready to burst forth with life next spring.
We encourage you to try this sustainable gardening technique this season. Share your experiences in the comments below, and don't forget to pass this guide along to fellow garden enthusiasts!
FAQ
- When is the best time to apply leaf compost?
The ideal time is late fall, after your final harvest but before the ground freezes, typically late October to November. - Can I use fresh leaves instead of fully decomposed compost?
While fresh, shredded leaves (leaf mold) can be used, they decompose slower and can temporarily tie up soil nitrogen. Fully decomposed leaf compost is generally preferred for immediate nutrient benefits. - What if I don’t have enough leaves for compost?
Check with your local municipality; many towns offer free shredded leaves or compost. Neighbors often have excess leaves they’d be happy for you to take. - Can I apply leaf compost if I only have minimal tools?
Absolutely! A sturdy rake for spreading and a shovel or even your hands can suffice for smaller areas. The key is even coverage. - My garden soil is very clayey. Will leaf compost help?
Yes, leaf compost is excellent for clay soils, improving drainage and aeration by breaking up heavy clumps. - How deep should the layer of leaf compost be?
Aim for a layer 2-4 inches (5-10 cm) deep for optimal benefits, adjusting slightly for very cold climates or particularly poor soil. - Will applying compost attract pests?
Properly decomposed leaf compost (dark, earthy smell) generally does not attract pests. However, an excessively thick layer of undecomposed leaves could potentially harbor slugs or other unwanted garden visitors. - What if my leaf compost is too dry?
Lightly moisten the compost before and after application to encourage microbial activity and prevent it from blowing away.
Internal & External Links
For more ideas on preparing your garden for the colder months, explore our guide on Autumn Bulb Planting for vibrant spring displays. Learn how to maintain your essential equipment with our insights on Garden Tool Maintenance. Discover eco-friendly strategies for backyard enhancement by reading about Recycled Garden Decor Ideas. And for year-round composting success, check out our piece on October Garden Compost with Fallen Autumn Leaves. Don’t forget to visit our Pinterest Boards — Garden & DIY inspiration for visual ideas and projects!


