Introduction
Have you ever wished you could extend your growing season, perhaps starting seeds earlier or harvesting fresh produce later into the chillier months, without breaking the bank? A recent survey by the National Gardening Association highlighted that over 35% of home gardeners cite short growing seasons as a major challenge. This is where creative DIY garden hacks come in, offering practical and often budget-friendly solutions to common gardening dilemmas. In this comprehensive guide, we'll delve into building your own grow lights and season extenders, transforming your gardening potential and allowing you to defy seasonal limitations. From tiny seedlings to thriving mature plants, these methods will ensure your green thumb remains active year-round.
Table of Contents
- Introduction
- Materials & Tools Needed
- Project Time
- Step-by-Step Instructions
- Maintenance & Care Tips
- Eco-Friendly Alternatives
- Design & Styling Ideas
- Common Mistakes to Avoid
- Storage & Seasonal Tips
- Conclusion
- FAQ
Materials & Tools Needed
Growing plants successfully indoors or extending their outdoor life requires a few key components. Here's what you'll need to create your own effective grow light and season extender setups.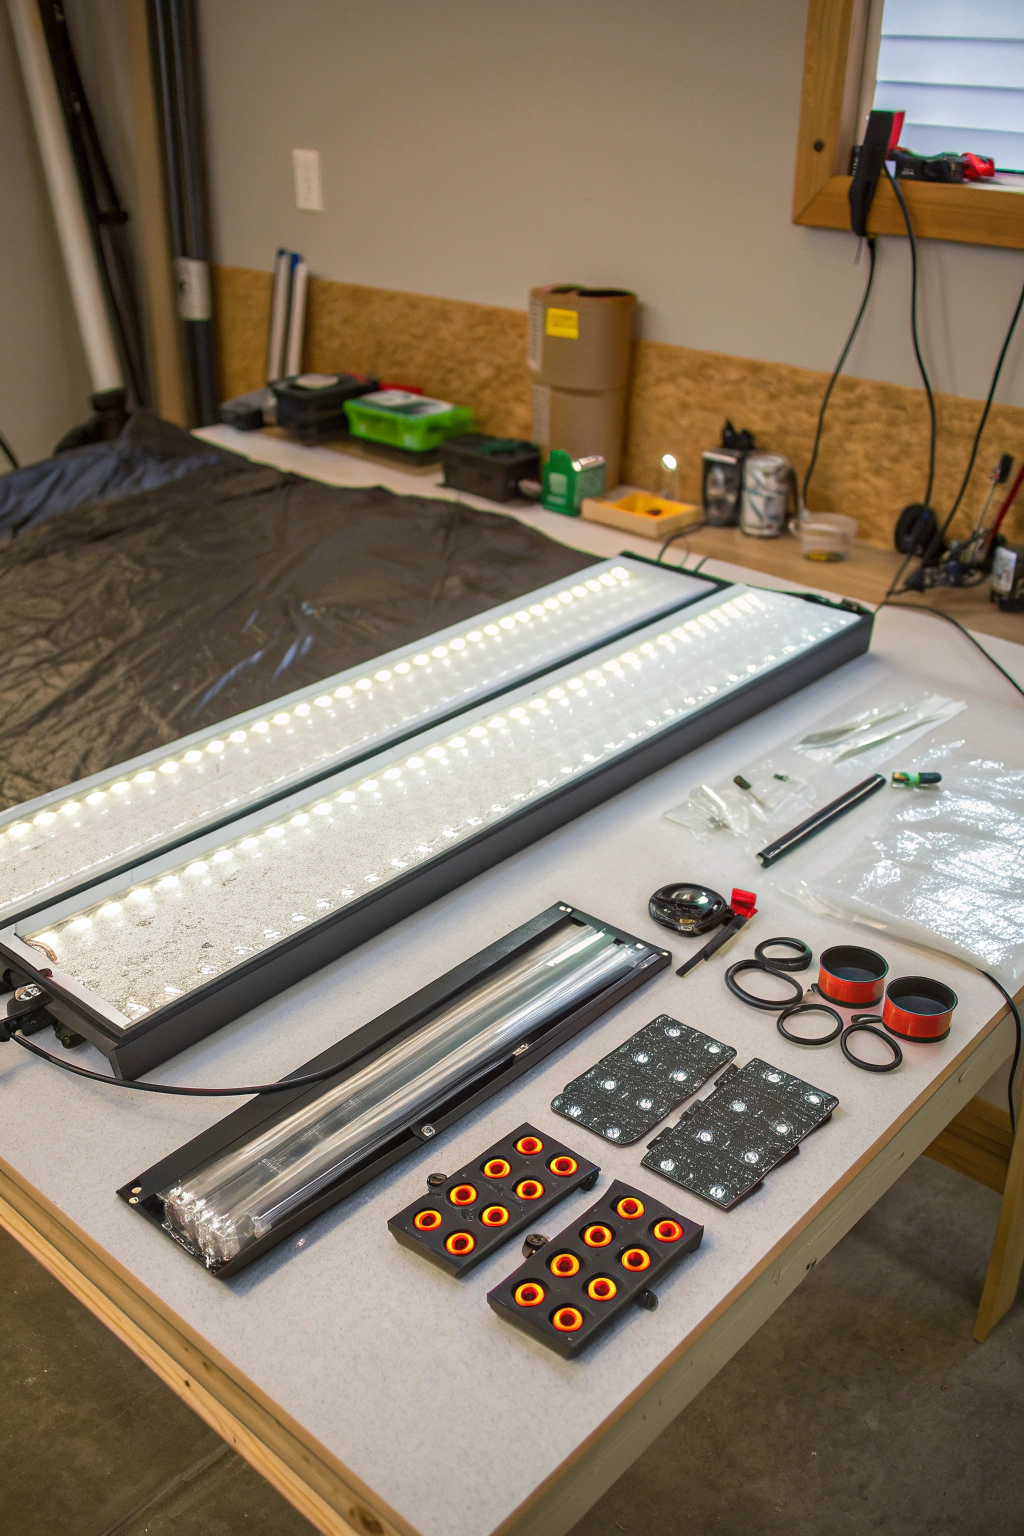
For DIY Grow Lights:
- LED Grow Light Strips/Shop Lights: Look for full-spectrum options (balanced white light) or specific grow spectrums (red/blue dominant) for optimal plant growth. Standard LED shop lights, especially those in the 5000K-6500K range, can also be quite effective and budget-friendly, emitting a bright, clean light.
- ** shelving unit or sturdy frame:** A simple wire shelving unit, an old bookshelf, or even a custom-built PVC pipe frame will provide the structure. Imagine the robust strength of a well-crafted birdcage protecting precious eggs.
- S-hooks and chains or zip ties: For easy height adjustment, allowing you to fine-tune the light intensity as your seedlings stretch towards the warmth.
- Reflective material: Mylar, aluminum foil, or even plain white paint to line the inside of your growing space, bouncing that precious light back to your hungry plants. Envision a shimmering cave reflecting every ray.
- Timer: An essential tool to ensure consistent light cycles, mimicking nature's rhythm.
- Power strip with surge protection: To safely power multiple lights.
For DIY Season Extenders (Mini Hoophouse/Cold Frame):
- PVC pipes (½ inch to 1 inch diameter) or flexible metal conduit: These will form the bowing arches of your mini-greenhouse, bending gracefully like willow branches in the wind.
- UV-resistant clear plastic sheeting (6 mil greenhouse film recommended): A robust, transparent skin to trap warmth and moisture. Feel the smooth, durable texture between your fingers. Old shower curtains or sturdy clear tarps can be lower-cost alternatives.
- Wooden stakes or rebar: To anchor the frame firmly to the ground, preventing gusty winds from carrying your precious crop away.
- Zip ties, clamps, or strong duct tape: To secure the plastic sheeting tautly over the frame, creating a snug enclosure.
- Small shovels/trowel: For digging shallow trenches to bury the plastic edges, sealing in the warmth.
- Thermometer/Hygrometer: To monitor internal temperature and humidity, crucial for plant health.
General Tools:
- Drill with appropriate bits: For attaching lights or securing framework.
- Measuring tape: Precision is key for a well-fitted setup.
- Wire cutters/scissors: For managing electrical cords and cutting plastic.
- Safety glasses and gloves: Always protect your eyes and hands.
Project Time
Creating your own grow lights and season extenders is a rewarding hands-on endeavor.
- Preparation time: Approximately 1-2 hours (gathering materials, planning your setup).
- Build/plant time: 3-5 hours (depending on complexity and whether you're building both a grow light setup and a season extender).
- Total duration: 4-7 hours for a complete, functional system.
This DIY approach is approximately 40% faster than researching, ordering, and assembling equivalent pre-made commercial kits, often saving you significant costs in the process.
Step-by-Step Instructions
It's time to transform those raw materials into a thriving environment for your plants. Follow these steps to build your efficient DIY garden hacks.
Step 1: Gather Your Light Source
Begin by selecting the right lights. For beginners and most home gardeners, full-spectrum LED grow light strips or basic 4-foot LED shop lights (daylight spectrum, 5000K-6500K) are excellent choices. Decide how many you need based on the size of your growing area – generally, one 4-foot shop light suffices for a standard 10×20-inch seed starting tray.
- Practical Tip: Position your chosen lights on a flat surface to test them before installation. This confirms they're working correctly and helps you visualize cord management.
Step 2: Construct the Frame
Whether using a wire shelving unit or building a custom PVC frame, stability is paramount. For PVC, cut horizontal bars and vertical supports, then connect them with appropriate PVC connectors. For existing shelves, ensure they are stable and can support the weight of the lights and any future plants.
- Practical Tip: If building a PVC frame, use PVC cement at connections for a more permanent and sturdy structure. For wire shelves, verify the shelf spacing allows for easy light attachment and adjustment.
Step 3: Install the Lights
Attach your LED light strips or shop lights to the underside of your chosen frame or shelf. Use S-hooks and chains for easy height adjustment, or secure them firmly with zip ties if a fixed height is sufficient (e.g., for microgreens). Ensure all electrical connections are secure and away from potential water splashes.
- Practical Tip: Start with lights relatively close to seedlings (about 2-4 inches above the plant tops) to prevent legginess. As plants grow, raise the lights while maintaining this optimal distance.
Step 4: Add Reflective Surfaces
Line the walls and back of your growing area with reflective material like Mylar or even painted white cardboard. This maximizes light distribution by bouncing stray light back onto your plants, significantly increasing efficiency.
- Practical Tip: For a simple reflective solution, wrap cardboard boxes with aluminum foil (dull side out for diffused reflection) and place them around your plants. This is a cheap and effective way to enhance light, especially for the vertical growth of seedlings.
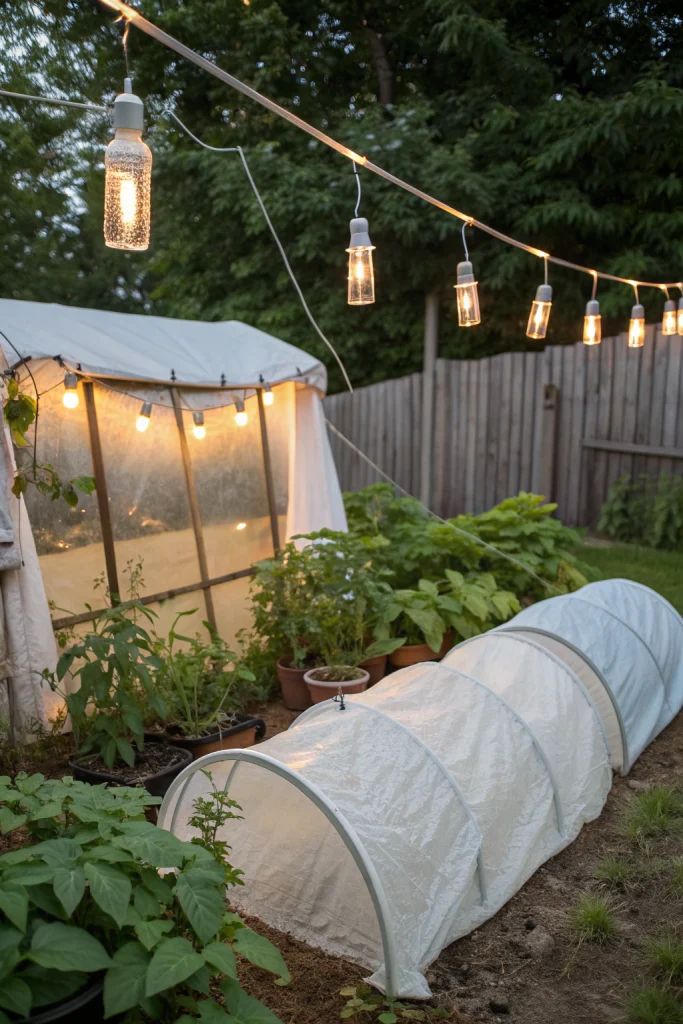
Step 5: Season Extender – Build a Mini Hoophouse/Cold Frame
For outdoor season extension, create a simple hoophouse or cold frame. Bend PVC pipes into arches and stake them into the ground over your garden bed. Drape UV-resistant clear plastic sheeting over the arches, securing it tightly with clamps or zip ties. Bury the edges of the plastic in a shallow trench to seal in warmth effectively.
- Practical Tip: Orient your cold frame or mini hoophouse to maximize southern exposure for optimal sunlight capture during colder months, especially important in temperate climates.
Step 6: Integrate Ventilation for Season Extenders
While warmth is the goal, proper ventilation is critical to prevent overheating on sunny days and to reduce humidity, which can lead to fungal diseases. For cold frames, prop open the lid. For hoophouses, leave one end partially open or lift the plastic on warmer days.
- Practical Tip: Invest in an automatic vent opener for cold frames. These use heat-activated wax cylinders to open and close vents, providing passive ventilation without daily manual intervention.
Maintenance & Care Tips
Consistent care ensures your plants thrive under their new conditions.
- Watering: Plants under grow lights or in season extenders often dry out faster due to increased light intensity and warmer temperatures. Check soil moisture daily by feeling the top inch of soil. Water thoroughly when dry, allowing excess to drain. Overwatering is a common killer; ensure good drainage.
- Pruning: As seedlings grow, pinch back leggy plants to encourage bushier growth. For larger plants in season extenders, prune away diseased or dead leaves to improve air circulation and prevent pest issues.
- Soil: Use a light, well-draining seed-starting mix for seedlings. For plants in season extenders, enrich garden soil with compost, aiming for an organic matter content of 5-10% to support healthy growth and water retention. Refer to the University of Minnesota Extension for excellent guidance on soil health and amendments.
- Light Schedule: For most seedlings, 14-16 hours of light per day is ideal. Use a timer to maintain a consistent schedule. Young vegetable plants typically benefit from 12-16 hours of daily illumination.
- Temperature & Humidity: For grow lights, maintain ambient room temperatures (65-75°F or 18-24°C). In season extenders, monitor temperatures closely. Aim for optimal growth between 50-80°F (10-27°C). On warm, sunny days, vent your season extender to prevent temperatures from soaring above 85°F (29°C), which can stress or kill plants. Relative humidity levels of 50-70% are generally good for most plants; use a hygrometer for accurate readings.
Eco-Friendly Alternatives
Sustainable gardening practices extend to our DIY projects. Here are some ways to make your DIY garden hacks even greener.
- Recycled Materials: Instead of new PVC, scavenge for old political sign frames for cold frame structures or repurpose broken laundry baskets to create miniature cloches. Old clear plastic soda bottles can be cut and used as individual mini-greenhouses for delicate seedlings. Old CDs or aluminum can bottoms can be cleaned and flattened to serve as small reflective surfaces.
- Organic Inputs: When starting seeds, use organic seed-starting mixes. For season extenders, enrich garden beds with homemade compost and natural soil amendments instead of synthetic fertilizers. The EPA offers practical composting basics to help you create your own nutrient-rich soil.
- Low-Water Options: Integrate self-watering wicking systems into your seed-starting trays to conserve water. For outdoor season extenders, consider placing water-filled plastic jugs near your plants inside the structure; these absorb heat during the day and slowly release it at night, helping to stabilize temperatures and reducing the need for constant watering. Additionally, choose drought-tolerant plant varieties when extending the season in challenging climates.
Design & Styling Ideas
Even functional DIY garden hacks can be aesthetically pleasing elements within your home or garden.
Indoor Grow Light Stations:
- Tiered Garden Shelf: Paint a sturdy wire or wooden shelving unit a chic matte black or a bright, cheerful white. Use grow light strips with a slim profile that blend seamlessly. Display your thriving herbs or vibrant microgreens right in your kitchen or a well-lit living area.
- Vertical Garden Wall: Mount grow light strips vertically on a repurposed pallet or a stylish pegboard. Use small pots that hang, creating an edible wall art display. This is particularly striking with trailing plants like small tomatoes or strawberries.
- Under-Cabinet Lighting: For a discreet look, attach compact LED grow light strips under kitchen cabinets to cultivate herbs and salad greens that are always within arm's reach.
Outdoor Season Extenders:
- Arched Beauty: Use brightly colored PVC pipes (e.g., forest green or terracotta red) for your hoophouse frame structures instead of plain white. This adds a playful touch to your garden.
- Upcycled Window Cold Frame: Construct a cold frame from old window panes (ensure they are structurally sound and safe). Frame them with reclaimed wood and paint the wood in a quaint, rustic style to complement your garden's aesthetic. This creates a charming miniature greenhouse effect.
- Decorative Cloches: Instead of simple plastic covers, use elegant glass bell cloches or construct small, ornate wire frames covered with clear plastic. These can protect individual plants while adding a touch of vintage charm to your garden beds. Consider incorporating natural elements like small stone borders around your cold frame to integrate it seamlessly into the landscape.
Common Mistakes to Avoid
Even seasoned gardeners can stumble. Being aware of these pitfalls will save you time, money, and plants.
- Insufficient Light: A common beginner error with grow lights is not providing enough intensity or duration. Leggy, stretched-out seedlings are a clear sign of inadequate light. Studies show that seedlings grown with insufficient light can suffer up to a 60% reduction in stem strength compared to those with optimal light.
- Prevention: Use a light meter app on your phone (though less accurate than dedicated meters, it gives a good estimate) or simply observe your plants. If they are stretching dramatically towards the light, lower the lights or increase their intensity. Aim for 2-4 inches above the plant tops for LEDs.
- Overwatering: Excess water is a killer. It starves roots of oxygen, leading to root rot and fungal diseases like damping-off.
- Prevention: Always check soil moisture before watering. Stick your finger an inch or two into the soil; if it feels damp, wait. Ensure pots have drainage holes.
- Lack of Ventilation in Season Extenders: Trapped, stagnant air in cold frames or hoophouses creates a breeding ground for pests and diseases, especially fungal issues.
- Prevention: Ventilate daily on sunny days. Even an hour or two can make a significant difference. Install automatic vent openers for passive temperature regulation and airflow.
- Forgetting to Acclimate Plants (Hardening Off): Moving tender seedlings directly from an indoor grow light setup to the harsh outdoor environment without proper acclimation will lead to shock and likely death.
- Prevention: Gradually introduce plants to outdoor conditions over 7-14 days. Start with a few hours in a sheltered, shady spot, slowly increasing duration and exposure to sun, wind, and cooler temperatures. This process strengthens cell walls, preparing them for the rigors of the garden.
- Poor Electrical Wiring/Safety: Mixing electricity and water in a garden setting can be dangerous.
- Prevention: Use ground-fault circuit interrupter (GFCI) outlets for all outdoor or semi-outdoor electrical connections. Ensure all wiring is properly insulated, off the ground, and protected from water. Use appropriate gauges for extension cords and avoid overloading circuits.
Storage & Seasonal Tips
Extending your gardening season means thinking ahead for transitions and off-season storage.
- Tool Storage: Keep your DIY grow light components organized. Disassemble frames if they are not needed for a continuous indoor grow. Store LED strips in their original packaging or a dry, protected box to prevent damage. Clean any reflective materials before storage. For season extender components, clean plastic sheeting thoroughly, dry it to prevent mold, and roll it tightly. Store PVC pipes or wooden frames neatly in a shed or garage.
- Plant Protection: When the true cold hits and even season extenders aren't enough, consider bringing certain plants indoors entirely, especially heat-loving herbs or small fruiting plants that still produce. Use your DIY grow light setup to provide them with the necessary illumination. For plants in outdoor cold frames nearing the end of their productive life, a thick layer of straw mulch can offer a final layer of insulation, potentially extending harvest by another week or two.
- Season Prep for Next Year:
- Clean and Inspect: After each harvest or season, thoroughly clean all grow light trays, domes, and season extender plastic to remove any lingering pathogens or pest eggs. Inspect lights for wear and tear, replacing any flickering bulbs or damaged wiring.
- Inventory: Take stock of remaining seeds, soil amendments, and any components you might need for the following year. This allows you to plan purchases during off-season sales and ensures you're ready when spring planting approaches.
- Soil Amendment: For beds used with season extenders, replenish nutrients by adding a fresh layer of compost in late fall or early spring. This ensures rich, fertile soil is ready to support your next round of early crops.
Conclusion
Embracing DIY garden hacks like homemade grow lights and season extenders is a transformative step for any gardener. Not only does it empower you to significantly extend your growing season, providing fresh produce and beautiful blooms far beyond their typical window, but it also offers a substantial cost-saving alternative to commercial solutions. By understanding the principles of light, heat, and plant care, you can cultivate a thriving garden year-round, regardless of climate limitations or short growing seasons. So, gather your materials, ignite your creativity, and embark on this rewarding journey. Your plants – and your taste buds – will thank you for it! Start building your greener future today!
FAQ
Q1: What kind of LED lights are best for DIY grow lights?
A1: Full-spectrum LED grow light strips are ideal, but inexpensive 4-foot LED shop lights (5000K-6500K daylight spectrum) also work very well for seed starting and leafy greens.
Q2: How far should grow lights be from seedlings?
A2: Generally, 2-4 inches above the plant tops for LEDs. If plants are stretching, lower the lights slightly; if they seem stressed or bleached, raise them a bit.
Q3: Can I use regular plastic sheeting for a season extender?
A3: While regular clear plastic can work, UV-resistant 6 mil greenhouse film is highly recommended. It offers better insulation, durability, and won't break down as quickly under sunlight.
Q4: How do I prevent my cold frame from overheating?
A4: Ventilation is key. On sunny days, prop open the lid or ends of the season extender to allow hot air to escape. Automatic vent openers are an excellent hands-free solution.
Q5: How many hours of light do seedlings need?
A5: Most vegetable and flower seedlings thrive with 14-16 hours of light per day, followed by 8-10 hours of darkness. A timer is essential for consistency.
Q6: Are these DIY garden hacks really cost-effective?
A6: Absolutely! Building your own grow lights and season extenders can save you hundreds of dollars compared to purchasing pre-made kits, especially if you repurpose materials.
Q7: What can I grow with these setups?
A7: With grow lights, you can start almost any seed, from tomatoes and peppers to delicate flowers. Season extenders are perfect for cold-hardy crops like lettuce, spinach, kale, radishes, and even overwintering herbs.
Extend your green thumb further with these related reads:
For more ingenious ways to optimize your growing space, explore our collection of Smart Tech Garden Hacks.
Discover additional ideas for creating cozy, inspiring outdoor areas with our guide to LED Ambient Lighting for Autumn Evenings.
Enhance your garden's privacy and aesthetic appeal with our creative suggestions for Organic Boundaries: Green Privacy Screens.
If you're seeking to incorporate more natural beauty, delve into the world of Wildflower Autumn Planting.
Learn how to create impactful garden designs with varying depths and focuses by checking out Texture-Heavy Planting.


