10 Essential Steps to Build Your Own DIY Worm Tower for Raised Garden Beds
Are you looking to supercharge your raised garden beds with a continuous supply of nutrient-rich fertilizer, all while reducing kitchen waste? A DIY worm tower raised beds integration is your secret weapon! This innovative and eco-friendly project transforms your garden into a self-sustaining ecosystem, delivering unparalleled benefits directly to your plant roots. Get ready to discover how easy it is to set up your own in-ground vermicomposting system and watch your garden thrive like never before.
[lwptoc]
Table of Contents
ToggleWhy This Matters for Your Garden: The Power of Worms
Integrating a worm tower directly into your raised garden beds is a game-changer for several compelling reasons. Firstly, it provides a consistent, slow-release source of liquid nutrients and worm castings directly into your soil. This means your plants receive a steady diet of essential minerals, leading to stronger growth, healthier foliage, and more abundant harvests.
Secondly, worms are incredible soil engineers. As they tunnel through the soil surrounding the tower, they aerate it, improving drainage and root penetration. This natural tilling action helps prevent soil compaction, creating an ideal environment for beneficial microbes and plant roots to flourish.
Beyond soil health, a worm tower is an excellent way to divert organic kitchen waste from landfills. Instead of throwing away fruit and vegetable scraps, coffee grounds, and tea bags, you can feed them to your industrious composting worms. This not only reduces your household’s environmental footprint but also transforms waste into a valuable resource for your garden.
Imagine a garden where you rarely need to buy synthetic fertilizers, where your soil is teeming with life, and where every plant radiates health. That’s the promise of a DIY worm tower. It’s a simple, sustainable, and incredibly effective solution for any raised garden bed enthusiast looking to elevate their gardening game. The active feeding by the worms stimulates microbial activity, further enhancing the soil food web to support robust plant growth throughout the entire growing season.
What You Need: Tools & Materials for Your Worm Tower
Building a DIY worm tower raised beds system is surprisingly straightforward and requires only a few readily available items. Most of these can be repurposed or found at your local hardware store, keeping costs down and sustainability high. Selecting the right materials ensures durability and optimal conditions for your new worm inhabitants.
Essential Materials:
- PVC Pipe (6-8 inches diameter, 2-3 feet length): This will form the main structure of your worm tower. The larger diameter allows for more feeding and better air circulation. Schedule 40 PVC is recommended for its durability.
- PVC Cap (matching diameter): To cover the top of the pipe, preventing unwanted pests and retaining moisture.
- Drill with a 1/4 to 1/2 inch drill bit: For creating holes in the PVC pipe, allowing worms to move in and out.
- Mesh or Hardware Cloth (small piece): To line the bottom of the pipe, preventing soil from entering the tower but allowing liquid nutrients to escape. A fine mesh prevents worms from escaping prematurely.
- Zip Ties or Wire: To secure the mesh to the PVC pipe.
- Composting Worms (Red Wigglers – Eisenia fetida): These are the stars of the show! Purchase them from a reputable supplier online or at a local garden center. Do not use regular garden earthworms.
- Bedding Material: Shredded newspaper, cardboard, coco coir, or aged compost. This provides a comfortable home for your worms upon installation.
- Organic Kitchen Scraps: Fruit and vegetable peels, coffee grounds, tea bags, crushed eggshells. Avoid meat, dairy, oily foods, and citrus in large quantities.
Optional (but Recommended) Materials:
- Saw (Hacksaw or PVC cutter): If you need to cut your PVC pipe to size.
- Marker: For marking drilling points.
- Gardening Shovel or Trowel: For digging the hole in your raised bed.
- Gloves: To keep your hands clean during assembly and feeding.
Gathering all your supplies before you begin will make the installation process smooth and efficient. Remember, quality materials will ensure your worm tower lasts for many seasons, providing continuous benefits to your garden. Consider using recycled PVC if available for an even greener approach to your project.
Step-by-Step Guide: Building and Installing Your Worm Tower
Creating your DIY worm tower raised beds system is a rewarding process that can be completed in just a few simple steps. Follow these instructions carefully to ensure your tower is effective, durable, and a welcoming home for your new wriggly residents.
Step 1: Prepare the PVC Pipe
First, if your PVC pipe isn’t already the desired length (2-3 feet is ideal for most raised beds), cut it to size. Next, mark drilling points along the bottom two-thirds of the pipe. You’ll want to drill holes that are roughly 1/4 to 1/2 inch in diameter, spaced about 2-3 inches apart in a staggered pattern around the circumference of the pipe. These holes are crucial for allowing your worms to travel between the tower and the surrounding soil, as well as for water and nutrients to seep out.
Step 2: Create the Base for Worm Entry/Exit
Take your piece of mesh or hardware cloth and cut it into a circle slightly larger than the diameter of your PVC pipe. This will form a permeable barrier at the bottom of the tower. Attach the mesh to the inside bottom edge of the PVC pipe using zip ties or wire, ensuring it’s securely fastened and covers the entire opening. This mesh allows nutrients and worms to pass through while preventing large soil particles from entering the main feeding chamber. Double-check for any gaps where soil might intrude.
Step 3: Dig the Hole in Your Raised Bed
Choose a location in your raised garden bed where your plants will benefit most from continuous fertilization. Dig a hole that is wide enough for the PVC pipe and deep enough so that about 6-12 inches of the pipe remains above the soil line once installed. The depth should ensure that a significant portion of the pipe is submerged, allowing worms to access a wide area of your bed. Consider placing it between several heavy feeders for maximum impact.
Step 4: Install the Worm Tower
Carefully insert the prepared PVC pipe into the dug hole. Backfill around the pipe with the displaced soil, compacting it gently to secure the tower in place. Ensure the pipe stands upright and is stable. The top 6-12 inches should be above the soil to allow for easy feeding and to prevent soil from washing into the tower during watering or rain. This elevation also makes it easier to monitor the worm activity.
Step 5: Add Bedding and Worms
Now it’s time to introduce your new gardeners! Place a layer of moist bedding material (shredded newspaper, cardboard, or coco coir) into the bottom of the worm tower, filling it about one-quarter to one-third full. Gently add your composting worms (Red Wigglers) on top of the bedding. They will naturally burrow down into their new home. Avoid overfilling the tower with bedding; leave room for food scraps.
Step 6: Initial Feeding and Cap Installation
Give your worms a welcoming first meal! Add a small amount of organic kitchen scraps (fruit/vegetable peels, coffee grounds) on top of the bedding and worms. Don’t overfeed initially; let them acclimate. Finally, place the PVC cap firmly on top of the pipe. This keeps the tower dark, moist, and prevents pests like rodents or flies from accessing your worm food. It also protects your worms from excessive rain or direct sunlight, maintaining a stable environment.
Congratulations! Your DIY worm tower raised beds system is now installed and ready to start converting your kitchen waste into garden gold. Regular feeding and occasional monitoring will ensure its continued success and the health of your garden.
Pro Tips and Common Mistakes for Worm Tower Success
Achieving a thriving DIY worm tower raised beds system involves more than just installation; it requires ongoing care and attention. Here are some pro tips and common mistakes to help you maximize your worm tower’s effectiveness and avoid potential problems in your garden.
Pro Tips for Optimal Performance:
- Balanced Diet for Worms: Just like us, worms need a balanced diet. Aim for a good mix of “greens” (nitrogen-rich: fruit/veg scraps, coffee grounds, tea bags) and “browns” (carbon-rich: shredded newspaper, cardboard, dried leaves). This balance helps prevent odors and creates ideal composting conditions.
- Chop Scraps Finely: The smaller the food pieces, the faster the worms can break them down. Chopping scraps into 1-inch pieces or smaller will significantly speed up the composting process.
- Maintain Moisture: Worms breathe through their skin and require a consistently moist environment, similar to a wrung-out sponge. If the tower seems dry, add a little water, but avoid making it soggy. The cap helps retain moisture.
- Rotate Feeding Spots: To encourage worms to spread throughout the surrounding soil, try adding food scraps to different areas of the tower each time you feed. This ensures a more even distribution of nutrients.
- Bury Food Deep: Always bury new food scraps under a layer of existing bedding or partially composted material. This deters fruit flies and other pests, and keeps odors at bay.
- Harvesting Worm Castings: While the primary benefit is direct nutrient release, every 6-12 months, you might find a substantial amount of rich worm castings at the bottom of the tower. You can gently scoop some out to use as a top dressing for other plants or to start new planting mixes. Replenish with fresh bedding.
- Monitor Temperature: Red Wigglers thrive in temperatures between 55-77°F (13-25°C). In extreme heat, ensure the tower is somewhat shaded. In cold climates, consider insulating the raised bed or adding more bedding during winter months.
Common Mistakes to Avoid:
- Overfeeding: This is the most common mistake. Too much food, especially high-nitrogen scraps, can lead to anaerobic conditions, foul odors, and attract pests. Start with small amounts and increase as your worm population grows and processes food faster.
- Adding Prohibited Foods: Avoid meat, dairy, greasy foods, and heavily processed items. These can attract rodents, spoil quickly, and create unpleasant smells. Large quantities of citrus can also create an overly acidic environment.
- Insufficient Moisture: A dry tower will cause worms to become sluggish or even die. Regularly check the moisture level of the bedding.
- Lack of Airflow: While the holes in the pipe provide some aeration, burying food too deeply without enough bedding material can lead to compaction and reduced airflow, slowing down decomposition.
- Using the Wrong Worms: Regular garden earthworms are not suitable for composting in a confined space like a tower. They are deep burrowers and prefer different conditions than surface-dwelling Red Wigglers.
- Ignoring Pests: If you notice an influx of fruit flies, bury food deeper, ensure the cap is secure, and check that you’re not overfeeding or adding too many high-sugar items. For other pests, ensure food is completely covered.
By following these tips and avoiding common pitfalls, your DIY worm tower raised beds will become a highly efficient and low-maintenance source of fertility for your garden, supporting vibrant growth season after season.
Eco-Friendly Variations for Your Worm Tower
While the standard PVC pipe worm tower is effective, there are several eco-conscious variations you can explore to make your DIY worm tower raised beds even more sustainable and tailored to your specific needs. These alternatives often utilize repurposed materials, further reducing your environmental footprint.
1. Repurposed Plastic Bucket Tower:
Instead of new PVC pipe, use an old 5-gallon plastic bucket. Drill numerous 1/2-inch holes along the bottom two-thirds of the bucket. You can also drill a few larger holes (1-2 inches) and cover them with hardware cloth for extra worm access and to prevent soil intrusion. This is a great way to reuse existing plastic, and buckets are often easier to acquire for free or very cheaply. Ensure the bucket is clean and previously held non-toxic materials.
2. Terracotta or Ceramic Pipe Tower:
For a more aesthetically pleasing option, particularly in ornamental raised beds, consider using large terracotta or ceramic drainage pipes. These materials are naturally porous, which can help with aeration and moisture regulation. The main challenge here is drilling the necessary holes without cracking the material, which might require a masonry drill bit and careful technique. They also offer a more natural look that can blend seamlessly with your garden design.
3. Multi-Chamber Tower (Larger Beds):
For very large raised beds or long garden rows, consider installing multiple smaller worm towers, or even a multi-chamber system using two or three connected pipes. This ensures a more even distribution of nutrients across a wider area. You could also use a large diameter pipe and create internal dividers with mesh to separate different types of food scraps or to manage different stages of composting if desired, though this adds complexity.
4. Worm Tower with Integrated Water Reservoir:
To ensure optimal moisture, especially in drier climates or during hot spells, you can modify your tower to include a small water reservoir. This could involve placing a smaller, sealed container with drilled holes inside the main tower at the very bottom, connected to a small pipe that allows you to add water periodically. The worms will be drawn to this consistent moisture source, and the moisture will slowly release into the surrounding soil. This advanced setup requires careful planning to prevent accidental drowning of worms.
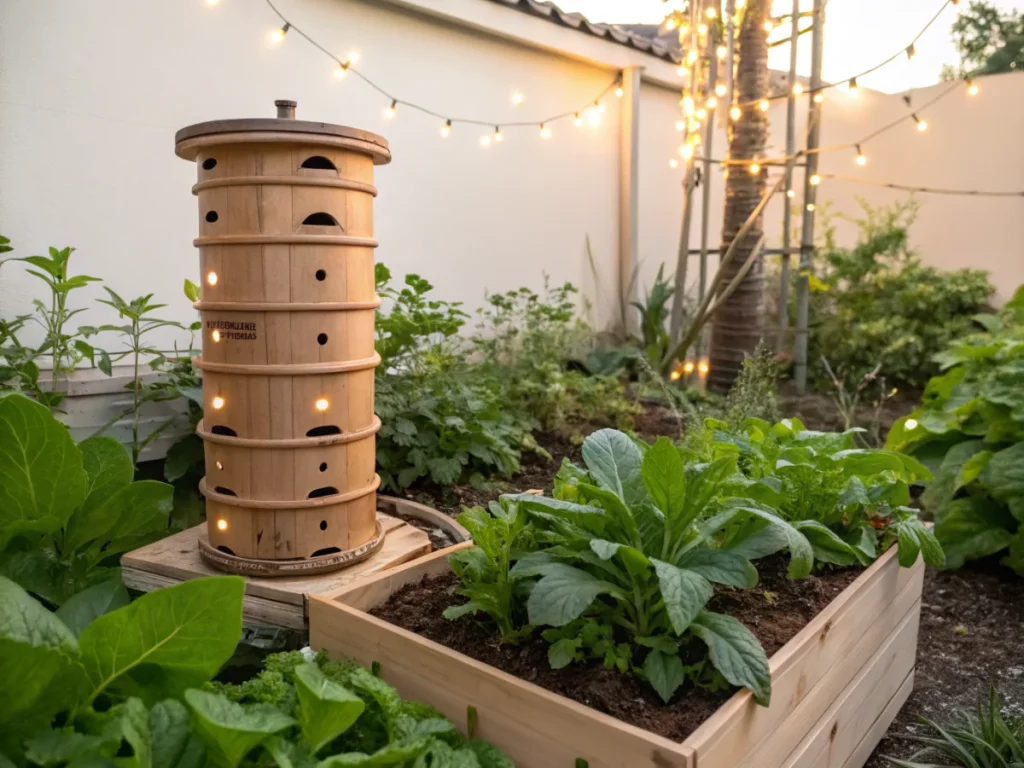
5. Natural Wood Stave or Barrel Tower:
For those committed to natural materials, a small, treated wooden barrel or sections of wood staves connected to form a cylinder can also work. However, wood will decompose over time and may harbor pests. If using wood, ensure it’s untreated and choose naturally rot-resistant species like cedar or redwood. Drill holes as you would for PVC. This option requires more maintenance and understanding of wood decomposition rates.
When choosing an eco-friendly variation for your DIY worm tower raised beds, always prioritize what is available to you, what aligns with your aesthetic preferences, and what provides the best environment for your composting worms. Each alternative offers unique benefits and challenges, but all aim to enhance your garden sustainably.
Seasonal Considerations for Your Worm Tower
A DIY worm tower raised beds system is a year-round asset, but its operation and the needs of your composting worms will vary with the seasons. Understanding these fluctuations is key to maintaining a healthy and productive worm colony and ensuring your raised beds receive continuous benefits.
Spring: Awakenings and Growth
As temperatures rise in spring, your worm colony will become more active. This is a great time to start increasing the amount of food scraps you add. The warming soil encourages worms to move more freely between the tower and your garden bed, actively aerating the soil and distributing nutrients. Spring is also an ideal time to start a new worm tower if you haven’t already, as temperatures are mild and stable. Monitor moisture levels as new growth in the garden might consume more water, potentially drawing moisture away from the tower. Ensure the tower remains adequately moist.
Summer: Heat Management and Hydration
Summer heat can be challenging for composting worms, as they prefer cooler temperatures. If your raised bed is in full sun, the worm tower might heat up, potentially leading to worm stress or even death.
To mitigate this, ensure the tower is in a partially shaded spot within the bed if possible, or consider adding a thicker layer of bedding material on top of the food scraps to act as insulation. It’s crucial to maintain consistent moisture; check the tower regularly and add water if the bedding feels dry. You might also want to temporarily reduce the amount of high-nitrogen ‘green’ scraps and increase ‘brown’ items like shredded newspaper, which helps absorb excess moisture and provides better aeration. Avoid overfeeding during extreme heat, as decomposing food can generate additional heat.
Autumn: Preparation for Winter
As temperatures begin to drop in autumn, your worm colony’s activity will slow down. This is an important time to prepare your DIY worm tower raised beds for the colder months. Gradually reduce the amount of food you feed the worms. Add extra bedding material such as shredded leaves, cardboard, or straw to the tower and around its base both inside and outside the raised bed. This acts as insulation, helping to protect the worms from freezing temperatures. Ensure the tower is well-covered with its cap to prevent excessive moisture from rain or snow. The worms will naturally burrow deeper to escape the cold.
Winter: Dormancy and Protection
In regions with freezing winters, your worms will become mostly dormant, and their composting activity will significantly decrease. The key is to protect them from freezing solid. If your raised bed is well-insulated and the winter is mild, the worms might survive comfortably in the lower, most insulated parts of the tower and surrounding soil. If you anticipate harsh frosts, consider adding a thick layer of mulch (straw, leaves, wood chips) over the entire raised bed and around the visible part of the tower. For very severe winters, some gardeners temporarily move their worm tower contents (worms and some bedding) into an indoor bin, or dig up the tower and store it in a sheltered area like a garage or shed until spring. Do not feed worms during deep cold as they cannot process food effectively, and it will only cause spoilage. A well-prepared tower can provide ongoing benefits while your garden sleeps.
By adapting your worm tower management to the changing seasons, you can ensure a healthy, productive colony that consistently enriches your raised garden beds, offering a sustainable source of fertility year after year. For more information on managing your raised beds year-round, you can visit nouvelles-technologie.com for seasonal raised bed care.
Expert Resources for Vermicomposting Enthusiasts
To deepen your understanding and enhance the success of your DIY worm tower raised beds, consulting expert resources is invaluable. These organizations provide science-backed information, practical tips, and extensive guides on all aspects of vermicomposting and organic gardening. Tapping into this knowledgebase will help you troubleshoot issues, optimize your system, and unlock even greater benefits for your garden.
1. Gardening Know How
Gardening Know How is an excellent online resource covering a vast array of gardening topics, including comprehensive articles on vermicomposting. Their website offers practical advice geared toward home gardeners, from choosing the right worms to troubleshooting common composting problems. You’ll find detailed guides on what to feed your worms, how to maintain a healthy bin, and the benefits of using worm castings in your garden. Their easy-to-understand articles make complex topics accessible to everyone.
Visit their Vermicomposting section: https://www.gardeningknowhow.com/composting/vermicomposting
2. Royal Horticultural Society (RHS)
The Royal Horticultural Society (RHS) is a world-renowned gardening charity with a wealth of information on sustainable practices. While based in the UK, their principles and advice on composting and soil health are universally applicable. Their website offers detailed guides on various composting methods, including vermicomposting, emphasizing organic matter management and its role in a healthy garden ecosystem. Their science-backed approach provides reliable information on maintaining soil fertility and plant health.
Explore their composting advice: https://www.rhs.org.uk/soil/compost
3. University of Minnesota Extension
University Extension programs are fantastic sources of research-based information, often tailored to local conditions but with broad applicability. The University of Minnesota Extension provides excellent resources on composting and recycling organic waste, including specific guides on vermicomposting. Their publications often cover everything from the science behind composting to practical steps for setting up and maintaining a worm bin, which can be easily adapted to a worm tower. They provide clear, actionable advice to ensure your composting efforts are successful and environmentally sound.
Check out their composting resources: https://extension.umn.edu/garden/yard-garden/landscaping/composting-and-mulching
By leveraging these expert resources, you can continuously learn and refine your vermicomposting techniques, ensuring your DIY worm tower raised beds setup remains a vibrant and productive component of your sustainable garden. For more innovative garden solutions, consider exploring nouvelles-technologie.com for sustainable garden solutions.
Pro Tip: Sourcing Your Worms
When purchasing composting worms (Red Wigglers), always buy from a reputable supplier. Look for reviews that confirm healthy, active worms. The quantity you need depends on the size of your tower and how much kitchen waste you produce, but a good starting point is usually 1/2 to 1 pound of worms for an average tower. Avoid using regular earthworms from your garden, as they are not efficient decomposers in a confined composting environment.
Conclusion: Cultivating a Thriving Ecosystem with Your Worm Tower
Embarking on the journey of building a DIY worm tower raised beds system is more than just a home improvement project; it’s an investment in the long-term health and sustainability of your garden. By integrating this ingenious system, you’re not only creating a continuous source of invaluable, nutrient-rich fertilizer but also actively participating in a closed-loop system of waste reduction and resource creation. It transforms your raised beds into dynamic, self-feeding ecosystems where plants flourish from the constant flow of worm castings and aerated soil.
The benefits extend far beyond immediate fertilization. You’re fostering a vibrant microbial community, enhancing soil structure, improving water retention, and diverting kitchen scraps from overburdened landfills. This eco-friendly approach empowers you to visibly reduce your household’s environmental footprint while simultaneously nurturing a more productive and resilient garden space.
From the simple act of preparing a PVC pipe to the careful task of introducing your new composting worms, each step contributes to a garden that truly thrives. With a little ongoing care—monitoring moisture, feeding appropriately, and understanding seasonal needs—your worm tower will repay your efforts manifold, providing season after season of robust growth and bountiful harvests. So, embrace the power of vermicomposting, get your hands a little dirty, and watch as your raised garden beds transform into a showcase of sustainable gardening success. For further inspiration and ideas for your garden, don’t forget to check out nouvelles-technologie.com for garden inspiration and ideas.
FAQ: Your DIY Worm Tower Questions Answered
Q: How often should I feed my worms?
A: Start by feeding your worms small amounts (about 1-2 cups) of kitchen scraps once or twice a week. Observe how quickly they consume the food. If it’s gone within a few days, you can slowly increase the quantity or frequency. It’s better to underfeed than overfeed, especially initially. Overfeeding can lead to odors and attract pests.
<h4>Q: What should I avoid putting in my worm tower?</h4>
<p>A: Avoid meat, dairy products, oily or greasy foods, and heavily processed items, as these can attract pests like rodents, putrefy, and create foul odors. While small amounts of citrus are okay, large quantities can make the environment too acidic for worms. Also, avoid diseased plants, pet waste, and any chemically treated yard waste.</p>

<h4>Q: How do I know if my worms are healthy and happy?</h4>
<p>A: Healthy worms are reddish-brown, plump, and active. They will be feeding on your scraps and congregating in moist, dark areas of the tower. If they are trying to escape, dying, or smell bad, it indicates a problem with their environment (too wet, too dry, too acidic, or too much food). The bedding should smell earthy, not unpleasant.</p>

<h4>Q: Will the worm tower attract pests to my garden?</h4>
<p>A: When managed correctly, a worm tower should not attract significant pests. Always bury food scraps completely under bedding material or soil to deter fruit flies and other insects. Ensure the pipe cap is tightly in place. Avoid prohibited foods like meat and dairy, which can attract larger animals like rodents. If you notice a high concentration of fruit flies, reduce moisture, bury food deeper, and add more 'brown' materials like shredded newspaper.</p>


