The Ultimate Guide to 7 Steps for Gravel Garden Design Without Watering
Imagine a garden that thrives on minimal attention, a landscape of serene beauty impervious to drought, offering architectural elegance and ecological resilience. This isn’t a desert mirage; it’s the profound reality of a well-executed gravel garden, one designed meticulously to flourish ‘without watering.’ In an era of increasing water scarcity and a growing desire for sustainable living, embracing drought-tolerant landscape solutions is not just an aesthetic choice but an environmental imperative. A gravel garden, often inspired by the rugged beauty of Mediterranean landscapes or arid steppe regions, offers a compelling alternative to traditional, thirsty lawns and borders.
[lwptoc]
This comprehensive guide will walk you through the entire process, from conceptualization to creation and enjoyment, ensuring your gravel garden not only survives but truly shines with natural elegance, demanding little from your hosepipe. We will delve into the critical elements, from selecting the right gravel and plants to understanding the underlying ecological principles that make such a garden a triumph of sustainable design. Prepare to transform your outdoor space into a breathtaking, water-wise sanctuary that will be the envy of your neighborhood.
Why This Matters for Your Garden: Embrace Sustainability and Beauty
The call for sustainable gardening practices has never been more urgent. Climate change brings increasingly erratic weather patterns, including prolonged droughts and water restrictions, making the traditional thirsty garden a luxury many can no longer afford, or ethically justify. A gravel garden designed to thrive without supplemental watering offers a powerful solution, allowing you to reduce your environmental footprint significantly without sacrificing aesthetic appeal. This approach isn’t just about saving water; it’s about creating a harmonious ecosystem that mimics natural dryland environments, fostering biodiversity and resilience.
Beyond the environmental benefits, a gravel garden offers immense practical advantages. Imagine drastically cut water bills, less time spent dragging hoses around, and significantly reduced weeding thanks to the gravel mulch. The low-maintenance aspect is a huge draw for busy homeowners, freeing up valuable time for enjoyment rather than endless chores. Furthermore, the aesthetic of a gravel garden is inherently sophisticated and timeless. Its clean lines, textural contrasts, and the subtle beauty of drought-tolerant plants bring a unique architectural quality to any landscape, providing year-round interest even in the harshest conditions.
This style of gardening encourages a deeper connection with nature, observing the plants that naturally flourish in challenging conditions and appreciating their inherent hardiness and beauty.
You’ll discover a world of plants you might never have considered, broadening your horticultural horizons and contributing to a more biodiverse garden. Embracing a gravel garden is not merely a design choice; it’s a commitment to a more sustainable, beautiful, and effortless outdoor living experience.
What You Need: Tools, Materials, and the Right Plant Palette
Embarking on your gravel garden journey requires careful preparation. Gathering the right tools, selecting appropriate materials, and, most importantly, choosing the perfect plant palette are crucial steps for success. Starting with a solid foundation ensures a long-lasting, low-maintenance, and truly ‘no-watering’ landscape.
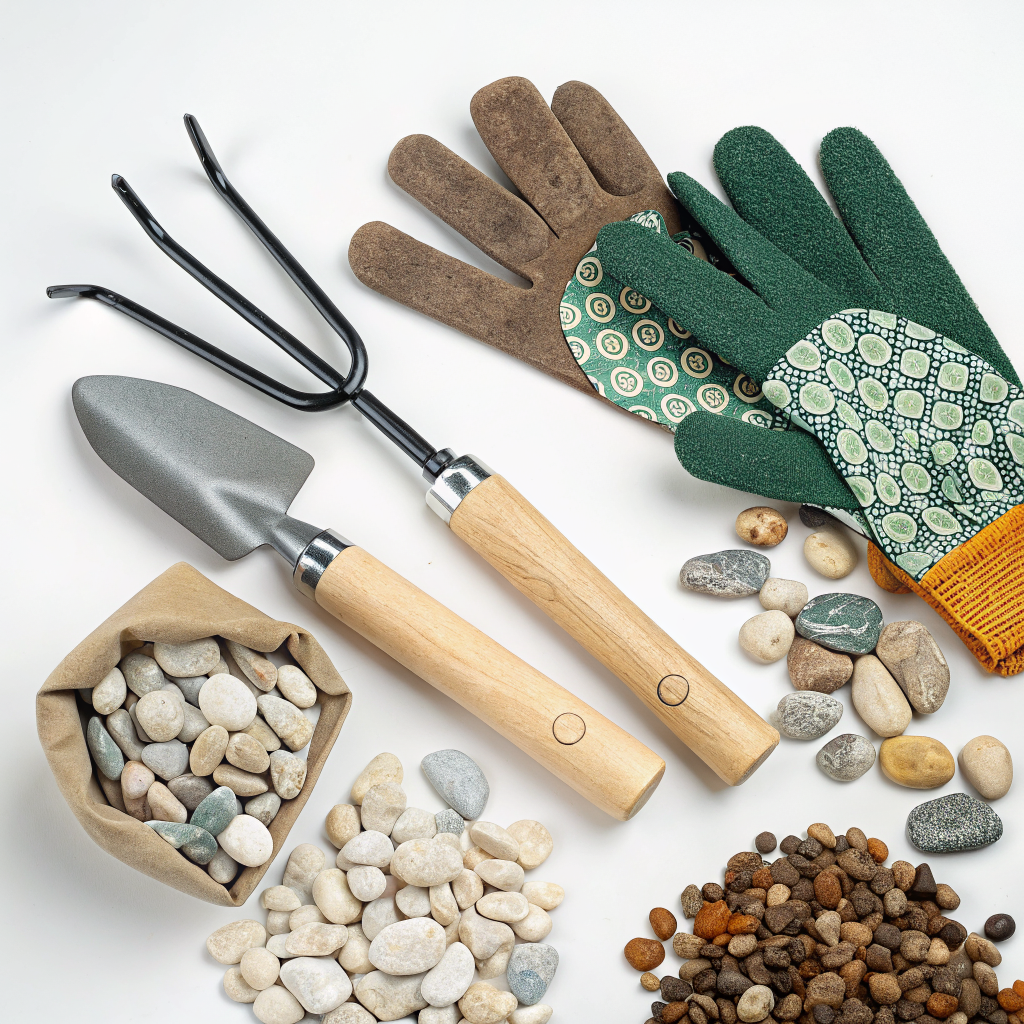
Essential Tools:
- Shovel and Spade: For digging, moving soil, and shaping beds.
- Rake: To level the ground and spread gravel evenly.
- Wheelbarrow: Indispensable for transporting gravel, soil, and plants.
- Measuring Tape and Stakes: For accurately laying out your garden design.
- Trowel: For planting smaller specimens.
- Gloves: To protect your hands during all stages of work.
- Weeding Tool: Despite the gravel, occasional weeds will appear, especially early on.
- Hose/Watering Can: Initially, for establishing new plants (before they become drought-proof).
- Spirit Level: To ensure proper drainage slopes and even surfaces.
- Rototiller (optional): For breaking up large areas of compacted soil.
Key Materials:
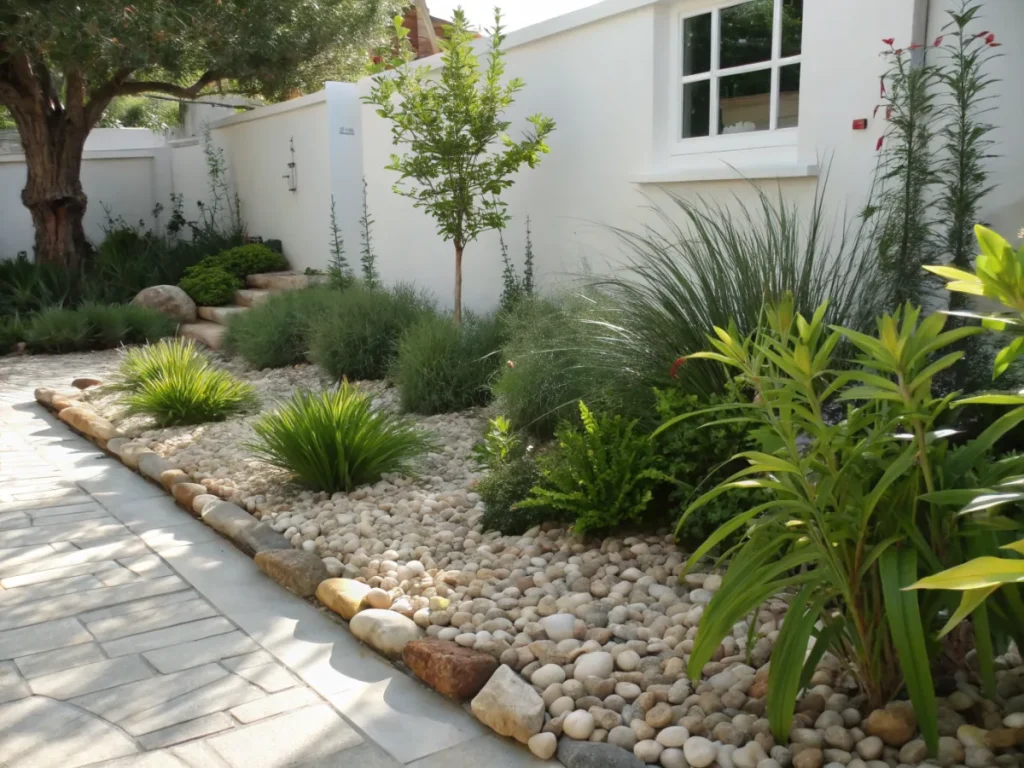
- Gravel: This is the star of your garden!
- Type: Opt for angular, crushed gravel (e.g., decomposed granite, crushed basalt, pea gravel if it’s angular, limestone chips). Angular gravel locks together better and offers superior weed suppression and drainage compared to smooth, rounded pebbles.
- Size: Generally, 1/4 to 3/4 inch (6-19mm) is ideal for pathways and as a planting medium. Finer gravel can create a softer look, while larger stones can be used for accents.
- Color: Choose a color that complements your home and plant choices. Light colors reflect heat, dark colors absorb it.
- Quantity: Calculate based on your area and desired depth (typically 3-4 inches for planting areas, 2 inches for paths over weed fabric).
- Topsoil/Compost: Essential for amending the planting holes to give new plants a good start. For true Mediterranean or arid plants, ensure good drainage by mixing in grit or sand if your soil is heavy clay.
- Landscape Fabric (optional but recommended for weed control): A heavy-duty, permeable fabric will significantly reduce weeds, especially under pathways. Ensure it’s water permeable to allow rain to reach plant roots. Avoid cheap, thin plastic as it impedes water and air.
- Edging Material (optional): Steel, wood, or stone borders can define your gravel garden and prevent gravel migration.
- Large Rocks/Boulders: For adding architectural interest, creating microclimates, and defining spaces.
The Right Plant Palette: Drought-Tolerant Wonders
The success of a ‘no-watering’ gravel garden hinges on selecting plants that are naturally adapted to dry conditions. Look for plants with characteristics like:
- Silver or Grey Foliage: Reflects sunlight, reducing water loss (e.g., Lavender, Lamb’s Ear, Santolina).
- Small, Leathery, or Hairy Leaves: Reduce transpiration (e.g., Rosemary, Thyme, many Salvias).
- Succulents/Cacti: Store water in their leaves or stems (e.g., Sedum, Sempervivum, Agave, Opuntia).
- Deep Taproots: Access water deep in the soil (e.g., California Poppies, certain Penstemons).
- Aromatic Oils: Can help deter pests and reduce water loss (e.g., Oregano, Hyssop).
Consider a mix of perennials, shrubs, and even small trees that thrive in your climate’s specific dry conditions (check your USDA hardiness zone or equivalent). Here’s a starting list of excellent choices:
- Lavandula (Lavender): Various species, renowned for fragrance and beauty.
- Rosemarinus officinalis (Rosemary): Evergreen, aromatic, culinary.
- Thymus (Thyme): Groundcovers and small shrubs, wonderful scent.
- Santolina chamaecyparissus (Lavender Cotton): Silvery foliage, yellow button-like flowers.
- Nepeta x faassenii (Catmint): Long-flowering, adored by pollinators.
- Salvia (Sage): Wide variety of drought-tolerant species, excellent for wildlife.
- Sedum (Stonecrop): Many forms, from groundcovers to upright varieties.
- Sempervivum (Hens and Chicks): Classic rock garden succulents.
- Yucca: Architectural, striking forms.
- Artemisia (Wormwood): Silvery, feathery foliage.
- Echinacea (Coneflower): Prairie native, robust and attractive.
- Achillea (Yarrow): Flat-topped flowers, tough and long-blooming.
- Stipa tenuissima (Mexican Feather Grass): Delicate, ethereal movement.
- Pennisetum alopecuroides (Fountain Grass): Ornamental grass with soft plumes.
- Perovskia atriplicifolia (Russian Sage): Silver foliage, lavender blooms, long season of interest.
- Euphorbia (Spurge): Many drought-tolerant varieties with unique forms.
Always research the specific water and sun requirements for each plant to ensure it is suitable for a truly unwated gravel garden in your particular microclimate. Local nurseries specializing in native or drought-tolerant plants are an invaluable resource.
Step-by-Step Guide: Building Your Water-Wise Oasis
Creating a thriving gravel garden without irrigation involves careful planning and execution. Follow these steps to lay a solid foundation for your sustainable oasis. This methodical approach will help ensure long-term success and minimal maintenance.
Step 1: Site Selection and Design
Choose an area that receives full sun, ideally 6+ hours a day, as most drought-tolerant plants thrive in these conditions. Observe the natural drainage patterns in your chosen spot; gravel gardens generally prefer well-drained locations. Sketch out your design on paper, considering pathways, planting zones, large rock placements, and the overall flow. Incorporate features like dry streambeds or stone elements to enhance the natural aesthetic. Think about sightlines from your home and how the garden will integrate into the wider landscape. A well-placed large boulder can provide a microclimate for shade-loving plants or create focal interest.
Step 2: Prepare the Site
Begin by clearing the area of all existing vegetation, especially perennial weeds and turf grass. If you have persistent weeds, consider sheet mulching or solarization in the season prior. Dig down approximately 6-8 inches to remove topsoil if it’s heavy clay, or just loosen it if it’s well-drained. Ensure proper leveling and create a slight slope (1-2%) away from structures for drainage. This preparation phase is crucial as it dictates the long-term health and maintenance of your garden. Any remaining weed roots will be a source of future frustration, so be thorough.
Step 3: Improve Drainage and Lay Down Fabric (if using)
If your soil is heavy clay, amend it by mixing in generous amounts of coarse sand, grit, or fine gravel to improve drainage. This creates the lean, free-draining conditions many drought-tolerant plants prefer. Once the soil is prepared, lay down a heavy-duty, permeable landscape fabric. Overlap seams by at least 6 inches and secure with landscape pins. This fabric acts as a significant weed barrier while still allowing water and air exchange. Avoid cheap, thin plastic sheeting, which creates more problems than it solves by trapping water and suffocating soil.
Step 4: Place Large Rocks and Contour
Before introducing plants or final gravel layers, position any large rocks or boulders. These elements provide structure, define spaces, and add sculptural interest. They can also create subtle microclimates, offering small pockets of shade or retaining heat. Experiment with different arrangements until you achieve a natural, pleasing composition. Use them to mimic a natural streambed or a rocky outcrop, ensuring stability by partially burying them. Contouring your site with subtle humps and hollows can add visual depth and improve drainage further, creating naturalistic pockets for planting.
Step 5: Plant Selection and Installation
Carefully choose plants suited to your climate zone and the “no-watering” philosophy (refer back to the ‘What You Need’ section). Strategically place plants on the landscape fabric, cutting X-shaped holes through the fabric. Dig generous planting holes, mixing some good quality compost with the excavated soil only if necessary (many desert plants prefer lean soil). Plant at the same depth as they were in their nursery pots. Water thoroughly after planting to settle the soil around the roots. This initial watering is vital for establishment; afterwards, watering will be minimal to none. Group plants with similar water needs together, though in a true gravel garden ‘no watering’ implies all plants are ultra drought-tolerant.
Step 6: Apply the Gravel Mulch
Once all plants are in the ground, it’s time for the signature element: the gravel mulch. Spread your chosen gravel evenly over the entire planted area, to a depth of 3 to 4 inches. This layer is critical for weed suppression, moisture retention in the soil below (by reducing evaporation), and regulating soil temperature. Ensure the gravel completely covers the landscape fabric and comes up to the base of most plants, but avoid mounding it directly against plant stems as this can lead to rot. Use a rake to smooth and adjust the gravel for a polished look. For pathways, a minimum depth of 2 inches is typically sufficient over compacted soil or fabric.
Step 7: Initial Watering and Long-Term Care
After the gravel is in place, give the entire garden a deep watering. This helps settle the gravel, removes dust, and ensures any newly disturbed roots get a final drink before enduring dry conditions. For the first few weeks, and potentially through the first dry season, you may need to provide occasional deep watering, especially for plants to establish their root systems. Once established (typically after one to two growing seasons), your gravel garden should be largely self-sufficient, requiring next to no supplemental watering. Long-term care primarily involves occasional hand-weeding, especially if seeds land on the gravel, and minimal pruning of plants to maintain shape or remove spent blooms. Remember, the goal is for the plants to send roots deep in search of water, which sporadic watering encourages, unlike frequent shallow watering.Visit this link for more information on plant establishment for drought tolerance.
Pro Tips and Common Mistakes: Mastering Your Gravel Garden
Creating a successful, low-maintenance gravel garden that thrives without watering involves more than just following steps; it requires understanding key principles and anticipating potential pitfalls. These pro tips and warnings about common mistakes will help you achieve enduring beauty and efficiency in your drought-wise landscape.
Pro Tips for Success:
- Think in Layers: A truly effective gravel garden has multiple layers. Start with soil preparation, then weed barrier (if used), then robust plant roots, and finally a deep layer of gravel mulch. Each layer plays a vital role in moisture management and weed suppression.
- Embrace Native and Adapted Plants: While Mediterranean plants are a classic choice, explore native drought-tolerant plants in your specific region. They are naturally accustomed to your climate, soil, and pest conditions, leading to even greater success and biodiversity.For more native plant inspiration, see this resource from Extension.umn.edu.
- Contour for Effect: Don’t just create a flat expanse. Gentle mounding and subtle depressions add visual interest and can direct water flow in beneficial ways during heavy rains, preventing runoff and encouraging deep infiltration where plants are.
- Use Boulders Strategically: Large rocks are not just decorative. They provide thermal mass, radiating heat in cooler evenings, and can create shaded pockets for plants needing a slight reprieve from intense sun. They anchor the design and give a sense of permanence.
- Plan for Accessibility: Include strategically placed stepping stones or wider gravel paths for easy access for occasional maintenance, weeding, or just strolling through your beautiful garden.
- Consider Winter Interest: Many drought-tolerant plants offer fantastic winter structure, seed heads, or evergreen foliage. Plan for year-round appeal, not just spectacular summer blooms. Ornamental grasses are excellent for this.
- Observe and Adapt: Your garden is a living system. Pay attention to how plants respond. Do some areas get more sun or drain differently? Be prepared to adjust plant placements or make small changes over time.
- Sustainable Sourcing: Whenever possible, source local gravel and plants. This reduces your carbon footprint and supports local economies.
Common Mistakes to Avoid:
- Not Preparing the Soil Properly: This is arguably the biggest mistake. If your soil is compacted clay, plants will struggle regardless of species. Poor drainage leads to root rot, even in drought-tolerant plants. Investing time in soil amendment is paramount.
- Insufficient Gravel Depth: A thin layer of gravel (less than 3 inches) won’t effectively suppress weeds, retain moisture, or regulate soil temperature. Weeds will sprout through easily, and the benefits of the mulch will be diminished.
- Using the Wrong Type of Gravel: Rounded pea gravel tends to shift easily, doesn’t lock together well for weed suppression, and can be difficult to walk on. Angular, crushed stone is superior for all practical purposes in a planted gravel garden.
- Planting Thirsty Plants: This might seem obvious, but mixing a few water-intensive plants into a ‘no-watering’ design defeats the entire purpose. Stick rigorously to drought-tolerant species once established.
- Over-Watering During Establishment: While initial watering is key, don’t overdo it. The goal is to encourage roots to grow deep in search of water, not to rely on surface irrigation. Gradually reduce supplemental watering until it’s eliminated.
- Ignoring Weed Control Early On: Even with fabric and gravel, some weeds will emerge. It’s much easier to pull small weeds by hand than to battle established ones. Address them promptly.
- Leaving Gaps Between Plants: When starting, young plants might look sparse. Resist the urge to overplant, but also don’t leave vast, empty expanses of gravel. Plan for plant mature sizes, but understand that wide-open gravel areas are magnets for blowing weed seeds.
- Not Considering Sun Exposure: Planting sun-loving plants in shade or vice versa will lead to failure. Meticulously map out sun exposure throughout the day.
By heeding these tips and avoiding common pitfalls, you will create a gravel garden that is not only beautiful and water-wise but also a joy to maintain for years to come. Remember, patience during the establishment phase pays dividends in a truly self-sufficient landscape. For additional insights on maintaining healthy plants, explore this resource on common plant diseases and pest control.
Eco-Friendly Variations: Beyond the Basics
A gravel garden is inherently eco-conscious due to its water-saving properties, but there are even more ways to amplify its environmental benefits and integrate it deeper into a sustainable landscape. Exploring these variations can create a truly regenerative and biodiverse outdoor space.
Rain Garden Integration:
Instead of preventing all water infiltration, design your gravel garden to include a ‘rain garden’ section. This involves creating a slight depression in an area that collects rainwater runoff from impervious surfaces like roofs or driveways. The rain garden is then filled with a gravel-soil mix and planted with species that can tolerate both dry conditions and occasional saturation. This captures otherwise wasted water, recharges groundwater, and filters pollutants, turning stormwater into a resource. The gravel surrounding acts as a dry, permeable buffer. Browse plants suitable for rain gardens at GardeningKnowHow.com.
Bio-Swales and Dry Streambeds:
Incorporate dry streambeds or bio-swales (shallow, vegetated swales specifically designed to convey and treat stormwater runoff) constructed with rocks and gravel. These features not only add naturalistic beauty but also function as efficient water management systems during rainfall events. They guide water slowly across the landscape, allowing it to percolate into the soil rather than running off, preventing erosion and nourishing adjacent plants. Even in dry periods, their structure adds visual interest and a sense of movement.
Habitat Creation with Native Plants:
Focus heavily on native drought-tolerant plants. Native species are best adapted to local conditions, require minimal inputs, and provide crucial food and shelter for local pollinators, birds, and other wildlife. A diverse planting of native grasses, wildflowers, and shrubs turns your gravel garden into a vibrant ecosystem, supporting biodiversity in your backyard. Consider incorporating features like log piles or rock cairns for insect habitats.
Decomposed Granite and Permeable Pavers:
For pathways and larger gathering areas within your gravel garden, consider using decomposed granite (DG) or permeable pavers. Decomposed granite compacts to a firm, natural-looking surface that is still permeable, allowing water to infiltrate the ground. Permeable pavers have spaces between them that are filled with gravel, allowing water to pass through. Both options reduce impervious surfaces, minimizing runoff and increasing groundwater recharge compared to traditional concrete or asphalt. This aligns perfectly with the water-wise ethos of a gravel garden. Explore natural stone hardscaping ideas to complement your gravel garden.
No-Dig/No-Till Techniques:
Wherever possible, adopt no-dig or no-till techniques during initial site preparation. Instead of churning the soil, sheet mulch existing vegetation with cardboard and compost layers, then add your gravel. This preserves the existing soil structure, fostering a healthy microbiome and reducing soil disturbance, which in turn minimizes carbon release and promotes soil health, crucial for sustaining plants without irrigation. This method also naturally suppresses weeds over time.
By integrating these eco-friendly variations, your gravel garden evolves from simply being water-efficient to becoming a truly holistic and environmentally beneficial landscape feature, contributing positively to local ecology and resource management.
Seasonal Considerations: Enjoying Your Gravel Garden Year-Round
A well-designed gravel garden offers beauty and interest throughout all four seasons, defying the notion that dry gardens are only vibrant in summer. Understanding how your garden will evolve seasonally helps in plant selection and provides a framework for appreciating its unique character year-round.
Spring: The Awakening
Spring in a gravel garden sees a gentle awakening. Low-growing alpines and early blooming perennials like Phlox subulata, Pulsatilla, or smaller Alliums might be among the first to show color, often peeking out from beneath the gravel. New growth on shrubs and perennials emerges, often with fresh, vibrant foliage. This is an ideal time for light pruning of any dead winter growth and to address any late-emerging weeds. The fresh gravel provides a clean backdrop for this emerging verdancy. Ensure any plants that were dormant through winter are showing signs of life. New planting can also be done in spring, allowing plants substantial time to establish roots before the summer dry spell.
Summer: The Peak of Resilience
Summer is when the gravel garden truly shines. The high-desert and Mediterranean plants are in their element, thriving under intense sun and heat. Lavender, Salvia, Thyme, Sedum, and various grasses will be in full bloom, attracting a host of pollinators. The gravel reflects some of the summer heat, helping to keep soil temperatures more consistent and reducing water evaporation from the soil. The textures and muted color palettes of silver foliage plants contrast beautifully with bolder blooms. Maintenance is minimal; perhaps deadheading spent flowers (though many forms of deadheading are optional in a naturalistic gravel garden) and occasional checks for any stubborn weeds that managed to sprout. This is the period where your ‘no-watering’ design truly proves its worth.
Autumn: Graceful Transition
As summer wanes, the gravel garden transitions gracefully. Many plants develop attractive seed heads (e.g., Echinacea, ornamental grasses) that provide architectural interest and food for birds. Some plants, like certain Sedums, will offer late-season color. Foliage might take on beautiful autumnal hues, particularly on grasses and some shrubs. The clean lines of the gravel and rock elements become more pronounced as herbaceous growth recedes. This is a good time to undertake any major structural pruning if needed, or to divide certain perennials. Leaves from deciduous trees should be raked off the gravel to prevent them from breaking down and creating a seedbed for weeds.
Winter: Subtle Structure and Evergreen Charm
Even in winter, a gravel garden retains its appeal. Evergreen perennials, shrubs (like Rosemary or certain Euphorbias), and the structural forms of dormant grasses provide enduring texture and shape. The subtle colors of the gravel and the permanence of large rocks come to the forefront, creating a minimalist yet compelling landscape. Frost on seed heads or the crisp lines of a stone pathway can be particularly beautiful. In regions with snow, the gravel can offer intriguing contrast. Winter maintenance is virtually non-existent, making it a truly ‘set it and forget it’ landscape for the colder months. Plan for plants that offer winter interest, ensuring your garden is never truly dormant in the visual sense.
Expert Resources: Deepening Your Knowledge
To further enhance your understanding and success with gravel garden design, consult these reputable external resources. They offer a wealth of information from leading horticultural organizations and experts.
- The Royal Horticultural Society (RHS) – Gravel Gardens: The RHS is a world-renowned authority on horticulture. Their article provides excellent foundational knowledge on gravel garden principles, plant choices, and maintenance, with a focus on temperate climates.
- GardeningKnowHow.com – Weed Control in Gravel Gardens: While your goal is ‘no watering,’ weed control remains a key aspect of low-maintenance gardening. This comprehensive guide offers practical tips and strategies for keeping your gravel garden pristine.
- University of Minnesota Extension – Drought-Tolerant Plants for Home Landscapes: University extension services are fantastic sources of region-specific, research-backed advice. This link provides a solid overview of drought-tolerant plants, which is crucial for making informed choices for your no-water garden.
Conclusion: A Landscape of Resilience and Beauty
Embracing gravel garden design without watering is more than just a passing trend; it’s a testament to sustainable living, innovative landscape design, and a deeper appreciation for nature’s resilience. By carefully selecting drought-tolerant plants, employing astute design principles, and following the practical steps outlined in this guide, you can transform your outdoor space into a sanctuary of understated elegance that demands minimal resources and offers maximum beauty. This approach not only conserves precious water but also reduces your carbon footprint, creates valuable habitats, and frees you from the endless cycle of watering and nurturing high-maintenance landscapes.
Your gravel garden will evolve with the seasons, offering year-round visual interest through textured foliage, architectural forms, and subtle color shifts. It will become a source of quiet contemplation and a vibrant testament to the power of thoughtful, eco-conscious gardening. Step away from the hose, step into a world of enduring beauty, and let your gravel garden flourish as a true oasis of self-sufficiency. The beauty truly lies in its ability to thrive, unaided, showcasing nature’s incredible capacity for adaptation and survival. Embrace the future of gardening, one stone and one resilient plant at a time.
Frequently Asked Questions About Gravel Garden Design
Q1: Can I really have a gravel garden with absolutely no watering, even in hot climates?
A1: Yes, once fully established, a well-designed gravel garden in appropriate climates (like Mediterranean or arid types) requires virtually no supplemental watering. The key is meticulous plant selection (truly drought-tolerant species), proper soil preparation for drainage, and a deep gravel mulch layer to conserve moisture. Initial establishment (1-2 years) will require some watering, but the goal is to wean plants off irrigation entirely as their roots delve deep.
Q2: What is the best type of gravel to use for weed suppression and drainage?
A2: Angular or ‘crushed’ gravel, typically 1/4 to 3/4 inch (6-19mm), is superior to rounded pea gravel. Its jagged edges interlock, creating a more stable surface for walking, better weed suppression, and excellent drainage. Materials like decomposed granite, crushed basalt, or limestone chips are excellent choices. Ensure the gravel is applied to a depth of 3-4 inches over existing landscape fabric for optimal results.
Q3: How do I prevent weeds from growing in my gravel garden?
A3: Effective weed prevention starts with thorough site preparation, including removing all existing weeds and their roots. A heavy-duty, permeable landscape fabric laid before the gravel is crucial. Finally, a thick layer (3-4 inches) of angular gravel acts as a mulch, suppressing weed seeds from germinating and making any that do appear easier to remove. Occasional hand-weeding will always be necessary, especially for wind-blown seeds.
Q4: What are the best plants for a ‘no-watering’ gravel garden?
A4: Look for plants with adaptations to dry conditions, such as silver/grey foliage, small/leathery leaves, or succulent properties. Excellent choices include Lavender (Lavandula), Rosemary (Rosemarinus), many Sages (Salvia), Catmint (Nepeta), Yarrow (Achillea), Stonecrop (Sedum), Hens and Chicks (Sempervivum), Yucca, Ornamental Grasses (e.g., Stipa, Pennisetum), and Russian Sage (Perovskia). Always choose plants hardy to your climate zone and known for their extreme drought tolerance once established.