Table of Contents
ToggleWhy Build a Sub-Irrigated Planter from a 5-Gallon Bucket?
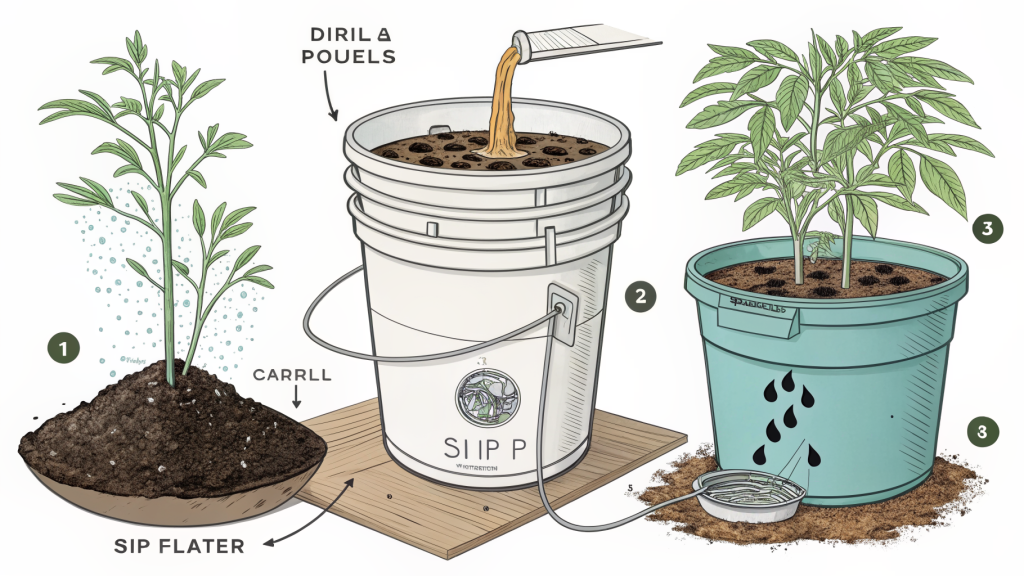
A sub irrigated planter bucket sip is a self-watering container that uses a reservoir at the bottom to wick moisture upward to plant roots. This design reduces water waste, prevents overwatering, and provides consistent hydration—ideal for growing vegetables like tomatoes, peppers, and leafy greens in small spaces. With a single 5-gallon bucket, you can create a water-efficient system that requires refilling only every few days, even in hot weather.
Materials and Tools Needed
Gather these items before starting:
- One 5-gallon food-grade bucket with lid
- One 2–3 inch diameter PVC pipe (about 12 inches long) for a fill tube
- One smaller container (e.g., a 1-quart yogurt tub) to create the wicking chamber
- Wicking material: an old cotton towel, felt fabric, or a piece of nylon rope
- Drill with 1/4-inch and 1/2-inch bits
- Jigsaw or utility knife
- Permanent marker
- Ruler or tape measure
- Potting mix (not garden soil)
- Water-soluble fertilizer (optional)
Step-by-Step Construction
1. Prepare the Bucket
Clean the bucket thoroughly. Using the marker, draw a circle around the bucket about 4 inches from the bottom—this marks the top of the reservoir. Below this line, drill 8–10 evenly spaced 1/4-inch holes for drainage. These prevent the reservoir from flooding the soil above.
2. Create the Wicking Chamber
Take the smaller container (e.g., yogurt tub) and drill several 1/4-inch holes in its sides and bottom. This container will sit at the bottom of the bucket, acting as a wicking chamber. Cut a piece of wicking material about 6 inches wide and 12 inches long. Thread it through the holes so that part hangs inside the chamber and part will extend into the soil above.
3. Install the Fill Tube
Drill a 1/2-inch hole in the bucket lid near the edge. Insert the PVC pipe through the hole so it reaches down into the reservoir area (about 1 inch from the bottom). The pipe should extend about 2 inches above the lid. This tube allows you to pour water into the reservoir without disturbing the soil.
4. Assemble the Planter
Place the wicking chamber (with wick) in the center of the bucket bottom. Fill the bucket with potting mix up to the reservoir mark (4 inches from bottom). Pack the soil firmly around the wick. Continue filling with potting mix until the bucket is full, leaving 1–2 inches of headspace at the top. Tamp down lightly.
5. Add the Fill Tube and Lid
Slide the PVC fill tube into the hole in the lid. Place the lid on the bucket, ensuring the tube is positioned correctly. The lid helps reduce evaporation and keeps pests out.
Planting and Initial Watering
Before planting, water the soil from the top until water drains from the overflow holes (the 1/4-inch holes you drilled). This primes the wick and settles the soil. Then, pour water into the fill tube until it begins to seep from the overflow holes—this fills the reservoir. Plant your vegetables (e.g., one tomato, two peppers, or several lettuce seedlings) directly into the potting mix. For best results, use a high-quality potting mix that retains moisture but drains well.
Maintenance Tips for Your SIP
- Check the reservoir level: Stick a finger or a dry stick into the fill tube to feel for water. Refill when it’s nearly empty, typically every 2–4 days depending on plant size and weather.
- Fertilize lightly: Because the reservoir can dilute nutrients, use a water-soluble fertilizer at half-strength every 2–3 weeks. Avoid over-fertilizing, which can cause salt buildup.
- Prevent algae and mosquitoes: Keep the lid on and the fill tube covered with a small cap or tape. If algae appears, flush the reservoir with a diluted hydrogen peroxide solution (1 part 3% hydrogen peroxide to 10 parts water).
- Winter storage: Empty the bucket and store it dry to prevent cracking.
Why This System Works for Vegetables
The sub irrigated planter bucket sip delivers water directly to the root zone, encouraging deep root growth and reducing foliar diseases caused by overhead watering. Vegetables like cucumbers, beans, and herbs thrive because they receive consistent moisture without the stress of dry-wet cycles. Plus, the bucket is portable—you can move it to catch sunlight or shelter from storms. Over a season, this setup can cut water usage by up to 50% compared to traditional containers.
Practical takeaway: Building a SIP from a 5-gallon bucket is a weekend project that pays off with healthier plants and less water waste. Once set up, you’ll spend just minutes a week maintaining it—and you’ll enjoy a steady harvest of homegrown vegetables from a container that fits on a patio, balcony, or small garden.


