Ultimate Guide: 7 Steps to Your Automated Greenhouse Ventilation System DIY
Welcome, fellow green thumb enthusiasts and DIY adventurers! Are you dreaming of a thriving greenhouse filled with lush plants, but dread the endless chore of manually opening and closing vents, especially during unpredictable weather? Imagine a world where your greenhouse practically takes care of itself, maintaining optimal temperatures without a second thought from you. This isn’t a fantasy; it’s entirely achievable with an automated greenhouse ventilation DIY system. In this comprehensive guide, we’ll walk you through everything you need to know to build your own thermostat-controlled vent opener, transforming your gardening experience. Get ready to embrace intelligent horticulture and elevate your greenhouse game!
[lwptoc]
Why This Matters for Your Garden: The Breath of Life for Your Plants
Proper ventilation is not merely a convenience; it’s the lifeblood of a healthy greenhouse ecosystem. Without adequate airflow, your carefully cultivated environment can quickly turn into a hostile one, leading to a myriad of problems for your precious plants. Understanding the critical role ventilation plays will underscore why an automated greenhouse ventilation DIY project is such a valuable investment of your time and effort.
Firstly, temperature regulation is paramount. Greenhouses, by design, trap solar radiation, leading to rapid temperature increases, especially on sunny days. Without a mechanism to vent this excess heat, internal temperatures can quickly soar to levels lethal for most plants, causing wilting, scorching, and irreversible damage. An automated system ensures vents open precisely when temperatures reach a critical threshold, preventing overheating even when you’re away.
Secondly, humidity control is another vital aspect. While some humidity is beneficial, excessive levels create a warm, moist environment that is a breeding ground for fungal diseases like powdery mildew, botrytis, and damping off. Good air circulation helps to dissipate this excess moisture, reducing the risk of disease outbreaks and promoting overall plant health. An automated system helps maintain that delicate balance, preventing both extreme dryness and detrimental humidity.
Thirdly, air circulation facilitates efficient gas exchange. Plants require carbon dioxide for photosynthesis, and in a sealed greenhouse, CO2 levels can become depleted. Fresh air replenishment through ventilation brings in new CO2, ensuring your plants have a continuous supply for optimal growth. It also helps to distribute oxygen, which is essential for root respiration, especially in the soil.
Furthermore, air movement strengthens plant stems. Constant gentle air currents encourage plants to develop stronger, more robust stems, making them less susceptible to damage and better able to support heavy fruit or flower production. Stagnant air, conversely, can lead to weak, leggy growth.
Finally, manual ventilation is prone to human error and inconsistency. Forgetting to open vents on a hot day or close them on a cool evening can swiftly lead to plant stress or damage. An automated system provides consistent, reliable climate control, freeing you from constant vigilance and allowing you to enjoy your gardening more. It’s an investment in the longevity and productivity of your greenhouse, making the automated greenhouse ventilation DIY project a truly rewarding endeavor.
What You Need: Tools and Materials for Your Smart Greenhouse
Before embarking on your automated greenhouse ventilation DIY journey, gathering all necessary tools and materials is crucial. This not only streamlines the building process but also ensures you have everything on hand to complete the project efficiently and safely. A well-prepared workspace is a happy workspace!
Tools You’ll Need:
- Drill/Driver: Essential for drilling holes and driving screws. A cordless drill offers greater flexibility.
- Measuring Tape: For accurate measurements of vent openings and component placement.
- Pencil or Marker: For marking drilling points and cut lines.
- Screwdrivers: Various sizes, both Phillips and flathead, to match your screws.
- Wire Strippers/Cutters: If your thermostat or actuator requires wiring.
- Wrenches/Pliers: For tightening nuts or making adjustments.
- Safety Glasses: Always protect your eyes during drilling and cutting.
- Work Gloves: To protect your hands from splinters or sharp edges.
- Optional: Multimeter: Useful for testing electrical connections if you’re working with more complex wiring.
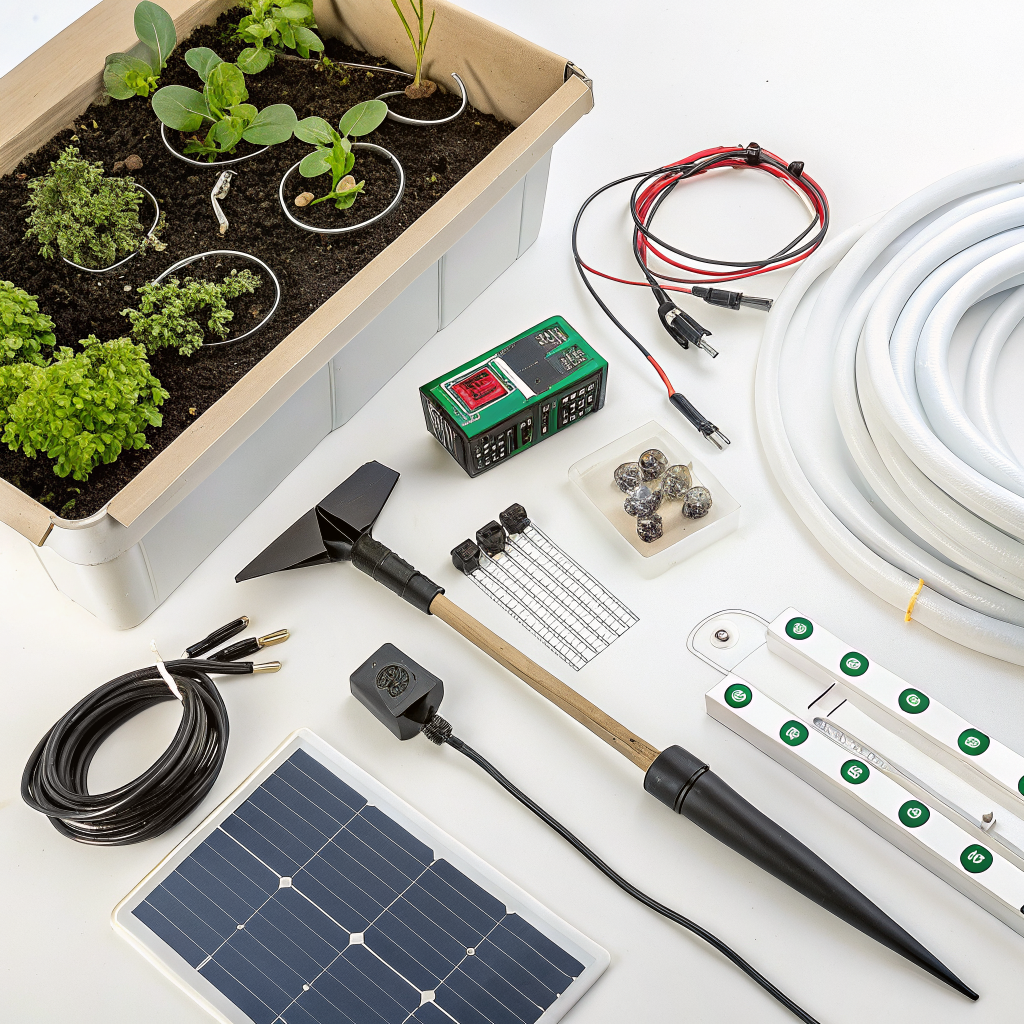
Materials You’ll Need:
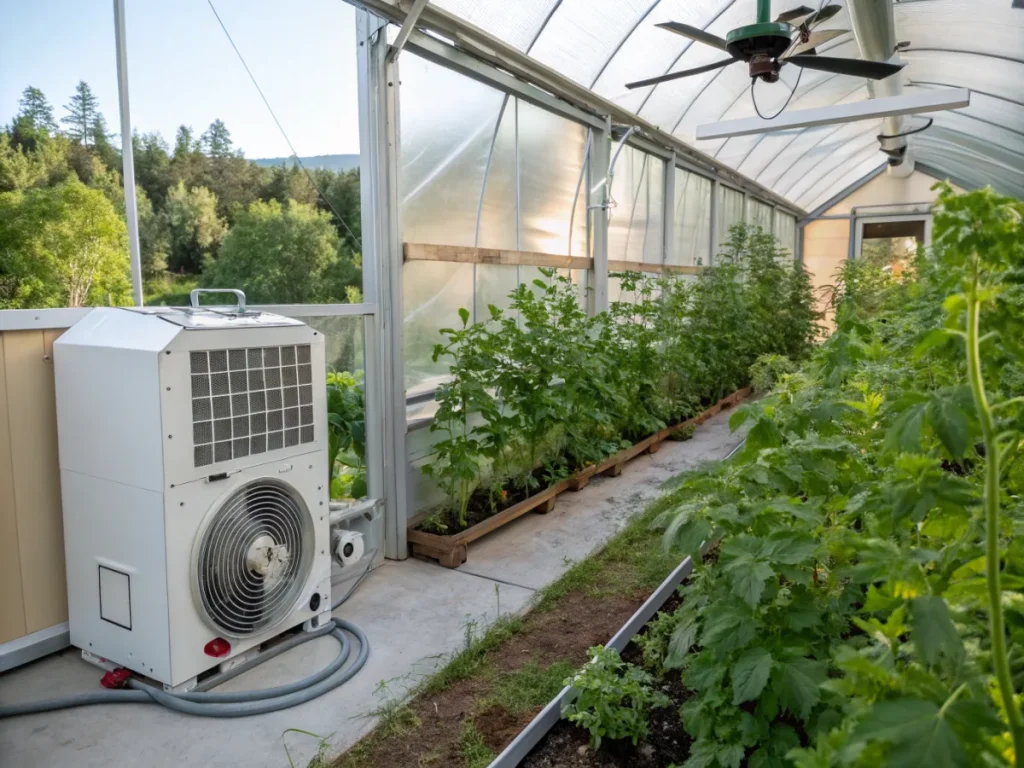
- Automatic Vent Opener (Hydraulic/Wax Cylinder): The heart of your automated system. These are typically standalone units that expand with heat, pushing the vent open, and contract with coolness, allowing it to close. They are passive and require no electricity.
- Alternatively, for a more advanced electrical system:
- Low-Voltage Linear Actuator: An electric motor that pushes and pulls to open/close the vent.
- Thermostat (Digital or Analog): To sense the temperature and trigger the actuator. Choose one designed for outdoor or greenhouse use.
- 12V DC Power Supply: To power the actuator and thermostat. Ensure it has sufficient amperage.
- Wiring: Appropriate gauge wire for low-voltage applications, often 18-22 AWG.
- Weatherproof Junction Box: To house and protect electrical connections.
- Mounting Hardware: Screws, bolts, nuts, washers appropriate for your greenhouse frame material (aluminum, wood, PVC). Stainless steel is recommended for durability in humid environments.
- Brackets/Angle Iron (if needed): To create stable mounting points for the vent opener or actuator on your specific vent design.
- Silicone Sealant (optional): To seal any drilled holes against moisture ingress.
- UV-Resistant Zip Ties or Cable Clamps: For neat and secure cable management if using an electrical system.
When selecting your automatic vent opener, consider the weight and size of your existing greenhouse vents. Most passive hydraulic openers have a weight limit. For heavier vents, an electric linear actuator might be more suitable. Researching your specific greenhouse model can help in choosing compatible components. For more on optimizing your greenhouse environment, check out this guide on DIY Smart Irrigation Systems.
Step-by-Step Guide: Building Your Automated Greenhouse Ventilation System
Embarking on this automated greenhouse ventilation DIY project is straightforward if you follow these steps carefully. We’ll primarily focus on the widely popular, passive hydraulic vent opener due to its simplicity and energy efficiency, but touch upon electrical considerations as well.
Step 1: Assess Your Vent and Identify Mounting Points
Before you even unbox your vent opener, take a good look at your existing greenhouse vent. Which way does it open? Does it pivot from the top, bottom, or side? Most automatic openers are designed for top-hinged or side-hinged roof vents. Identify sturdy sections of your greenhouse frame and the vent frame where the opener can be securely attached. These points must be able to withstand the force of the opener and the weight of the vent. If your vents are very old or fragile, you might need to reinforce them first.
Step 2: Understand Your Vent Opener’s Mechanism
Refer to the manufacturer’s instructions for your specific vent opener. While most work similarly, there can be subtle differences in mounting brackets or adjustment screws. A hydraulic vent opener typically consists of a cylinder containing a special wax that expands when heated, extending a piston to push the vent open. As it cools, the wax contracts, allowing a spring to pull the vent shut. Understand how the adjustable temperature settings work; many allow you to set the point at which the vent begins to open.
Step 3: Temporarily Position and Mark Mounting Points
With the vent closed, carefully position the vent opener in its intended location. Typically, one end attaches to the fixed greenhouse frame and the other to the movable vent frame. Ensure the opener’s movement path is clear and won’t interfere with other greenhouse components. Use your pencil or marker to precisely mark the drilling locations for the mounting brackets on both the greenhouse frame and the vent frame. Double-check alignment to ensure the opener will operate smoothly and without binding.
Step 4: Drill Pilot Holes and Attach Brackets
Using your drill, create small pilot holes at the marked locations. It’s crucial to use a drill bit appropriate for the screw size and material of your greenhouse frame (e.g., metal bits for aluminum, wood bits for timber). Drilling pilot holes prevents splitting wood and makes driving screws into metal easier, especially with self-tapping screws. Once the pilot holes are done, attach the mounting brackets securely to both the greenhouse frame and the vent frame using the provided hardware (screws, bolts, nuts). Ensure they are firmly tightened but do not overtighten, especially on aluminum frames, to avoid stripping threads.
Step 5: Install the Vent Opener Body
Now, attach the main body of the automatic vent opener to the newly installed mounting brackets. This usually involves connecting pins or bolts that allow the opener to pivot. Follow your manufacturer’s specific instructions for this step. Once attached, the opener should be able to move freely without obstruction, mimicking the opening and closing action. At this stage, the vent should still be closed or barely cracked open.
Step 6: Fine-Tune and Adjust Temperature Settings
Most passive vent openers have an adjustment screw or mechanism to set the starting temperature at which the vent begins to open. Refer to your opener’s manual for precise instructions. A common starting point is around 68-72°F (20-22°C), but this can be adjusted based on the specific needs of your plants and your local climate. It’s often best to set it to start opening before your plants experience stress. You may need to observe its operation over a few warm days to dial in the perfect setting. Remember, greenhouse temperatures can fluctuate rapidly.
Step 7: Test and Observe
The final, crucial step is to test your new automated greenhouse ventilation DIY system. On a warm, sunny day, monitor the internal temperature of your greenhouse and observe the vent opener’s action. Does it begin to open at your desired temperature? Does it open fully? Does it close completely when temperatures drop? If using an electrical system, ensure the thermostat triggers the actuator correctly and the power supply is stable. Make any final adjustments to the temperature setting or mounting positions as needed to ensure smooth, reliable operation. Consider placing a separate thermometer inside your greenhouse for accurate readings as you test. For more high-tech solutions, consider integrating DIY hydroponic systems to further enhance your growing environment.
Considerations for Electrical Systems (Linear Actuator & Thermostat):
If you opted for a more sophisticated electrical system, your wiring will be critical. Ensure all electrical connections are secure and well-insulated, preferably housed in a weatherproof junction box to protect them from moisture and humidity. Follow diagrams provided with your actuator and thermostat. A simple setup involves the thermostat acting as a switch for the 12V power supply to the linear actuator. Some thermostats offer more advanced features like bidirectional control for both opening and closing.
This systematic approach ensures a successful installation of your automated greenhouse ventilation DIY system, providing your plants with the consistent, optimal environment they need to thrive. For a deeper dive into smart home integration, explore options like Smart Home Automation for Eco-Friendly Living which can inspire further automation in your garden.
Pro Tips and Common Mistakes: Mastering Your Automated System
Even with a detailed guide, a few insider tips can elevate your automated greenhouse ventilation DIY project, while avoiding common pitfalls can save you time and frustration. Learning from others’ experiences is key to a smooth installation and optimal performance.
Pro Tips:
- Multiple Openers for Larger Vents: If your greenhouse has very long or heavy vents, a single automatic opener might struggle. Consider installing two openers per vent, one at each end, for balanced and efficient operation. This prevents twisting or binding of the vent structure.
- Vent Reinforcement: Older or flimsier vents might benefit from some reinforcement before attaching the opener. Adding a simple wooden batten or aluminum strip along the vent frame where the opener attaches can provide a more secure mounting point and distribute the load.
- North-Facing Vents First: If you have multiple vents, prioritize automating those that are exposed to direct sunlight first, as they will contribute most to heat buildup. North-facing vents, or those on the shadier side, might need less aggressive automation or a higher opening temperature setting.
- Monitor and Adjust Seasonally: The ideal opening temperature for your vents isn’t static. Plants’ needs change with the season, and external conditions vary. Be prepared to slightly adjust your opener’s settings as temperatures shift from spring to summer to autumn. Hotter summers might require earlier opening, while cooler springs can tolerate later activation.
- Lubrication for Longevity: For passive hydraulic openers, occasionally check their movement. If they seem stiff, a light lubrication of the pivot points (not the cylinder itself) can ensure smooth operation and extend their lifespan. Use a silicone-based lubricant, not oil-based, to avoid damaging plastic components.
- Consider Airflow Direction: Think about how air enters and exits your greenhouse. Ideally, cooler air should enter low, and hot air should exit high. Automating roof vents handles the hot air exit. If you have side vents, consider automating them too or ensuring they can be opened manually to assist with lower-level air intake.
Common Mistakes to Avoid:
- Ignoring Vent Weight Limits: One of the most frequent errors is matching an opener that is too weak for the vent it’s supposed to operate. Always check the maximum lift capacity of your chosen opener against the actual weight of your vent. Overloading can lead to opener failure or incomplete vent opening.
- Incorrect Installation Angle: Installing the opener at the wrong angle can reduce its effectiveness, cause binding, or put undue stress on its components. Follow the manufacturer’s diagrams precisely regarding the angle relative to the vent and frame.
- Obstructing Movement: Ensure nothing, such as plant growth, staging, or other greenhouse accessories, will impede the full opening or closing motion of the vent or the opener itself. Test the full range of motion after installation.
- Loose Mounting Hardware: Over time, vibrations and temperature changes can loosen screws and bolts. Regularly inspect all mounting hardware. Loose connections can lead to instability, inefficient operation, or even damage to your vent and opener.
- Neglecting Winter Considerations: While brilliant for warmth, passive hydraulic openers can become stiff or even stick in freezing temperatures, especially if condensation accumulates and freezes. Some models are designed for year-round use; others might need to be removed or disengaged during the coldest months to prevent damage.
- Underestimating Electrical Wiring Needs (for advanced systems): If going electric, don’t skimp on wire gauge or weather protection. Using wires that are too thin can lead to voltage drops, and exposed wiring is a safety hazard in a humid environment. Always use suitable outdoor-rated electrical components and enclosures.
- Not Testing Thoroughly: A quick check isn’t enough. Monitor your system over several varying temperature days. Observe how quickly it reacts, its full range of motion, and its closing action. Small adjustments early on can prevent bigger problems later.
By keeping these pro tips in mind and actively avoiding common mistakes, your automated greenhouse ventilation DIY system will provide reliable, efficient service for many seasons to come, supporting a flourishing greenhouse environment.
Eco-Friendly Variations: Green Beyond the Greenhouse
Embracing an automated greenhouse ventilation DIY project already ticks many eco-friendly boxes by optimizing resource use and reducing human intervention. However, there are additional steps you can take to make your automated system and your overall greenhouse operation even greener and more sustainable.
The primary eco-friendly benefit of the passive hydraulic vent opener is its complete independence from electricity. It harnesses the natural expansion and contraction of wax in response to temperature, making it a truly passive and zero-energy solution. This not only saves on electricity bills but also reduces your carbon footprint significantly. When choosing a passive opener, look for models made with durable, recyclable materials that will have a long lifespan.
However, if you opt for an electrical linear actuator system for heavier vents or more precise control, there are still ways to minimize its environmental impact:
- Solar Power Integration: Power your 12V DC linear actuator and thermostat entirely with a small solar panel and a deep-cycle battery. This makes your electrical ventilation system completely off-grid. A small 20-50W solar panel and a 10-20Ah 12V battery, coupled with a charge controller, can easily power most low-voltage actuators.
- Energy-Efficient Components: When selecting an electric actuator, choose one with a low power draw. Look for specifications that indicate its amperage when idle and when operating. The less power it consumes, the smaller the solar panel and battery you’ll need, and the greener your system will be.
- Recycled Materials for Mounts: Instead of buying new metal brackets, consider repurposing angle iron, sturdy plastic, or even dense wood from salvaged sources to create custom mounting points for your vent opener. Ensure any repurposed materials are strong enough and treated for outdoor use.
- Local Sourcing: Whenever possible, purchase your vent opener and other components from local suppliers. This reduces transportation emissions and supports local businesses.
- Durability and Repairability: Invest in high-quality components that are built to last. A system that needs frequent replacement generates more waste. Choose brands known for their reliability and, if possible, for offering replacement parts. The ability to repair rather than replace is a cornerstone of eco-conscious consumption.
- Optimal Insulation: While not directly part of the ventilation system, good greenhouse insulation (e.g., using double-wall polycarbonate or insulating around the foundation) will reduce the overall heating and cooling demands, meaning your vents won’t have to work as hard or as often, saving energy indirectly.
- Water Harvesting: Combine your automated ventilation project with other eco-friendly greenhouse practices, such as installing a rainwater harvesting system to provide water for your plants, reducing reliance on municipal water sources.
- End-of-Life Planning: Consider the recyclability of the materials used in your system. While passive openers are often mostly metal, electrical components contain mixed materials. Knowing how to responsibly dispose of or recycle parts at the end of their lifespan adds to the overall eco-friendliness.
By incorporating these eco-friendly variations into your automated greenhouse ventilation DIY project, you’re not just creating a more efficient growing space; you’re also contributing to a more sustainable planet, one flourishing plant at a time.
Seasonal Considerations: Adapting Your Automation Year-Round
While an automated greenhouse ventilation DIY system provides remarkable consistency, the dynamic nature of seasons means your system will benefit from thoughtful adjustments through the year. Understanding these shifts will help you maintain optimal conditions for your plants, regardless of external weather patterns.
Spring: The Awakening and Initial Setup
Spring marks the awakening of your greenhouse. As outdoor temperatures begin to rise, your automated vents become crucial. Set your opening temperature relatively low initially, perhaps around 65-70°F (18-21°C), to allow for gentle air exchange on bright, sunny days that can still turn chilly. This prevents heat buildup in the greenhouse even when spring days are deceptive. It’s also the ideal time to fully test your system after any winter dormancy or maintenance. Check for smooth operation, lubricate pivot points if necessary, and ensure all mounting hardware is secure. As the season progresses and outdoor temperatures stabilize, you might gradually increase the opening temperature if your plants prefer warmer conditions.
Summer: High Heat Management
Summer is when your automated vents work hardest. Intense solar radiation can quickly push internal greenhouse temperatures into dangerous territory. Your automated system will be your best line of defense against overheating. You might consider setting the vent to open at a slightly higher temperature, say 75-80°F (24-27°C), depending on your plants’ heat tolerance. For exceptionally hot climates or plants that struggle with high temperatures, you might even integrate additional cooling methods like shade cloth rolled out over the greenhouse, or an automated misting system for evaporative cooling, working in conjunction with your vents. Ensure your vents can open fully to maximize airflow. Good circulation is paramount during these months.
Autumn: Gradual Cooling and Humidity Control
As autumn arrives, temperatures become more unpredictable. Warm sunny days can still cause significant heat buildup, but cool nights can drop temperatures quickly. Your automated vents will continue to play a critical role in moderating these swings. As the season progresses, you’ll likely want to lower the vent’s opening temperature back towards the spring settings. This allows for earlier closure on cooler afternoons, retaining valuable heat for the evening. Pay close attention to humidity levels as well; falling leaves and lower light can increase fungal risks, and good ventilation helps keep humidity in check, especially during damp periods.
Winter: Dormancy, Protection, and Selective Use
Winter presents the most unique challenges. For many passive hydraulic openers, continuous outdoor temperatures below freezing can cause the wax to become too stiff, potentially damaging the mechanism, or causing the vent to stick shut if condensation freezes it.
- Passive Systems: During deep winter, especially in regions with consistent hard freezes, it’s often advisable to temporarily remove or disengage passive hydraulic vent openers. The vents should then be securely closed and sealed to prevent heat loss. If you rely solely on natural heating, you might only open vents manually on unusually warm winter days.
- Electrical Systems: If you have an electrical linear actuator system, it generally handles freezing temperatures better, as the motor is not wax-based. However, ensure all wiring and components are rated for outdoor winter conditions. You’ll likely want to set your thermostat’s opening temperature much higher, perhaps only allowing ventilation on unseasonably warm days, or not at all if your primary goal is heat retention for sensitive plants. Supplemental heating will become critical in most winter greenhouses, and ventilation will typically be minimized to prevent heat escape.
Remember that the goal of your automated greenhouse ventilation DIY system is to create a stable, plant-friendly environment. Seasonal adjustments ensure that your automation supports, rather than hinders, this goal, making your greenhouse a productive space year-round.
Expert Resources: Deepening Your Greenhouse Knowledge
Embarking on an automated greenhouse ventilation DIY project is just one step in maximizing your gardening potential. To truly become a greenhouse master, it’s invaluable to consult expert resources that offer depth and breadth in horticultural knowledge. These platforms provide trusted information, troubleshooting tips, and inspiring ideas to help your greenhouse thrive.
Gardening Know How (gardeningknowhow.com)
Gardening Know How is an extensive online resource covering nearly every imaginable gardening topic, including a vast section dedicated to greenhouse management. You’ll find articles on climate control, pest management, plant-specific care, and general greenhouse maintenance. Their practical advice is easy to understand and directly applicable to DIY enthusiasts. It’s an excellent place to cross-reference information about optimal growing conditions for specific plants you intend to cultivate in your automated greenhouse, ensuring your ventilation settings are perfectly aligned with their needs.
Royal Horticultural Society (RHS) (rhs.org.uk)
As one of the world’s leading horticulture charities, the Royal Horticultural Society offers authoritative and scientifically backed information for gardeners of all levels. While based in the UK, their principles and research on greenhouse cultivation, propagation, and plant health are universally applicable. Their website provides detailed guides on greenhouse ventilation strategies, ideal temperature ranges for various plant groups, and advice on managing humidity and diseases. It’s a goldmine for understanding the ‘why’ behind effective greenhouse climate control and optimizing your automated system.
University of Minnesota Extension (extension.umn.edu)
University Extension services across the United States are fantastic resources for localized and research-based horticultural advice. The University of Minnesota Extension, like many others, offers comprehensive guides on greenhouse growing, covering topics from construction to crop production. Their publications often delve into the scientific aspects of greenhouse environments, including detailed explanations of heat exchange, air circulation, and the impact of environmental factors on plant physiology. This academic yet practical approach helps you understand the underlying principles that make your automated ventilation system so effective.
By regularly consulting these expert resources, you can continually refine your understanding of greenhouse dynamics, make informed decisions about your automated greenhouse ventilation DIY system, and ensure your plants receive the best possible care. Happy growing!
Conclusion: Breathe Easy with Your Automated Greenhouse
You’ve done it! You’ve successfully navigated the path to creating your very own automated greenhouse ventilation DIY system. From understanding the vital role of airflow and temperature regulation to meticulously selecting components and executing the step-by-step installation, you’ve empowered your greenhouse with intelligent climate control. This project is more than just installing a gadget; it’s about reclaiming your time, ensuring consistent optimal conditions for your plants, and stepping up your gardening game with a touch of sustainable technology.
The beauty of an automated system lies in its ability to respond to its environment autonomously. Whether you chose the elegant simplicity of a passive hydraulic opener or the flexible control of an electrical actuator, your plants will now enjoy a more stable, stress-free existence. No longer will you worry about scorching tender seedlings on an unexpectedly hot day or allowing damp conditions to foster disease. Your greenhouse breathes with resilience and precision, fostering stronger, healthier growth and more abundant harvests.
Beyond the immediate benefits to your plants, this DIY endeavor reinforces the satisfaction of building something practical and impactful with your own hands. It embodies an eco-conscious approach to gardening, especially when integrating passive mechanisms or solar power. As you watch your vents gracefully open and close in response to the sun’s energy, you’ll feel a profound connection to the rhythm of nature, augmented by your ingenuity.
So, stand back and admire your handiwork. Enjoy the peace of mind that comes with knowing your greenhouse is taking care of itself. Your journey into smarter, more efficient gardening has just begun, and your automated ventilation system is a cornerstone of that evolution. Happy gardening, and may your greenhouse forever be a haven of lush, vibrant life!
FAQ: Your Automated Greenhouse Ventilation Questions Answered
Q1: How often do I need to maintain my automated greenhouse ventilation system?
For passive hydraulic systems, annual maintenance is usually sufficient. This involves checking mounting hardware for tightness, ensuring smooth movement of the vent and opener (lubricating pivot points if needed with silicone spray), and inspecting the cylinder for any leaks or damage. For electrical systems, annually check all wiring connections for corrosion or loosening, ensure the thermostat is functioning accurately, and clean any dust from the actuator or fan if applicable. Regular visual checks throughout the growing season are always a good idea.
Q2: Can I use an automated vent opener on any type of greenhouse vent?
Most automatic vent openers are designed for top-hinged or side-hinged roof vents and sometimes side-wall vents. They are less common for sliding vents or louvers without specific adapters. Always check the manufacturer’s specifications for compatibility with the weight, size, and opening mechanism of your specific greenhouse vent. If your vent is very heavy or unusually designed, you might need to explore specialized heavy-duty openers or a custom electric linear actuator setup.
Q3: What temperature should I set my automated vent opener to?
The ideal temperature setting depends on the types of plants you’re growing and your local climate. A common starting point for mixed plant greenhouses is usually between 68-72°F (20-22°C), meaning the vent will begin to open as the temperature reaches this range. For heat-loving plants, you might set it slightly higher (e.g., 75-80°F/24-27°C), and for plants sensitive to heat, slightly lower. It’s best to monitor your greenhouse with a separate thermometer and adjust the setting over a few days or weeks to find the optimal point for your specific environment and plants. Adjust seasonally as well.
Q4: Will a passive hydraulic vent opener work in cold weather?
Passive hydraulic vent openers rely on the expansion and contraction of a special wax. While they will retract and close the vent as temperatures drop, prolonged exposure to freezing temperatures (especially below 20-30°F or -7 to -1°C) can cause the wax to become very stiff, potentially leading to slow operation or even damage to the mechanism if it’s forced. In regions with consistent hard freezes, it is generally recommended to remove or disengage passive vent openers during the winter months to prevent damage and ensure the vent stays securely closed for heat retention. Always check the manufacturer’s specific recommendations for cold weather use.


