Table of Contents
ToggleWhy Choose Recycled Concrete Blocks for Your Raised Bed?
Building a raised bed concrete blocks garden is an affordable, durable, and eco-friendly way to create growing space. Recycled materials reduce waste and give your garden a unique, rustic look. Concrete blocks are sturdy, resist rot, and can withstand weather extremes, making them ideal for long-lasting beds.
Planning Your Raised Bed
Selecting the Location
- Choose a level spot with at least 6–8 hours of direct sunlight daily.
- Ensure good drainage; avoid low areas where water pools.
- Consider proximity to a water source for easy irrigation.
Determining Size and Shape
- Standard width: 3–4 feet so you can reach the center from both sides.
- Length: any length works, but keep it manageable (e.g., 6–8 feet).
- Height: one or two blocks high (8–16 inches) is typical. Taller beds reduce bending but require more fill.
- Shape: rectangular is easiest; you can also create L-shapes or U-shapes.
Calculating Materials
- Count the number of blocks needed: measure perimeter in inches, divide by 16 (block length), then multiply by number of courses.
- Example: 4 ft x 8 ft bed (48+96+48+96 = 288 inches) / 16 = 18 blocks per course. For two courses, 36 blocks.
- Add extra for corners and cuts if needed.
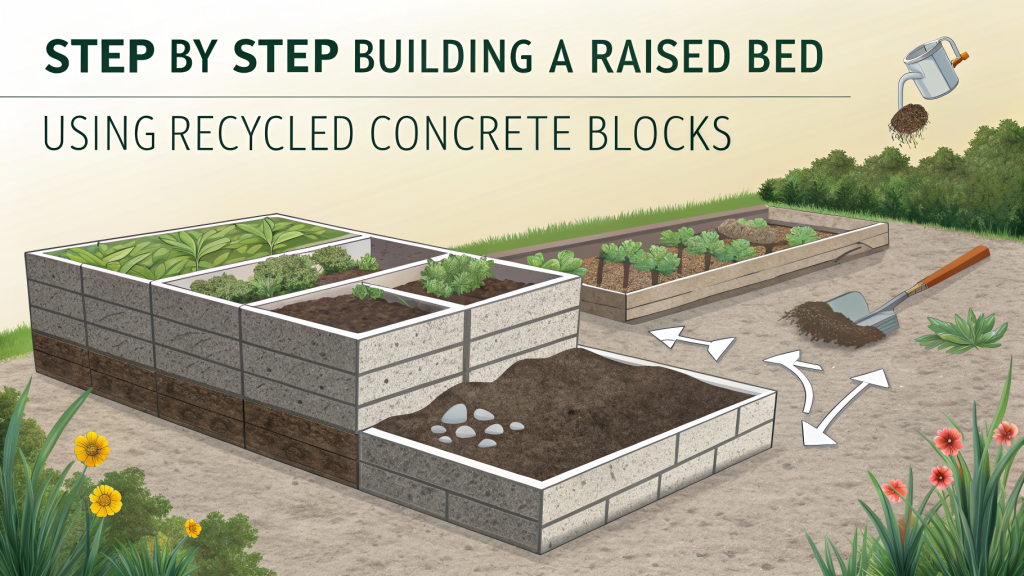
Step-by-Step Construction
Prepare the Ground
- Mark the bed outline with stakes and string.
- Remove grass or weeds inside the area. You can lay cardboard or landscape fabric to suppress growth.
- Dig a shallow trench (2–3 inches deep) along the perimeter to seat the first course of blocks for stability.
Lay the First Course
- Place blocks in the trench, hollow side up, ensuring they are level. Use a rubber mallet to adjust.
- Check corners are square (use a framing square or measure diagonals).
- Stagger joints in subsequent courses like brickwork for strength.
Add Additional Courses
- Stack blocks directly on top, offsetting seams by half a block.
- Use construction adhesive or mortar between courses for extra stability (optional).
- For corners, you can use half-blocks if needed; cut blocks with a masonry saw or hammer and chisel.
- Ensure each course is level before adding the next.
Finishing Touches
- Fill the hollow cores with gravel or soil to improve stability and drainage.
- Add a cap row of blocks placed sideways (holes facing out) for a finished look if desired.
Soil Layering for Healthy Growth
Base Layer: Drainage
Add 4–6 inches of coarse gravel or crushed stone at the bottom to prevent waterlogging, especially if you have heavy clay soil underneath.
Middle Layer: Green Waste
Layer on 6–8 inches of organic materials like grass clippings, leaves, or straw. This decomposes over time, enriching the soil and improving moisture retention.
Top Layer: Growing Mix
Fill the remaining space with a blend of:
- 50% topsoil or garden soil
- 30% compost or well-rotted manure
- 20% perlite or coarse sand for drainage
Mix thoroughly and water well before planting.
Planting Tips for Your New Bed
What to Grow
- Root vegetables (carrots, radishes) thrive in loose, deep soil.
- Leafy greens (lettuce, spinach) do well in partial shade if needed.
- Tomatoes, peppers, and cucumbers love the warm soil of concrete block beds.
- Herbs like basil and oregano are excellent for small spaces.
Spacing and Succession
- Follow seed packet spacing; raised beds allow denser planting due to rich soil.
- Plant in succession: sow new seeds every 2–3 weeks for continuous harvest.
- Use trellises for vining plants to maximize vertical space.
Watering and Mulching
- Water deeply at the base to encourage deep roots; avoid overhead watering to reduce disease.
- Apply a 2–3 inch layer of organic mulch (straw, wood chips) to retain moisture and suppress weeds.
Practical Takeaway
Building a raised bed with recycled concrete blocks is a weekend project that yields years of productive gardening. The blocks are durable, easy to work with, and give your garden a clean, structured look. With proper soil layering and thoughtful planting, you’ll enjoy bountiful harvests while reducing waste. Start small, expand as you go, and watch your garden thrive.


