Table of Contents
ToggleWhy Build a Self-Watering Raised Bed from a Plastic Crate?
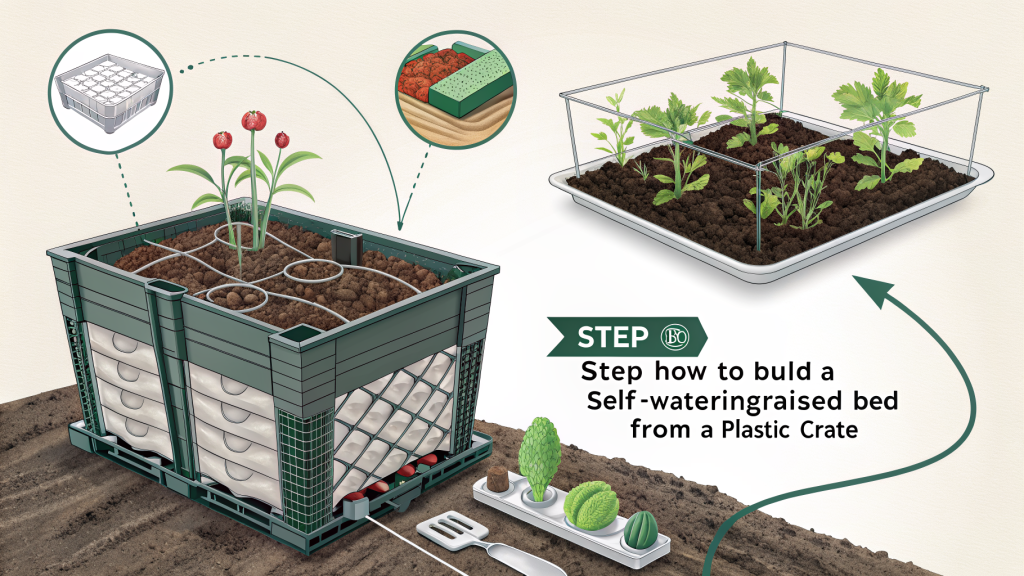
If you’re short on space or looking for an affordable gardening solution, a self-watering raised bed made from a plastic crate is a game-changer. It reduces watering frequency, keeps roots consistently moist, and recycles a common item. This step-by-step guide will show you how to convert a plastic crate into an efficient, self-contained planter.
Materials and Tools You’ll Need
- Large plastic crate (at least 12 inches deep, with a solid base; milk crates work well)
- Landscape fabric or weed barrier
- PVC pipe (1–2 inches in diameter, about 2 feet long)
- Plastic container or tray to serve as water reservoir (must fit inside crate base)
- Gravel or perlite (for drainage layer)
- Potting soil (not garden soil)
- Drill with 1/4-inch and 1/2-inch bits
- Utility knife or scissors
- Ruler or tape measure
- Marker
Step 1: Prepare the Crate and Reservoir
Drill Overflow Holes
Turn the crate upside down. Use the 1/4-inch bit to drill a row of holes about 1 inch from the bottom on one side. These will be your overflow outlets—water should never rise above this level. Space holes 2–3 inches apart.
Create the Water Reservoir Compartment
Place the plastic container or tray inside the crate. This will hold the water. Ensure it fits snugly and does not block the overflow holes. If needed, trim the container’s height so it sits at least 2 inches below the overflow holes. The reservoir should occupy about one-third of the crate’s interior height.
Step 2: Install the Watering Tube and Fill Tube
Drill a Hole for the Fill Tube
Near one corner of the crate, drill a 1/2-inch hole through the side, about 2 inches from the top. This hole will hold the PVC pipe through which you’ll add water.
Insert the PVC Pipe
Cut the PVC pipe so it reaches from the hole to just above the bottom of the reservoir. Slide it into the hole, ensuring the bottom end sits inside the reservoir. The top should be above the soil line for easy filling. No need to glue—friction will hold it in place.
Add a Fill Indicator (Optional)
Insert a thin wooden dowel or a piece of stiff wire into the fill tube. Mark it at the top of the tube, then mark a second line 2 inches lower. When you check the water level, pull out the dowel; if it’s wet to the lower mark, the reservoir still has water.
Step 3: Build the Wicking System
The wicking system draws water up to the roots. You can use either a fabric wick or a capillary mat.
Option A: Fabric Wick
- Cut a strip of absorbent fabric (old t-shirt or towel) about 3 inches wide and long enough to reach from the reservoir bottom to 6 inches above it.
- Lay the fabric strip across the top of the reservoir, with one end dangling into the water. Spread the other end over the gravel layer (next step).
Option B: Capillary Mat
- Cut a piece of capillary matting (or felt fabric) to fit the width of the crate, with a 6-inch tail that will hang into the reservoir.
- Place the mat over the reservoir, allowing the tail to dip into the water. The mat will act as a wick across the entire base.
Step 4: Add Drainage and Soil Layers
Drainage Layer
Spread a 1–2 inch layer of gravel or perlite over the reservoir and around the wick. This prevents soil from clogging the wick and provides air space. Make sure the wick remains in contact with the gravel and extends above it.
Landscape Fabric Barrier
Cut a piece of landscape fabric to cover the entire drainage layer, tucking it around the watering tube. This prevents soil from washing down into the gravel while allowing water to pass through.
Fill with Potting Soil
Add potting soil on top of the fabric, filling the crate to about 1 inch from the rim. Gently firm the soil, but don’t pack it. Water the soil lightly to settle it, then add more if needed.
Step 5: Plant and Maintain Your Self-Watering Raised Bed
Choose Suitable Plants
Because the soil stays consistently moist, this system works well for vegetables like tomatoes, peppers, lettuce, and herbs. Avoid plants that prefer dry conditions (e.g., succulents).
Planting Tips
- Make holes in the soil and place transplants or seeds. Water gently from the top to settle the soil.
- Mulch the top with straw or shredded leaves to reduce evaporation.
Watering Routine
Pour water into the PVC fill tube until it begins to trickle out of the overflow holes. This indicates the reservoir is full. In hot weather, check the water level every few days using the dowel indicator. Top up as needed. The soil should remain moist but not soggy.
Fertilizing
Since water-soluble nutrients can leach out, use a slow-release organic fertilizer mixed into the soil at planting time. Alternatively, feed with a diluted liquid fertilizer every 2–3 weeks during the growing season.
Practical Takeaway
Building a self-watering raised bed from a plastic crate is a weekend project that saves water, reduces maintenance, and gives you a productive garden even in small spaces. With proper setup—especially a working wick and correct overflow height—your plants will thrive with minimal watering. Start with one crate, and you’ll soon want a whole row of them.


