If you want to give your garden a powerful, natural boost without spending a fortune on commercial products, brewing your own worm tea is a game-changer. With a simple, DIY worm tea brewer made from two buckets and basic aquarium supplies, you can produce a microbe-rich fertilizer that feeds your soil and plants. This aerated compost tea system is easy to build, affordable, and delivers consistent results.
Table of Contents
ToggleWhy Brew Worm Tea?
Worm tea, also known as worm compost tea, is a liquid extract made by steeping vermicompost (worm castings) in water. When aerated, beneficial bacteria, fungi, and protozoa multiply rapidly, creating a living inoculant. Applying it to your garden improves soil structure, suppresses pathogens, and enhances nutrient uptake. Unlike synthetic fertilizers, worm tea feeds the soil food web, promoting long-term plant health.
What You’ll Need for the DIY Worm Tea Brewer
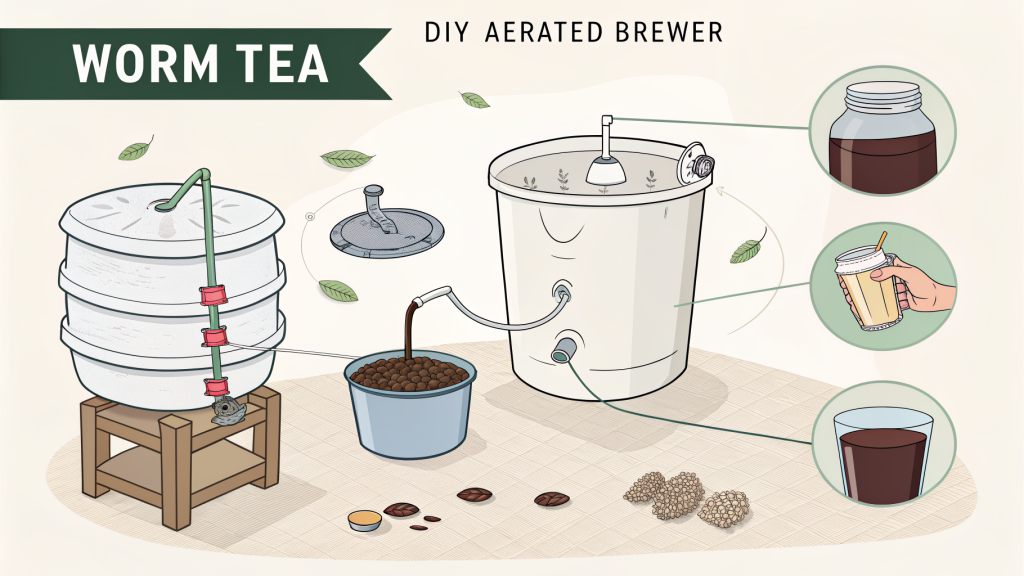
This design uses two 5-gallon buckets, one with a lid, and a few inexpensive items from a pet store. Total cost is typically under $30.
Materials List
- Two 5-gallon buckets (one must have a tight-fitting lid)
- 1/4-inch aquarium air tubing (6–8 feet)
- Two air stones (round or cylindrical)
- An air pump (rated for at least two outlets)
- A small piece of window screen or mesh
- A drill with a 1/4-inch bit
- A rubber grommet for the lid (optional but helps seal)
Step-by-Step: Building Your Worm Tea Brewer
Follow these steps to assemble a functional, leak-proof system.
1. Prepare the Buckets
- Drill a 1/4-inch hole in the center of the lid. Insert the rubber grommet if using.
- Cut the air tubing into two equal lengths. Attach one air stone to each piece.
- Thread the tubing through the lid hole so the air stones hang inside the bucket.
- Connect the other ends to the air pump outlets.
2. Set Up the Brewing Vessel
- Place the second bucket (no lid) inside the first bucket? Actually, you’ll use the bucket with the lid as the brewing bucket. The second bucket is used for straining.
- Cut a piece of window screen large enough to cover the top of the second bucket. Secure it with a rubber band or string.
- This screen will hold the worm castings while allowing water to flow through.
3. Add Worm Castings and Water
- Place 2 cups of high-quality worm castings onto the screen in the second bucket.
- Set this bucket on top of the brewing bucket (the one with the lid and air stones). The screen should be suspended above the water.
- Fill the brewing bucket with 4 to 5 gallons of non-chlorinated water. Let it sit for 10 minutes to dechlorinate if needed.
- Slowly pour water through the worm castings, allowing it to drip into the brewing bucket. Discard the solids or add them to your compost pile.
Brewing Your Worm Tea
Now you’re ready to aerate and activate the tea.
Setting Up Aeration
- Place the lid with the air stones securely on the brewing bucket.
- Plug in the air pump. You should see fine bubbles rising from the air stones.
- Let it run for 24 to 36 hours. Do not exceed 48 hours, as the tea can begin to go anaerobic.
Monitoring the Brew
- The tea should smell earthy, not sour or rotten. A foul odor indicates insufficient aeration or too long a brew time.
- Water temperature between 65°F and 75°F is ideal. Avoid direct sunlight.
- After brewing, use the tea immediately for best results. It can be stored for up to 4 hours if kept aerated.
How to Apply Worm Tea
Worm tea is versatile and can be used in several ways:
- Soil drench: Pour 1 cup of tea around the base of each plant weekly.
- Foliar spray: Strain through a fine cloth to prevent clogging. Spray leaves in early morning or late evening.
- Seed starting: Dilute 1 part tea with 4 parts water and use to moisten seed starting mix.
Always apply worm tea within 4 hours of brewing to ensure microbial activity is at its peak. Avoid using chlorinated water; let tap water sit out for 24 hours or use a dechlorinator.
Practical Takeaway
Building your own worm tea brewer from buckets is a straightforward weekend project that pays dividends in garden health. With consistent use, you’ll notice stronger plants, richer soil, and fewer pest problems. Start with a small batch, adjust your brew time, and watch your garden thrive.


